Page is loading ...

Serie / Serie
Emissione / Ausgabe Sostituisce / Ersetzt
Manuale / Handbuch
RTA
09.04
M 90 ab
---
ITALIANO / ENGLISH
MANUALE DI
INSTALLAZIONE
USO E
MANUTENZIONE
INSTALLATION,
USE AND
MANTEINANCE
MANUAL

2
RTA
0. ELENCO DOCUMENTI ALLEGATI
Elenco documentazione fornita a corredo della macchi-
na facente parte integrante del presente manuale.
-Foglio di collaudo
-Schema frigo
-Disegno dimensionale
-Schema elettrico
-Programmazione microprocessore
-Manuale microprocessore
-Istruzioni varie elettriche
-Istruzioni varie elettroniche
-Certificato di garanzia
-Dichiarazione di conformità
-______________________
-______________________
0. LIST OF ATTACHMENTS
List of documents supplied with the unit and forming an
integral part of this manual.
-Test sheet
-Refrigeration circuit diagram
-Scale drawing
-Wiring diagram
-Microprocessor programming
-Microprocessor manual
-Various electrical instructions
-Various electronic instructions
-Certificate of guarantee
-Declaration of conformity
-______________________
-______________________

3
RTA
INDICE
Argomento
ELENCO DOCUMENTI ALLEGATI
PREMESSA
Informazioni generali
Allegati
Avvertenze
DESCRIZIONE DELLA MACCHINA
Identificazione
Codice di identificazione
Destinazione d'uso
Controindicazioni
Descrizione generale
Limiti di funzionamento
SICUREZZA
Definizioni
Regole generali di sicurezza
Simbologia
Segnali di sicurezza
Dispositivi di emergenza e di sicurezza
Descrizione del rischio residuo
Rischio residuo in prossimità della macchina
Misure da adottare in caso di fuoriuscita di
gas frigorigeno
Operazioni con rimozione dei pannelli
ISPEZIONE, TRASPORTO
Ispezione
Stoccaggio
Sollevamento e trasporto
Disimballo
INSTALLAZIONE
Scelta del luogo di installazione
Posizionamento ed assemblaggio
Collegamento del circuito aeraulico
Pag.
2
5
5
5
5
7
7
8
8
8
9
10
10
10
11
12
12
13
13
13
14
14
15
15
15
16
16
17
17
18
19
0
1
1.1
1.2
1.3
2
2.1
2.1.1
2.2
2.3
2.4
2.5
3
3.1
3.2
3.3
3.3.1
3.4
3.5
3.5.1
3.5.2
3.5.3
4
4.1
4.2
4.3
4.4
5
5.1
5.2
5.3
Subject
LIST OF ATTACHMENTS
INTRODUCTION
General information
Attachments
Warnings
UNIT DESCRIPTION
Identification
Identity code
Intended use
Contraindications
General description
Operating limits
SAFETY
Definition
General safety regulations
Symbols
Safety signs
Emergency and safety devices
Description of residue risks
Residue risks near the unit
Measures to take in case of leaking refrigerant
gas
Operations with the panels removed
INSPECTION AND TRANSPORT
Inspection
Storage
Lifting and transport
Unpacking
INSTALLATION
Choosing the installation site
Positioning and assembly
Air duct connections
0
1
1.1
1.2
1.3
2
2.1
2.1.1
2.2
2.3
2.4
2.5
3
3.1
3.2
3.3
3.3.1
3.4
3.5
3.5.1
3.5.2
3.5.3
4
4.1
4.2
4.3
4.4
5
5.1
5.2
5.3
Page
2
5
5
5
5
7
7
8
8
8
9
10
10
10
11
12
12
13
13
13
14
14
15
15
15
16
16
17
17
18
19

4
RTA
Collegamenti idraulici
Vasche
Batterie
Umidificatore a perdere o a vapore
Umidificatore con pompa
Collegamenti elettrici
Generalità
Consensi esterni
AVVIAMENTO
Controlli preliminari all'avviamento
Messa in funzione
Verifiche durante il funzionamento
Generalità
Sbrinamento
(Solo unità pompa di calore)
Arresto del gruppo
FUNZIONAMENTO
Generalità
Fermata stagionale
RICERCA GUASTI
MANUTENZIONE E CONTROLLI PERIODI-
CI
Generalità
Controlli periodici
Operazioni da eseguire
Riparazioni del circuito frigo
Rabbocchi di refrigerante
DISMISSIONE E SMALTIMENTO
5.4
5.4.1
5.4.2
5.4.3
5.4.4
5.5
5.5.1
5.5.2
6
6.1
6.2
6.3
6.3.1
6.3.2
6.4
7
7.1
7.2
8
9
9.1
9.1.1
9.1.2
9.2
9.3
10
19
19
20
20
20
21
21
21
22
22
23
24
24
25
26
26
26
26
27
32
32
33
34
36
36
37
Hydraulic connections
Thanks
Coils
Disposable humidifier
humidifier with pump
Electrical connections
General
External signals
START UP
Preliminary controls
Start up
Checks during unit operation
General
Defrosting
(Only heat pump units)
Stopping the unit
OPERATION
General
Seasonal shut down
TROUBLE SHOOTING
ROUTINE MAINTENANCE AND CONTROLS
General
Monthly controls
Four-monthly controls
Repairing the refrigerant circuit
Topping up the refrigerant liquid
SHUT DOWN AND DISPOSAL
19
19
20
20
20
21
21
21
22
22
23
24
24
25
26
26
26
26
30
32
32
33
34
36
36
37
5.4
5.4.1
5.4.2
5.4.3
5.4.4
5.5
5.5.1
5.5.2
6
6.1
6.2
6.3
6.3.1
6.3.2
6.4
7
7.1
7.2
8
9
9.1
9.1.1
9.1.2
9.2
9.3
10

5
RTA
1. PREMESSA
1.1 INFORMAZIONI GENERALI
Questo manuale contiene le norme di installazione, uso
e manutenzione dei condizionatori RTA, evidenziandone
rischi e pericoli connessi. Esso è stato espressamente
studiato e sviluppato per permettere al personale prepo-
sto un utilizzo facile e in sicurezza dei condizionatori
RTA. Leggere attentamente e completamente tutte le
informazioni in esso riportate. Prestare particolare atten-
zione alle norme evidenziate con
in quanto se non osservate possono causare danno alle
persone, all’ambiente e/o alla macchina stessa.
La società declina ogni responsabilità per qualsiasi uso
improprio della macchina, per modifiche alla stessa non
autorizzate o per la non osservanza delle norme riporta-
te sul manuale.
Il manuale deve essere conservato il luogo sicuro e
messo a disposizione del personale addetto alla
conduzione ed alla manutenzione del refrigeratore.
1.2 ALLEGATI
Fanno parte integrale del presente manuale i documenti
evidenziati a pag. 2.
1.3 AVVERTENZE
Le unità RTA sono state progettate e costruite per
garantire nel tempo grande affidabilità di esercizio e
massima sicurezza; per questo e grazie alle scelte
progettuali e realizzative, la società può garantire la
totale conformità agli standard di sicurezza CE.
Ulteriore garanzia è assicurata dai collaudi cui la macchi-
na è stata sottoposta in fabbrica.
All’utente resta quindi soltanto l’impegno di un uso pro-
prio e di una manutenzione preventiva conforme alle
indicazioni contenute in questo manuale.
Ogni intervento, di qualsiasi natura, sulla
macchina deve essere preceduto da una
attenta lettura del presente manuale in tutte
le sue parti.
1. INTRODUCTION
1.1 GENERAL INFORMATION
This manual contains the installation, use and mainte-
nance instructions for the RTA roof top, and highlights
all connected risks and perils. It has been expressly
prepared and written to allow authorised users to use the
RTA roof top in complete safety and with the greatest of
ease. Please read the whole of this manual with care,
paying special attention to the sections marked with
as non-compliance may cause harm to people, deterio-
rate the environment and/or damage the unit.
The company declines all responsibility for any improper
use of the unit, unauthorised modifications or non-
compliance with the instructions contained in this manual.
Please keep this manual in a safe place and make it
available to chiller operators and maintenance men.
1.2 ATTACHMENTS
The documents shown on page 2 form an integral part of
this manual.
1.3 WARNINGS
The RTA units have been designed and built to ensure
long-term operating reliability and maximum safety; for
this reason and thanks to the company’s design and
construction policy, the company is able to guarantee
that this product totally complies with EC safety stand-
ards.
A further guarantee of this is provided by the factory tests
carried out on the unit.
The user, therefore, must only ensure the unit is properly
used and that maintenance operations are carried out
according to the indications contained in this manual.
The unit should not be touched until
the whole of this manual has been
carefully read.

6
RTA
Il manuale di installazione, uso e manuten-
zione deve essere sempre a disposizione
degli addetti, i quali, prima di ogni operazio-
ne sulla macchina, devono obbligatoriamen-
te leggerlo.
Per ogni ulteriore informazione e chiarimento la
G.I. HOLDING S.p.A. si rende disponibile al seguente
indirizzo:
G.I. HOLDING S.p.A.
Assistenza Clienti
Via Max Piccini, 11/13 - 33050 RIVIGNANO (UD)
ITALY
tel. +39 0432 773220
fax +39 0432 773855
e-mail: [email protected]
This installation, use and maintenance manual
must always be kept within easy reach of
authorised staff who are obliged to read it
before carrying out any operations on the unit.
For any further information or explanations please contact
G.I. HOLDING S.p.A. at the following address:
G.I. HOLDING S.p.A.
Customer Service
Via Max Piccini, 11/13 - 33050 RIVIGNANO (UD)
ITALY
tel. +39 0432 773220
fax +39 0432 773855
e-mail: [email protected]

7
RTA
2DESCRIZIONE DELLA MACCHINA
Questo capitolo ha lo scopo di fornire una descrizione
generale delle caratteristiche principali della macchina
nel suo insieme, unitamente a quella dei principali com-
ponenti, standard e opzionali.
2.1 IDENTIFICAZIONE
2.1.1 Identificazione della macchina
La macchina si identifica tramite le due targhette poste
sul telaio che riportano i seguenti dati:
-Ragione sociale del costruttore
-Indirizzo del costruttore
-Designazione della serie e del tipo di unità
-Numero di matricola
-Anno di costruzione
-Tipo e quantità di refrigerante
-Pressione di lavoro
-Taratura dei pressostati
-Simbolo della certificazione CE
-Caratteristiche elettriche
-Identificazione schema elettri
2UNIT DESCRIPTION
This chapter contains a general description of the main
unit characteristics, together with those of its principal
standard and optional components.
2.1 IDENTIFICATION
2.1.1 Unit identification
A plate attached to the unit contains the following infor-
mation:
-Manufacturer’s name
-Manufacturer’s address
-Description of the series and type of unit
-Series number
-Year of construction
-Type and quantity of refrigerant liquid
-Operating pressure
-Pressure switch set point
-EC certification symbol
-Electrical characteristics
-Wiring diagram identification

8
RTA
2.2 DESTINAZIONE D’USO
Gli RTA sono dei condizionatori ad aria autonomi,
monoblocco, con condensazione ad aria, previsti per
installazione all' esterno, da collegare ad una rete di
canali di distribuzione aria per la climatizzazione di
ambienti.
2.3 CONTROINDICAZIONI
Non impiegare in prossimità della macchina
prodotti infiammabili.
Non impiegare in prossimità della macchina
sostanze in grado di formare miscele esplo-
sive.
Non impiegare la macchina dove sussistono
problemi di impatto ambientale (vedi punto
3.5 pag. 13).
2.2 INTENDED USE
The RTA series of en bloc, independent, air conden-
sation conditioners has been designed for outdoor in-
stallation, connected to a network of air ducts for con-
ditioning rooms.
2.3 CONTRAINDICATIONS
Do not use inflammable products near the
unit.
stances that can form explosive mixtures
near the unit.
Do not use the unit in conditions that could
be harmful for the environment(see point
3.5 on page 13).

9
RTA
2.4 DESCRIZIONE GENERALE
Struttura.In lamiera zincata preverniciata, i pannelli
facilmente rimovibili permettono l' accesso per manuten-
zione e/o riparazione.
Sezione trattamento aria.E' rivestita internamente con
25 mm di materiale fonoassorbente e termoisolante, la
tenuta contro infiltrazioni è garantita da una guarnizione.
mandata aria verso il basso o verso l' alto , ripresa aria
orizzontale. Include :- ventilatore di mandata centrifugo
con motore elettrico, cinghie e pulegge a passo variabile,
su supporti elastici; - sezione per l’eventuale batteria di
post riscaldamento; - batteria di scambio termico, con
tubi in rame ed alette di alluminio, posta su un’apposita
bacinella di raccolta condensa; - filtri sintetici.
Sezione motocondensante. Include: - compressori
scroll ermetici, su supporti elastici; - condensatore costi-
tuito da una o due batterie alettate con tubi in rame ed
alette in alluminio; - ventilatori, di tipo assiale accoppiati
a motori trifase a rotore esterno, con rete antinfortunistica
sull’uscita dell’aria.
Circuito frigorifero. In tubo di rame, include, inoltre:
rubinetti sulla mandata del compressore e sul liquido,
filtro deidratore, spia liquido, valvola termostatica, valvo-
le per il collegamento con i manometri, pressostati di alta
e bassa pressione.
Quadro elettrico. Include: - interruttore generale con
bloccaporta; - fusibili, contattori per compressori e ven-
tilatori; - microprocessore per l’autodiagnosi e per la
gestione automatica dell’unità, permette di visualizzare
lo stato di funzionamento dell’unità e le temperature
dell’aria, frontalino rimovibile e posizionabile in ambien-
te.
ACCESSORI:
- batteria ad acqua calda o elettrica; - manometri di alta
e bassa pressione sul circuito frigorifero; - manometro
differenziale per controllo filtri aria; - interfaccia seriale
per PC; - contatti puliti per segnalazione funzionamento
o anomalie; - griglie o filtri di protezione batteria conden-
sante; - funzionamento in raffrescamento invernale.
2.4 GENERAL DESCRIPTION
Body. Painted galvanised sheet steel body with easy to
remove panels allowing access for maintenance and
repairwork.
Air handling section. This section is lined internally with
a 25 mm thick layer of thermal and acoustic material, and
adequate gaskets guarantee an airtight seal against any
infiltrations. Air supply can be from beneath or from
above, with horizontal return air. The section includes: -
belt driven centrifugal air supply fan with motor with
variable pulley and fitted onto spring loaded base frame;
- section which can house heating coil; - heat exchanger
with copper tubes and aluminium fins and fitted with a
condensate drain pan; - synthetic filters.
Condensing section. This section includes: - hermetic
scroll compressors fitted onto spring loaded mounts; -
one or two condenser coil with copper tubes and
aluminium fins; - axial fans with threephase motors and
external rotors, a safety grill protects the outlet.
Refrigeration circuit. The circuit is in copper piping and
includes shut-off valves on compressor supply line and
on liquid line, filter dryer, sight glass, expansion valve ,
connection points for manometers, high and low pressure
switches.
Electrical panel. Includes: - main circuit breaker switch
with panel door interlock; - fuses and contactors for
compressors and fans; - microprocessor for diagnostics
and automatic control of the unit, and which displays the
operating status and air temperature; the removable
front panel can be repositioned separately in the
environment.
ACCESSORIES:
- electric or hot water coil; - high and low pressure
manometers on the refrigeration circuit; - differential
pressure manometer for air filter control; - serial line port
for output to PC; - volt free contacts to indicate operation
or alarm; - grills or wire mesh filters to protect condenser
coil; - cooling mode for the winter season.

10
RTA
2.5 LIMITI DI FUNZIONAMENTO
3SICUREZZA
3.1 DEFINIZIONI
In questo documento verranno utilizzate le seguenti
definizioni:
-Zone pericolose: qualsiasi zona all’interno e/o in pros-
simità della macchina in cui la presenza di una persona
esposta costituisca un rischio per la sicurezza e la
salute di detta persona.
-Persona esposta: qualsiasi persona che si trovi inter-
namente o in parte in una zona pericolosa.
-Operatore/Manutentore: la o le persone incaricate di
far funzionare, regolare, eseguire la manutenzione,
riparare, movimentare la macchina.
3SAFETY
3.1 DEFINITION
This document uses the following definitions:
-Dangerous areas: any area inside and/or near to the
unit in which the presence of a person would give rise
to a risk for that person’s health.
-Exposed person: anyone who is wholly or partly inside
a dangerous area.
-Operator/Maintenance man: person or persons au-
thorised to operate, adjust, service, repair or move the
unit.
2.5 OPERATING LIMITS
50
40
30
20
10
0
-10
15 20
Temperatura a bulbo umido aria ingresso evaporatore °C /
Air temperature (measured with moist bulb) inlet evaporator °C
Temperatura aria esterna °C / Ambient air temperature °C
Funzionamento unità standard
Standard unit operating
Funzionamento ammesso solo
per unità dotate di controllo
di condensazione
Operating allowed only by units
with condensing control
25
10
-5
15 20 25 30
Temperatura dell' aria all' ingresso della batteria condensante °C /
Air temperature inlet coil °C
temperatura a bulbo umido aria esterna °C /
Temperatura a bulbo umido aria esterna °C
-15
-10
0
5
15
20
Funzionamento ammesso solo
con kit controllo evaporazione
Operating allowed only with
evaporating control kit
25
CICLO DI RAFFREDDAMENTO / COOLING CYCLE
CICLO DI RAFFREDDAMENTO / COOLING CYCLE
POMPA DI CALORE
PORTATA ARIA ALLA BATTERIA INTERNA:
PORTATA NOMINALE ±10% /
AIR FLOW INTO THE COIL NOMINAL FLOW ±10%
Funzionamento unità standard
Standard unit operating

11
RTA
3.2 REGOLE GENERALI DI SICUREZZA
È vietato alle persone non autorizzate avvici-
narsi alla macchina.
Prima di ogni intervento di manutenzione
sulla macchina, seguire scrupolosamente
quanto indicato nel capitolo 9 a pag. 32.
È vietato l’ingresso all’interno della macchi-
na. L’accesso è consentito solo al personale
qualificato e solo a macchina ferma.
È vietata la rimozione delle protezioni e
l’esclusione dei dispositivi di sicurezze e di
emergenza.
È vietato stazionare sulla macchina.
-Impiegare la macchina solo per l’uso a cui essa è
destinata.
-Il costruttore non risponde dei danni derivanti da un
impiego improprio della macchina o da modifiche
tecniche effettuate sulla macchina.
-Controllare regolarmente se i dispositivi di sicurezza
presentano un funzionamento corretto.
-Non smontare, modificare o mettere fuori funzione
parti della macchina.
-Per tutti gli interventi da effettuare sulla macchina,
utilizzare esclusivamente attrezzi ed equipaggiamenti
idonei e in buone condizioni. Gli operatori dovranno
indossare i normali dispositivi di protezione individuali
(guanti, casco, occhiali, ecc.).
-I lavori sull’equipaggiamento elettrico devono essere
eseguiti solo da un elettricista qualificato.
-Gli interventi sul circuito frigorifero possono essere
effettuati solo da personale specializzato.
3.2 GENERAL SAFETY REGULATIONS
It is forbidden for unauthorised persons to
approach the unit.
Scrupulously observe the contents of Chapt
er10 on page 32 before carrying out each
maintenance operation on the unit.
It is forbidden to enter the unit. Access is
only permitted to qualified staff when the
unit is disconnected.
It is forbidden to remove safety guards and
by-pass safety and emergency devices.
It is forbidden to stand on the unit.
-Only use the unit to do what it was built for.
-The manufacturer declines all responsibility for dam-
age deriving from improper use or technical modifica-
tions made to the unit.
-Check the safety devices are in perfect working order
on a regular basis.
-Do not dismount, modify or disconnect unit parts.
-When working on the unit, only use suitable tools and
equipment in good condition. Operators must wear
normal personal protection equipment (gloves, hel-
met, goggles, etc.).
-Work on the electrical system of the unit may only be
carried out by a qualified electrician.
-Work on the refrigerant circuit may only be carried out
by specialised staff.

12
RTA
3.3 SIMBOLOGIA
Verificare periodicamente lo stato delle targhette e prov-
vedere, in caso di necessità, al loro ripristino.
3.3.1 Segnali di sicurezza
POSIZIONE ANTIVIBRANTI
SHOCK ABSORBERS POSITION
SCHWINGUNGSDÄMPFERSPOSITION
POSITION ANTIVIBRANTS
PUNTI DI SOLLEVAMENTO
LIFTING POINTS
HEBENPUNKTEN
POINT DE SOULEVEMENT
- PRESENZA DI ORGANI IN MOVIMENTO
- PRESENCE OF MOVING OBJECTS
- ANWESENHEIT VON GEGENSTÄNDEN IN
BEWEGUNG
- PRESENCE DES ORGANS EN MOUVEMENT
- PRESENZA DI FONTI DI CALORE
- PRESENCE OF HEAT SOURCES
- ANWESENHEIT VON WÄRMEQUELLEN
- PRESENCE DES SOURCES DE CHALEUR
-PRESENZA DI SUPERFICI CHE POSSONO
CAUSARE LESIONI
- ANWESENHEIT VON FLÄCHEN, DIE VERLETZUNGEN
VERURSACHEN KÖNNEN
-PRESENCE OF SURFACES WHICH MIGTH CAUSE
LESIONS
- PRESENCE DES SURFACES QUI PEUVENT LESER
3.3 SYMBOLS
Check the state of the plates on a regular basis and repair
them if necessary.
3.3.1 Location of safety signs
DANGER
ORGANI IN
MOVIMENTO
MOVING
MACHINERY
MOTORE
SOTTOTENSIONE
ELECTRIC
SUPPLY
TOGLIERE CORRENTE
PRIMA DI APRIRE
ISOLATE ELSEWHERE
BEFORE OPENING

13
RTA
3.4 DISPOSITIVI DI EMERGENZA E DI SICUREZ-
ZA
Un dispositivo di emergenza che tolga ten-
sione dalla macchina deve essere previsto
all’esterno della stessa a cura di chi installa
la macchina.
3.5 DESCRIZIONE DEL RISCHIO RESIDUO
La descrizione del rischio residuo prende in considera-
zione i seguenti elementi:
-a quale tipologia di pericoli è soggetto chi opera nel-
l’ambito della macchina;
-la descrizione dei principali pericoli;
-chi può essere esposto a tali pericoli;
-quali sono le principali misure di sicurezza adottate per
ridurre il rischio di infortuni.
Le indicazioni per la prevenzione degli infortuni di segui-
to riportate, con riferimento alle relative aree a rischio
residuo, devono essere integrate con tutte le indicazioni
generali del presente capitolo e con le norme di preven-
zione infortuni vigenti nel paese di destinazione dell’im-
pianto.
3.5.1 Rischio residuo in prossimità della macchina
-Folgorazione, se non vengono effettuati correttamente
l’allacciamento elettrico e la messa a terra della mac-
china.
-Tagli o escoriazioni per la presenza di superfici taglien-
ti.
-Aspirazione e successiva dispersione in ambiente
delle sostanze presenti sul luogo dell’installazione.
-Proiezione di eventuali oggetti che possano cadere
sulle pale dei ventilatori.
-Fuoriuscita di acqua (in caso di anomalia).
-Formazione di acqua di condensa e di ghiaccio nella
zona antistante la macchina durante il funzionamento
in riscaldamento delle macchine a pompa di calore.
-Alterazione del microclima (durante il funzionamento).
-Emissione di rumore (durante il funzionamento).
-Fuoriuscita di olii (per anomalia).
-Fuoriuscita del frigorigeno (per anomalia).
N.B. Il frigorigeno è una sostanza ad effetto serra, e nel
caso sia R22 è anche lesiva dell’ozono stratosfe-
rico. Si tratta di vapori più pesanti dell’aria e che
possono provocare soffocamento riducendo l’os-
sigeno disponibile per la respirazione. Una rapi-
da evaporazione del liquido può causare
congelamento.
3.4 EMERGENCY AND SAFETY DEVICES
An emergency external circuit breaker must
be fitted by the unit installer to disconnect
the unit from the power supply.
3.5 DESCRIPTION OF RESIDUE RISKS
The description of residue risks includes the following
elements:
-the kind of danger the people working on the unit are
subjected to;
-description of the main dangers;
-who is exposed to such dangers;
-the main safety methods used to reduce the risk of
injury.
The following accident prevention instructions, with ref-
erence to the relative areas concerned by residue risks,
must be integrated with all the general indications con-
tained in the present chapter and with the accident
prevention regulations in force in the country of installa-
tion.
3.5.1 Residue risks near the unit
-Electrocution if the unit is not properly corrected to the
mains power supply and earth circuit.
-Cuts or abrasions caused by sharp surfaces.
-Extraction and subsequent dispersion in the environ-
ment of substances present in the installation site.
-Ejection of objects falling on the fan blades.
-Leaking water (in case of malfunction).
-Formation of condensation and ice in front of the unit
while the unit heat pumps are working.
-Alteration of the micro climate (during operation).
-Noise (during operation).
-Leaking oil (in case of malfunction).
-Leaking refrigerant liquid (in case of malfunction).
N.B. Refrigerant liquid is a substance which causes a
greenhouse effect, and, in the case of R22, it can
also damage the ozone layer. Its vapours are
heavier than air and can cause suffocation by
reducing the amount of oxygen available for
breathing. Rapid evaporation of the liquid can
cause freezing to occur.

14
RTA
3.5.2 Misure da adottare in caso di fuoriuscita di
gas frigorigeno
-Tipo di prodotto:
R407C - R134a - R404A.
-Misure di pronto soccorso:
Informazione generale:
non somministrare alcunchè a persone svenute.
Inalazione:
portare all’aria aperta. Ricorrere all’ossigeno o alla
respirazione artificiale se necessario. Non sommini-
strare adrenalina o sostanze similari.
Contatto con gli occhi:
sciacquare accuratamente ed abbondantemente con
acqua per almeno 15 minuti e rivolgersi ad un medi-
co.
Contatto con la pelle:
Lavare subito abbondantemente con acqua. To-
gliersi immediatamente tutti gli indumenti contami-
nati.
-Misure in caso di fuoriuscita accidentale:
Precauzioni individuali:
evacuare il personale in aree di sicurezza. Prevede-
re una ventilazione adeguata. Usare mezzi di prote-
zione personali.
Precauzioni ambientali:
evapora.
Metodi di pulizia:
evapora.
3.5.3 Operazioni con rimozione dei pannelli
Alcune delle operazioni e/o verifiche di seguito descritte
richiedono la rimozione dei pannelli del condizionatore
per accedere all’interno dello stesso.
Prima di rimuovere qualsiasi pannello peri-
metrale, eccezion fatta per quello che pro-
tegge il quadro elettrico, è obbligatorio to-
gliere tensione.
Si fa presente che all’interno dell’unità, anche a macchi-
na ferma possono esserci superfici calde (tubazioni,
compressore, ecc.), o fredde (compressore, separatore
d’aspirazione, ecc.), taglienti (alette batterie) o corpi in
movimento (ventilatori).
Pertanto tali operazioni devono essere effet-
tuate solo da personale qualificato che in-
dossi indumenti di sicurezza.
3.5.2 Measures to take in case of leaking refrigerant
gas
-Product type:
R407C - R134a – R404A
-First aid measures:
General information:
Do not give anything to people who have fainted.
Inhalation:
take the person out into the open air. Use oxygen or
artificial respiration if necessary. Do not give adrena-
line or similar substances.
Contact with eyes:
carefully rinse with abundant water for at least 15
minutes and see a doctor.
Contact with the skin:
Wash with abundant water and remove all contami-
nated clothing immediately.
-Measures to take in case of accidental leaking:
Personal precautions:
evacuate all staff to safety areas. Make sure the area
is suitably ventilated. Use personal protection equip-
ment.
Environmental precautions:
the gas evaporates.
Cleaning methods:
the gas evaporates.
3.5.3 Operations with the panels removed
Some of the following operations and/or controls require
the panels of the unit to be removed in order to access the
inside of the roof top.
Before removing an outer panel, except for
the one protecting the electrical panel easy
to recognise due to its ventilation slits, the
unit must be disconnected from the mains
power supply.
Please note that some surfaces inside the unit may be
hot (piping, compressor, etc.), cold (compressor, suc-
tion separator, etc.), sharp (coil fins) or moving (fans)
even when the unit is not working.
These operations may only be carried out by
qualified staff wearing safety clothing.

15
RTA
Verifiche di funzionamento possono richiedere il funzio-
namento (totale o parziale dell’unità) con un pannello
aperto. In tal caso il pannello va rimosso a macchina
ferma.
Queste verifiche sono particolarmente peri-
colose e sono pertanto riservate a personale
altamente qualificato.
Operare come segue:
-Togliere tensione tramite l’interruttore generale.
-Aprire il quadro elettrico e disattivare, togliendo i rela-
tivi fusibili, gli organi di cui non è necessario il funzio-
namento per la verifica che si deve effettuare.
-Richiudere il quadro elettrico.
-Rimuovere il pannello interessato.
-Avviare l’unità.
-Effettuare le verifiche richieste con la massima cautela
e con l’utilizzo di protezioni individuali.
-Completate le verifiche, arrestare l’unità e rimettere al
suo posto il pannello precedentemente tolto.
-Togliere tensione e rimettere al loro posto gli eventuali
fusibili precedentemente tolti.
-Richiudere il quadro elettrico.
4. ISPEZIONE, TRASPORTO
4.1 ISPEZIONE
All’atto del ricevimento dell’unità, verificarne l’integrità.
Poiché la macchina è stata accuratamente controllata
prima di lasciare la fabbrica, eventuali danni sono da
imputare al trasportatore. Si raccomanda perciò di anno-
tarli sul Foglio di Consegna prima di controfirmarlo.
Avvisare tempestivamente la società o l’Agente sull’en-
tità del danno riportato dall’unità.
Il Cliente deve sempre compilare un rapporto scritto che
riguarda ogni eventuale danno subito dalla macchina.
4.2 STOCCAGGIO
La temperatura dell’ambiente in cui vengono immagaz-
zinate le unità deve essere compresa tra -20 e +50°C.
Operating checks may require the unit to work (totally or
partially) while a panel is open. In this case the panel
should be removed when the unit is not working.
These checks are particularly dangerous
and may only be carried out by highly quali
fied staff.
Proceed as follows:
-Turn off mains power with the main power switch.
-Open the electrical panel and remove the relative
fuses to disconnect the components that do not need
to be working in order to carry out the relative check.
-Close the electrical panel.
-Remove the panel in question.
-Start the unit.
-Carry out the relative check with the greatest of care
and using personal protection equipment.
-After completing the check, stop the unit and put the
panel back in place.
-Turn off mains power and put back any fuses that were
previously removed.
-Close the electrical panel.
4. INSPECTION AND TRANSPORT
4.1 INSPECTION
Check the condition of the unit on receipt. As the unit was
carefully checked before leaving the factory, any claims
for damages should be addressed to the forwarder. Any
damage should therefore be indicated on the Delivery
Note before signing it.
Please inform the company or the Agent of the nature of
the damage to the unit immediately.
The Customer must always write a report describing any
damage caused to the unit.
4.2 STORAGE
The temperature in the area where the units are stored
must range between -20 and +50°C.

16
RTA
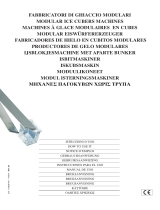
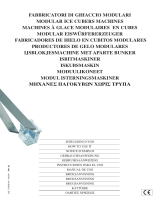
4.3 SOLLEVAMENTO E TRASPORTO
Durante lo scarico ed il posizionamento dell’unità, pre-
stare molta attenzione alle manovre che non devono in
alcun modo essere brusche e/o violente. Non utilizzare
come punti di sollevamento le tubature o altri componenti
della macchina.
La macchina va movimentata esclusivamente come
indicato sulla targhetta posta sulla macchina stessa.
I punti di sollevamento sono chiaramente evidenziati con
l’etichetta .
Attenzione!
In tutte le operazioni di sollevamento assicu-
rarsi di aver ancorato saldamente l’unità per
evitare ribaltamenti o cadute accidentali.
Solitamente le unità vengono spedite completamente
assemblate, qualora per problemi di trasporto ciò non è
possibile esse vengono fornite suddivise in parti
assemblabili in cantiere.
Tutte le unità sono munite di apposite guide con fori per
l' introduzione di tubi che facilitano il sollevamento con
funi come da schema.
Applicare le funi come da schemi indicati.
4.4 DISIMBALLO
L’imballo va tolto solo quando l’unità è giunta sul posto di
installazione e non dovrà più essere movimentata.
Rimuovere con cura l’imballo della macchina, evitando
di danneggiare la stessa.
Poiché i materiali che costituiscono l’imballo sono di
natura diversa (legno, nylon, polistirolo, cartone, ecc.), si
consiglia di conservarli separatamente e di consegnarli
alle ditte specializzate nello smaltimento e nel riciclaggio
degli stessi allo scopo di salvaguardare l’ambiente.
PUNTI DI SOLLEVAMENTO
LIFTING POINTS
HEBENPUNKTEN
POINT DE SOULEVEMENT
PUNTI DI SOLLEVAMENTO
LIFTING POINTS
HEBENPUNKTEN
POINT DE SOULEVEMENT
4.3 LIFTING AND TRANSPORT
When unloading and positioning the unit, take great care
not to make sudden and/or violent manoeuvres. Do not
lift the unit by its piping or any other components.
The unit should only be moved as shown in the plate
attached to it.
The lifting points are clearly indicated with the label.
Attention!
Make sure the unit is securely anchored
before lifting it in order to prevent it from
accidentally overturning or falling.
The units are usually shipped totally assembled, but if
this is not possible for transport reasons, they are sup-
plied in pieces that can then be assembled in situ.
All the units are supplied with special guides with holes
for introducing tubes to make them easier to lift with
cables as shown in the diagram.
Attach the cables as shown.
4.4 UNPACKING
Only unpack the unit when it has reached the installation
site and no longer needs to be moved.
Remove the packing material with care, making sure not
to damage the unit.
Given that various kinds of packing materials are used
(wood, nylon, polystyrene, cardboard, etc.), they should
be separated and delivered to specialised disposal and
recycling companies for environmental reasons.

17
RTA
5INSTALLAZIONE
5.1 SCELTA DEL LUOGO DI INSTALLAZIONE
Nella scelta del luogo di installazione si dovrà tenere
conto di:
-Peso dell’unità:
La soletta di appoggio dell’unità deve essere
perfettamente orizzontale ed in grado di sop-
portare il peso in funzionamento dell’unità.
È opportuno costruire una soletta di supporto di dimen-
sioni proporzionate all’unità. Ciò si rende in particolar
modo necessario quando l’unità deve essere posta su
terreno instabile (giardini, terreni di riporto, ecc.).
La soletta deve:
•appoggiare su opportune fondamenta, avere un’al-
tezza, rispetto al terreno circostante, di circa 10-15
cm;
•essere orizzontale ed in grado di sopportare circa il
200% del peso di esercizio della macchina. Si con-
siglia di interporre una guarnizione di sughero ade-
guatamente sigillata lungo il perimetro.
-Spazi:
È necessario verificare che gli spazi di ri-
spetto riportati sul foglio dimensionale del-
l’unità siano lasciati liberi.
Ridurre lo spazio richiesto può significare difficoltà o
impossibilità di effettuare le operazioni di manutenzio-
ne e/o malfunzionamento dell’unità a causa di riduzio-
ne della portata d’aria che investe la batteria conden-
sante o di ricircolo della stessa.
Si fa presente che non sono ammessi osta-
coli quali tettucci, pensiline o coperture in
genere al di sopra della macchina.
Si tenga presente che le unità a pompa di calore danno
luogo a formazione di ghiaccio e condensa che si
riversa sul pavimento antistante l’unità. Si dovrà per-
tanto provvedere a raccogliere e drenare l’acqua di
condensa e sbrinamento per evitare che il pavimento
diventi sdrucciolevole.
Tutta la zona di rispetto dovrà essere inter-
detta, fatta eccezione per gli operatori e
manutentori addetti alla macchina.
-Rumore:
Durante il suo funzionamento, l’unità genera del rumo-
re, evitare pertanto l’installazione in ambienti riverbe-
ranti.
L’unità dovrà essere posizionata con il lato batteria
rivolto nella direzione in cui la rumorosità è meno
critica.
-Venti predominanti:
Il vento può alterare le condizioni di funzionamento,
per minimizzarne gli effetti si consiglia di posizionare
l’unità con il lato lungo parallelo alla direzione dei venti
predominanti.
5INSTALLATION
5.1 CHOOSING THE INSTALLATION SITE
When choosing the installation site the following points
should be considered:
-The weight of the unit:
The supporting surface under the unit must
be perfectly horizontal and able to withstand
its operating weight.
A supporting surface with an appropriate area should
be built. This is particularly important if the unit is
installed on unstable ground (gardens, embankments,
etc.).
The supporting surface must:
•lie on suitable foundations and be about 10-15 cm
higher than the surrounding ground;
•be horizontal and able to withstand about 200% of
the weight of the unit in operation. A suitable sealed
layer of cork should be placed along the perimeter.
-Spaces:
Make sure that sufficient free space, as indi
cated on the scale drawing, is left around the
unit.
Less space will make it difficult or impossible to carry
out maintenance operations and/or lead to faults in the
unit due to the reduction in the air flow on the con-
denser coil or its recirculation.
Please note that obstacles such as cano
pies, shelters or coverings in general are not
permitted.
Please note that the heat pump units cause ice and
condensation to form and drain onto the floor in front of
the unit. This water must therefore be collected and
drained to prevent the floor from becoming slippery.
People may not enter the unit area unless
they are authorised operators and
maintnance personnel.
-Noise:
The unit generates noise while it’s working; do not
install it in reverberating rooms. The unit must be
positioned with the coil side facing the direction where
noise is less critical.
-Prevailing winds:
Wind may alter operating conditions; to minimise its
effects the unit should be positioned with the long side
parallel to the direction of prevailing winds.

18
RTA
-Vibrazioni:
Benché le macchine trasmettano al terreno un basso
livello di vibrazioni, è in ogni caso consigliabile frapporre
fra il basamento delle stesse ed il piano di appoggio un
nastro di gomma rigido.
Quando si rende necessario un isolamento maggiore
è opportuno l’utilizzo di supporti antivibranti (in gomma
o a molle).
5.2 POSIZIONAMENTO ED ASSEMBLAGGIO
·E’ necessario posizionare l ‘ unità con bolla di livello
e spessorare se richiesto gli appoggi, per consentire
una perfetta apertura delle portine di scarico delle
bacinelle.
·Invitiamo a verificare che il posizionamento delle
unità preveda degli spazi tecnici indispensabili per
le operazioni di manutenzione e sostituzione dei
componenti.
·Essendo le parti in movimento tutte
dinamicamente isolate all ’ interno non si
richiedono ammortizzatori esterni.
·Quando per necessità tecnico-strutturali si ritenga
necessario adottare supporti antivibranti esterni
tra unità e pavimento, è indispensabile ricordarsi
di provvedere tutti gli attacchi idrici e le
canalizzazioni di idonei giunti elastici.
Giunzione delle sezioni:
Si ottiene grazie al sistema a lamina d ‘ incastro, che
consente di avvicinare le varie sezioni tra loro,
ottenendo le ottimali condizioni di assetto
indispensabili per una perfetta tenuta. Nella sezione
ventilante vi sono i materiali necessari per le giunzioni
(siliconi e viti).
Per procedere all ‘ assemblaggio delle sezioni:
·Applicare un cordolo di silicone su tutto il
perimetro del profilo.
·Avvicinare le sezioni (la centratura è
agevolata dalle lamine di d ‘ incastro).
·Verificare la messa in bolla dell ‘ unità di
trattamento
·Procedere alle bullonature; questa
operazione può essere eseguita entrando
nelle unità, se lo spazio lo permette, oppure
attraverso le portine di ispezione o
rimuovendo alcuni pannelli.
-Vibrations:
Although the units transmit a low level of vibrations to
the ground, a sheet of rigid rubber should always be
placed between the unit base and the supporting
surface.
If greater insulation is required, vibration moisting
supports should be used (in rubber or with springs).
5.2 POSITIONING AND ASSEMBLY
·Position the unit with a spirit level and shim the
supports if required until the drain tank doors open
perfectly.
·Make sure that there is enough free space round
the unit to allow maintenance operations to be
carried out and components to be replaced.
·As all moving parts are dynamically insulated in-
side, no external shock absorbers are required.
·When external vibration dampers between the unit
and the floor are required for technical/structural
reasons, make sure to fit suitable elastic joints to
all the water connections and ducts.
Fitting the sections together:
All the sections are fitted with plate joints which ensure
they are perfectly aligned when they are joined to-
gether, thereby ensuring optimal sealing. The ventilat-
ing sections contain the materials required for assem-
bly (silicon and screws).
Assembling the sections:
··Apply a film of silicon all around the edge
of the profile.
··Put the sections together (the plate joints
make sections easier to centre).
··Check the unit is perfectly level.
·Bolt them together; this operation can be
carried out by entering the units if there’s
enough space, through the inspection
hatches or by removing some panels.

19
RTA
5.3 COLLEGAMENTO DEL CIRCUITO AERAULICO
Le dimensioni dei canali devono essere determinate in
funzione della portata d ‘ aria che vi deve transitare e
della corrispondente pressione statica messa a
disposizione dal ventilatore dell ‘ apparecchio.
E’ comunque indispensabile seguire le seguenti
raccomandazioni:
•Indipendentemente dal tipo di canale che viene
usato , il materiale da costruzione non deve
essere infiammabile, né deve dare luogo allo
sviluppo di gas tossici in caso d ‘ incendio. Le
superfici interne dei canali devono essere lisce e
non devono contaminare in alcun modo l ‘ aria in
transito. Raccomandiamo comunque l ‘ uso di
canali in lamiera adeguatamente isolati per evitare
condensazioni e rientrate di calore.
•E’ raccomandabile collegare l ‘ apparecchio alle
condotte dell ‘ aria interponendo dei giunti flessibili
in modo da assorbire le vibrazioni, prevenire la
generazione di rumori nei canali.
•Le curve in prossimità dell ’ apparecchio
dovrebbero essere evitate per quanto è possibile.
Se nonostante tutto non si riuscisse ad evitarne l ‘
installazione, occorre almeno fare in modo che
abbiano il più ampio raggio di curvatura possibile
e prevedere dei deflettori all ‘ interno quando il
canale sia di ampie dimensioni.
Occorre garantire con l ' applicazione di sigil-
lanti la tenuta all ' acqua del passaggio nei
canali attraverso le solette o i muri in modo da
prevenire ogni infiltrazione d ' umidità nell '
edificio.
5.4 COLLEGAMENTI IDRAULICI
5.4.1 Vasche
Connettere con opportuni sifoni gli scarichi
per evitare che la depressione del
ventilatore non consenta il drenaggio e lo
scarico.
Il sifone dovrà avere una profondità non
inferiore a 100 mm.
La linea di drenaggio deve trovarsi al di sotto del
relativo attacco ed avere una pendenza in direzione
del flusso in modo da facilitare lo scarico.
5.4 HYDRAULIC CONNECTIONS
5.4.1 Tanks
Connect suitable siphons to the drains to
ensure that fan depression does not pre
vent them from draining.
The siphon must not be less than 100 mm
deep.
The drain line must lie under the relative connector
and must slope down in the direction of the flow in or-
der to make drainage easier.
5.3 AIR DUCT CONNECTIONS
The sizes of the ducts must be determined according
to the relative airflow and the corresponding static
pressure provided by the fan.
The following recommendations must be observed in
all cases:
•Regardless of the type of duct used, the material
they are made of must not be inflammable or de-
velop poisonous fumes in case of fire. The inner
surfaces of the ducts must be smooth and must
not contaminate the air in any way. Suitably insu-
lated sheet metal ducts should always be used in
order to prevent condensation and returning heat.
•The equipment should be connected to the air
ducts with elastic joints in order to absorb vibra-
tions and prevent the generation of noise.
•Bends near the equipment should be avoided if at
all possible. If bends must be fitted near the equip-
ment they must have a curvature radius as large
as possible and be fitted with internal deflectors if
the duct is large.
Apply a sealer to stop the water in the
ducts from leaking through the floors or
walls and create damp in the building.

20
RTA
5.4.2 Batterie
Le batterie ad acqua devono essere collegate
idraulicamente con l ‘ ingresso dell ‘ acqua dal
basso in controcorrente rispetto al flusso dell ‘
aria.
•Evitare che i collegamenti del circuito causino
ostacoli alla estrazione delle batterie.
•Evitare di caricare il peso delle tubazioni di
collegamento sugli attacchi delle batterie.
•Verificare la corretta installazione dello sfiato e
dello scarico nei due branchetti dei collettori della
batteria.
•Assicurarsi che siano state prese le opportune
precauzioni per evitare rotture delle batterie a
causa del gelo (dispositivi antigelo elettrici o
aggiunta di antigelo al fluido).
5.4.3 Umidificatore a perdere o a vapore
•Collegare l ‘ umidificatore alla rete idrica con tutti
gli accessori tipo: valvola di regolazione, filtro,
valvola solenoide, valvola di flusso costante,
manometro.
•Ricordarsi di munire di sifone lo scarico vasca.
5.4.4 Umidificatore con pompa
•Collegare la valvola a galleggiante alla rete idrica
•Riempire la bacinella e regolare la valvola del
galleggiante in modo che sia chiusa quando l ‘
acqua tracima sul tubo troppo pieno. Il battente d ‘
acqua ottenuto garantisce un perfetto
funzionamento della pompa.
•Ricordarsi di lasciar trafilare leggermente l ‘ acqua
dal troppo pieno per evitare l ‘ aumento di
concentrazione di calcare e la formazione di alghe
e fanghi (quantità 2-4% contenuto vasca).
•Intervenendo sulla valvola di regolazione e sul
rubinetto di bleed off si può regolare il flusso d ‘
acqua in caduta sul pacco evaporativo. L ‘ esatto
quantitativo d ‘ acqua viene determinato da un
leggero afflusso di questa nella parte esterna del
pacco.
Tutte le operazioni sopra descritte devono essere
eseguite a ventilatore fermo.
Attenzione: è opportuno cambiare più volte l ‘
acqua in circolazione durante la prima ora di
funzionamento, consentendo cosi’ di eliminare la
formazione di schiuma e cattivi odori che si
potranno manifestare all ‘ inizio. Prestare molta
attenzione all ‘ installazione di un eventuale altro
pacco evaporativo per evitare che l ‘ errato
posizionamento possa pregiudicarne l ‘ errato
funzionamento.
5.4.2 Coils
Connect the water coils to the bottom of the
water inlet and in a direction opposite to
that of the air flow.
•Make sure the circuit connections do not obstruct
the extraction of the coils.
•Do not let the connecting tubes weigh on the coil
connectors.
•Make sure the vent and the drain in the two parts
of the coil manifolds are properly installed.
•Make sure that appropriate measures have been
taken to prevent frost from bursting the coils (elec-
tric anti-freeze devices or anti-freeze fluid in the
liquid).
5.4.3 Disposable humidifier
•Connect the humidifier to the water main, together
with all the required accessories such as: control
valve, filter, solenoid valve, constant flow valve,
pressure gauge.
•Fit the tank drain with a siphon.
5.4.4 Humidifier with pump
•Connect the float valve to the hydraulic circuit
•Fill up the tank and adjust the float valve so that it
is closed when the water overflows from the over-
flow pipe. The head of water obtained ensures the
pump works perfectly.
•Let a little water leak from the overflow pipe to
prevent excessive scale from building up and al-
gae and mud from forming (2-4% of tank capac-
ity).
•Adjust the flow of water falling onto the evaporator
pack with the control valve and the bleed valve.
The quantity of water is correct when it trickles
into the outer part of the pack.
All the above operations must be carried out with the
fan stopped.
Attention: change the circuit water several
times during the first working hour in order
to prevent the formation of foam and bad
smells that may occur at the start. Take
great care when installing a second evapo
rator pack as bad positioning can lead to
faulty operation.
/