Page is loading ...

Hobie
®
Mirage
®
Lynx

.

In 1950, Hobie’s dream was born in his
parents’ garage when he decided to apply
his love of woodworking to the sport of
surfing. Dad backed out the Buick... Hobie
carved out his very first surfboard...
Hobie’s business of fun had begun.

4
Table of Contents
Anatomy .............................................................................................................. .5
MirageDrive
®
/Handle Installation...... .................................................................. .7
Seating Installation .............................................................................................. .8
Rudder Installation............................................................................................. .10
MirageDrive 180 Instructions ............................................................................. .12
Paddle Storage ................................................................................................... .16
Accessory Options .............................................................................................. .17
Storage and Transport ....................................................................................... .18
Maintenance ....................................................................................................... .21
Safety .................................................................................................................. .24
Warranty ............................................................................................................. .26
Look for this icon. Online video is available at
www.hobie.com/support
Please read through the instruction manual before using this product
Please note that your Lynx hull is EPS foam filled. Drilling/
screwing into the hull may cause water entry and saturation.
Accessory mounting should utilize the provided gear tracks
and accessory-ready inserts only.

5
hobie.com
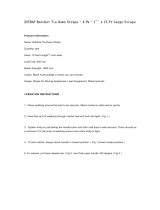
1. Lynx Hull
2. MirageDrive 180 Kick-Up
3. Paddle
4. Cup Holder
5. Seat
6. Steering System
7. Carry Handles
8. Cassette Plug
Anatomy
Items not shown to scale
1
3
4
2
5
6
8
7

6
Lynx Features
Steering
Handle
Tracks
H-Bar Mounts
Rudder Up-
Down Line
PowerPole
Mounts
Paddle Holder
Accessory
Tube
Seat
Rudder
Cart Scuppers

7
hobie.com
MirageDrive/Carry Handle Assembly
7/32
MirageDrive Cranks
Carry Handle Installation
1
Insert cranks into drums while depressing
button at top. Make sure you are putting
the Left and Right pedal on the correct
side as shown here.
2
Tighten crank
bolt all the way
using a 7/32”
Allen® wrench.
7/32
Loop the bow and stern
carry handles through the
bow leash plug and stern
D-ring

8
Seating
1
2
There are two con-
nection points on the
kayak to secure the
seat.
Connect the rear
seat bottom frame
into the seat holders
on the back of the
kayak.
Push down on the
seat until it snaps
into the holders.
Secure by stretch-
ing the shock cord
over the seat bottom
frame and loop-
ing the shock cord
around the hook
built into the seat
holder.
Connect the hooks
on the left and right
straps that hang off
the front of the seat
to the leash plugs
molded in the kayak.
Pull the Left and
Right straps tight to
secure the seat in
place.
1
2
Installation

9
hobie.com
Seating
Connect the hooks
on the left and right
straps that are fixed
to the seat back
frame to the loops
on the left and right
side of the seat bot-
tom frame.
Loosen the webbing
through the plastic
buckle to recline the
seat.
Pull the webbing
tabs on the left
and right straps to
adjust the seat more
upright.
1
2
3
Seat Adjustment

10
Rudder Installation
Rudder Installation/Removal
Align the track on
the rudder system
with the track on the
gudgeon that is
mounted to the back
of the kayak.
Slide the rudder
track into the gud-
geon track making
sure the red pin
locks.
To remove the rud-
der, pull the red
locking knob out
while pulling the
rudder up.
1
2
3
NOTE: Your rudder pin is
designed to break under high
loads. An extra pin is stored
inside a small pocket on the
back of your seat.

11
hobie.com
Rudder Installation
There are steering tracks lo-
cated on both sides of the seat.
Choose which side is best for
you.
Slide the steering handle onto
the track over the lock pin. The
pin will click into place.
Point the steering handle in
the direction you would like to
travel.
To remove the steering handle,
pull down on the red knob
located on the underside of the
steering track and slide the
handle off the track.
Steering
1
2
3
4
Connect the hook on the rudder up/
down line to the padeye mounted on
the back of the seat bottom frame.
1
Once the up/down line is connected,
pull up on the line to flip the rudder
down and back up.
2
Rudder UP/DOWN
Pull

12
CLICK
Removal
Level
Press down and lock drive into
Click and Go’s. The drive locks
automatically when installed.
Lower drive
straight down
making sure the
spine is level.
Lift drive
straight up
Pull back
each Click
and Go lever
Installation
1
2
1
2
MirageDrive 180 Instructions

13
hobie.com
MirageDrive 180 Instructions
Pedal Adjustment
Squeeze
Adjust cranks
by rotating and
clicking them
into the desired
position. Make
sure both cranks
are in the same
position number.
With both feet on
the pedals and
together (fins
straight down),
your knees should
be comfortably
bent and not
crunched or over
extended.
Squeeze
adjuster handle
1
2
3

14
Reverse
From the forward
position, pull the
right handle to
shift the drive
into reverse.
(This is the lon-
ger handle of the
two)
Shifting with the
fins too far apart
can cause inter-
ference with the
shift. Pull with
firm pressure
while cranks are
close together.
From the reverse
position, pull
the left handle
to shift the drive
into forward.
1
2
Left Handle = Forward
(shorter handle)
Right Handle = Reverse
(longer handle)
reverse
forward
MirageDrive 180 Instructions

15
hobie.com
MirageDrive 180 Instructions
MirageDrive Operation
Shallow
Water and
Beaching
Kick Up Fins
Press either pedal forward in
shallow water to raise fins.
Pressing one pedal fully forward
will orient the fins with the kayak
underside.
The kick-up fins will automatically
retract backwards when coming in
contact with any object and resume
their normal position when clear of
obstruction when you pedal.

16
Paddle Storage
Paddle Storage
Extra Rudder Pin
Rest paddle on the right
side rail for storage.
Secure by looping the
Bungee around the
paddle and securing
over the ball end.
On the back of the seat
there is a small pocket
containing an extra
rudder pin.

17
hobie.com
NOTE: The transducer
hardware kit is an optional
accessory and is not included
with the Lynx.
Transducer Install
Accessory Options
To take off the plate on the
bottom of the hull, remove the
screws using a hand Phillips
screwdriver.
Follow instructions on your
Fishfinder kit for installation.
Cup Holder
PowerPole Mount
Place on the opposite side of the steering handle.
Remove the PowerPole scupper cover plates and install the PowerPole
Mount to the molded inserts from the Lynx PowerPole Hardware Kit.

18
Storing your boat
cockpit side up on
rigid crossbars can
dent the bottom.
Storing your boat
on its side over a
long period of time
can flatten/dent
the sides.
Never use PVC
runners or tubes
to store boat on.
Never hang the
boat by handles or
leash plugs. They
are not designed to
handle long–term
load and will fail.
Storing your boat
upside down on
crossbars or
hanging from wide
strapping are two
ways to keep the
boat stored.
Locating straps
through the scup-
pers is a secure
way to hang your
Lynx.
Storage Do’s
Storage Don’ts
Storage and Transportation

19
hobie.com
Storage and Transportation
Store out of the Weather
Additional Storage Key Points
• Always remove all water from boat.
• Don’t leave tie–down straps tight over a long period of time.
• Storing in non-recommended configurations can result in hull
damage and can void your warranty.

20
Storage and Transportation
The best way to transport your boat is to purchase a trailer or roof rack
from your dealer. Using proper cradles that support the hull, the boat
can be transported right side up. Straps can then be laid across the boat
and tied to the rack bars. Straps should be tight, but not so tight that
they distort the shape of the boat. Avoid using ratchet straps to prevent
overtightening.
Be sure to consult your car and roof rack owner’s manual
to ensure that you comply with all recommendations,
precautions and specifications.
Running a line or strap from the bow and stern of the boat to each
bumper is required. If your bumpers do not have a gap to pass a rope
around, look underneath. There should be a loop of metal, which is used
by car transports such as tow trucks.
Many people like to use the scupper holes to tie the boat to the car. This
helps prevent the boat from sliding back and forth or the tie-down rope
from slipping off the boat. (This is an acceptable method for tying the
boat down for transport.)
Roof Topping
1
2 3
/