Page is loading ...

Half Cadillac for A, C & M Series
Assembly Instructions & User Guide
Note: To check for the latest version of this manual please visit:
https://align-pilates.com/pilates-equipment-resources/assembly-user-guides/
Shown: A8-Pro with standard legs, gondola pole and Half Cadillac
March 2020

COMPATIBILITY
This Half Cadillac is compatible with all A2 & A8 series reformers, which includes the A2, A2R and A2RII, A8-
Pro and C Series reformers from the C1-Pro, including the C2-Pro, C2-Pro RC & C8-Pro reformers and finally
the M2 & M8 reformers. The Half Cadillac can be attached to the listed reformers with any of the available
leg heights. In order to attach the Half Cadillac the correct bracket must be purchased separately. For
the A series reformers the part code for the correct bracket is PAPA2HALFCADBKT. For the C series the part
code is PAPC1PROHCADBKT. This manual assumes the correct bracket has been purchased prior to as-
sembly.
IMPORTANT NOTES BEFORE ASSEMBLY:
To assemble the Half Cadillac on reformers with 40 or 64cm legs you will need 2.45m or 2.75m high
ceilings respectively in order to insert the frame. It is therefore sensible to measure the ceiling height in
advance. In cases where the ceiling is high enough to accommodate the Half Cadillac but not to insert it,
the A2 series of reformers allows you to remove the reformer legs, then attach the Half Cadillac and finally
reattach the legs to avoid the ceiling height problem - see your reformer manual for information on
attaching the reformer legs.
Assembled Heights:
A series:Rehab Leg 235cm, Std Leg 213cm and Low Leg 199cm.
C Series: 195cm, C Series with leg extension 208cm,
M Series:213cm
At least two people are required to unpack & assemble the Half Cadillac. At all times you are responsible
for your own safety. Please unpack the equipment in a clear, clean & dry environment on a level floor
surface. Remove all strapping using a safety knife and remove the carton lid and remove the contents
from the boxes.
Half Cadillac Map:
Swing though bar
height adjustment
knob
Sliding Spring eyelet
Safety strap
Double Loop Handles
Roll down bar
Hand Handles
64cm long springs
47cm short springs
Swing Through Bar

3
a) A Series Half Cadillac Bracket
Before installing your Half Cadillac for the A2, please consider if you wish
to use the rope risers on the reformer, or if you would prefer to install
them on to the stainless steel tube of the Half Cadillac frame. The pull
line on the ropes with the pulleys mounted on the Half Cadillac frame is
not quite the same, but some consider the benefits of having the risers
out of the way more than compensates for this. The original risers can
then either be unbolted or can be folded down out of the way as shown
in Fig.1. When folded the carriage can slide over the top of the risers.
Installing the Half Cadillac Bracket
Installing the Half Cadillac bracket is easy and is done with the tools sup-
plied. Simply attach the Half Cadillac bracket with the allen key provided
the four short bolts go in where the bolts are shown ion Fig 2, then the 2 long bolts screw in to the under
side of the frame. Repeat on the opposite side of the reformer for the second bracket, then with the help
of a colleague, slide the Half Cadillac frame into the brackets and use the Allen key to tighten the grub
screws to fix the Half Cadillac into position (Fig.4). Congratulations, you have now
completed installation of the A2 Half Cadillac.
Fig. 2 Fig. 3 Fig. 4
Fig. 1
b) C Series Half Cadillac Assembly
i. Attaching the lower Half Cadillac bracket
The Half Cadillac can be fitted to qualifying C Series reformers with its standard legs or with the extended
legs. The attachment proceedure is the same, though here we illustrate it being attched to the leg exten-
sion version. If you are attaching the Half Cadillac to the standard low leg reformer then the brackets in
Fig. 1 simply attach directly to the reformer leg.
At the riser end of the reformer attach the Half Cadillac base feet to the leg extensions using the Allen key
and 4 bolts/washers provided, 2 bolts/washers per side, see Fig 1 & 2. Insert and hand tighten all the bolts
first and then go round and tighten them properly with the Allen key supplied
Fig.1 Fig.2
Attaching the Brackets

4
ii. Attaching the Upper Half Cadillac bracket
As per the arrows in Fig. 3 and 4 there are four bolt positions to attach the Half Cadillac top bracket to the
leg extension. Initially attach the two bolts directly onto the runner first, use the Allen key provided to tighten
until hand tight, and then attach the bolts on the underside and front face of the runner. Once all bolts are
inserted, tighten fully. Do this for both sides of the reformer. Now all four brackets are attached securely to
the leg extensions, with assistance remove the reformer from the trestle and place in its final desired
situation. Before attaching any springs or the roll down bar, ensure the reformer is level and all 4 feet are
on the ground for stability. Then with assistance insert the Half Cadillac frame into the brackets. Ensure the
2 grub screws on all 4 of the brackets are unscrewed to ensure the frame slides in without issue. Please
note: the twist pull knobs on the Half Cadillac carriages should be facing outward, not toward the
carriage bed when you insert the frame.
2) Installing the Stainless Steel frame
Once the brackets are installed, get someone to assist you to install the Half Cadillac frame in to the
brackets as the frame is heavy and you do not want to scratch the reformer. Simply slide the stainless steel
frame in to the brackets being careful not to scratch the paint. Once installed insert the small grub screws
in to the sides of the brackets (2 per bracket) and tighten with the allen key provided.
4) Attaching the Accessories
The Half Cadillac includes 8 springs with a set of dog clips for one end and karabiners for the other, which
springs are used where is down to the exercise and customer preference. We recommend that where
the spring connects to the frame you use a Karabiner, and where it is close to the hand you use a double
ended dog clip.
Springs can be attached to the front or back of the 4 sliding spring holders. The central eyelet at the top
of the frame is normally used for attaching the safety strap and the eyelets either side to attach the spring
bar to. Springs included: 2x 64cm Long Strong springs (red) • 2x 64cm Long Light springs (purple) • 2x
47cm Light springs (blue) • 2x 47cm Very Light springs (yellow)
There is one set of foot straps and one set of hand handles for use with the springs and both ankle straps
and leg extension straps are available as optional extras. Other spring strengths are available from Align-
Pilates in 47cm length as the springs are the same as those used on Align-Pilates reformers.
Using and Adjusting the Half Cadillac
a) Adjusting spring positions
Adjusting the spring heights on the Half Cadillac is done by loosening the knob on the sliding spring holder
and then pulling the knob outwards to release the locking pin. Slide to the desired height and ensure the
Fig.3 Fig.4
c) M Series Half Cadillac Assembly
On the M series maple reformers the Half Cadillac bracket must be screwed on to
the frame using the supplied wood screws. 8 are required to hold on each of the
brackets.
The easiest way is to place the bracket on a flat book of approx.1cm thick and
then centralise the bracket on the leg with a ruler and mark the holes. Then pilot drill
each marked hole (pilot holes guarantee that your screw won’t break off and your
wood won’t crack). Once all pilot holes are drilled attach the bracket.
If you are unfamilair with the above please consult a tradesman to get the job
done for you.
Fig.5

5
pin re-engages in one of the holes, then tighten the knob to prevent rattle. Each Half Cadillac carriage
has both forward and backward facing eyelets so you can choose to attach the springs on either side.
Eyelets not in use can be used for hanging spare springs.
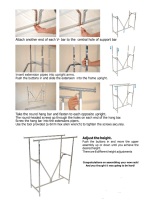
b) Adjusting the push through bar height
The push through bar height can also be adjusted in the same way as the spring height by pulling out
both knobs and changing the height - this is easiest done by 2 people though it is not something done
frequently.
b) Using the push through bar & Safety Strap
Particular care must be taken when using the swing through bar. The safety strap MUST be used when the
springs are attached to the push through bar from the bottom side. If you do not take this precaution, the
user can get seriously injured. Further the user must never let go of the push through bar when it is under
spring tension.
Our safety strap design (Fig.6) allows for the quick adjustment of the strap - to tighten the strap simply pull
the loose end of the strap (Fig.7); to loosen first take the spring tension off the bar and then loosen the
D-rings to loosen the strap. The Safety strap also features a quick release dog clip, which can be used to
quickly take the safety strap off - this is convenient when you wish to let the bar hang down (or put it up to
get it out the way) when no springs are attached. The quick release should not be used whilst the bar is
under spring tension or it could result in an accident. If you are in doubt about how to safely use the swing
through bar, please seek training from a qualified Pilates professional prior to use.
Notes on Safe Usage -of your Half Cadillac - see your reformer manual for safe use of the reformer
The equipment is intended for use for recognised Pilates repertoire only, by/or, under the instruction of a
qualified Pilates professional. Access to the equipment by children without a qualified professional in
attendance must be prevented.
The Half Cadillac and related accessories are designed for inside use only and on a level floor with
suitable clearance around the equipment for safe operation. This free area should be not less than 0,6 m
greater than the training area in the directions from which the equipment is accessed. The free area must
also include the area for emergency dismount. Where equipment is positioned adjacent to each other
the value of the free area may be shared.
The maximum user weight for the equipment is 150Kg. When using the Half Cadillac it is not
recommended to take your centre of gravity outside the frame as this may affect the stability of the
equipment and could result in an accident. Recognised Pilates repertoire does not recommend that this
is done anyway.
Please note that the Safety strap is solely designed to prevent the swing through bar from swinging down
dangerously under tension and hitting the user, mainly when it is sprung from underneath the bar and the
user is lying underneath it. The safety strap is not designed to turn the swing through bar in to a rigid bar,
such that it can then be sat on, knelt on, stood on, hung on, swung on or climbed on with full body weight.
The swing through bar is designed for push through / swing through exercises, either un-sprung or with the
springs supplied. It is not designed to withstand resistances from any source other than the springs pro-
vided nor is it designed for isometric or body weight exercises applied from any angle. Exercises involving
Fig.6 Fig.7

6
Standing, kneeling or sitting on the bar or support arms, swinging on the bar or support arms, hanging on
the bar or support arms or laterally pulling or pushing on the bar or side arms fall outside the design speci-
fications of this equipment and risk injury to the user.
Periodic Maintenance
Please check the apparatus before first use and after each of the first few uses to check all the fittings are
securely fastened. Thereafter, it is important to follow a regular maintenance schedule by someone
familiar with the equipment and record your maintenance checks. Equally inspection should be made
immediately if any part appears not be operating correctly or something appears to be loose. Below
follows a basic maintenance guide though a detailed maintenance guide and a sample maintenance
log can be downloaded from
https://align-pilates.com/pilates-equipment-resources/assembly-user-
guides/
• Springs & Spring Clips
Inspect all springs for signs of wear, look for deformation, kinks, gaps and corrosion. Springs showing
signs of damage must not be used and must be replaced immediately. Check all spring clips and
carabiners for signs of wear, ensuring there is no deformation and that the “gates” firmly engage.
Springs must be replaced every 2 years.
• Hardware
Ensure that all nuts, bolts and screws are securely fastened.
• Safety Strap, Foot Straps, Ropes, Fuzzies and Handles
Check all stitching for wear and damage and replace immediately as needed.
• Movable Spring holders
Test to ensure the locking push pins engage securely into the upright frame.
• Eyelets & Spring Hooks
Hand check that all eyelets on the sliding spring eyelets, swing through and roll down bar are tight and
cannot rotate. If loose remove, apply blue Loctite and retighten.
• Feet Level
Confirm bed is level and all the feet are in contact with the ground or this will affect stability
• Push-through Bar
Confirm all push-through bar bolts and nuts are securely fastened.
• Brackets and Grub Screws
Ensure the brackets that hold the Half Cadillac to the reformer frame are securely fastened and the
grub screws that prevent the frame from moving are tight
• Upholstery
Regularly clean all upholstery on your Align equipment, we recommend using Gym Wipes from Vital
Clean (www.vital-clean.de) as these will not damage your upholstery. Beware that some bactericides
and strong or abrasive cleaning products will dry out the vinyl and reduce its life. Vinyl is
non-absorbent, so will not absorb dirt. Surface wiping is only required.

7
Exploded diagrams:
Note: For larger images of the exploded diagrams and a detailed parts list please download
from: https://align-pilates.com/pilates-equipment-resources
Align-Pilates is a registered trade mark of Align-Pilates Equipment Ltd.
The Aign-Pilates Half Cadillac is protected by Registered Community Design.

Warranty Information
ALIGN-PILATES™ LIMITED LIFETIME WARRANTY
Terms of Limited Lifetime Warranty
Align-Pilates offers the following limited lifetime warranty, for the periods as stated below from the date of purchase, to the original
owner of their products, upon presentation of an original invoice in their name. The warranty is a Light Commercial Warranty
allowing for a maximum usage of 27.5 hours per week.
Align-Pilates will repair or replace any mechanical part that malfunctions due to defects in materials and/or workmanship during
the warranty period. The warranty excludes normal wear and tear, damage due to negligence or misuse, abuse, modification
or unauthorized repair; scratches to the finish, and tears or indents in the upholstery. Align-Pilates will, at its discretion, repair or
replace any parts deemed defective during the warranty period. If we opt to repair or replace your apparatus, this may require
that your product is returned for inspection at our premises prior to sending out replacement apparatus. Parts repaired or replaced
under the terms of this warranty will be warranted for the remainder of the original warranty period only. This warranty does not
cover shipping charges, customs clearance fees (where applicable) or any costs incurred in installing repaired or replacement
parts shipped under the provisions of this warranty.
This warranty will be null & void if springs are not changed as specified or, if all safety, maintenance and usage instructions as
specified in the manuals are not observed or, if the equipment is used for any other purpose other than for recognized Pilates
repertoire or, if the equipment has been subjected to accident, abuse, improper service, or modification not authorised by the
Align-Pilates.
Duration of Limited Warranty
1) Metal & Aluminum Frames & welded components.
10 year warranty
2) Wooden Frames, Gear bar and foot bar mechanisms
5 year warranty. Wooden frames must not be positioned next to convection radiators or air conditioning units.
3) Other non-wear and tear components
2 year warranty
4) Ropes, Straps, Spring Clips, Handles, Fuzzies, Wheels, Foot straps, Rotational disks & powder coating
1 year warranty
5) Springs
2 year / 3,000 hours warranty is given on all springs, excepting that a decrease of 5% of the spring power per 1,500 hours
usage is acceptable according to internationally standards. Align-Pilates Springs should be replaced after a maximum of
3,000 hours use or 2 years, whichever is earlier. In the event of any signs of damage or wear springs should be replaced
immediately regardless of age or usage.
6) Upholstery
The upholstery fabric on Align-Pilates equipment will be replaced if it fails to give normal wear for 90 days from the date of
delivery. Proof of damage may be required. This warranty does not cover cuts, scratches, burns, stains, soiling, or damages
caused by unreasonable use such as wearing jewellery or inappropriate clothing whilst using the equipment. Align-Pilates
reserves the right to substitute an equivalent fabric if an identical fabric is not available. Upholstery must be properly cared
for – do not use chemical sprays or industrial soaps. Align-Pilates recommend using GymWipes (www.2xlcorp.com/contact-us/)
to clean upholstery and wipe down equipment.
Warranty Return Procedure
The customer must call Align-Pilates or its authorized Distributor for authorization prior to returning the equipment. The customer is
responsible for the cost of returning products to Align-Pilates (or their appointed Distributor) for warranty adjustment should this be
deemed necessary. The customer is responsible for any damage or loss during shipment back to Align-Pilates (or their appointed
Distributor). The customer is responsible for the cost of return freight to them in the event Align-Pilates decline to make a warranty
adjustment. Align-Pilates do not accept responsibility for any items returned without a pre-approved authorization number, which
must be clearly marked on the outside of the package.
Limitation of Liability
The above is our exclusive warranty and is in lieu of all other warranties, express or implied, including warranties of merchantability
or fitness for any purpose. In no event shall Align-Pilates or their Distributors be liable for incidental, consequential or punitive
damages.
CONTACT
This warranty is issued by Align-Pilates Equipment Ltd. Contact details: 430 Enterprise Way, Vale Park, Evesham, Worcs WR11 1 AD,
UK. Telephone + 44 1386 425920. Email: [email protected]
For more information about Align-Pilates equipment please visit: www.align-pilates.com
www.Align-Pilates.com
/