Page is loading ...

400-8401030
China toll free No.:
400-8401030
(For other region,
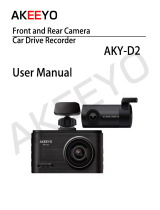
FHD 1080p Driving
Recorder
DS231GSW
User
Guide
China toll free No.: (For
other region, please

Po
l
a
r
oid · D
S231GSW
About this Guide .......................................................................................1
Battery Warning .......................................................................................1
Notes on Installation ....................................................................................1
Caution .......................................................................................................2
1 Introduction...............................................................................................3
1.1 Features .................................................................................................3
1.2 Package Contents ...................................................................................3
1.3 Product Overview ..................................................................................4
2 Getting Started.........................................................................................5
2.1 Inserting the Memory Card......................................................................5
2.2 Installing in Vehicles...............................................................................5
2.3 Connecting to Power .............................................................................7
2.4 Powering the Device On / Off .................................................................7
2.4.1 Auto Power On / Off .............................................................................7
2.4.2 Manual Power On / Off and Reset .........................................................7
2.4.2.1 Manual Power On / Off .....................................................................8
2.4.2.2 Reset the Device .............................................................................8
2.5 Set the Date / Time....................................................................….........8
2 . 5 . 1 A u t o U p d a t e … … … … … … … … … … … … … … … … … … … … … … … … … … … . 8
2 . 5 . 2 M a n u a l U p d a t e … … … … … … … … … … … … … … … … … … … … … … … … … . 8
2.6 Mode Selection....................................................................................8
3 Using the Driving Recorder......................................................................8
3.1 Recording Videos ..................................................................................8
3.1.1 The Recording Screen .........................................................................9
3.1.2 A key Protection ..................................................................................9
3.1.3 Motion Detection ................................................................................9
3.1.4 G-sensor Collision Recording Protection...............................................10
3.1.5 Audio On / Off......................................................................................10
3.1.6 Front and Rear Camera Swich...............................................................10
3.1.7 Video Menu Operation........................................................................10
3.1.8 Movie Mode Menu Options ...................................................................10
3.1.9 General Settings Menu Options .............................................................11
3.2 Taking Picture .........................................................................................13
3.2.1 Still Capture Screen ...........................................................................13
3.2.2 Zoom in / out ......................................................................................14
3.3 Playback Mode ………….. ......................................................................14
3.3.1 Playing Videos .....................................................................................14
3.3.2 Play Video Screen................................................................................14
3.3.3 Videos Switch of Front and Rear..........................................................15
4 GPS Tracking........................................................................................... 15
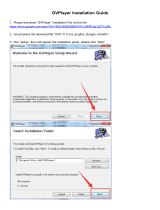
4.1 GVP Player Instruction............................................................................15
4.2 GPS Abnormal Warning State……………………………………………....……15
5 Warning Radar Setting………………………………………………………………16
6
W
i
fi
Connection 1
7
Trademark
Polaroid, Polaroid Pixel, Polaroid Classic Border Logo, and Polaroid Color
Spectrum are trademarks of PLR IP Holdings, LLC, used under license. PLR IP
Holdings, LLC does not manufacture this product. Fairyard Enterprises Limited
will provide manufacturer warranty and support.
Copyright © 2017, All Rights Reserved.
Manufactured By:
Fairyard Enterprises Limited
RM 7B, 12/F, HOPEFUL FACTORY CENTRE 10-16 WO SHING STREET,
FO TAN, N.T., Hong Kong
www.polaroidcarcam.com

Po
l
a
r
oid · DS231GS
W
About this Guide
The content in this document is for information purpose and is subject to
change without prior notice. We made every effort to ensure that this User
Guide is accurate and complete, however, no liability is assumed for any
errors and omissions that may have occurred.
Po
l
a
r
oid · D
Caution
· Due to local laws and vehicles safety considerations, do not operate the
device while driving.
· Set up time and date accurately before you use this device.
· This product gets warm when in use, this is normal.
· Do not place the device near a heat source or directly expose it to flame or
heat.
· Never place the device in vicinity of equipments generating strong
electromagnetic fields. Exposure to strong magnetic fields may cause
malfunctions or data corruption and loss.
· The system is used only for non-commercial use, within the maximum limits
permitted by applicable law. Our company does not accept any responsibility
for any data loss during the operation.
· Improper use or operation of the product may result in damage of the product
or its accessories and void the warranty.
Battery Warning
· Always charge using the provided system. Improper handling of the battery
may result in explosion.
· Never dismantle or pierce the battery or allow the battery to short-circuit.
· Batteries may explode if exposed to naked fire. Never dispose of batteries in
a fire.
· Disposed of used batteries observing local regulations.
· Never replace the battery on your own, have the dealer do it for you.
Notes on Installation
· This product shall be installed near the rear view-mirror, at the center of
windshield, if possible, for optimal viewing.
· Make sure that the lens is within the wiping range of the windscreen wiper to
ensure a clear view even when it rains.
· A protective film on the lens will affect the video or photographic effect, remove
the protective film before using the device.
· Do not touch the lens with your fingers. Finger grease may be left on the lens
and will result in unclear videos or snapshots. Clean the lens on a regular basis.
· Do not install the device on a tinted window. Doing so may damage the tint film.
· Make sure that the installation position is not hindered by the tinted window.
· To use the contained car power adaptor only. In order to avoid equipment burn
or cause the battery explosion, please do not use other brand car power adaptor.
Before you start using the system, it is assumed that you agree to the
above statement.
Do not attempt to disassemble or alter any part of the device that is not
described in this guide.
EN-1 EN-2

Po
l
a
r
oid · DS231GS
W
1 Introduction
Thank you for purchasing this advanced Driving Recorder. This device is
specifically designed for real time video and audio recording.
Po
l
a
r
oid · D
1.3 Product Overview
1.1 Features
Full HD 1080p Driving Recorder
2.3” TFT Display
G-sensor Collision Recording Protection
Seamless Loop Recording
Support up to 128GB Micro SD Memory Card
Support GPS Journey Tracking
1
12 3
7
5
6
4
1.2 Package Contents
The package contains the following items. In case there is any missing
or damaged item, contact your dealer immediately.
8 9 10
11
2
Inside your
User Manual
Warranty Card
USB Cable
Suction Mount
Car Power Adaptor
Driving Recorder
Rear camera
Rear camera cabl
e
EN-3 EN-4
1
USB port
7
LCD
2
2.5mm headphone Interface Block
8
Menu/Mode button
3
Power button
9
Up button
4 Lens
10
Down button
5
Reset button
11 REC/OK button
6TF Card slot
12
GPS

Po
l
a
r
oid · DS231GS
W
2 Getting Started
2.1 Inserting the Memory Card
Follow the direction indicated by the silk printing on the device to insert the
memory card, a click sound is heard indicating the card is in position .
Po
l
a
r
oid · D
(not included)
To remove the memory card, push to eject the memory card out of the slot.
Note:
1. Do not remove or insert the memory card when the device is turned on. This
may damage the memory card.
2. Please use a Class 6 or higher rating Micro SD card, max. up to 32GB.
3. Please format the micro SD card before the initial use.
4. When removing the memory card, be careful that the card may spring out
and get lost. The memory slot has this spring-out feature for easy removal
of the card.
2.2 Installing in
V
ehicles
EN-5 EN-6
→ Rotating the device to have proper view.
← Push the head of the mount into the
device slot, make sure the mount is securely
locked in place.
← Loosen the knob to swivel the device
vertically. Locking knob, and confirm that
the device is securely locked in place.
→ Remove the protective film from the
suction cup, with the suction-cup laying
flat, position the suction-cap on the
windshield, and then press down the
clamp to mount the holder to the
windshield. Make sure the base is
securely locked in place.

Po
l
a
r
oid · DS231GS
W
2.3 Connecting to Power
Use only the attached car power adaptor for activating the device and charging
the built-in battery.
Po
l
a
r
oid · D
2.4.2.2 Reset the Device
In case the device fails to function normally
due to unknown causes, press the Power
button with 10sec to restart the device.
1. Connect one end of power connector to USB port on the device.
2.5 Set the Date / Time
To set the correct date and time, press Menu button
to enter the menu
setting, then press Menu button change to General Settings Menu ,
then press Up / Down button to select Clock settings, press REC button
2. Plug the other end of the power adapter to the cigarette lighter socket of
your vehicle. Once the vehicle engine is started, the device automatically
turns on.
to enter date / time setting, then press Up / Down button to
adjust the value, press REC button
all the settings, press REC button
switch to next setting, after finished
to back General Settings Option, press
Menu button to exit from menu setting.
2.6 Mode Selection
The default setting is Video Mode
switch to Still Capture Mode
, Long press Menu button can
, Video Playing Mode , Picture
viewing Mode .
2.4 Powering the Device On / Off
2.4.1 Auto Power On / Off
Once the vehicle engine is started, the device automatically turns on and
recording (must have SD Card). After the car engine stopped, the device will
automatically save the last recorded file and shutdown.
3 Using the Driving Recorde
r
3.1 Recording Videos
Before starting recording, please insert a SD card into the TF card slot. Press
REC button
to start recording, the video recording icon flashes on
2.4.2 Manual Power On / Off and Reset
2.4.2.1 Manual Power On / off
Press Power button to turn it on. To
the screen. The recorded files are saved on the TF card. To stop recording,
press REC button again.
With car power adaptor connected the device will automatically turn on and
start recording when the car engine starts. When the engine stops, the device
will automatically save the last file and turn off.
power off the device press the Power
button with 3 seconds.
EN-7 EN-8

Po
l
a
r
oid · D
S231GSW
Po
l
a
r
oid · D
S231GSW
Motion event REC time and the default setting is 5 second. The device will
start next 5 second recording if any motion detected, press any button can
Resolution Mode
Memar
y
status
GPS 状态 Batter
y
status
Exposurebias Value
3.1.4 G-sensor Collision Recording Protection
When a collision is detected while recording, the default setting is the lock
icon will appear on the right corner of the screen, then the current movie
clip will be protected automatically and cannot be replaced.
3.1.5 Audio On / Off
During recording, press Up button can turn Off / On the audio.
3.1.6 Front and Rear Camera Swich
Recording mode, press down button can be switched front and rear camera.
3.1.7 Video Menu Operation
wifi 状
态
S
y
stem date & time Remaing memor
y
time
3.1.2
A
Key Protection
During recording, press Menu button
to protect current video, the lock
Press Menu button to enter menu setting, press Up / Down button
icon appears on the screen, the current movie clip will be protected and
to select sub menu, then press REC button to enter the setting, press
cannot be replaced (the default setting for a movie clip is 3-minute), the next
movie clip will unlock automatically and can be replaced if the SD card is full.
Up / Down button to select the option, and then press REC button
confirm. After finished the setting, press Menu button
setting.
third to exit menu
3.1.3 Motion Detection
3.1.3.1 enter to General Settings to activate Motion Detection function(the
default setting is Off, choose Low / Middle / High to activate the unction);
3.1.8 Movie Mode Menu Options
3.1.3.2 Set motion detection recording time in recording menu
select 5mins/10mins/30mins.
to
3.1.3.3 Long press Up button to enter motion detection mode on
movie mode, the motion detection icon appears on the right side of
the screen and start count backwards 10 seconds, then standby for
detection, it will recording automatically once the device detected any
motion in front of lens within 2.5m. The recording time depends on the
EN-9 EN-10
S
tandby

Press an
y
button to
p
ower u
p
the LCD.
Po
l
a
r
oid · D Po
l
a
r
oid · D
1280*720 30fps
is full.
5min/10min
On - Select this to enable audible
Off - No date or logo is displayed on the video.
MM DD YYYY/
Date+Logo
Logo - Only logo is displayed on the
简体中文 /Russian
speed of 60km/h or more, there will be warning
3.1.9 General Settings Menu Options
EN-11 EN-12
Main Menu Function List
Description Available Option
General
Settings
Menu
Setting for enable / disable the beep.
beeps when setting the menu options.
This is the default setting for this
option. Off - Disables the audible
system beeps.
On/Off
Set the system date & time.
Set the format of the date or no stamp to
show on the file.
YYYY MM DD/
DD MM YYYY
Setting for the indication of
date and logo stamp on the video
recorded.
Off - No date or logo is displayed on the
video.
Date - Only date is displayed on the video.
Date+Logo
Dt dl i
Of f / Dat e / Log o /
Select the desired OSD language.
English / 繁体中文 /
Set the suitable frequency.
50HZ/60HZ
Manage the backlighting and presentation
of the LCD. It is advisable to enable
this feature to preserve battery power.
Off - Select to disable power saving for
the
LCD. This is the default setting for this
option.
1min/3min - The driving recorder
will
automatically shut down the LCD
after
Off / 1min / 3min
Setting for the sensitivity of G-sensor to
detect collision to protect the recording
video.
Off - Disable the G-sensor function.
Low/Medium/High - The higher sensitivity
the
collision will be detectedeasier.
Off/High/Middle/Low
Main Menu Function List
Description Available Option
Movie Mode
Setting for video resolution.
1920*1080 30fps
Setting for enabling automatic loop record and
the movie clip time.
Off - The recording will stop when the SD card
1 Minute/2 Minutes/3 Minutes - Select to limit
recording time per file.
3 Minutes, for example, the recording time for
per file is 3 minutes. If 21 minutes of video is
recorded, then 7 files of 3 minutes in length is
created.
Off/1min/3min/
Setting the recording time for detected
motion in front while standby.
5sec/10sec/30sec
Setting for the indication of date and logo
stamp on the video recorded.
ON - Date and logo is displayed on the video.
On/Off
Manual compensation for low or bright
light levels. The more negative “-” in
scale, the darkerthe recorded video
appears. The more positive “+”, the
lighter the recorded video appears. 0 is
the neutral settin
g
for this o
p
tion and is
the default value.
+2.0/-1.7/-1.3/-1/
-0.7/-0.3/0/+0.3/
+0.7/+1/+1.3/
+1.7/+2.0
Lane Departure Warning Systems
Off - No warning tone when lane departure.
On - When the GPS is positioned, driving
speed of 60km / h or more, there will be
warning when the deviation from the lane.
On/Off
Forward Collision Warning Systems
Off - No warning tone when collision occur .
On - When the GPS is positioned, driving
when the distance less than 20 meters from
front vehicle.
On/Off

Po
l
a
r
oid · D Po
l
a
r
oid · D
3.2.2 Zoom in / out
On the still capture mode, press Up/Down button
to zoom in / out.
3.3 Playback Mode
3.3.1 Playing Videos
Long Press Mode button
switch to videos view mode, press Up / Down
button to select the video to play, press REC button to playing
mode, then press REC button again to start playing video. Press REC
button can pause the playing, press Mode button to back
videos view mode, then press Mode button
recording mode.
again to back video
3.3.2 Play
V
ideo Screen
3.2
T
aking Picture
To take a picture make sure the Still Capture Mode
is selected. Press
the REC button to take a photo. Taken photos are saved on TF Card.
3.2.1 Still Capture Screen
deleted.
numbers to
EN-13 EN-14
Still
Capture
Mode
Resolution
SD card
status
Battery Status
Zoom in/out
Date/Time
Remaining
take photo
Norrow
Parking
Emergency
Video
Icon
Video Folder
Normal - Save the normal traffic
recording video, can be recycled, can
be deleted.
Parking - Save the motion detection
video, can be recycled, can be
Emergency - Save manual protected
video and G-sensor protected video,
cannot auto recycled and deleted.
File name
Date/Time
Record Time
Norrow
Parking
Emergency
Setting for activating the motion
detection and the sensitivity.
Off - Disable the motion detection.
Low/Middle High - Select to enable the
motion detection and the sensitivity.
Off/High/Middle/Low
This option sets the driving recorder to the
original factory default settings.
Yes /No
Turn On/Off Wi-Fi hotspot.
On/Off
Formats the inserted micro SD card.
YES - Selecting this option completes the
format process.
NO - Select this to abort the format and
return
to the previous menu.
Warning: ALL Video and photo les are be
permanently deleted and CANNOT be
dh di
Yes /No
This option displays the current
firmware number of the driving
recorder.
This information may be important
for service and support
communications

Po
l
a
r
oid · D Po
l
a
r
oid · D
3.3.3 Video Switch between the Front and Rear
5 Warning Radar Setting
Long press the Menu key
for watching.
can switch between the front and rear camera
4 GPS Function
This product built-in GPS module, power on and waiting for 1 minute in outdoor,
when GPS word on preview screen turned green, it means that the signal has
been received, the recorded video can be tracked at this time.
4.1 GVP Player Operating Instructions:
Users can install the player directly on the computer with the accessory disc.
When GPS is properly positioned, the information such as longitude and
latitude provided by GPS will be recorded in the video of the product. When
using GVP player, the player will play the video and also the latitude and
longitude information link Google map / Baidu map shows the corresponding
map location.
4.2 GPS
A
bnormal Warning Condition
4.1.2 GPS Abnormal prompts caused may by:
1. Adjacent lane spacing less than 50 meters.
2. Fixed camera removed but still prompted (notify seller or online feedback).
3. When the front corners have a fixed camera.
4. Continuous speed point spacing is less than 100 meters.
5. There is a fixed camera at the exit of the tunnel.
6. Multi-viaduct overlap.
Above six cases the system may be false positives, please pay attention to
identification.
4.2.2 Impact of satellite signal reception are:
(1) Basement or tunnel (2) Under the viaduct
(3) Around High-rises (4) In the jungle or valley
Above four cases the product may not receive satellite signals or weak signal,
please pay attention to driving according to regulations, in order to avoid
security accidents or be photographed.
EN-15 EN-16
Main Menu Function List
Description Available Option
GPS
Set the beep volume.
Off/Volume1-8
Set speed limited prompt
Off - No warning tone during over speed
20km/h - 100km/h - When the speed exceeds.
20km/h - 100km/h there will be a warning
tone.
Off/20km/h—100km//h
Set the speed at which the over speed
warning tone.
Off/40km/h-160km/h
Set the radar detection sensitivity
High/ Super High/
Auto/ Off
Set a fixed point broadcast mode.
Nomal - Broadcast fixed point and radar.
Electronic eyes - Only broadcast speed test
type and radar at fixed point, do not broadcast
security type fixed point.
Safe Mode/
E-Police/Off
Adjust the error data between the GPS
positioning shows the current speed and each
brand car dashboard display speed.
-6---6

Po
l
a
r
oid · D Po
l
a
r
oid · D
6 Connecting WIFI
The camera's built-in Wi-Fi allows you to connect to the smart phone/tablet
via the App. the specific steps are as follows:
1. Install App on your phone or tablet computer.
1.1 Android system can search keywords "wifi camera app" to download and
install on Google Play, 360 mobile guards and other security market.
1.2 IOS system can search keyword "wifi camera a" to download and install on
APP Store.
2. Turn on the recorder and then turn on the Wi-Fi, use mobile phones or
flat-panel search for this Wi-Fi hotspot to connect;
Hot Name: SD_CarDV_WiFi
Hotkey Password: 1234567890
3. After the connection and then open the APP, you can use the app to remote
control and set the function.
7
T
echnical Specifications
1280*720 30fps
maximum up to 128GB
ot
EN-17 EN-18
LCD display 2.3" color TFT screen
Image sensor 4.0MP, 1/2.7" CMOS sensor
View angle 130°
Video resolution
1920*1080 30fps
Photo resolution
5M
Video format
MOV
Photo format
JPG
Memory
Support Class 6 or higher rating Micro SD card,
Microphone
Built-in
Speaker
Built-in
G-sensor
Yes
Power source Built-in battery, car power adaptor
GPS
Positioning accuracy ≤ 10;
Receiving sensitivity -159dB;
Positioning time average cold star t 42S/warm star t 28S/
h
star t 1S;
Receive fre
q
uenc
y
1.57542GHz
Interface Micro USB port, TF card slot
Operating temperature
0°~ 45° C
Dimensions
Weight
/