Page is loading ...

Radio sveglia AM-FM
ISTRUZIONI D’USO
Radio alarm clock AM-FM
INSTRUCTIONS FOR USE
RSV145
I
GB

2
230V~ 50Hz
Battery Back Up: 2x1,5V (AA)
Batterie non incluse/Batteries not included
15
17
16
1
13
2 3 4 5 6
7
8
9
10
14
11
12

GENERAL SAFETY RE-
QUIREMENTS
Carefully read the re-
quirements in this ma-
nual and keep in a safe place. It
contains important instructions on
the safety, use and future of your
appliance.
This appliance is only for domestic
use and must only to be used for
the purpose it was specifically de-
signed.
Any other use is considered im-
proper and dangerous.
The manufacturer cannot be held
responsible for any damages cau-
sed by improper, incorrect and
negligent use.
The installation must be carried
out according to the manufacture-
r’s instructions.
The manufacturer shall not be
held responsible for any damages
to people, animals or objects cau-
sed by incorrect installation.
The safety of the electrical equip-
ment is only guaranteed if it is
connected to an electrical installa-
tion equipped with a suitable ear-
thing system in compliance with
the current standards on electrical
safety.
Do not leave parts of packaging
(plastic bags, foam polystyrene,
nails, etc) within reach of children
or incapacitated people since they
are potential sources of danger.
Before connecting the appliance,
check that the technical data on
the rating label corresponds to
those of the main electricity net-
work.
In case of incompatibility between
the outlet and the plug, contact a
qualified electrician for the neces-
sary adjustments.
Do not use adaptors, multiple
plugs and extension leads.
However, if absolutely necessary
only use materials that conform to
the current safety standards and
that are compatible with the ap-
pliance and the main electricity
network.
On using the appliance for the first
time, remove any labels or protec-
tive sheets.
If the appliance is equipped with
air inlets, make sure they are
never blocked not even partially.
The use of any electrical appliance
involves the observance of some
fundamental rules. In particular:
Do not immerge the appliance in
water and do not wet; do not use
it near water, in the tub, washba-
sin or near other recipients with li-
quids. If the appliance should
accidentally fall in water, DO NOT
try to touch it but immediately di-
sconnect the plug from the mains
power.
Then bring it to an authorised ser-
vice centre for the necessary con-
trols.
During use, the appliance must be
kept away from any inflammable
objects or substances or explosives.
GB
9

Do not touch the appliance with
wet hands or feet.
Do not use the appliance with bare
feet.
Do not pull on the power cord or
on the appliance itself to discon-
nect the plug from the power ou-
tlet.
Do not leave the appliance expo-
sed to atmospheric agents (sun,
rain…).
Keep the appliance out of reach of
children or incapacitated people
and do not let them use it.
Disconnect the plug from the
power outlet when the appliance is
not being used and before car-
rying out any cleaning or mainte-
nance.
The power cord must be comple-
tely unwound to prevent it from
overheating.
The power cord must be kept
away from heat sources and/or
sharp edges.
If power cord is damaged, have it
replaced by qualified personnel.
Switch off and contact a qualified
technician if the appliance should
breakdown and/or not function
properly.
Any tampering or interventions
executed by unqualified people
will cancel the guarantee.
Use a soft and non-abrasive cloth
to clean the appliance.
When the appliance is unservicea-
ble and must be eliminated, re-
move its cords and dispose of it at
an authorised disposal centre in
order to protect the environment.
• Warranty does not cover any
glass parts of the product.
ATTENTION:
The damages of the power supply
cord, originate by the wear aren’t
covered by guarantee; the repair
will be in charge to the owner.
ATTENTION:
Warranty does not cover any pla-
stic parts of the product
ATTENTION:
If the need should arise to take or
send the appliance to an authori-
sed service centre, make sure to
clean all its parts thoroughly.
For hygienic purposes, the service
centre shall reject appliances that
are not perfectly clean on the
outside or inside without making
any controls or repairs.
The symbol on the product
or on its packaging indicates that
this product may not be treated
as household waste. Instead it
shall be handed over to the appli-
cable collection point for the re-
cycling of electrical and electronic
equipment.
By ensuring this product is dispo-
sed of correctly, you will help
prevent potential negative conse-
10

quences for the environment and
human health, which could other-
wise be caused by inappropriate
waste handling of this product.
For more detailed information
about recycling of this product,
please contact your local city of-
fice, your household waste dispo-
sal service or the shop where you
purchased the product.
Warning
To prevent electric shock; do not
use this plug with an extension
cord receptacle or other outlet
unless the blades can be fully in-
serted to prevent blades explo-
sure.
To prevent fire or shock hazard;
do not expose this appliance to
rain or moisture.
CAUTION: TO REDUCE THE RISK
OF ELECTRIC SHOCK, DO NOT
REMOVE COVER (OR BACK). NO
USER SERVICEABLE PARTS IN-
SIDE REFER SERVICING TO QUA-
LIFIED SERVICE PERSONNEL.
The lighting flash with arrowhead
symbol, with an equilateral trian-
gle is intended to alert the user to
the presence of un-insulated dan-
gerous voltage within the products
enclosure that may be of sufficient
magnitude to constitute a risk of
electric shock to persons.
The exclamation point within an
equilateral triangle is intended to
alert the user to the presence of
important operating and mainte-
nance (servicing) instruction in the
literature accompanying the ap-
pliance.
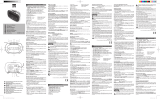
QUICK REFERENCE
1. SOURCE/AL. OFF
•
Use this button to select AM
or FM band
•
Use this button to turn the
ALARM off after Alarm
activates.
2. TIME/MEM/M+
•
Use this button to set the
clock
•
Use this button to store
radio stations in the memory
•
Use this button to select the
stored radio stations in the
memory
3. VOL- / AL2
•
Use this button to decrease
the volume
•
Use this button to set the
alarm time in ALARM 2
4. VOL+/ AL1
•
Use this button to increase
the volume
•
Use this button to set the
alarm time in ALARM 1
5. TUN - / MIN
•
Use this button to search the
radio station in backward
direction
•
Use this button to adjust the
minute in CLOCK or ALARM
time
6. TUN + / HR
•
Use this button to search the
11

radio station in forward
direction
•
Use this button to adjust the
hour in CLOCK or ALARM
time
7. SNOOZE / SLEEP
•
Use this button to temporarily
suspend the ALARM for a
short period
•
Use this button to set the
sleep time
8. PM INDICATOR
•
This indicator shows that the
time display is PM
9. AL1-B INDICATOR
•
This indicator shows that the
unit is in ALARM-1 buzzer
mode
10. AL1-R INDICATOR
•
This indicator shows that the
unit is in ALARM-1 radio
mode
11. AL2-B INDICATOR
•
This indicator shows that the
unit is in ALARM-2 buzzer
mode
12. AL2-R INDICATOR
•
This indicator shows that the
unit is in ALARM-2 radio
mode
13. LED DISPLAY
•
Display for the Clock and the
Radio frequency.
14. SPEAKER
•
Sound output.
15.FM WIRE ANTENNA
•
Extent this wire antenna to
obtain better FM broadcasting
16. DC JACK
•
Connect the unit to the
AC/DC adaptor.
17. BATTERY COMPARTMENT
•
Compartment for the
back-up battery.
CONNECTING THE UNIT
TO POWER
Plug one end of the AC adaptor
into the DC power Input, and then
plug the other end into AC wall
outlet. Before switching on the
unit, make sure that the voltage of
your electricity supply is the same
as that indicated on the rating
plate.
BATTERY BACKUP
Insert two pieces UM-3 batteries
into the battery compartment. Be
sure to observe the proper polarity
(the "+" and "-" signs) as indicated
inside the battery compartment.
In case of power failure or inter-
rupted AC power, the current time
and alarm time settings, the sto-
red radio stations are preserved in
the memory of the unit by means
of battery back-up function.
SETTING THE CLOCK
A. With the unit in CLOCK mode,
press and hold the TIME/MEM/M+
button for about 1 second, the
time will begin to flash on the LED
display.
12

13
B. Press the TUN+/HR button to
adjust the hour.
C. Press the TUN-/MIN button to
adjust the minute.
D. When the correct time is selec-
ted, press the TIME/MEM/M+ but-
ton again to confirm.
SETTING THE ALARMS
A. With the unit in CLOCK mode,
press the VOL+/AL1 or VOL-/AL2
button. The ALARM time will begin
to flash on the LED display.
B. Press the TUN+/HR button to
adjust the alarm hour.
C. Press the TUN-/MIN button to
adjust the alarm minute.
D. When the correct time is se-
lected, press the VOL+/AL1 or
VOL-/AL2 button to confirm.
E. Press the VOL+/AL1 or
VOL-/AL2 to select the ALARM
sound mode - buzzer or curren-
tly set radio station.
The alarm buzzer or radio indi-
cator will light up.
SNOOZE FUNCTION
A. Whenever the alarm (radio or
buzzer) activates, it can be tem-
porarily suspended for a short pe-
riod of 9 minutes by pressing the
SNOOZE button once.
B. The buzzer or radio will then
automatically activate again after
the 9 minutes SNOOZE period has
ended.
C. This procedure can be repeated
for up to approximately one hour.
TURN OFF THE ALARM
When the Alarm activate, press the
SOURCE/AL.
OFF button to turn off the Alarm.
LISTENING TO
THE AM/FM RADIO
A. Press the SOURCE/AL. OFF but-
ton to select AM or FM band.
B. Press the TUN+/HR or
TUN-/MIN buttons step by step to
tune to the desired radio stations.
C. Press and hold the TUN+/HR or
TUN-/MIN buttons for approx. 1
second, it will start to search the
next radio station in the direction
of the search. The search opera-
tion simply finds stations with
strong signals. Stations with weak
reception can only be tuned in
manually.
SAVING A RADIO STATION TO
THE MEMORY
A. Tune the radio to the desired
station.
B. Press and hold the TIME/MEM/M+
button for approx. 1 second, it will
store this radio station in the me-
mory.
C. Up to 10 AM and 10 FM radio
stations can be stored in the me-
mory.
TO LISTEN TO A SAVED RADIO
STATION
A. Press the SOURCE/AL.
OFF button to select AM or FM
band.

14
B. Press the TIME/MEM/M+ button
to select the stored radio station.
SLEEP TO MUSIC FUNCTION
A. This function allows you to li-
sten to the radio while you fall
asleep.
B. Press the SNOOZE/SLEEP but-
ton, the display will show the de-
fault sleep time of 90 minutes and
the SLEEP indicator will start to
flash.
C. Press the SLEEP button again to
adjust the desired sleep time.
D. Now you can enjoy listening to
the radio for the pre-set period of
sleep time.
E. After this pre-set time has elap-
sed, the unit will switch off auto-
matically.
SPECIFICATIONS
Frequency Range:
AM 535 - 1650 KHz
FM 88 – 108 MHz
Power Supply:
AC 230V ~ 50 Hz
Back-Up Battery:
2 pc. UM3
Specifications are subject to
change without prior notice.

GARANZIA
La durata della garanzia decorre dalla data di acquisto dell’apparecchio,
comprovata dal timbro del rivenditore e cessa dopo il periodo prescritto
anche se l’apparecchio non é stato usato. Rientrano nella garanzia tutte le
sostituzioni o riparazioni che si rendessero necessarie per difetti di materiale
o di fabbricazione. La garanzia decade qualora l’apparecchio venga mano-
messo o quando il difetto sia dovuto ad uso improprio. Le sostituzioni o le
riparazioni contemplate nella garanzia vengono effettuate gratuitamente per
merce resa franco nostri centri assistenza. Sono a carico dell’utente le sole
spese di trasporto. Le parti o gli apparecchi sostituiti diventano di nostra
proprietà.
GUARANTEE
The validity of the guarantee starts from the purchasing date certified by
the seller’s stamp and expires at the end of the indicated period, even when
the device has not been used. The guarantee covers all substitutions or re-
pairs due to material or manufacturing defects. The guarantee has no va-
lidity in case of device tampering or when the defect is due to incorrect or
improper use of the same. Substitutions and repair covered by the guarantee
are made free of any charge for goods delivered free our service company
representative. Only the freight will be at buyer’s expense. All replaced parts
or devices will become our property.

MOD. RSV145
DATA ACQUISTO
PURCHASE DATE
DATA RIPARAZIONE
REPARE DATE
TIMBRO CENTRO ASSISTENZA
AFTER SALES SERVICE
CENTER STAMP
MOD. RSV145
Compilare all’atto dell’acquisto - Check before purchasing
DATA ACQUISTO
PURCHASE DATE
Allegare scontrino fiscale con timbro del rivenditore
Seller’s stamp
La presente garanzia non é valida se incompleta
This certificate of guarantee has to be dulyfilled in to be valid
internet: www.johnson.it e-mail: com @johnson.it
G A R A N Z I A - G U A R A N T E E
2
ANNI YEARS
/