Aluratek AHDURS250F User manual
- Category
- HDD/SSD enclosures
- Type
- User manual

Tornado Plus 2.5” USB 2.0 External Hard Drive
with Key Recognition Security
model AHDURS250F
Instructional Manual
mnl M10071

3
Table of Contents
Introduction ......................................................................................................................
Features & Requirements ................................................................................................
Package Contents ............................................................................................................
RFID External Hard Drive Highlights ...............................................................................
Hardware Installation (for enclosure purchase only) ........................................................
Setup Hard Drive RFID and Encryption ...........................................................................
Partitioning and Formatting for PC ..............................................................................
Partitioning and Formatting for MAC............................................................................
How to use the RFID drive .....................................................................................................
To remove the encryption from the hard drive .............................................................
Technical Support ............................................................................................................
Radio and TV Interference Statement ..............................................................................
Warranty ...........................................................................................................................
04
05
06
07
08
11
12
18
20
20
21
22
23

4
Introduction
Thank you for choosing Aluratek’s® Tornado Plus Drive to serve your external hard drive needs.
In no time, you will able to easily store and access digital music, photo, video, multimedia and
personal data files.
In addition to making sure only quality materials are used for manufacturing, Aluratek® is also
dedicated to provide the best customer satisfaction and support.
The goal of Aluratek is to embody “Simple Elegance” in every product it designs, manufactures and sells.
The product focus of Aluratek is to bring simple yet elegant connectivity solutions to the consumers
to enhance their consumer electronics, communications and computing experience. Each product
is carefully designed with the consumer in mind. Each product is solution-driven to address the
need of the consumers and deliberately planned to provide the ultimate user experience.
Read this guide thoroughly and follow the installation and operation procedures carefully to prevent
any damage to the unit and / or any of the devices it connects to.

5
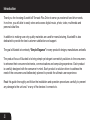
Features and Requirements
Features
• RFID Data Encryption
• Includes 2 RFID Security Keys
• Swipe your key to lock / unlock the drive
• Supports SATA hard drives
• High-Speed USB 2.0 with data transfer rate up to 480 Mbps
• Backward compatible with USB 1.1 specification
• Easily store and access digital music, photo, video, multimedia and personal data files
• Compact design is perfect for mobile professionals
• No software installation required
• Plug-n-Play, Hot swappable, and Hot pluggable
• Limited 1 Year Warranty
Requirements
• Windows 2000, XP and Vista
• Mac OS 9 or later
• Available USB port
m
a
c
m
a
c
w
i
n
w
i
n

6
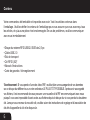
• 2.5” RFID USB 2.0 External Hard Drive
• USB 2.0 Cable (Type A to mini-B)
• Carrying Case
• RFID Key (x2)*
• Instructional Manual
• Warranty / Registration Card
*Warning: If you lose one of the RFID keys, please backup your data to a different hard drive or
your computer ASAP. After you have backed up your files, it is recommended that you purchase a
new RFID key from us as you will not able to access the files on the hard drive anymore if you lose
the second key. Once you receive the new RFID key, please follow the remove encryption and key
association instructions to pair the key and the drive again.
Package Contents
Your order has been carefully packaged and inspected. The following should be included in
your package. Please inspect the contents of the package to ensure that you have received
all items and that nothing has been damaged. If you discover a problem, please contact us
immediately for assistance.

5
A
B
C
1
2
3
4
1
2
3
4
5
A
B
C
6
6
7
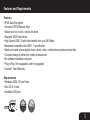
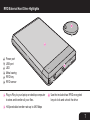
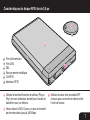
RFID External Hard Drive Highlights
Power port
USB port
LED
Metal casing
RFID key
RFID sensor
Plug-n-Play to your laptop or desktop computer
to store and transfer all your files.
Hi-Speed data transfer rate up to 480 Mbps
Use the included two RFID encrypted
keys to lock and unlock the drive

8
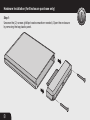
Hardware Installation (for Enclosure purchase only)
Step 1:
Unscrew the (2) screws (phillips head screwdriver needed). Open the enclosure
by removing the top plastic panel.
1
1

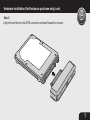
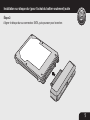
Hardware Installation (for Enclosure purchase only) cont.
Step 2:
Align the hard drive to the SATA connector and push forward to connect.
9
2
2

10
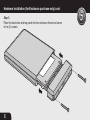
Hardware Installation (for Enclosure purchase only) cont.
Step 3:
Place the hard drive and top panel into the enclosure frame and screw
in the (2) screws.
3
3

11
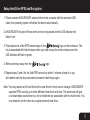
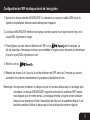
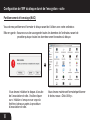
Setup Hard Drive RFID and Encryption
1. Please connect AHDURS250F external drive to the computer with the enclosed USB
cable; the operating system will detect the device automatically.
2. AHDURS250F will give off three-short and one-long sound and the LED indicator will
flash in red.
3. Place/swipe one of the RFID sensor keys on the logo on the enclosure. The
key is associated with the enclosure when you hear a beep from the enclosure and the
LED indicator will flash in green.
4. Remove the key away from the logo.
5. Repeat steps 3 and 4 for the 2nd RFID sensor key within 3 minutes of step 4 or you
will need to start the key association process for both keys again.
Note: You may replace a full hard drive with a new drive for more secure storage. AHDURS250F
supports RFID security up to three different hard drives at a time. The enclosure will give
a constant beep sound when you try to initiate the key association with the fourth drive. You
may however use the drive as a regular external hard drive.

12
Setup Hard Drive RFID and Encryption cont.
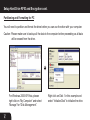
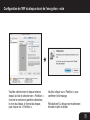
Partitioning and Formatting for PC
You will need to partition and format the drive before you can use the drive with your computer.
Caution: Please make sure to backup all the data to the computer before proceeding as all data
will be erased from the drive.
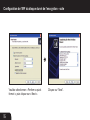
For Windows 2000/XP/Vista, please
right click on “My Computer” and select
“Manage” for “Disk Management”.
Right click on Disk 1 in this example and
select “Initialize Disk” to initialize the drive.

13
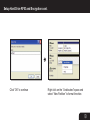
Click “OK” to continue Right click on the “Unallocated” space and
select “New Partition” to format the drive.
Setup Hard Drive RFID and Encryption cont.

14
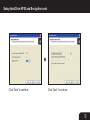
Click “Next” to continue Click “Next” to continue
Setup Hard Drive RFID and Encryption cont.

15
Click “Next” to continue Click “Next” to continue
Setup Hard Drive RFID and Encryption cont.

16
Please select “Perform a quick format”,
then click “Next”.
Click “Finish”.
Setup Hard Drive RFID and Encryption cont.

17
Congratulations!!! The drive is now
formatted and ready to use.
Setup Hard Drive RFID and Encryption cont.

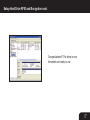
18
Setup Hard Drive RFID and Encryption cont.
Partitioning and Formatting for MAC
You will need to partition and format the drive before you can use the drive with your computer.
Caution: Please make sure to backup all the data to the computer before proceeding as all data
will be erased from the drive.
You will need to initialize the disk after the
key association. Please click “initialize”
when you see the above window after the
key association procedure.
You will now need to format/partition the
drive in “Disk Utility”.

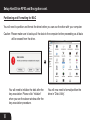
19
Please select the external drive in the list
and select “Partition”. Enter the desired
number of partitions, name of the drive,
drive format and click “partition”
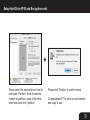
Please click “Partition” to confirm format.
Congratulations!!! The drive is now formatted
and ready to use.
Setup Hard Drive RFID and Encryption cont.

20
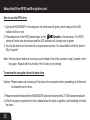
Setup Hard Drive RFID and Encryption cont.
How to use the RFID drive
1. Connect AHDURS250F to the computer, the enclosure will gives a short beep and the LED
indicator will be in red
2. Place/swipe one of the RFID sensor keys on the on the enclosure. The RFID
sensor will make two-short beeps and the LED indicator will change color to green
3. You should able to use the drive like a regular external drive. You should able to find the drive in
“My Computer”
Note: If the enclosure makes a one-long sound instead of two-short sounds in step 2, please try the
key again. Repeat with the 2nd key if the 1st key is not working.
To remove the encryption from the hard drive
Caution: Please make sure to backup all the data to the computer before proceeding as all data will
be erased from the drive.
1. Please remove the hard drive from AHDURS250F and insert it to any other 2.5” SATA external enclosure
2. After the system recognizes the drive, please follow the steps in partition and formatting to format
the drive.

21
If you need further assistance, please contact Aluratek support department prior to returning this device.
E-mail: [email protected]
Web: www.aluratek.com/support
Local (Irvine, CA): 949-419-6504
Toll free:
1-866-580-1978
Technical Support
Page is loading ...
Page is loading ...
Page is loading ...
Page is loading ...
Page is loading ...
Page is loading ...
Page is loading ...
Page is loading ...
Page is loading ...
Page is loading ...
Page is loading ...
Page is loading ...
Page is loading ...
Page is loading ...
Page is loading ...
Page is loading ...
Page is loading ...
Page is loading ...
Page is loading ...
Page is loading ...
Page is loading ...
Page is loading ...
Page is loading ...
Page is loading ...
Page is loading ...
Page is loading ...
-
 1
1
-
 2
2
-
 3
3
-
 4
4
-
 5
5
-
 6
6
-
 7
7
-
 8
8
-
 9
9
-
 10
10
-
 11
11
-
 12
12
-
 13
13
-
 14
14
-
 15
15
-
 16
16
-
 17
17
-
 18
18
-
 19
19
-
 20
20
-
 21
21
-
 22
22
-
 23
23
-
 24
24
-
 25
25
-
 26
26
-
 27
27
-
 28
28
-
 29
29
-
 30
30
-
 31
31
-
 32
32
-
 33
33
-
 34
34
-
 35
35
-
 36
36
-
 37
37
-
 38
38
-
 39
39
-
 40
40
-
 41
41
-
 42
42
-
 43
43
-
 44
44
-
 45
45
-
 46
46


Aluratek AHDURS250F User manual
- Category
- HDD/SSD enclosures
- Type
- User manual
Ask a question and I''ll find the answer in the document
Finding information in a document is now easier with AI
in other languages
- français: Aluratek AHDURS250F Manuel utilisateur
Related papers
-
Aluratek Hurricane plus 3.5" User manual
-
-
-
-
-
-
Aluratek APB02F User manual
-
-
Aluratek AHDDU200F User manual
-
Other documents
-
Sharkoon Swift-Case Securita Datasheet
-
DeLOCK 42453 Datasheet
-
Allied Telesis TOR-UH4EU Datasheet
-
Rosewill RX203 User manual
-
Gembird EE2-U2S-1 Datasheet
-
Verbatim External Hard Drive User manual
-
-
Motion Computing C5te Owner's manual
-
Digittrade RS256 500GB User manual
-
Brother P-touch RL-700S User manual