Alpine PKG-RSE3DVD Owner's manual
- Category
- Car video systems
- Type
- Owner's manual
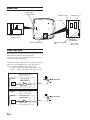
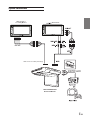
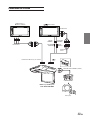
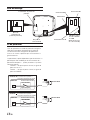
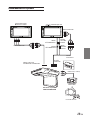
Alpine PKG-RSE3DVD is a DVD entertainment system designed for in-car use. It features a flip-down overhead monitor with interchangeable color covers for a customizable look. The system includes two AV connectors, allowing for the connection of various audio and video sources, such as DVD players, game consoles, and smartphones. Additionally, it has a remote control for convenient operation from any seat in the vehicle.
Alpine PKG-RSE3DVD is a DVD entertainment system designed for in-car use. It features a flip-down overhead monitor with interchangeable color covers for a customizable look. The system includes two AV connectors, allowing for the connection of various audio and video sources, such as DVD players, game consoles, and smartphones. Additionally, it has a remote control for convenient operation from any seat in the vehicle.


-
 1
1
-
 2
2
-
 3
3
-
 4
4
-
 5
5
-
 6
6
-
 7
7
-
 8
8
-
 9
9
-
 10
10
-
 11
11
-
 12
12
-
 13
13
-
 14
14
-
 15
15
-
 16
16
-
 17
17
-
 18
18
-
 19
19


Alpine PKG-RSE3DVD Owner's manual
- Category
- Car video systems
- Type
- Owner's manual
Alpine PKG-RSE3DVD is a DVD entertainment system designed for in-car use. It features a flip-down overhead monitor with interchangeable color covers for a customizable look. The system includes two AV connectors, allowing for the connection of various audio and video sources, such as DVD players, game consoles, and smartphones. Additionally, it has a remote control for convenient operation from any seat in the vehicle.
Ask a question and I''ll find the answer in the document
Finding information in a document is now easier with AI
in other languages
Related papers
-
Alpine HCE-C107D User manual
-
Alpine PKG-RSE3DVD Specification
-
-
Alpine PKG-RSE3HDMI Installation guide
-
Alpine HCE-C105 - Rear View Camera System User manual
-
-
-
Alpine HCE-C157D Owner's manual
-
-
Alpine INE-W920R-NS User guide
Other documents
-
Audiovox MMD92 User manual
-
Voxx VODA10 Installation guide
-
-
Advent ADVDLX9 Installation guide
-
-
Mode d'Emploi Kenwood Série DNX7200 User manual
-
-
Sony XA-115 Installation guide
-
 Mode d'Emploi X703D A4 A4R A5 Q5 Q5R Installation guide
-
Metra 108-FD5CH Operating instructions
