Moog Mother-32 User manual

Type
User manual

Moog Mother-32 is a versatile analog synthesizer that combines a classic Moog ladder filter with a step sequencer, an arpeggiator, and a variety of modulation options. With its intuitive controls and powerful sound engine, the Mother-32 is perfect for creating everything from warm pads and lush soundscapes to screaming leads and pulsating basslines.

Here are some of the things you can do with the Mother-32:

  • Create complex sequences with the 32-step sequencer, which offers a variety of playback modes, including forward, reverse, pendulum, and random.
  • Use the arpeggiator to create rhythmic patterns that can be synchronized to an external clock.
MOTHER-32 MANUAL ADDENDUM
FIRMWARE UPDATE V2.0
1
MOTHER-32 FIRMWARE UPDATE V2.0 April 2020
VERSION 2.0
Version 2.0 is a comprehensive firmware update to Mother-32, adding some new sequencer functions, more
versatility with MIDI and Clock functions, an enhanced Setup menu, and a variety of other new additions and
improvements.
In order to begin enjoying these new features, you will first need to update your Mother-32.
WHAT YOU WILL NEED
A Computer with internet access
A USB-MIDI Cable or Interface with 5-Pin MIDI Output
A program for sending MIDI SysEx files from your computer; free options include
SysEx Librarian for OS X or Bome SendSX for Windows.
HOW TO UPDATE YOUR FIRMWARE
You will need a 5-pin (DIN) MIDI output device for your computer. Connect MIDI Out from the computer
to MIDI In on the Mother-32. Use a program for sending MIDI SysEx files from your computer; free options
include SysEx Librarian for OS X or Bome SendSX for Windows.
1. Connect your Mother-32 to your computer using a USB to MIDI cable or via your
MIDI-enabled interface.
2. Download the newest Mother-32 Firmware from https://www.moogmusic.com/products/mother-32.
3. Open the downloaded .zip file.
4. Open the folder: “Mother-32_Firmware_v2.0”.
5. Copy these files from the folder to your SysEx application’s library:
Mother-32_ERASE_firmware.syx
Mother-32_Firmware_v2_0_0.syx
6. Send Mother-32_ERASE_firmware.syx from your SysEx application to your Mother-32 via your USB
MIDI interface. Look for the Tempo LED to flash green/red; this means unit is now in boot-loader mode.
The old firmware still needs to be erased.
7. Send Mother-32_ERASE_firmware.syx a second time – you should see two slow red blinks from the
Tempo LED, then it will flash green on/o. The old firmware is now erased and the unit is ready for
new firmware.
8. Send new main firmware (Mother-32_Firmware_v2_0_0.syx). Observe the MIDI LED flashing red
and the Tempo LED flashing yellow during transfer.
9. On completion, the Tempo LED will flash green 2-3 times and the unit will perform the normal
boot-up light show sequence, indicating the update finished successfully.
If you have any questions or trouble with your update please contact techsupport@moogmusic.com.
2
MOTHER-32 FIRMWARE UPDATE V2.0 April 2020
NEW SEQUENCER FUNCTIONS
SEQUENCER PLAYBACK DIRECTION
The playback order of the notes being generated by the sequencer can be changed from Forward (normal/
default), to Reverse (backward), to Pendulum (back & forth), or to Random.
To set the playback order, hold down both the (KB)
and (STEP) buttons while pressing one of the first four
(STEP) buttons.
FORWARD / (KB) + (STEP) + 1
This combination of buttons will cause the notes
stored in the sequencer to play normally, from
beginning to end. This is the default setting.
REVERSE / (KB) + (STEP) + 2
This combination of buttons will cause the notes
stored in the sequencer to play in reverse order, from
end to beginning.
PENDULUM / (KB) + (STEP) + 3
This combination of buttons will cause the notes
stored in the sequencer to play in pendulum order,
alternating from beginning to end, from end to
beginning, from beginning to end, etc.
RANDOM / (KB) + (STEP) + 4
This combination of buttons will cause the notes
stored in the sequencer to play in a random order.
PRE-ARMING THE SEQUENCER FOR AN EXTERNAL CLOCK
If the Tempo Input mode is set to Single Clock Advance or to
Analog Clock (see page 3), then holding down the (KB) and
(STEP) buttons then pressing the RUN / STOP button will arm
the sequencer for use with an external clock. In this case, the
sequencer is stopped, but it will begin playing as soon as the
next clock or trigger is detected at the TEMPO input jack.
NOTE: To start the sequencer playing from the beginning, press RESET after arming the sequencer and before starting
the external clock.
SWING AMOUNT AND RATCHET VALUE
In the sequencer, pressing (SHIFT) while rotating the TEMPO knob will vary the Swing Amount. Pressing
(SHIFT) while rotating the GLIDE control will select a Ratchet value. Swing sets a percentage that the o
beats are ahead of or behind the beat. Ratchet specifies a number (1-4) of note-repeats occurring during
the length of a single step.
NOTE: In addition to setting the Swing Amount, Version 2.0 now allows the Swing Interval (note value) to be set
independently as well. Please refer to the SWING section on page 5.
Forward
Reverse
Pendulum
Random
+ +
HOLD
HOLD
HOLD HOLD PRESS
+ +
3
MOTHER-32 FIRMWARE UPDATE V2.0 April 2020
NEW TEMPO INPUT MODES
TEMPO INPUT
TEMPO is a configurable input for modulating the internal clock tempo, or for
replacing the internal clock signal. Beginning with Version 2.0, the TEMPO input
has 4 available modes, which are assigned using the SETUP mode. See page 9 for
details on selecting the mode for this input.
NOTE: By default, the TEMPO input accepts a -5V to +5V signal. 0V to +5V is selectable via
Setup Mode, Page 8, Option 5 (see page 11 of this doc).
MODE 1 - TEMPO CV
The input is summed with the position of the TEMPO panel control. With the TEMPO knob in the
center position, a -5V to +5V control voltage changes the internal clock tempo from minimum to maximum
(20 BPM to 300 BPM).
MODE 2 - SINGLE CLOCK ADVANCE (DEFAULT)
When the input of a clocks rising edge is detected, the internal clock is suppressed, and the Tempo
LED is lit green. The pattern is advanced one step for each rising edge detected. If the clock applied is at
a steady tempo, then any Ratchets will be performed in synchronization with the incoming clock pulses.
A rising edge must be faster than 1V / msec to be detected as an edge, so slowly changing signals will be
ignored. In this mode, the TEMPO panel control is ignored. If clock pulses to this input stop, the Mother-32
internal clock may be restarted by pressing RUN / STOP or by turning the TEMPO knob.
MODE 3 - ANALOG CLOCK
Prior to Version 2.0, this mode was fixed at 24 pulses per quarter note (PPQN) and was referred to as
DIN Sync mode.” Beginning with Version 2.0, the Analog Clock Mode can be used to synchronize with any
regular analog clock signal applied to the TEMPO input. The time base for the analog clock input is set on
Setup Page 4 (Clock Input PPQN). While the TEMPO input is in Analog Clock mode, a clock detected at the
TEMPO input will override both the internal clock and MIDI sync. Stop the external clock or disconnect
it from the TEMPO input in order to use internal clock or MIDI sync again.
MODE 4 - STEP ADDRESS CV
In the Step Address CV mode, the sequencer isn’t driven by a clock. Instead, individual sequence steps are
selected and played directly based on the CV level received at the TEMPO input. The total CV input voltage
range is evenly divided across the number of sequence steps in the pattern. Any input voltage within the
range allocated to each step will select that step. When the input voltage crosses the division between one
step address and another, the new step is played. Smaller voltage changes which do not cross a boundary
between step addresses have no eect. A ramp LFO will play the sequence normally, and will be synced
to the ramp LFO rate. Experiment with patching in dierent modulation sources to find fun new playing
techniques.
NOTE: While in Step Address CV mode, a changing voltage at the TEMPO input will override normal playback. Pressing
the RUN / STOP button will restore normal playback until / unless the voltage at the TEMPO input changes again.
4
MOTHER-32 FIRMWARE UPDATE V2.0 April 2020
NEW CLOCK DIVISIONS ADDED
CLOCK/TEMPO OVERVIEW
The Mother-32 sequencer runs in musical time, using note durations (quarter note, sixteenth note and
so on) based on some tempo in beats per minute. The tempo is set by a “clock”, which in the world of
analog sequencers is just an equally spaced series of pulses. The Mother-32 can follow its own internal
clock, or an external clock signal connected to the TEMPO input jack. The Tempo LED located above the
(SHIFT) button blinks to indicate how fast the sequencer is stepping. The color of the Tempo LED shows
the current clock source: red for internal clock or green for external clock (MIDI, or an analog clock
connected to the TEMPO input).
The internal clock Tempo is set by the panel TEMPO knob. When using the internal clock, the TEMPO knob
can vary the base tempo from 20 BPM to 300 BPM.
The TEMPO knob is also used to set the note value (interchangeably called the clock division) at which the
sequencer will advance relative to the clock.
When synchronized to an external clock (analog or MIDI), or if you hold the (KB) or (STEP) buttons while
turning it, the TEMPO knob is used to set the clock division value.
Previously, the TEMPO knob oered only eight clock divisions. With Version 2.0, this has been increased to
twenty-four clock divisions. These twenty-four values are arranged in three groups of eight; one group for
dotted note values, one group for triplet note values, and one for straight timing.
HERE ARE THE AVAILABLE CLOCK DIVISION VALUES:
1. Two whole notes (dotted, triplet, straight)
2. Whole note (dotted, triplet, straight)
3. Half note (dotted, triplet, straight)
4. Quarter note (dotted, triplet, straight)
5. Eighth note (dotted, triplet, straight)
6. Sixteenth note (dotted, triplet, straight)
7. Thirty-second note (dotted, triplet, straight)
8. Sixty-fourth note (dotted, triplet, straight)
HERE IS HOW TO ACCESS THE CLOCK DIVISION VALUES:
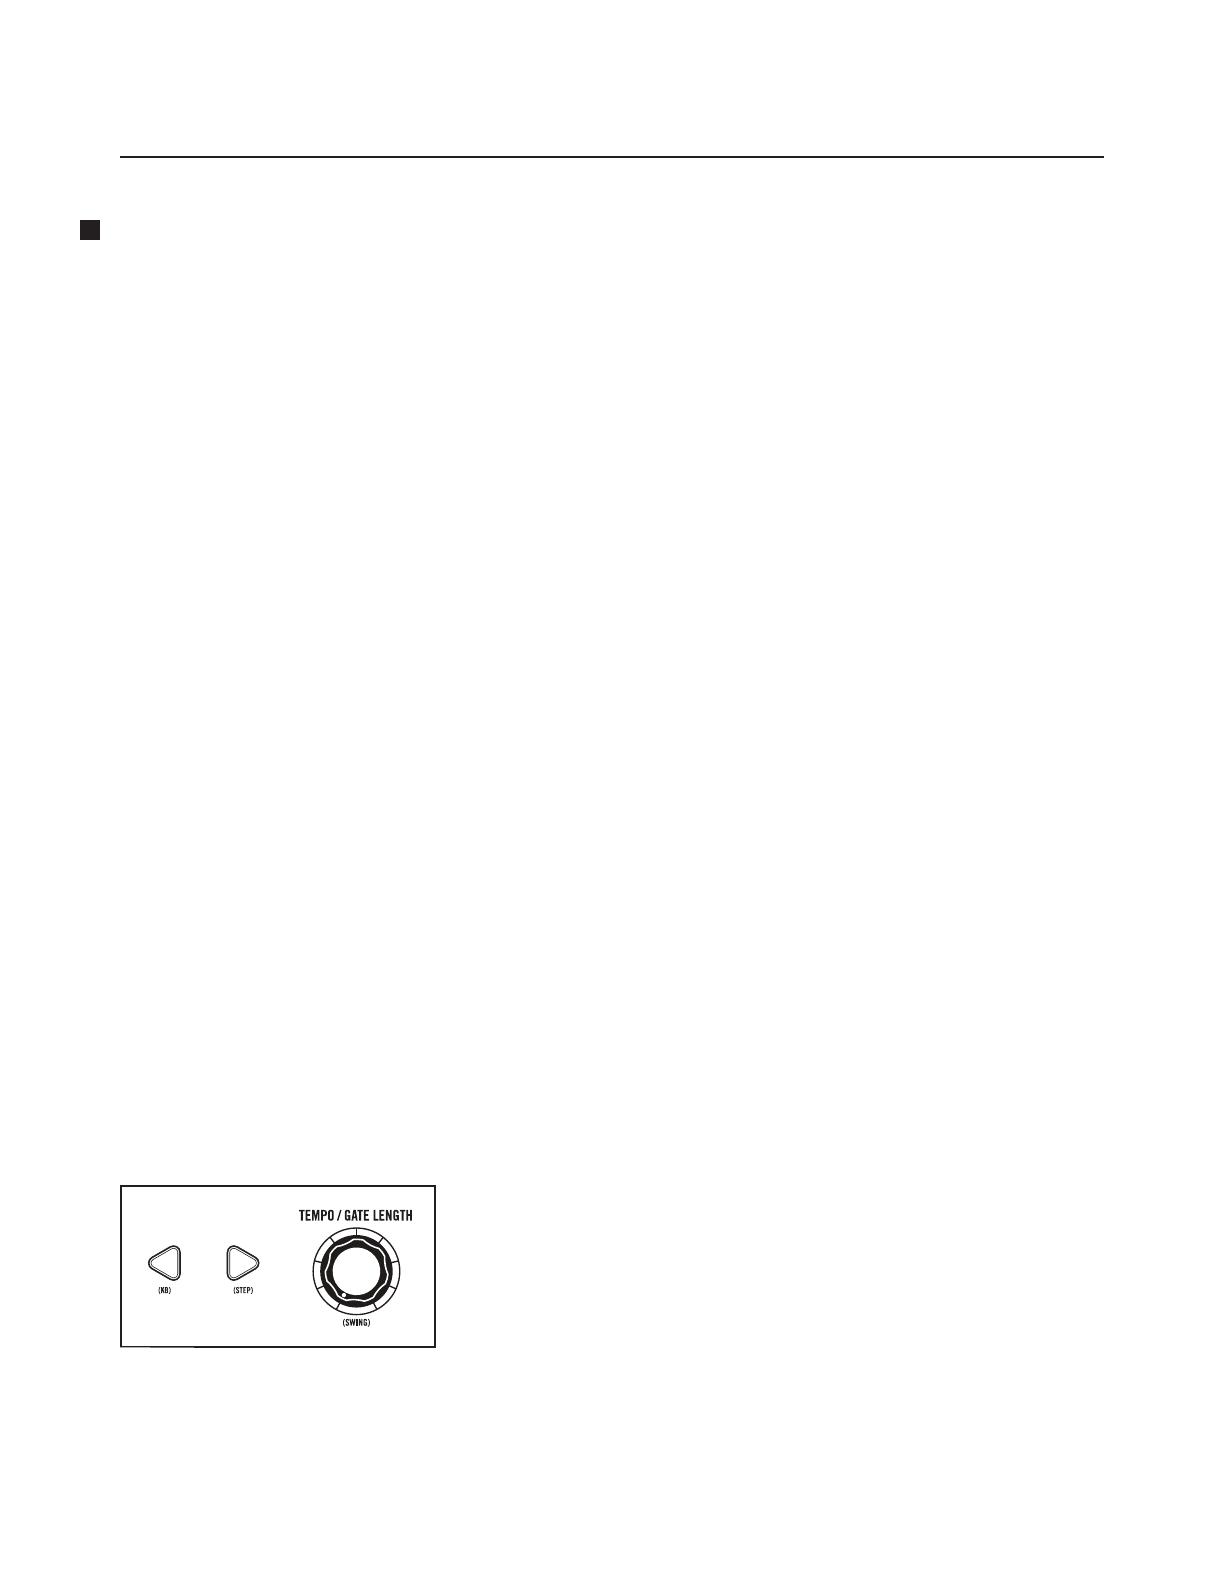
DOTTED NOTES
Hold down the (KB) button while turning the TEMPO
knob to select one of the eight dotted note values.
TRIPLET NOTES
Hold down the (STEP) button while turning the TEMPO
knob to select one of the eight triplet note values.
STRAIGHT NOTES
When Mother-32 is synced to MIDI or to an analog clock input, simply rotate the TEMPO knob to select one
of the eight straight note values. If Mother-32 is synced to the internal clock, then hold down both the (KB)
and (STEP) buttons whole rotating the TEMPO knob to select one of the eight straight note values.
NOTE: The selected clock division will be shown by yellow OCTAVE / LOCATION LEDs.
+ +
5
MOTHER-32 FIRMWARE UPDATE V2.0 April 2020
CLOCK PRIORITY
CLOCK PRIORITY RULES
1: With no other clock source connected, the internal clock has priority.
2: A connected MIDI Clock will override the internal clock.
3: A connected Analog Clock will override a connected MIDI clock, and / or the internal clock.
SWING
NEW SWING INTERVAL CONTROL
Previously, Swing simply alternated between longer and shorter timing on every sequencer step. You can
now set the sequencer to Swing at a dierent beat interval than the one at which it is stepping. The rhythmic
relationship between these two dierent intervals can create many new and interesting patterns of longer
and shorter notes.
HOW SWING WORKS GENERALLY (AND ON THE MOTHER-32)
Generally speaking, Swing involves alternating between rushing and dragging the speed of playing relative
to the tempo, creating a pattern of alternating longer and shorter notes. Here we refer to these two
alternating phases of Swing as the “onbeat” and the “obeat.”
THE SWING AMOUNT
The Swing Amount controls the relative duration of the on beat
versus the obeat; this is adjusted by holding SHIFT and turning
the TEMPO / GATE LENGTH (SWING) knob. With Swing Amount
at 50% (12:00 on the TEMPO knob), timing is precisely aligned with
the clock and there is no audible swing feel. As Swing Amount is
adjusted clockwise from 12:00, the on beat is stretched out to be
longer and the obeat is compressed to be correspondingly shorter.
If swing is adjusted counterclockwise from 12:00 (less than 50%),
then the on beat is compressed, and the obeat starts sooner
(before the beat) and lasts correspondingly longer.
THE SWING INTERVAL
The Swing Interval sets the interval, using musical note-length values, used to alternate between the on beat
and the obeat. The speed of the on beat versus the speed of the obeat is proportional; as you slow one
down, the other speeds up, so that an on beat plus an obeat always takes the same total amount of total
time (two Swing Intervals). Because of this, every other Swing Interval is aligned with the underlying clock.
The on beat always aligns with the clock; the obeat can start earlier or later relative to the clock tempo,
depending on the Swing Amount.
In the vast majority of sequencers, the Swing Interval is fixed to match the rate of the sequencer, i.e. every
other step alternates back and forth between long swung beat and short swung beat. This is depicted in the
diagram on the following page.
+
6
MOTHER-32 FIRMWARE UPDATE V2.0 April 2020
THE SWING INTERVAL (Continued)
The following diagram shows an example where the Step Interval is eighth notes, and the Swing Interval is
eighth note triplets.
Experiment with dierent combinations of Swing Interval divisions and Swing % to advance the sequencer in
new and interesting ways!
HERE ARE THE AVAILABLE SWING INTERVAL VALUES:
1. Two whole notes (dotted, triplet, straight)
2. Whole note (dotted, triplet, straight)
3. Half note (dotted, triplet, straight)
4. Quarter note (dotted, triplet, straight)
5. Eighth note (dotted, triplet, straight)
6. Sixteenth note (dotted, triplet, straight)
7. Thirty-second note (dotted, triplet, straight)
8. Sixty-fourth note (dotted, triplet, straight)
HERE IS HOW TO ACCESS THE SWING INTERVAL VALUES:
DOTTED NOTES
Hold down the (KB) button while turning the GLIDE knob to select
one of the eight dotted note values.
TRIPLET NOTES
Hold down the (STEP) button while turning the GLIDE knob to
select one of the eight triplet note values.
STRAIGHT NOTES
Hold down both the (KB) and (STEP) buttons whole rotating the GLIDE knob to select one of the eight
straight note values.
BEAT
STEP INTERVAL: 1/8
SWING INTERVAL: 1/8 TRIPLET
ON/OFFBEAT IF SWING AMT 66%
SEQUENCER STEPS IF SWING 66%
1
1 2
1 2 3 4 5 6 7 8
3 4 5 6 7 8
2 3 4
BEAT
STEP INTERVAL: 1/8
1
1 2
1 2 3 4 5 6 7 8
3 4 5 6 7 8
2 3 4
SWING INTERVAL: 1/8
ON/OFFBEAT IF SWING AMT 66%
SEQUENCER STEPS IF SWING 66%
7
MOTHER-32 FIRMWARE UPDATE V2.0 April 2020
THE SWING INTERVAL (Continued)
NOTE: The selected clock division will be shown in green using the OCTAVE / LOCATION LEDs.
NOTE: The Swing Amount and Swing Interval are stored per pattern.
NOTE: A step will play for a duration determined by the current Swing Interval and Swing Amount settings. If the
on-beat Swing Interval ends in the middle of a step, the step will complete its remaining duration at the rate of
the o-beat Swing Interval, and vice versa.
TIP: To initialize the Swing Amount and Swing Interval to default values, first set or reset your Sequencer Clock Division
(this will also reset your Swing Interval), then press SHIFT + TURN. TEMPO knob to 12 o’clock for a 50% Swing Amount.
Alternatively, initializing or reloading the pattern is a quick way to reset Swing settings, but these are destructive actions,
so be sure you aren’t losing any work since your last save!
NEW PATTERN SAVE MODES
SAVING A PATTERN
In addition to the Manual Save mode, two additional save modes have been added in Version 2.0 – Auto
Save and Write Protect. Selecting the Save mode can be done on Page 6 of the Mother-32 Setup mode.
MANUAL SAVE MODE
In this mode, you must manually save any changes. If you change
patterns before saving your changes, the changes will be lost. To
manually save the pattern press the (SHIFT) + RUN / STOP buttons
simultaneously for about a second. One of the OCTAVE / LOCATION
LEDs (1-8) will begin to blink rapidly, indicating the location where
the pattern will be saved. To save the pattern to this location, simply
press the (SHIFT) + RUN / STOP buttons again. Otherwise, use
the (KB) button or the (STEP) button to select a dierent pattern
location Again, the blinking LED will indicate the specified location.
Press the (SHIFT) + RUN / STOP buttons to save your pattern to this
location, or simply press the RUN / STOP button to exit without saving.
NOTE: You can also hold (SHIFT) and press one of the eight corresponding
pattern location buttons.
To manually save the pattern to a location in a dierent bank (1-8),
first press and hold the (BANK) button while using the (KB) button
or the (STEP) button to select a dierent bank. Release the (BANK)
button and you can now use the (KB) button or the (STEP) button
to select a pattern location within that bank. Press the (SHIFT) +
RUN / STOP buttons to save your pattern to this location, or simply
press the RUN / STOP button to exit without saving.
NOTE: You can also hold (BANK) and press one of the eight corresponding
bank location buttons.
+
Select Setup Mode Page
(Indicated by Yellow LED)
Select Pattern Location
Blinking Green LED
Indicates Save Destination
+
Select Setup Mode Page
(Indicated by Yellow LED)
Select Bank Location
Yellow LED Indicates
Save Destination Bank
8
MOTHER-32 FIRMWARE UPDATE V2.0 April 2020
SAVING A PATTERN (Continued)
CANCEL / SAVE
To complete the saving process press (SHIFT) + RUN / STOP.
To exit the saving process at any time, simply press RUN / STOP.
AUTO SAVE MODE
In this mode, changes you make to the current pattern will automatically be saved. The original pattern
remains unchanged and resides in a buer. To restore the pattern to its original state (as first loaded before
any editing began), hold the PATTERN button and press the RESET button. Otherwise, selecting a new
pattern will cause the changes you have made to become permanent.
WRITE PROTECT MODE
In this mode, changes you make to the current pattern cannot be saved. The patterns can be tweaked and
modified as part of a performance or sonic exploration, but the contents of the Mother-32 pattern memory
will remain unaected.
NEW VISUAL FEEDBACK ADDED
The OCTAVE / LOCATION LEDs now provide visual feedback during the initialization, saving (or not saving)
of a pattern.
1. INITIALIZE PATTERN - When initializing the current pattern, the OCTAVE / LOCATION LEDs will sweep
from right to left, in red, to indicate that the pattern has been initialized.
2. PATTERN SAVE SUCCESSFUL - When saving the current pattern, the OCTAVE / LOCATION LEDs will
sweep to the center, in green, to verify that the pattern has been saved.
3. PATTERN SAVE CANCELED - When canceling the save operation, the OCTAVE / LOCATION LEDs will sweep
to the center, in red, to signify that the save operation was canceled, and that the pattern was not saved.
4. BANK NUMBER LED - When selecting a Bank Number, the Bank Number LED will now be shown in
yellow, to distinguish it from the Pattern Number LED which is shown in green.
NEW PATTERN CHANGE OPTIONS
DELAY PATTERN CHANGE
Normally, when a new pattern is selected as the sequencer is playing, the current pattern will finish playing
before the new pattern will begin (Delay Pattern Change On). Beginning with Version 2.0, it is possible to
have the newly selected pattern begin instantly, without waiting for the previous pattern to finish (Delay
Pattern Change O). This Delay Pattern Change parameter can be accessed can be found on Setup menu
Page 8, option 6.
LOAD SAVED TIMING
By default, when a pattern is loaded from memory, it also restores the Clock Division, Swing Amount, and
Swing Interval that were active when the sequence was saved (Load Saved Timing On). If Load Saved
Timing is O, then changing patterns will not change the timing settings which are currently active. Load
Saved Timing can be adjusted on Setup Menu page 8, option 7.
+
9
MOTHER-32 FIRMWARE UPDATE V2.0 April 2020
NEW SETUP PAGES AND PARAMETERS
SETUP MODE
Setup mode is a non-performance mode that uses the Keyboard and sequencer buttons to access certain
Mother-32 parameters (MIDI Channel, Assignable Output, etc.) and to specify their values.
NOTE: Settings made in Setup mode are remembered on power down.
ENTER SETUP MODE
Press (SHIFT) + RESET + SET END + STEP 8 buttons.
The Tempo LED will flash yellow, and the OCTAVE/
LOCATION LEDs will show a single yellow LED
indicating the currently-active Setup mode page.
Setup mode values are shown using a green or red
OCTAVE/LOCATION LED.
NOTE: The same button combo will exit Setup mode.
SELECTING A PAGE
Use the (KB) and (STEP) arrows to select a Setup mode page (page 7 is
reserved and is not selectable). Yellow OCTAVE / LOCATION LEDs indicate
the current Setup mode page.
PAGE 1: ASSIGNABLE Output jack function (new default is sequencer clock)
PAGE 2: MIDI channel selection
PAGE 3: TEMPO Input jack mode (new features added in Version 2.0)
PAGE 4: Clock Input PPQN (new for Version 2.0)
PAGE 5: Clock Output PPQN (new for Version 2.0)
PAGE 6: Save mode (new for Version 2.0)
PAGE 7: [Reserved]
PAGE 8: On / O Settings (new for Version 2.0)
SELECTING A PARAMETER
Each Page may contain up to 16 value options. (STEP) buttons 1-8 select values 1-8. The value is indicated
by green OCTAVE / LOCATION LEDs.
To access values 9-16, press
(SHIFT) + (STEP) buttons 1-8
(9-16). The value is indicated by
red OCTAVE / LOCATION LEDs.
NOTE: If the Parameter number is the
same as the current Page number, the
LED will alternately flash between the
yellow Page color and the green (1-8)
or red (9-16) Parameter color.
+ + +
Select Values 1-8
Select Setup Mode Page
(Indicated by Yellow LED)
Page 3
Page 2
Page 1
10
MOTHER-32 FIRMWARE UPDATE V2.0 April 2020
PAGE 1: ASSIGNABLE OUTPUT JACK
From this page, you can specify which Mother-32 signal is available via the ASSIGN output jack. The full
descriptions of each option can be found in the ASSIGNABLE OUTPUT: ASSIGN OUTPUT section of this manual.
PAGE 2: MIDI CHANNEL
Here you can set the MIDI Channel your Mother-32 will use to send and receive MIDI data.
PAGE 4: CLOCK INPUT PPQN (Pulse Per Quarter Note)
Here you can set the number of incoming clock pulses that will equal one quarter note.
NOTE: 24 PPQN is used by the DIN SYNC standard; 48 PPQN is used by some older drum machines
PAGE 3: TEMPO INPUT JACK MODE
This page allows you to specify the operating mode for the TEMPO input jack. The full descriptions of each
mode can be found under the CLOCK / TEMPO OVERVIEW: TEMPO INPUT section of this manual.
1: Accent
2: Sequencer Clock (Default)
3: Sequencer Clock / 2
4: Sequencer Clock / 4
5: Sequencer Step Ramp
6: Sequencer Step Saw
7: Sequencer Step Triangle
8: Sequencer Step Random
9: Sequencer Step 1 Trigger Output
10: MIDI Velocity
11: MIDI Channel Pressure
12: MIDI Pitch Bend
13: MIDI CC 1
14: MIDI CC 2
15: MIDI CC 4
16: MIDI CC 7
1: MIDI Channel 1
2: MIDI Channel 2
3: MIDI Channel 3
4: MIDI Channel 4
5: MIDI Channel 5
6: MIDI Channel 6
7: MIDI Channel 7
8: MIDI Channel 8
9: MIDI Channel 9
10: MIDI Channel 10
11: MIDI Channel 11
12: MIDI Channel 12
13: MIDI Channel 13
14: MIDI Channel 14
15: MIDI Channel 15
16: MIDI Channel 16
1: 1 PPQN
2: 2 PPQN
3: 3 PPQN
4: 4 PPQN
5: 5 PPQN
6: 6 PPQN
7: 7 PPQN
8: 8 PPQN
9: 9 PPQN
10: 10 PPQN
11: 11 PPQN
12: 12 PPQN
13: 13 PPQN
14: 14 PPQN
15: 24 PPQN
16: 48 PPQN
1: CV Input mode
2: Single Clock Advance mode
3: Analog Clock mode (revised in Version 2.0)
4: Step Address CV mode (added in Version 2.0)
11
PAGE 5: CLOCK OUTPUT PPQN (Pulse Per Quarter Note)
Here you can set the number of outgoing clock pulses that will equal one quarter note.
NOTE: 24 PPQN is used by the DIN SYNC standard; 48 PPQN is used by some older drum machines
PAGE 6: SAVE MODE
This page allows you to specify the Save mode for your Mother-32. The full descriptions of each mode can
be found under the SAVING A PATTERN section of this manual.
PAGE 7: [RESERVED]
There are no user accessible parameters on this Page.
PAGE 8: ON / OFF PARAMETERS
The parameters available on this page can be toggled On or O so that your Mother-32 will behave in a way
conductive to your creative process.
1: 1 PPQN
2: 2 PPQN
3: 3 PPQN
4: 4 PPQN
5: 5 PPQN
6: 6 PPQN
7: 7 PPQN
8: 8 PPQN
9: 9 PPQN
10: 10 PPQN
11: 11 PPQN
12: 12 PPQN
13: 13 PPQN
14: 14 PPQN
15: 24 PPQN
16: 48 PPQN
1: Manual Save mode
2: Auto Save mode (added in Version 2.0)
3: Write Protect mode (added in Version 2.0)
1: Follow MIDI Clock (On / O)
2: Follow MIDI Start Stop (On / O)
3: Clock Output Swing (On / O)
4: Accent Out CV Only
ON: The internal Accent circuit is disabled when the ASSIGN Output Jack is set to Accent (Page 1;
Parameter 1).
OFF: The internal Accent circuit is enabled.
5: Tempo Input Range
ON: The voltage range of the TEMPO input is 0V to +5V
OFF: The voltage range of the TEMPO input is -5V to +5V
6: Delay Pattern Change
ON: When a new Pattern is selected, the sequencer will finish playing the current pattern before
switching to the new pattern
OFF: When a new Pattern is selected, the sequencer will begin to play the new pattern
immediately.
7: Load Saved Timing
ON: When a new Pattern is selected, the timing settings (Clock Division, Swing Interval, and
Swing Amount) that were saved with the pattern will be restored.
OFF: When a new Pattern is selected, the previously-active timing settings will remain unchanged.
MOTHER-32 FIRMWARE UPDATE V2.0 April 2020
12
MOTHER-32 FIRMWARE UPDATE V2.0 April 2020
SETUP MODE GLOBAL DEFAULTS
BUG LIST
BUGS FIXED IN VERSION 2.0
1. The Clock Output (Assignable Output Modes 2, 3, 4) is no longer aected by Ratcheting steps.
2. MIDI note-o commands received while sequencer is playing no longer truncate the currently-
playing note.
3. Invalid glide times present after changing patterns have been fixed.
4. MIDI notes will now transpose the sequence even when sequence is not playing. (i.e. before the
sequencer is started.)
5. Phase alignment is maintained between the Mother-32 sequencer and the analog clock output.
KNOWN ISSUES IN VERSION 2.0
1. If starting/resuming playback while synchronized to an external clock, you must start playback on a swing
onbeat in order to stay correctly aligned to the external clock.
Example: If using MIDI Song Position Pointer to begin playback later than the beginning of a pattern, you should
start playback on a swing onbeat. Otherwise, pattern playback may begin with a slight delay.
PAGE 1: ASSIGNABLE Output Jack Sequencer Clock Output
PAGE 2: MIDI Channel Selection Channel 1
PAGE 3: TEMPO Input jack Step Advance / Trigger
PAGE 4: Clock Input PPQN 4 (sixteenth note)
PAGE 5: Clock Output PPQN 4 (sixteenth note)
PAGE 8: Follow MIDI Clock On
PAGE 8: Follow MIDI Start / Stop On
PAGE 8: Clock Output Swing On
PAGE 8: Tempo Input Range O (-5V to +5V)
PAGE 8: Accent Out CV Only O
PAGE 8: Load Saved Timing On
  • Page 1 1
  • Page 2 2
  • Page 3 3
  • Page 4 4
  • Page 5 5
  • Page 6 6
  • Page 7 7
  • Page 8 8
  • Page 9 9
  • Page 10 10
  • Page 11 11
  • Page 12 12
  • Page 13 13

Moog Mother-32 User manual

Type
User manual

Moog Mother-32 is a versatile analog synthesizer that combines a classic Moog ladder filter with a step sequencer, an arpeggiator, and a variety of modulation options. With its intuitive controls and powerful sound engine, the Mother-32 is perfect for creating everything from warm pads and lush soundscapes to screaming leads and pulsating basslines.

Here are some of the things you can do with the Mother-32:

  • Create complex sequences with the 32-step sequencer, which offers a variety of playback modes, including forward, reverse, pendulum, and random.
  • Use the arpeggiator to create rhythmic patterns that can be synchronized to an external clock.

Ask a question and I''ll find the answer in the document

Finding information in a document is now easier with AI