Page is loading ...

2
Dometic WAECO International GmbH
Hollefeldstrasse 63
D-48282 Emsdetten
www.dometic-waeco.com
≤1,5 Nm
1
3
2
ABC
b
a
c
0
4445100705 F 08/2015 MO1139

Roof light
Installation and Operating Manual. . . 3
Dachfenster
Montage- und Bedienungsanleitung 13
Dôme de toit
Instructions de montage
et de service . . . . . . . . . . . . . . . . . . 23
Claraboya
Instrucciones de montaje y de uso . 33
Oblò
Istruzioni di montaggio e d’uso . . . . 44
Dakraam
Montagehandleiding en
gebruiksaanwijzing . . . . . . . . . . . . . 54
Tagvindue
Monterings- og
betjeningsvejledning . . . . . . . . . . . . 63
Takfönster
Monterings- och bruksanvisning . . . 72
Takvindu
Monterings- og bruksanvisning . . . . 81
Kattoikkuna
Asennus- ja käyttöohje . . . . . . . . . . 90
Clarabóia
Instruções de montagem e manual de
instruções . . . . . . . . . . . . . . . . . . . . 99
Окно для крыши
Инструкция по монтажу и
эксплуатации . . . . . . . . . . . . . . . . 109
EN
DE
FR
ES
IT
NL
DA
SV
NO
FI
PT
RU
Okno dachowe
Instrukcja montażu i obsługi . . . . . 120
Střešní okno
Návod k montáži a obsluze. . . . . . 130
Strešné okno
Návod na montáž a uvedenie do
prevádzky . . . . . . . . . . . . . . . . . . . 140
Tetőablak
Szerelési és használati útmutató . 150
PL
CS
SK
HU
Midi Heki Style
400 x 700

EN
Midi Heki Style 400 x 700 Explanation of symbols
3
Please read this instruction manual carefully before installation and
first use, and store it in a safe place. If you pass on the product to
another person, hand over this instruction manual along with it.
Table of contents
1 Explanation of symbols . . . . . . . . . . . . . . . . . . . . . . . . . . . . . . . . . . . 3
2 Safety and installation instructions. . . . . . . . . . . . . . . . . . . . . . . . . . . 4
3 Scope of delivery . . . . . . . . . . . . . . . . . . . . . . . . . . . . . . . . . . . . . . . . 5
4 Accessories . . . . . . . . . . . . . . . . . . . . . . . . . . . . . . . . . . . . . . . . . . . . 5
5 Intended use . . . . . . . . . . . . . . . . . . . . . . . . . . . . . . . . . . . . . . . . . . . 5
6 Pre-installation instructions . . . . . . . . . . . . . . . . . . . . . . . . . . . . . . . . 6
7 Installing the Midi Heki Style . . . . . . . . . . . . . . . . . . . . . . . . . . . . . . . 7
8 Using the Midi Heki Style . . . . . . . . . . . . . . . . . . . . . . . . . . . . . . . . . 10
9 Troubleshooting . . . . . . . . . . . . . . . . . . . . . . . . . . . . . . . . . . . . . . . . 11
10 Maintaining and cleaning the Midi Heki Style . . . . . . . . . . . . . . . . . 11
11 Warranty . . . . . . . . . . . . . . . . . . . . . . . . . . . . . . . . . . . . . . . . . . . . . 12
12 Disposal . . . . . . . . . . . . . . . . . . . . . . . . . . . . . . . . . . . . . . . . . . . . . . 12
1 Explanation of symbols
A
I
➤ Action: This symbol indicates that action is required on your part. The
required action is described step-by-step.
✓ This symbol describes the result of an action.
Fig. 1 5, page 3: This refers to an element in an illustration. In this case,
item 5 in figure 1 on page 3.
NOTICE!
Failure to observe this instruction can cause material damage and
impair the function of the product.
NOTE
Supplementary information for operating the product.

EN
Safety and installation instructions Midi Heki Style 400 x 700
4
2 Safety and installation instructions
Please observe the prescribed safety instructions and stipulations
from the vehicle manufacturer and service workshops.
The manufacturer accepts no liability for damage in the following cases:
Damage to the product resulting from mechanical influences
Alterations to the product without express permission from the manu-
facturer
Use for purposes other than those described in the operating manual
I
Please note the following:
If faults or disturbances occur, consult a specialist workshop immediately.
Risk of breakage! Do not tread on the glass dome.
Before starting your journey, check that the roof window is locked
properly.
Before starting your journey, check the roof window for damage (such as
tension cracks in the acrylic glass).
Do not open the roof window while driving.
Do not open the window in strong wind or rain.
Close the roof window if it rains or snows.
Do not leave the vehicle with the roof window open.
Keep the roof window free of snow and ice.
NOTE
If you do not have sufficient technical knowledge for installing the
components in vehicles, you should have a specialist install the
roof window in your vehicle.

EN
Midi Heki Style 400 x 700 Scope of delivery
5
3 Scope of delivery
4 Accessories
5 Intended use
The Midi Heki Style roof light is suitable for installing in motorhomes or cara-
vans with roof thicknesses of 25–60 mm:
without forced ventilation: Item no. 9104116967
with forced ventilation: Item no. 9104116966
It may not be fitted in vertical surfaces.
The maximum travel speed permitted is 130 km/h, as noise or damage could
occur depending on the vehicle design or installation position.
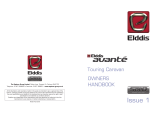
No. in
fig. 1
Quantity Description
1 1 Outer frame with glass dome
2 1 Inner frame
310
20
Fastening screw ∅ 4mm
Fastening screw ∅ 3.5 mm
4 10 Mounting supports
5 1 Hexagon bolt 68 mm
Description Item no.
Spoiler, 540 mm 9104100260

EN
Pre-installation instructions Midi Heki Style 400 x 700
6
6 Pre-installation instructions
➤ Before installation, check the roof thickness of your vehicle. Consult the
vehicle manufacturer if you have any questions.
➤ When choosing the installation location, observe the following:
– Adjoining components (roof rack or attachment and reinforcing parts),
cables and cabinets in the vehicle interior must not get damaged when
sawing the hole.
– Sufficient space needs to be available for installing the inner and outer
frames.
– Only fit the roof light on flat and parallel interior and exterior roof areas
with a maximum inclination of 15° to the horizontal.
– You may use an existing roof hole provided the roof light fits into it.
– The roof light may only be fitted with the hinge-side at the front in the
direction of travel.
6.1 Pressing out the hole
See fig. 2
6.2 Using reinforcing rails
See fig. 3
I
➤ Remove the foam according to the width of your reinforcing rails (not in
scope of delivery) (A).
➤ Fit the reinforcing rails (B).
NOTE
You must use reinforcing rails to
prevent the insulation from being pressed together and the
room wall from being bent
allow the mounting supports to be fixed on the inside of the
roof

EN
Midi Heki Style 400 x 700 Installing the Midi Heki Style
7
7 Installing the Midi Heki Style
See fig. 4
The scope of delivery includes mounting supports, which are suitable for roof
thicknesses of 30–34 mm. For roof thicknesses of 25–29 mm and
35–60 mm, you need to have a suitable mounting set (see table).
➤ Measure your roof thickness W.
➤ Choose a suitable mounting set:
See fig. 5
For roof thicknesses from 35 mm, you must replace the existing hexagon bolt
in the gear with the hexagon bolt included in the scope of delivery (fig. 1 6).
➤ Remove the existing hexagon bolt from the gear.
➤ Insert the hexagon bolt (fig. 1 6) included in the scope of delivery, with
the punched side in the gear.
See fig. 6
➤ Check that the roof light has sufficient space around it (approx. 1 to 2 mm)
in the roof opening.
See fig. 7
➤ Clean the roof opening in the mounting area.
Roof thickness Item no.
25–29 mm 9104107495
30–34 mm Included in the scope of delivery
9104107496
35–42 mm 9104107497
43–52 mm 9104107498
53–60 mm 9104107499

EN
Installing the Midi Heki Style Midi Heki Style 400 x 700
8
See fig. 8
A
➤ Seal the mounting frame with a flexible non-hardening butyl sealing com-
pound (e.g. Sika Lastomer-710).
See fig. 9
➤ Check the direction of travel when installing (hinge-side at front in direc-
tion of travel).
➤ Place the outer frame in the middle of the roof opening.
➤ Press the outer frame in the roof slightly so that the packing compound
spreads out.
See fig. 0
➤ Place the 10 mounting supports on the inside of the vehicle all the way
into the recess of the outer frame.
If you use wooden rails as reinforcement
A
➤ Pre-drill two 2.2 mm holes for each mounting support in the roof construc-
tion (A).
➤ Fix the mounting supports on the roof with the ∅ 3.5 mm screws
included (B).
For other constructions, suitable screws must be used (not in scope of
delivery).
➤ Fix the 10 mounting supports with the ∅ 4 mm fixing screws to the outer
frame (C).
To do this use the large holes in the mounting supports.
NOTICE!
Observe the sealant manufacturer’s instructions.
NOTICE!
Do not drill through the roof construction.

EN
Midi Heki Style 400 x 700 Installing the Midi Heki Style
9
Making a final check
➤ Check visually whether the seal all round the outer frame is against the
roof surface and the mounting supports are aligned.
➤ Tighten the screws about 10 minutes after installation.
See fig. a
A
➤ Press the inner frame into the groove (1) on the mounting supports.
➤ After installing, check the roof light works properly.
➤ Remove the protective film from both sides of the acrylic glass.
I
➤ If necessary, enter the new vehicle height and weight in the vehicle doc-
uments.
NOTICE!
Hold the hand crank in the closed position when placing the inner
frame on the outer frame, otherwise the position of the hand crank
(2) will be misaligned with the hexagon part (3).
NOTE
If the protective film is exposed to sunlight for too long, it cannot
be taken off without leaving a residue.

EN
Using the Midi Heki Style Midi Heki Style 400 x 700
10
8 Using the Midi Heki Style
8.1 Opening and closing the Midi Heki Style (fig. b)
➤ Turn the hand crank clockwise to open the roof light.
Turn the hand crank until you feel its resistance. The opening angle of
the roof light is approx. 70°.
➤ Turn the hand crank anti-clockwise to close the roof light.
Turn the hand crank until you feel its resistance.
➤ Fold in the hand crank; you must feel a slight tension on the hand crank
before folding it in.
➤ Check whether the roof light is locked properly: Try to push up the pane
of glass with your hand (without using force).
8.2 Opening and closing the roller blinds (fig. c)
A
I
➤ Hold the recessed handle of the roller blind and pull it into the required
position.
NOTICE! Risk of damage due to a build-up of heat between
the roller blind and the window.
In strong sunlight, only close the blackout roller blind two thirds of
the way.
NOTE
You can adjust the blackout roller blind and the flyscreen sepa-
rately.

EN
Midi Heki Style 400 x 700 Troubleshooting
11
9 Troubleshooting
If you are unable to rectify the fault, get in touch with a specialist workshop.
10 Maintaining and cleaning the
Midi Heki Style
A
➤ Clean the roller blind with mild soap and plenty of water.
➤ Put talcum powder on the rubber seal.
Fault Possible cause Suggested remedy
The roof light does not
close completely.
Dirt between the glass and
frame
Clean the window.
Remove any leaves and twigs
between the glass and frame.
The flyscreen or black-
out roller blind cannot
be moved.
Dirt on the side guides Clean the side guides.
NOTICE!
Do not use any sharp or hard objects for cleaning since they may
damage the acrylic glass.
Only use cleaning agents that are approved by the manufacturer.
Acrylic glass polish (item no. 9104100242), special polishing cloth
(item no. 9104100243) and acrylic glass cleaning agent (item no.
9104100244).

EN
Warranty Midi Heki Style 400 x 700
12
11 Warranty
The statutory warranty period applies. If the product is defective, please
contact the service partner in your country (addresses on the back on the
instruction manual).
Our experts will be happy to help you and will discuss the warranty process
with you in more detail.
12 Disposal
➤ Place the packaging material in the appropriate recycling waste bins
wherever possible.
M
If you wish to finally dispose of the product, ask your local recycling
centre or specialist dealer for details about how to do this in
accordance with the applicable disposal regulations.

AUSTRALIA
Dometic Australia Pty. Ltd.
1 John Duncan Court
Varsity Lakes QLD 4227
1800 212121
+61 7 55076001
Mail: sales@dometic-waeco.com.au
AUSTRIA
Dometic Austria GmbH
Neudorferstrasse 108
2353 Guntramsdorf
+43 2236 908070
+43 2236 90807060
Mail: [email protected]
BENELUX
Dometic Benelux B.V.
Ecustraat 3
NL-4879 NP Etten-Leur
+31 76 5029000
+31 76 5029090
Mail: [email protected]
DENMARK
Dometic Denmark A/S
Nordensvej 15, Taulov
DK-7000 Fredericia
+45 75585966
+45 75586307
Mail: [email protected]
FINLAND
Dometic Finland OY
Mestarintie 4
FIN-01730 Vantaa
+358 20 7413220
+358 9 7593700
Mail: info@dometic.fi
FRANCE
Dometic SAS
ZA du Pré de la Dame Jeanne
F-60128 Plailly
+33 3 44633500
+33 3 44633518
Commercial : [email protected]
SAV/Technique : ser[email protected]
HONG KONG
WAECO Impex Ltd.
Suites 2207-2211 · 22/F · Tower 1
The Gateway · 25 Canton Road,
Tsim Sha Tsui · Kowloon
+852 24611386
+852 24665553
Mail: info@dometic-waeco.com.hk
HUNGARY
Dometic Plc. Sales Office
Kerékgyártó u. 5.
H-1147 Budapest
+36 1 468 4400
+36 1 468 4401
Mail: budapest@dometic.hu
ITALY
Dometic Italy S.r.l.
Via Virgilio, 3
I-47100 Forlì
+39 0543 754901
+39 0543 756631
Mail: [email protected]
NORWAY
Dometic Norway AS
Skolmar 24
N-3232 Sandefjord
+47 33428450
+47 33428459
Mail: firmapost@waeco.no
POLAND
Dometic Poland Sp. z o.o.
Ul. Puławska 435A
02-801 Warszawa
+48 22 414 32 00
+48 22 414 32 01
Mail: [email protected]
RUSSIA
Dometic RUS LLC
Komsomolskaya square 6-1
107140 Moscow
+7 495 780 79 39
+7 495 916 56 53
Mail: [email protected]
SLOVAKIA
Dometic Slovakia Sales Office Bratislava
Nádražná 34/A
SK-900 28 Ivanka pri Dunaji
/ +421 2 45 529 680
Mail: bratislava@dometic.com
SPAIN
Dometic Spain S.L.
Avda. Sierra del Guadarrama, 16
E-28691 Villanueva de la Cañada
Madrid
+34 902 111 042
+34 900 100 245
Mail: [email protected]
SWEDEN
Dometic Scandinavia AB
Gustaf Melins gata 7
S-42131 Västra Frölunda (Göteborg)
+46 31 7341100
+46 31 7341101
Mail: [email protected]
SWITZERLAND
Dometic Switzerland AG
Riedackerstrasse 7a
CH-8153 Rümlang (Zürich)
+41 44 8187171
+41 44 8187191
Mail: info@dometic-waeco.ch
TAIWAN
WAECO Impex Ltd.
Taipei Office
9F.-10, No. 1180, Zhongzheng Rd.,
Zhonghe Dist., New Taipei City 23586
+886 2 22237225
+886 2 81926742
Mail: market[email protected].tw
UNITED KINGDOM
Dometic UK Ltd.
Dometic House · The Brewery
Blandford St. Mary
Dorset DT11 9LS
+44 844 626 0133
+44 844 626 0143
Mail: [email protected]
UNITED ARAB EMIRATES
Dometic Middle East FZCO
P. O. Box 17860
S-D 6, Jebel Ali Freezone
Dubai
+971 4 883 3858
+971 4 883 3868
Mail: [email protected]
UNITED STATES OF AMERICA
Dometic Marine Division
2000 N. Andrews Ave. Extension
Pompano Beach, FL 33069 USA
+1 954 973 2477
+1 954 979 4414
Mail: marinesales@dometicusa.com
GERMANY
Dometic WAECO International GmbH
Hollefeldstraße 63 · D-48282 Emsdetten
+49 (0) 2572 879-195 · +49 (0) 2572 879-322
Mail: info@dometic-waeco.de · Internet: www.dometic-waeco.de
www.dometic-waeco.com
4445100705 H 08/2015 MO1138
/