Page is loading ...

1 Introduction
The LPC55S69 is an Arm
®
Cortex
®
-M33 based micro-controller for embedded
applications. This device includes but not limited to:
• Dual 150 MHz cores
• 320 kB on-chip RAM
• 640 kB on-chip flash
• Eight flexible seral communication peripherals, each of which can be a
USART, SPI, I
2
C, or I
2
S interface
• RTC/alarm timer
• One 16bit 1.0 Msps ADC
The most important feature of LPC55S69 is security. The Arm Cortex-M33
provides a security foundation, offering isolation to protect valuable IP and data
with TrustZone
®
technology. To support security requirements, the LPC55S69
offers support for HASH, AES, RSA, UUID, dynamic encrypt and decrypt the
data/code in on-chip flash.
LPC55S69 is also a low-power MCU. The dynamic current of LPC55S69 is
lower than 40 μA/MHz and the static current is nearly 18 μA when MCU is in the
OFF mode with 320 kB SRAM full retention, 5μA when keeping 8 kB SRAM.
e-Lock is a typical IOT application that requires the MCU to provide:
• High performance with low dynamic/static current
• Multi serial ports to connect different kinds of modules, sensors, wireless modules, and so on
• Big flash/RAM to store data like fingerprint templates and support capture enough sensor data in a period
• Security mechanism to set up safety connection and protect user’s data/code un-hackable
LPC55S69’s features are suitable for e-Lock and other IOT application.
LPC55S69 e-Lock demo kit supports features as below:
• Fingerprint recognition
• MIFARE card detection, NFC reader only supporting card’s ID
• Capacitive touch pin pads, 3 × 4 keys
• Bluetooth LE wireless communication
• MP3/WAV music play
• External SPI NOR flash
• Simple lock/un-lock motor control
• LED matrix, 3 × 4 LED
Contents
1 Introduction......................................1
2 Hardware.........................................2
2.1 Overview......................................2
2.2 Touch PCB board........................ 3
2.3 MCU base board..........................3
2.4 Wireless PCB board.....................6
3 LPC55S69/QN9090 software..........7
4 e-Lock functions demonstration...... 8
4.1 Android Bluetooth LE APK...........8
4.2 Pin-pad password...................... 10
4.3 Fingerprint enrollment and
recognition................................. 10
4.4 NFC card registration and
detection.................................... 10
5 Developing LPC55S69 & QN9090
and updating firmware...................10
5.1 Setting up LPC55S69 development
environment............................... 11
5.2 Updating LPC55S69 firmware... 11
5.3 Updating QN9090 firmware....... 11
5.4 Updating voice files....................13
6 References....................................14
LPC55S69ELDKUG
Setting Up LPC55S69 e-Lock Demo Kit
Rev. 0 — 09/2020
User's Guide

The LPC55S69 has two special features to enhance e-Lock application safety and easy development.
• PUF & PRINCE: It can help users protect password, application code and fingerprint templates data.
• Dual-core mechanism: It can support to save user data to flash and play music at the same time.
This User Guide guides users on what’s LPC55S69 based e-Lock hardware and how to set up the develop environment and
update firmware.
2 Hardware
2.1 Overview
The LPC55S69 e-Lock kit has three PCB boards as below:
• Touch PCB board, which includes:
— A TSM16C capacitive touch IC which can support up to 16 buttons
— 12 buttons connected with TSM16C
— 3 × 4 keys matrix
— An NFC reader’s antenna
• MCU base PCB board, which includes:
— LPC55S69 the main MCU with a RTC crystal to support RTC calendar
— CLRC663/630 NFC reader to read IC card
— One GD25Q32 SPI NOR flash to store MP3/WAV files and user data
— One ES7134LV audio codec to drive a speaker and play music
ES7134LV needs external amplifier to drive the speaker.
NOTE
— Two 74HC595 with 12 LED matrix to indicate which button was touched
• Wireless PCB board, which includes:
— NXP Bluetooth LE SOC QN9090 to support wireless connections with phones
— Motor driver DRV8837 to control the lockstitch status
Figure 1 shows the basic functions of each board.
Figure 1. LPC55S69 e-Lock demo kit block diagram
NXP Semiconductors
Hardware
Setting Up LPC55S69 e-Lock Demo Kit, Rev. 0, 09/2020
User's Guide 2 / 15

Figure 2 shows the real PCB boards. The original files of board schematic and design can be downloaded from nxp.com. The
detailed function and connector descriptions are introduced in following chapters.
Figure 2. e-Lock PCB
2.2 Touch PCB board
The touch PCB board integrates capacitive touch function and NFC antenna. It has 12 channel buttons, and users can input 1,
2, 3, 4, 5, 6, 7, 8, 9, 0,*, and #.
There is only one connector to link with MCU base board. The silkscreen name is J1.
Table 1. Touch board J1 pin description
Description Pin# Description
NC 1 2 Touch interrupt
NFC RF antenna 3 4 Touch reset
NFC RF antenna 5 6 Touch I
2
C SCL
NC 7 8 Touch I
2
C SDA
Ground 9 10 NC
VDD (3.3 V) 11 12 NC
2.3 MCU base board
The MCU base board integrates e-Lock’s basic functions as below:
• MCU, LPC55S69JBD100
• NFC reader, MFRC630
• Fingerprint sensor, BTL160
• Audio codec, ES7134LV
ES7134LV needs an external amplifier to drive a speaker.
NOTE
• SPI Flash, GD25Q32
NXP Semiconductors
Hardware
Setting Up LPC55S69 e-Lock Demo Kit, Rev. 0, 09/2020
User's Guide 3 / 15

• 3 × 4 LED matrix with two 74HC595
• Two buttons, reset (SW1) and key (SW2)
• Standard Debug SWD connector, 10 pin, 1.27 mm
• USB micro connector
The MCU base board has two LR6232B33M 3.3 V LDOs:
• One for digital power domain, such as, MCU, flash, RC630, LED, etc.
• One dedicated to speaker power supply, to improve LED keep stable brightness when speaker play voice or music
There are seven connectors to support external power supply and link with Wireless board, Touch board or expand other
functions. Table 2 to Table 8 describe the usages and pin functions of the each connector.
1. JP1: Used to connect with a coin battery. The battery provides the power for MCU’s RTC alive when external four or eight
AA battery pack power are removed.
Table 2. MCU base board JP1 pin description
Pin# Descriptions
1 Coin battery – (Ground)
2 Coin battery +
2. JP2: Used to connect with external power sources. JP2 can simulate when four AA battery pack can not provide current to
e-Lock system. The end customer can use JP2 to power the whole system.
Table 3. MCU base board JP2 pin description
Pin# Descriptions
1 External emergency power ground
2 External emergency power positive source
3. JP3: Used to connect with external speakers.
Table 4. MCU base board JP3 pin description
Pin# Descriptions
1 Audio right channel
2 Ground
3 Audio left channel
4. J3: Used to connect with an external fingerprint sensor module. J3 is compatible with Pmod connector rules.
Table 5. MCU base board J3 pin description
Description Pin# Description
SPI CS 1 2
GPIO P1_17
SPI MOSI 3 4
GPIO P0_25
SPI MISO 5 6
GPIO P1_9
Table continues on the next page...
NXP Semiconductors
Hardware
Setting Up LPC55S69 e-Lock Demo Kit, Rev. 0, 09/2020
User's Guide 4 / 15

Table 5. MCU base board J3 pin description (continued)
Description Pin# Description
SPI SCK 7 8
GPIO P1_10
GND 9 10
GPIO P1_11
VDD (3.3 V) 11 12 NC
5. J4: Dedicated to connect with a wireless board.
Table 6. MCU base board J3 pin description
Description Pin# Description
USB VCC (5.0 V) 1 2 Reset signal
P0_7 for lock status detect
3 4
P0_5 control MCU ISP
P0_8 for lock status detect
5 6
P1_31 Bluetooth LE interrupt
P0_9 for motor control
7 8
P0_29 Bluetooth LE UART TXD
P0_10 for motor control
9 10
P0_30 Bluetooth LE UART RXD
Four AA power pack power 11 12 Ground
6. J5: Used to connect with Touch board.
Table 7. MCU base board J5 pin description
Description Pin# Description
NC 1 2
P1_27, Touch interrupt
NFC RF antenna 3 4
P1_28, Touch reset
NFC RF 1ntenna
5
6
P0_14, Touch I
2
C SCL
NC 7 8
P0_13, Touch I
2
C SDA
Ground 9 10 NC
VDD (3.3 V) 11 12 NC
7. J6: Used to expand other functions, such as, connecting with UWB and Face ID module. J6 is compatible with Pmod
connector rules.
Table 8. MCU base board J6 pin description
Description Pin# Description
SPI CS 1 2 P0_23
SPI MOSI 3 4
P0_24
Table continues on the next page...
NXP Semiconductors
Hardware
Setting Up LPC55S69 e-Lock Demo Kit, Rev. 0, 09/2020
User's Guide 5 / 15

Table 8. MCU base board J6 pin description (continued)
Description Pin# Description
SPI MISO 5 6
P0_27
SPI SCK 7 8
P1_22
GND 9 10 NC
VDD (3.3 V) 11 12 NC
Users can debug MCU based board separately, with the debug port as J2, to evaluate any fingerprint sensor easily through the
J3 connector.
JP1 supports designer measurement the MCU’s only RTC alive current when removed external four AA power pack and MCU
goes to deep power-down modes.
J6 connection may help end customers expand more functions based on NXP LPC55S69 e-Lock demo kit, such as, adding UWB
function and Face Detect module for high-end e-Lock product.
2.4 Wireless PCB board
Wireless board is integrated with Bluetooth LE and simple lock/un-lock motor control functions:
• Bluetooth LE, QN9090HN
• Lock motor control, DRV8837C
• Hall sensor, CT832BV, to detect the lock’s status
• SPI Flash, GD25Q32
• Secure Element, SE070(optional)
• Two buttons, user key1 (SW1) and user key2 (SW2)
• Standard Debug SWD connector (J1), 10 pin, 1.27 mm
• One LED to indicate Bluetooth LE connection status
There are five connectors to support external power supply and link with MCU base board. Table 9 to Table 13 describe the usages
and pin functions for each connector.
1. JP1: If JP1 is shorted, the QN9090 enters the ISP mode and the firmware can be updated through the UART on Pin8&10
of J2.
In a normal mode, leave JP1 as open status.
Table 9. Wireless board JP1 pin description
Pin# Descriptions
1 Ground
2 QN9090 PIO5 ISP entry detect pin
2. JP2: Used for connecting external four AA battery power pack and providing the system power source.
NXP Semiconductors
Hardware
Setting Up LPC55S69 e-Lock Demo Kit, Rev. 0, 09/2020
User's Guide 6 / 15

Table 10. Wireless board JP2 pin description
Pin# Descriptions
1 Four AA Battery Power Pack ground
2 Four AA Battery Power Pack positive source
3. J2: Dedicated for connecting with MCU base board.
Table 11. Wireless board J2 pin description
Description Pin# Description
USB VCC (5.0 V) 1 2 Reset signal
Lock status detect 3 4 Bluetooth LE PIO15
Lock status detect 5 6 Bluetooth LE PIO5 (ISP)
Motor control 7 8 Bluetooth LE UART TXD (PIO8)
Motor control 9 10 Bluetooth LE UART RXD(PIO9)
Four AA power pack Power 11 12 Ground
4. J3: Used for detecting the lock status.
Table 12. Wireless board J3 pin description
Pin# Descriptions
1 VCC
2 IO1
3 IO2
4 Ground
5. J4: Used for locking motor control.
Table 13. Wireless board J3 pin description
Pin# Descriptions
1 Motor Control IO1: Suggested to connect with Motor negative
2 Motor Control IO2: Suggested to connect with Motor positive
3 LPC55S69/QN9090 software
The LPC55S69 based e-Lock demo software is based on SDK2.8.2. The latest SDK package and wireless uart project code on
QN9090 can be downloaded from MCUXpresso SDK.
Figure 3 shows the LPC55S69’s e-Lock application project diagram. The application falls into three levels:
• The basic level is SDK2.8.2, including the LPC55S69 basic IP (uart, timer, spi, I
2
c, flash API, etc) driver source codes.
• The middleware provides drivers for each e-Lock function, including initialization driver and read/write function drivers.
NXP Semiconductors
LPC55S69/QN9090 software
Setting Up LPC55S69 e-Lock Demo Kit, Rev. 0, 09/2020
User's Guide 7 / 15

• Application level codes include low power function, NFC read card, Pin-pad password input, fingerprint detection, voice
play, wireless connectivity, and battery monitor functions.
Figure 3. e-Lock LPC55S69 software structure diagram
4 e-Lock functions demonstration
The LPC55S69-based e-Lock demo kit includes:
• Hardware kit
• MCU application project
• QN9090 wireless Uart image binary file
• Android APK
This demo kit demonstrated basic e-Lock functions, such as, pin-pad password input, fingerprint enroll, recognition, and MIFARE
(NFC) card detection. Users can set e-Lock system or un-lock by Android Bluetooth LE APK.
4.1 Android Bluetooth LE APK
The e-Lock Android Bluetooth LE APK can be installed on Android Phone. The
apk
file is in the software zip package, the path
is
qn9090_binary_apk\android_app
, and the
apk
name is
WuartElock.apk
.
Figure 4 shows the e-Lock APP on Android. Once users open the the WuartElock app, it will search the e-Lock’s Bluetooth LE
broadcast name first, as shown in .
NXP Semiconductors
e-Lock functions demonstration
Setting Up LPC55S69 e-Lock Demo Kit, Rev. 0, 09/2020
User's Guide 8 / 15

Figure 4. e-Lock Android Bluetooth LE APK
Figure 5 lists all the Bluetooth LE devices nearby the phone. The NXP_WU is the LPC55S69 based e-Lock device name. WU is
short for Wireless Uart.
Figure 5. APK scan Bluetooth LE broadcast name
Users may click the NXP_WU button to enter the main e-Lock app application page.
As shown in Figure 4, to register a new fingerprint, select the numbers after Enroll Finger(注册指纹) and then click the button. The
e-Lock system will receive the command and enter the fingerprint enroll mode. Users need to follow the voice prompt and touch
the fingerprint sensor three times, waiting until hear the enroll fingerprint success voice prompt.
To register a new MIFARE (NFC) card, select the numbers after Register Card(注册卡 ID) and then click this button. The e-lock
system will play voice prompt messages to reminder customers to put the card to the NFC antenna area. Then a registered card
success voice will play by the e-Lock, which means your card ID is logged into the e-Lock devices.
To add a new pin-pad password, input the digital password, not longer than 32 characters, at the bottom of Add Password(注
册密码) and then select this password’s ID after this button and click it. The e-Lock will play the add new password success
prompt voice.
Clicking the Un-lock Door(开锁按钮) once may let e-Lock drive motor to unlock the door.
NXP Semiconductors
e-Lock functions demonstration
Setting Up LPC55S69 e-Lock Demo Kit, Rev. 0, 09/2020
User's Guide 9 / 15

Figure 6. APK scan Bluetooth LE broadcast name
4.2 Pin-pad password
Users need to add a password through APP first before inputting the right password through pin-pad.
Pin-pad is TSM16C with 12 capacitive touch buttons. The software for pin-pad input supports anti-peeping virtual length password.
The * button is used to delete one bit when users input a wrong number.
The # button is used for confirmation.
If the user clicks the # button, LPC55S69 starts to compare input characters with record passwords. If any recorded passwords
match with input, the LPC55S69 will control lock motor and un-lock the door.
4.3 Fingerprint enrollment and recognition
Users need to enroll a fingerprint first. During the fingerprint enroll process, LPC55S69 plays the voice prompt to reminder that
the user finger enrollment succeeds or not. Usually, users need to touch fingerprint sensor three times and the touch times can
be set in the software.
Once the e-Lock system enrolled one or several fingerprints, users can touch the fingerprint sensor. If the fingerprint is valid,
LPC55S69 plays Finger valid and drives motor to open the door. If the fingerprint is invalid, LPC55S6i plays Finger illegal only.
For fingerprint sensor with LEDs, in a normal mode, we turn on green and red led together and toggle them as breathe effect.
If the fingerprint is valid, the LEDs turn Green only and last one second. If the fingerprint is invalid, the LEDs turn RED and last
one second.
4.4 NFC card registration and detection
Users need to register one or multi cards into e-Lock through APP. When an ISO14443A card is closed to the e-Lock’s NFC
antenna area, the LPC55S69 will read the CARD ID and compare it with recorded cards list. If the card ID is valid, the LPC55S69
plays Card Valid voice prompt and drives motor to un-lock the door. If the card ID is invalid, the LPC55S69 plays Card illegal and
turns off all LEDs for one second.
5 Developing LPC55S69 & QN9090 and updating firmware
The e-Lock demo kit’s source code for LPC55S69 part is fully open source except fingerprint algorithm, which is packed as a library
and included in the project zip file. Users can download this demo project’s zip package from NXP.
To development the whole e-Lock software system, users should pre-install KEIL MDK with LPC55S69 DFP pack installed.
Uart terminal, such as, tera-term, should be installed too.
NXP Semiconductors
Developing LPC55S69 & QN9090 and updating firmware
Setting Up LPC55S69 e-Lock Demo Kit, Rev. 0, 09/2020
User's Guide 10 / 15

Python 3.7 should be installed for updating audio files into extern SPI flash.
5.1 Setting up LPC55S69 development environment
LPC55S69 uses KEIL MDK as development IDE. The KEIL MDK installation file can be dowloaded from KEIL.
KEIL needs the target MCU pack patched. To download LPC55S69 patch, click LPC55S69 for downloading.
Figure 7. LPC55S69 development IDE
The debugger can use Ulink2, Jlink, LPC-Link2 or MCU-Link.
5.2 Updating LPC55S69 firmware
Users can program LPC55S69 firmware through the debugger. The debugger connects with J1 on MCU base board through a
10-pin (0.05”) cable, as shown in Figure 8.
Figure 8. MCU-Link connected with MCU base board
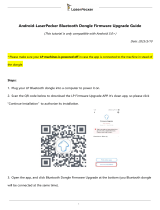
5.3 Updating QN9090 firmware
The name of QN9090 firmware update software is QTool. Users need download it from QTool and install it on Windows PC.
The QN9090 needs to update the firmware through UART.
1. Short JP1 and make sure QN9090 enters the ISP mode after power-up or reset, as shown in Figure 9.
NXP Semiconductors
Developing LPC55S69 & QN9090 and updating firmware
Setting Up LPC55S69 e-Lock Demo Kit, Rev. 0, 09/2020
User's Guide 11 / 15

Figure 9. Wireless board update firmware jumper setting
2. Connect the Wireless board with a USB to UART dongle. Here, it is CP2102 USB2UART dongle.
3. Connect Wireless board with USB2Uart dongle, as shown in Figure 10. TXD of USB2Uart is connected with Pin10 of J2
and RXD with Pin8. The GND of USB2Uart is connect with Pin12 of J2 and +5 V (VCC) with Pin1.
Figure 10. Wireless board connect with USB2Uart dongle
Input the following commands, to program the QN9090 images to wireless board through UART. Figure 11 shows the command
input examples and the process log.
COM10 needs to be replaced by the port number of your PC.
NOTE
1.
DK6Programmer.exe -V 2 -P 1000000 -s COM10 -e FLASH@0
2.
DK6Programmer.exe -V5 -s COM10 -P 1000000 -w
PSECT:64@0x160=00000000180001000000000000000000006000007802010200500500d8010103000000000000000000
0000000000000000000000000000000000000000000000
3.
DK6Programmer.exe -V 2 -P 1000000 -s COM10 -pFLASH@0=k32w061_ssbl.bin
NXP Semiconductors
Developing LPC55S69 & QN9090 and updating firmware
Setting Up LPC55S69 e-Lock Demo Kit, Rev. 0, 09/2020
User's Guide 12 / 15

4.
DK6Programmer.exe -V 2 -P 1000000 -s COM43 -pFLASH@0x55000=wireless_uart_bm.bin
5.
DK6Programmer.exe -V5 -s COM43 -P 1000000 -w PSECT:4@0x04=83000000
Figure 11. QTool command history logs
5.4 Updating voice files
To update audio voice files, Python 3.7 is required to be installed on PC. Users may upload voice file through J6 on MCU base
board through a USB2UART dongle.
Before uploading the voice files, program the bootloader binary to LPC55S69 first.
Figure 12. USB2UART dongle update voice file
The TXD of USB2UART dongle is connected with Pin3 of J6 on MCU base board and RXD with Pin5. GND is conectted with Pin9
of J6, as shown in Figure 12.
It the bootloader is programmed into flash successfully and MCU base board is powered through USB connector, hold SW2 and
click SW1.
After releasing SW1, users can run the
python
script in the audio folder.
• py_generate_chs.py: To program Chinese language voice files into SPI nor flash.
• py_generate_eng.py: To program English language voice files into SPI nor flash.
Before running this script,
1. Modify the COM port number at line 71 in scripter file, same as the PC’s COM port number.
2. Install pyserial and pydub by pip install command.
NXP Semiconductors
Developing LPC55S69 & QN9090 and updating firmware
Setting Up LPC55S69 e-Lock Demo Kit, Rev. 0, 09/2020
User's Guide 13 / 15

We need update 19 voice files into the SPI nor flash and the script will stop automatically once the program succeeds.
6 References
1.
LPC55S6x Data Sheet
(document LPC55S6X)
2.
QN9090 Getting Started
(document UM11356)
3.
MFRC630 and MFRC630 plus: High-performance frontend for MIFARE and NTAG products
(document MFRC630)
NXP Semiconductors
References
Setting Up LPC55S69 e-Lock Demo Kit, Rev. 0, 09/2020
User's Guide 14 / 15

How To Reach Us
Home Page:
nxp.com
Web Support:
nxp.com/support
Information in this document is provided solely to enable system and software implementers
to use NXP products. There are no express or implied copyright licenses granted hereunder
to design or fabricate any integrated circuits based on the information in this document. NXP
reserves the right to make changes without further notice to any products herein.
NXP makes no warranty, representation, or guarantee regarding the suitability of its products
for any particular purpose, nor does NXP assume any liability arising out of the application
or use of any product or circuit, and specifically disclaims any and all liability, including
without limitation consequential or incidental damages. “Typical” parameters that may be
provided in NXP data sheets and/or specifications can and do vary in different applications,
and actual performance may vary over time. All operating parameters, including “typicals,”
must be validated for each customer application by customer's technical experts. NXP does
not convey any license under its patent rights nor the rights of others. NXP sells products
pursuant to standard terms and conditions of sale, which can be found at the following address:
nxp.com/SalesTermsandConditions.
While NXP has implemented advanced security features, all products may be subject to
unidentified vulnerabilities. Customers are responsible for the design and operation of their
applications and products to reduce the effect of these vulnerabilities on customer’s applications
and products, and NXP accepts no liability for any vulnerability that is discovered. Customers
should implement appropriate design and operating safeguards to minimize the risks associated
with their applications and products.
NXP, the NXP logo, NXP SECURE CONNECTIONS FOR A SMARTER WORLD, COOLFLUX,
EMBRACE, GREENCHIP, HITAG, I2C BUS, ICODE, JCOP, LIFE VIBES, MIFARE, MIFARE
CLASSIC, MIFARE DESFire, MIFARE PLUS, MIFARE FLEX, MANTIS, MIFARE ULTRALIGHT,
MIFARE4MOBILE, MIGLO, NTAG, ROADLINK, SMARTLX, SMARTMX, STARPLUG, TOPFET,
TRENCHMOS, UCODE, Freescale, the Freescale logo, AltiVec, C‑5, CodeTEST, CodeWarrior,
ColdFire, ColdFire+, C‑Ware, the Energy Efficient Solutions logo, Kinetis, Layerscape, MagniV,
mobileGT, PEG, PowerQUICC, Processor Expert, QorIQ, QorIQ Qonverge, Ready Play,
SafeAssure, the SafeAssure logo, StarCore, Symphony, VortiQa, Vybrid, Airfast, BeeKit,
BeeStack, CoreNet, Flexis, MXC, Platform in a Package, QUICC Engine, SMARTMOS, Tower,
TurboLink, UMEMS, EdgeScale, EdgeLock, eIQ, and Immersive3D are trademarks of NXP
B.V. All other product or service names are the property of their respective owners. AMBA,
Arm, Arm7, Arm7TDMI, Arm9, Arm11, Artisan, big.LITTLE, Cordio, CoreLink, CoreSight, Cortex,
DesignStart, DynamIQ, Jazelle, Keil, Mali, Mbed, Mbed Enabled, NEON, POP, RealView,
SecurCore, Socrates, Thumb, TrustZone, ULINK, ULINK2, ULINK-ME, ULINK-PLUS, ULINKpro,
µVision, Versatile are trademarks or registered trademarks of Arm Limited (or its subsidiaries)
in the US and/or elsewhere. The related technology may be protected by any or all of patents,
copyrights, designs and trade secrets. All rights reserved. Oracle and Java are registered
trademarks of Oracle and/or its affiliates. The Power Architecture and Power.org word marks and
the Power and Power.org logos and related marks are trademarks and service marks licensed
by Power.org.
©
NXP B.V. 2020. All rights reserved.
For more information, please visit: http://www.nxp.com
For sales office addresses, please send an email to: [email protected]
Date of release: 09/2020
Document identifier: LPC55S69ELDKUG
/