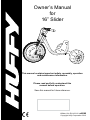
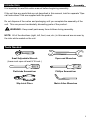
Huffy 16” Slider is a wheeled vehicle that provides safe and enjoyable transportation and recreation when used and maintained properly. It is designed for children 5 years of age and older who weigh less than 150 lbs. The Huffy 16” Slider has a sturdy frame and handlebars, and it comes with a variety of safety features, including a CPSC-approved helmet, kneepads, wrist guards, gloves, and elbow pads. It also has a rear brake for added safety.
Huffy 16” Slider is a wheeled vehicle that provides safe and enjoyable transportation and recreation when used and maintained properly. It is designed for children 5 years of age and older who weigh less than 150 lbs. The Huffy 16” Slider has a sturdy frame and handlebars, and it comes with a variety of safety features, including a CPSC-approved helmet, kneepads, wrist guards, gloves, and elbow pads. It also has a rear brake for added safety.


-
 1
1
-
 2
2
-
 3
3
-
 4
4
-
 5
5
-
 6
6
-
 7
7
-
 8
8
-
 9
9
-
 10
10
-
 11
11
-
 12
12
-
 13
13
-
 14
14
-
 15
15
-
 16
16
-
 17
17
-
 18
18
-
 19
19
-
 20
20


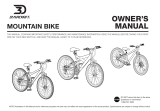
Huffy 16” Slider Owner's manual
- Type
- Owner's manual
- This manual is also suitable for
Huffy 16” Slider is a wheeled vehicle that provides safe and enjoyable transportation and recreation when used and maintained properly. It is designed for children 5 years of age and older who weigh less than 150 lbs. The Huffy 16” Slider has a sturdy frame and handlebars, and it comes with a variety of safety features, including a CPSC-approved helmet, kneepads, wrist guards, gloves, and elbow pads. It also has a rear brake for added safety.
Ask a question and I''ll find the answer in the document
Finding information in a document is now easier with AI
Related papers
-
Huffy 20” Slider Owner's manual
-
-
-
-
-
-
-
-
-
Other documents
-
 Dynacraft 8152-54TJD Owner's manual
-
SCOTT BMX 2011 User manual
-
 Pacific Cycle CUCINA HR7633 User manual
-
Husky HD-105 User manual
-
Centurion ROAD BIKE ISO 4210-2 User manual
-
Cannondale Bicycle Owner's manual
-
 Pacific Cycle Mountain Bicycles; BMX Bicycles User manual
-
 Merida Bike User manual
-
Kettler KC200-110 Owner's manual
-


