Page is loading ...

WW
WATERWARDEN
PP OO OO LL SS AA FF EE TT YY PP RR OO DD UU CC TT SS
®
SAFETY FENCE
Installation Manual
Read through these instructions carefully and completely
before you begin drilling.
Detailed instructions for curved or free-form installation
can be found on Page 4.
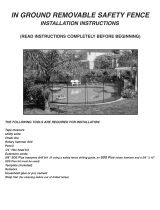
LIST OF COMPONENTS:
• Drilling Template “A” (printed on inside of carton)
• WaterWarden safety fence section (Fig. 1)
• Plastic Feet (Fig. 2)
• Plastic Caps (Fig. 3)
• Safety Latch (Fig. 4)
• Rubber Heads for poles (Fig. 5)
LIST OF TOOLS NEEDED FOR INSTALLATION:
• Utility knife or box cutter
• Rotary hammer drill
•
5/8” SDS masonry drill bit [If using a drilling guide, a 5/8” x 18”
masonry drill bit is needed]
• ¼” phillips head bit
• Extension cord (if necessary)
• Measuring tape
• Chalk line or white chalk
• Pencil or white chalk
• Hammer or rubber mallet
• Square and level or drilling guide (available for rental from
dealer where fence was purchased)
• PVC glue
INSTALLATION:
1.Locate Drilling Template “A” on inside flap of the Pool
Fence carton (“A”). Carefully cut out the Drilling
Template with utility knife or box cutter. Puncture spots
marked “B”, “C” and “D” .
2. Snap a chalk line around the perimeter of the pool, 24”
from pool edge.
3. Decide where the opening of your pool fence will be.
Mark “X” on the pool deck with chalk for placement of
initial pole. See (Fig. 1).
4. If you have purchased a separate Gate for your pool fence,
that must be installed first. Please see special instructions
included with the Gate, for Gate installation. If you will be
using the join of two sections as the opening for your Water-
Warden safety fence, continue with the following.
5. Place Drilling Template on pool surround, carefully aligning
spot “D” with the chalk mark “X”. Check to make sure that the
template is straight and aligned with the chalk line, and that
spots marked “B” and “C” are also 24” from pool edge.
Insuring that template does not move, drill through spots
marked “B”, “C” and “D”. All holes should be drilled to a
depth of 4”, and at a direct 90º angle to the deck. (Please note,
the spots marked “C” and “D” is where the opening of your
pool fence will be. The two poles that fit into these holes will
be joined with a “Safety Latch”.)
6. Continue around the entire pool, drilling holes while using the
Drilling Template for guidance. Place spot marked “B” over
the hole on the far right (last hole drilled). Drill through spot
marked “C”. Proceed around the perimeter of the entire pool,
always placing the spot marked “B” over the last hole drilled,
and ensuring that spot marked “C” is 24” from pool edge.
Keep drilling the new hole through the spot marked “C”. Every
12 feet (or at the end of each section), you must also drill
through spot marked “D”, to accommodate the pole of the
new section.
7. When you come to a corner of the pool, it is not recommen-
ded that you design 90º corners within one fence section.
Always use two smaller sections to meet at the corner (see #8
below for instructions on cutting down a fence section). Drill
the two corner holes at a 5º angle away from each other (use
a square and level to measure the angles before drilling, or
use the drilling guide available for rent from dealer where the
fence was purchased.)
8. To cut down a fence section to create a smaller panel, follow
the steps below:
• IMPORTANT: Lay out mesh on flat surface, ensuring that
mesh is tight and straight in all directions.
• Decide the width of the custom panel. Add four inches to
your measurement prior to cutting.
• Using scissors or utility knife, cut mesh of panel to
determined width.

• Using any extra pole, detach trim with ¼” phillips head bit.
• Mark desired length on mesh with a chalk line. Fold extra
fabric back and under, leaving fabric ½” longer than marked
chalk line. Reattach trim to pole along marked line, ensuring
that the fabric is sandwiched in between the pole and the
trim, and that the screws are directly on the chalk line. Trim
away excess fabric from pole edge with scissors or utility
knife. Use a heat source to melt the cut edge of the mesh to
prevent fraying.
9.
When you have completed all the holes, clear the holes of any
drilling dust. Insert the plastic “feet” into the holes. Always
insert the feet with care, so as not to damage them. Confirm
that plastic feet fit snugly into
the holes. If you are having
trouble getting the feet to fit into the holes, tap them gently
into place with a hammer
or rubber mallet. If using hammer,
protect the plastic feet with a piece of wood before ham-
mering, so as not
to break them. Complete this step for all
the plastic feet.
10. Attach Safety Latch to end of each fence section, using
the pre-drilled holes in the pole.
11. Begin inserting your WaterWarden safety fence into the
plastic feet. Fasten each section to the next with the “Safety
Latch”.
12. Place a Rubber Head onto the top of each pole.
13. If desired, you may drill one additional hole near the fence
opening. Insert plastic foot into hole as described above.
Roll up open section of fence, and place pole into new hole,
when continuous access to pool is wanted. This will hold the
fence section open.
14. Hose down pool deck to rinse away any chalk marks or
drilling dust.
15. If WaterWarden safety fence will be removed for an extended
period of time, use enclosed plastic caps to seal holes in the
ground. This will insure that the holes with the plastic feet
inside do not fill up with any dirt or debris. Simply remove
fence from holes, taking care to leave plastic feet in the
holes. Insert the caps into the feet.
1. Measure and drill initial hole as described in Basic Installation
instructions. Continue to measure and mark the spots for
drilling, allowing 36” from center of hole to center of hole. At
the end of each fence section, measure 2” from center of last
hole for beginning hole of new section. When marking the
holes around a curved run of fencing, the holes should be
drilled ¼” closer on the outside curve, and ¼” further apart
on the inside curve, to ensure there will be no slack in the
fence and that the fence material is pulled tightly.
2. Angle the drilling of the holes in the following manner. Use a
square and level or drilling guide (available for rental from
dealer where fence was purchased) to drill the holes that have
been marked. (This method of drilling ensures that the fence
will be pulled tight when inserted into the feet.)
• Holes for a straight run of fencing should be drilled at a 90º
angle to the deck
• Holes for an outside curve should be angled 2º to 3º away
from the pool. Very tight curves may require an angle of up
to 4º.
• Holes on the inside curve of the pool should be angled 2º to
3º toward the pool. Very tight curves may require an angle
of up to 4º. See (Fig. 6) below.
3. Repeat steps 1 and 2 around perimeter of pool. Always check
to make sure your marks are 24” from pool edge, and that
you have correctly angled the drill, before drilling.
4. To avoid this measuring of angles and distances, you may
consider surrounding your curved pool with a rectangular
installation design.
Fig. 6
Congratulations! You have completed your WaterWarden pool
safety fence installation
!
INSTALLATION INSTRUCTIONS FOR A CURVED OR FREE-
FORM POOL:
Read through Basic Installation instructions to understand the
general method used to install your pool safety fence. Mark
all the holes with chalk for each section before you drill.
Illustration of Pole Angles for Curved or Free Form Pools:
Fig. 1
Fig. 2 Fig. 3 Fig. 4 Fig. 5

Register your safety fence and activate the warranty by returning this form, along with a copy of your receipt, within 30
days of purchase to: WaterWarden Pool Safety Products, 687 Prospect Street, Suite 460, Lakewood, NJ, 08701
Purchase Date:______________________________________________________________________________________
Purchaser’s Name:___________________________________________________________________________________
Address:___________________________________________________________________________________________
Phone No._____________________________Email:_______________________________________________________
Fence Size: __________________Standard Mesh □ Ultra Mesh □ Solid □ Serial No.____________________________
Dealer Name:_______________________________________________________________________________________
Dealer Address: _____________________________________________________________________________________
Dealer Phone No.______________________________Dealer Email: ___________________________________________
SAFETY REMINDERS
WARNING:
THERE IS NO SUBSTITUTE FOR ADULT SUPERVISION AROUND A SWIMMING POOL. THE WATERWARDEN POOL
SAFETY FENCE IS NOT DESIGNED TO BE A SUBSTITUTE FOR ADULT SUPERVISION, NOR IS IT GUARANTEED TO
PREVENT ACCESS TO THE POOL.
• Any pool safety product is only effective as a level of protection against unauthorized pool access if used correctly.
• The WaterWarden safety fence must isolate the pool from all exits of the home.
• All sides of the pool should be surrounded by the safety pool fence, or by another permanent obstruction, such as a
concrete wall, iron fence, brick wall etc.
• If the pool safety fence is not being used as a complete structure, or adjoins a permanent structure, you must
ensure that the permanent structure is solid and sturdy. Also make sure that a child cannot climb over, under or
through the permanent structure.
• Make sure not to install the pool safety fence near another structure that a child can climb on, such as raised walls,
seating or decorative objects.
• Check local building codes before installation to be sure you are in compliance with fencing laws.

WW
WATERWARDEN
PP OO OO LL SS AA FF EE TT YY PP RR OO DD UU CC TT SS
®
w w w . s m a r t p o o l . c o m
ALL WARRANTY CLAIMS MUST BE HANDLED DIRECTLY
WITH SMARTPOOL. DO NOT RETURN TO YOUR DEALER.
SMARTPOOL ACCEPTS CLAIMS FROM POOL OWNERS ONLY.
1) Call 1-732-730-9880 between the hours of 8:30 am and 5:00 pm (Est) to initiate a claim.
2) You will receive an instruction package within 10 days.
3) Please allow 2-4 weeks for warranty claims to be settled. Allow extra time for in-season (July-October) claims.
4) If you do not receive your fence within 6 weeks, please call SmartPool Warranty Department.
SmartPool Pool Safety Fence
L i m i t e d W a r r a n t y
( Va l i d f o r N o r t h A m e r i c a O n l y )
To File a Claim:
SmartPool LLC warrants to the original purchaser of the Safety Fence that the company will, at its option, repair or replace any safety fence that proves to be defective
in either workmanship or material upon prepaid return of the fence by the owner to SmartPool LLC, subject to the provisions of the limited warranty stated above, and
the exclusions and limitations set forth below. SmartPool. will, pursuant to the terms of this warranty, at its sole option. either repair the fence at a nominal charge to
the owner, or replace the fence per the pro-rated provisions stated herein. All repaired or replaced covers will be returned at the homeowner’s expense. The pro-rated
basis for fence replacement is set forth above.
What is covered:
The safety fence is warranted to be free of defects in material and workmanship when leaving the factory.
What is not covered: Any damage due to improper installation, sizing or storage; Damage, defects, malfunctions, or other failures arising from use of the product which does
not comply with the instructions provided by the manufacturer; Excessive wear. misuse. neglect, or abuse, including burn holes from smoking or from the effluent of fireplaces,
rips and tears caused by acts of nature, rodents and/or people, including animals. Damage, defects, malfunctions, or other failure caused by or related to repairs performed by
any servicer other than an authorized service representative of SmartPool LLC. Claims will not be accepted for a fence’s damage in transit unless damage to shipping container is
noted at time of delivery on the transport company’s delivery bill.
SMARTPOOL LLC SHALL IN NO WAY BE LIABLE OR RESPONSIBLE UNDER ANY CIRCUMSTANCES OR IN ANY AMOUNT FOR ANY CONSEQUENTIAL OR
INCIDENTAL DAMAGES OR FOR ANY INJURY OR DAMAGES TO PERSON OR PROPERTY USING OR USED IN CONNECTION WITH THIS PRODUCT, OR
FOR LOSS OF PROFITS OR OTHER COSTS OR EXPENSES OF ANY KIND OR CHARACTER. THERE ARE NO OTHER WARRANTIES OR REPRESENTATIONS,
EITHER EXPRESS OR IMPLIED, WHETHER OF MERCHANTABILITY, FITNESS FOR A PARTICULAR PURPOSE, OR OTHER, MADE BY SMARTPOOL LLC,
OTHER THAN THOSE SPECIFICALLY SET FORTH IN THIS WARRANTY. NO PERSON, FIRM, OR CORPORATION IS AUTHORIZED TO MAKE ANY
REPRESENTATIONS, OR INCUR ANY OBLIGATIONS IN THE NAME OF OR ON BEHALF OF SMARTPOOL LLC, EXCEPT AS STATED HEREIN. THIS WARRANTY
IS IS EXPRESSLY UNDERSTOOD TO BE THE EXCLUSIVE REMEDY AVAILABLE TO THE PURCHASER, AND THIS WARRANTY CONTAINS THE FULL AND
COMPLETE AGREEMENT BETWEEN SMARTPOOL AND THE PURCHASER. THIS WARRANTY SETS FORTH THE ONLY OBLIGATIONS OF SMARTPOOL WITH
REGARD TO THIS PRODUCT, AND THERE ARE NO WARRANTIES WHICH EXTEND BEYOND THE DESCRIPTION ON THE FACE HEREOF.
The representations set forth herein are the only representations made by SmartPool LLC with respect to the product, and this warranty does not constitute either a
performance or satisfaction guarantee. It is the responsibility of the product owner to regularly test and check the product for proper function and safety.
This warranty gives the original purchaser specific legal rights. You may have other rights depending on where you live.
FIVE YEAR STANDARD WARRANTY
Five year limited warranty from date of purchase with one year full.
After the first year, the claimant shall pay the list price at the date of the claim less one-sixtieth (1/60) of that price
for each full month remaining in the warranty period.
/