M
E
S
H
G
U
A
R
D
+
S
C
R
E
E
N
T
I
G
H
T
N
O
M
O
R
E
P
I
C
K
E
T
S
!
F
R
E
E
Y
O
U
R
P
O
R
C
H
•
S
C
R
E
E
N
T
I
G
H
T
.
C
O
M
N
O
M
O
R
E
P
I
C
K
E
T
S
!
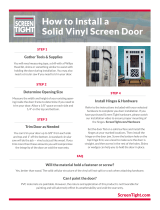
How to Install a
Solid Vinyl Screen Door
STEP 1
STEP 2
Gather Tools & Supplies
You will need a tape measure, a drill with a phillips head bit, shims or
something similar to assist with holding the door during installation.
You may also need a circular saw if you plan on trimming your door.
Determine Opening Size
Measure the width and height of your existing opening inside the door
frame to determine if you need to trim your door. Allow a 1/8” space
on each side and top and up to 1/4” on the bottom.
STEP 3
Trim Door as Needed
You can trim your door up to 3/8” from each side and top and 1” off the
bottom. If you trim more than these amounts you will compromise the
integrity of the door an void the warranty. A standard circular saw will
do the job — vinyl cuts just like wood.
Installation guides and videos available at ScreenTight.com/Hardware
Position Hinges
Measuring from the
top of your door, mark
the door frame at 10”,
40” and 67”. Position
each hinge on the
center of each mark.
Mount Hinges
Align the middle of the each hinge with the side of
the door by pushing the Edge Guide directly against
the frame. The vertical holes of each hinge attach
to the frame while the horizontal holes attach to
the door itself. Mark hole locations and drill pilot
holes. Attach with included screws. Be sure not to
over-tighten as this may break the hinge. Once
hinges are mounted, slide screw covers into place.
Mount Pull Handles
Mount pull handles at
desired height — usually
aligned near the center of
the door about 36” from
the top. Drill pilot holes
then install with included
screws, being sure not to
overtighten.
B CA D
Tape Measure
Shims or Spacers
Circular Saw (if needed)
Drill with 3.32” Drill Bit
and Phillips #2 Bit
TOOLS & SUPPLIES
1/8” SPACE
1/4” SPACE
1/8” SPACE 1/8” SPACE
Adjust Hinge Tension
Screen Tight hinges have built-in adjustable
springs for door movement control. To
increase hinge tension, insert a phillips
head screwdriver into the top of the hinge,
push down and turn counter-clockwise
about 60° then release. There are four
levels of tension. The maximum tension is
reached at about 240° from zero.
FIG B
INSTALL HINGES & HARDWARE
FIG A
FRAME SIDE
DOOR SIDE
The following are instructions for installing Screen Tight hardware which may or may not have been included with your door.
IMPORTANT: Screen Tight hinges have built-in guides to assist with installation. Note the hole direction on
each side (g. A) — vertical holes must be mounted to the frame while horizontal holes are mounted to the
door itself. Be sure to push the Edge Guide (g. B) on the back of the hinge directly against the door frame.


