Philips LX-3000D/25S User manual
- Category
- Home audio sets
- Type
- User manual

1
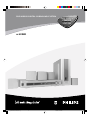
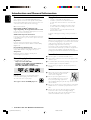
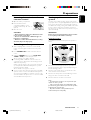
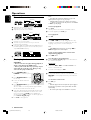
DVD VIDEO DIGITAL SURROUND SYSTEM
DVD HOME
CINEMA
SYSTEM
DVD HOME
CINEMA
SYSTEM
LX-3000D
pg 001-023/LX3xxx/22-Eng 4/16/02, 1:20 PM1

2
IMPORTANT NOTE
Important notes for users in the U.K.
Mains plug
This apparatus is fitted with an approved 13 Amp plug.
To change a fuse in this type of plug proceed as follows:
1 Remove fuse cover and fuse.
2 Fix new fuse which should be a BS1362 5 Amp, A.S.T.A.
or BSI approved type.
3 Refit the fuse cover.
If the fitted plug is not suitable for your socket outlets, it
should be cut off and an appropriate plug fitted in its
place.
If the mains plug contains a fuse, this should have a value
of 5 Amp. If a plug without a fuse is used, the fuse at the
distribution board should not be greater than 5 Amp.
Note: The severed plug must be disposed of to avoid a
possible shock hazard should it be inserted into a 13 Amp
socket elsewhere.
How to connect a plug
The wires in the mains lead are coloured with the
following code: blue = neutral (N),
brown = live (L).
¶ As these colours may not correspond with the colour
markings identifying the terminals in your plug, proceed
as follows:
– Connect the blue wire to the terminal marked N or
coloured black.
– Connect the brown wire to the terminal
marked L or coloured red.
– Do not connect either wire to the earth terminal in
the plug, marked E (or e) or coloured green (or green
and yellow).
Before replacing the plug cover, make certain that the
cord grip is clamped over the sheath of the lead - not
simply over the two wires.
Copyright in the U.K.
Recording and playback of material may require consent.
See Copyright Act 1956 and The Performer’s Protection
Acts 1958 to 1972.
Important Note
Norge
Typeskilt finnes på apparatens underside.
Observer: Nettbryteren er sekundert innkoplet.
Den innebygde netdelen er derfor ikke frakoplet
nettet så lenge apparatet er tilsluttet
nettkontakten.
For å redusere faren for brann eller elektrisk støt, skal
apparatet ikke utsettes for regn eller fuktighet.
Italia
DICHIARAZIONE DI CONFORMITA’
Si dichiara che l’apparecchio LX-3000D Philips risponde
alle prescrizioni dell’art. 2 comma 1 del D.M. 28 Agosto
1995 n. 548.
Fatto a Eindhoven
Philips Consumer Electronics
Philips, Glaslaan 2
5616 JB Eindhoven, The Netherlands
DK
Advarsel: Usynlig laserstråling ved åbning når
sikkerhedsafbrydere er ude af funktion. Undgå
utsættelse for stråling.
Bemærk: Netafbryderen er sekundært indkoblet og
ofbryder ikke strømmen fra nettet. Den indbyggede
netdel er derfor tilsluttet til lysnettet så længe
netstikket sidder i stikkontakten.
S
Klass 1 laseraparat
Varning! Om apparaten används på annat sätt än i
denna bruksanvisning specificerats, kan användaren
utsättas för osynlig laserstrålning, som överskrider
gränsen för laserklass 1.
Observera! Stömbrytaren är sekundärt kopplad och
bryter inte strömmen från nätet. Den inbyggda
nätdelen är därför ansluten till elnätet så länge
stickproppen sitter i vägguttaget.
SF
Luokan 1 laserlaite
Varoitus! Laitteen käyttäminen muulla kuin
tässä käyttöohjeessa mainitulla tavalla saattaa
altistaa käyttäjän turvallisuusluokan 1 ylittävälle
näkymättömälle lasersäteilylle.
Oikeus muutoksiin varataan. Laite ei saa olla
alttiina tippu-ja roiskevedelle.
Huom. Toiminnanvalitsin on kytketty toisiopuolelle,
eikä se kytke laitetta irti sähköverkosta.
Sisäänrakennettu verkko-osa on kytkettynä
sähköverkkoon aina silloin, kun pistoke on
pistorasiassa.
This product complies with the radio
interference requirements of the European
Community.
CAUTION
Use of controls or adjustments or performance
of procedures other than herein may result in
hazardous radiation exposure or other unsafe
operation.
pg 001-023/LX3xxx/22-Eng 4/16/02, 1:21 PM2

3
English
Deutsch Español
Nederlands
Italiano
Français
∂ÏÏËÓÈο Português Suomi Dansk Svenska
Polski
Index
INDEX
English -------------------------------------------------------- 5
Français ------------------------------------------------------ 24
Español ------------------------------------------------------43
Deutsch ----------------------------------------------------- 62
Nederlands ------------------------------------------------- 81
Italiano ----------------------------------------------------- 100
Svenska ---------------------------------------------------- 119
Dansk ------------------------------------------------------ 138
Suomi ------------------------------------------------------ 157
Português ------------------------------------------------- 176
-------------------------------------------------- 195
Polski------------------------------------------------------- 215
pg 001-023/LX3xxx/22-Eng 4/16/02, 1:21 PM3

4
CAUTION
VISIBLE AND INVISIBLE LASER RADIATION WHEN
OPEN AVOID EXPOSURE TO BEAM
ADVARSEL
SYNLIG OG USYNLIG LASERSTRÅLING VED ÅBNING
UNDGÅ UDSÆTTELSE FOR STRÅLING
VARNING
SYNLIG OCH OSYNLIG LASERSTRÅLNING NÄR
DENNA DEL ÄR ÖPPNAD BETRAKTA EJ STRÅLEN
VARO!
AVATTAESSA OLET ALTTIINA NÄKYVÄLLE JA
NÄKYMÄTTÖMÄLLE LASER SÄTEILYLLE. ÄLÄ KATSO
SÄTEESEEN
VORSICHT
SICHTBARE UND UNSICHTBARE LASERSTRAHLUNG
WENN ABDECKUNG GEÖFFNET NICHT DEM
STRAHL AUSSETSEN
ATTENTION
RAYONNEMENT LASER VISIBLE ET INVISIBLE EN CAS
D’OUVERTURE EXPOSITION DANGEREUSE AU
FAISCEAU
Manufactured under license from Dolby Laboratories.
“Dolby” and the double-D symbol are trademarks of Dolby
Laboratories. Confidential Unpublished Works. ©1992-
1997 Dolby Laboratories, Inc. All rights reserved.
Manufactured under license from Digital Theater Systems,
inc. US Pat. No. 5,451,942 and other worldwide patents
issued and pending. “DTS” and “DTS Digital Surround” are
trademarks of Digital Theater Systems, Inc. 1996 Digital
Theater Systems, Inc. All rights reserved.
This product incorporates copyright protection technology
that is protected by method claims of certain U.S. patents
and other intellectual property rights owned by Macrovision
Corporation and other rights owners. Use of this copyright
protection technology must be authorized by Macrovision
Corporation, and is intended for home and other limited
viewing uses only unless otherwise authorized by
Macrovision Corporation. Reverse engineering or
disassembly is prohibited.
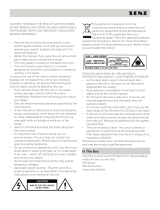
WARNING: Due to the fact that the mains switch of sub-woofer was located at
the rear panel, the apparatus must be located in an open area without any
obstructions to access the mains switch.
WARNING: To prevent fire or shock hazard, do not expose this equipment to rain
or moisture.
ATTENTION: L’interrupteur d’alimentation se trouve à l’arrière du caisson de
basses et par conséquence, vous devrez laisser assez d’espace autour de l’appareil
sans obstacles pour pouvoir accéder à l’interrupteur.
ATTENTION: Pour éviter les chocs electriques ou les risques de flamme,
n’exposez pas cet appareil à la pluie ou à l’humidité.
ADVERTENCIA: Debido a que el interruptor de conexión a la red eléctrica del
sub-woofer está situado en el panel trasero, el aparato debe estar situado en un
área abierta y sin obstrucciones para el acceso a dicho interruptor.
ADVERTENCIA: Para evitar riesgos de incendio o sacudidas eléctricas, no
exponga este equipo a la lluvia o a la humedad.
WARNHINWEIS: Aufgrund der Tatsache, dass sich der Netzschalter des
Subwoofers auf der Rückwand befindet, muss das Gerät in einem offenen Bereich
aufgestellt werden, damit der Netzschalter völlig ungehindert zugänglich ist.
WARNHINWEIS: Dieses Gerät weder Regen noch Feuchtigkeit aussetzen, um
der Brand- bzw. Stromschlaggefahr vorzubeugen.
WAARSCHUWING: Gezien het feit dat de aan/uit-schakelaar van de subwoofer
op de achterkant van het apparaat zit, dient er rondom het apparaat ruimte te
zijn zodat men zonder problemen bij de aan/uit-schakelaar kan komen.
WAARSCHUWING: Houd het apparaat uit de buurt van regen of vocht om het
risico op schokken of brand te vermijden.
AVVERTENZA: L’interruttore d’alimentazione del subwoofer si trova sulla parte
posteriore dell’apparecchio e dunque controllare che lo spazio intorno
all’apparecchio sia sufficiente e senza ostacoli per accedere all’interruttore.
AVVERTENZA: Per evitare il pericolo di scosse elettriche o di incendio, non
esporre l’apparecchio a pioggia o umidità.
VARNING: På grund av att subwooferns strömbrytare sitter på bakre panelen, måste
apparaten ställas fritt så att strömbrytaren är lätt åtkomlig.
VARNING: För att förhindra risken för brand eller elektrisk stöt får denna
utrustning inte utsättas för regn eller fuktighet.
ADVARSEL: Fordi subwooferens netafbryder sidder på bagpanelet, skal apparatet
anbringes på et åbent sted uden forhindringer, så der er let adgang til
netafbryderen.
ADVARSEL: For at undgå risiko for brand eller elektriske stød må dette udstyr
ikke udsættes for regn eller fugtighed.
VAROITUS: Koska alabassokaiuttimen virtakytkin sijaitsee takapaneelilla, laite on
asetettava avoimeen tilaan virtakytkimen käytön mahdollistamiseksi esteettä.
VAROITUS: Tulipalon ja sähköiskuvaaran ehkäisemiseksi älä altista tätä laitetta
sateelle tai kosteudelle.
ATENÇÃO: O interruptor de alimentação do subwoofer encontra-se na parte de
trás do aparelho; certifique-se de que existe espaço suficiente em volta do
aparelho e sim obstáculos para ter acesso ao interruptor.
ATENÇÃO: Para evitar o risco de choque ou de incêndio, não exponha o
aparelho a chuva ou humidade.
OIOOI: p p subwoofer
p p, pp p p
pp p
p .
OIOOI: ! p"# p#
p$, #.
UWAGA: Wyłącznik zasilania znajduje się na tylnym panelu. Z tego powodu
subwoofer musi stać na wolnej przestrzeni i nic nie może utrudniać dostępu do
wyłącznika.
UWAGA: Ze względu na niebezpieczeństwo porażenia prądem lub powstania
pożaru, nie wolno narażać opisywanego urządzenia na deszcz lub wilgoć.
The DVD VIDEO player is in conformity
with the EMC directive and low-voltage
directive.
Laser
Type Semiconductor laser GaAIAs
Wave length 650nm
Output Power 7mW
Beam divergence 60 degree
pg 001-023/LX3xxx/22-Eng 4/16/02, 1:21 PM4

5
English
Introduction and General
Information
Features ............................................................................... 6
Discs for playback ............................................................. 6
Player zone
Supplied accessories ......................................................... 6
Environmental information.............................................. 6
Installation ........................................................................... 6
Maintenance........................................................................ 6
Functional Overview
Front and Rear panels ...................................................... 7
Remote Control ................................................................ 8
Connections
Connecting antennas ........................................................ 9
MW Indoor Loop Antenna
FM Indoor Antenna
FM Outdoor Antenna
Connecting the speakers ............................................... 10
Connecting a TV and additional components ........... 10
Preparations
Inserting batteries into the remote control.............. 11
Switching on the system ................................................ 11
Setting up the surround sound system ............... 11–12
Placing the speakers
Changing the volume level
Setting up the subwoofer .............................................. 12
System Setup (DVD) ............................................... 12–14
General operation
Setting the picture
Setting the sound
Setting the language
Setting the features
Basic Functions
Selecting the surround sound mode ........................... 15
Selecting the digital sound effect ................................. 15
Volume control ................................................................ 15
Dimming the display screen .......................................... 15
Contents
Operations
Discs information ............................................................ 16
Basic playback ............................................................ 16–17
Skipping to another track/chapter
Fast Search
Continue playback from the last stop point
Repeat play
Repeat A-B
Programme favourite tracks
Special DVD/VCD features .................................... 17–19
Changing subtitle language
Changing sound track language
Playing in slow motion mode
Searching for a particular passage
Display the disc information during playback
Moving to another title/chapter
Playback from a selected point
Zooming in
Viewing from another angle
Advancing by frames
Checking the contents of DVD
Special VCD/SVCD features ......................................... 19
Playback Control (PBC)
Special MP3-CD features ............................................... 20
MP3-CD menu
Other Functions
Tuning to radio stations ................................................. 21
Presetting radio stations ................................................ 21
Listening to preset radio stations ................................ 21
Sleep timer setting .......................................................... 21
Specifications ............................................. 22
Troubleshooting ......................................23
CONTENTS
pg 001-023/LX3xxx/22-Eng 4/16/02, 1:21 PM5

6
English
Features
Your complete 7-piece 200-Watt DVD Digital Home
Cinema System creates the same dynamic sound qualities
that you find in full-fledged cinemas and incorporates some
of the best features in home theatre technology.
Other features include:
Built-in DTS and Dolby
R
Digital decoder,
supporting Dolby
R
ProLogic and virtual surround
Lets you use the Home Cinema Audio System for a movie-
theatre surround sound experience.
Additional Component Connections
Lets you connect other audio and audio/visual components
to the DVD system so you can use the system’s surround
sound speakers.
Night Mode
Lets you compress the dynamic range, reducing the
difference in loudness between different sounds in Dolby
Digital mode.
Parental Control (Rating Level)
Lets you set a ratings level so that your children cannot
watch a DVD that has a rating higher than you set.
Sleep Timer
Enables the system to switch to standby mode
automatically at a preset time.
Discs for playback
Your DVD player is able to play :
– All pre-recorded audio CDs
– All finalised audio CDR and audio CDRW discs
– All VCDs, Super VCDs and DVDs
– MP3-CDs (CD-ROMs with MP3 tracks)
Player zone
DVD discs and players are designed with regional
restrictions. Before playing a disc, make sure the
disc is the same zone as your player.
The region code for this DVD player is 2.
Supplied accessories
– a remote control with two AA batteries
– an MW loop antenna and an FM wire antenna
– an audio cable and Scart cable for connection with
the TV
– five satellite speakers, including five speaker cables
– an active subwoofer, including a connection cable
and a power cable
– a power cable for connection with the main unit
– this instruction booklet
If any item is damaged or missing, contact your retailer or
Philips.
Environmental information
All unnecessary packaging has been omitted. We have tried
to make the packaging easy to separate into three materials:
cardboard (box), polystyrene foam (buffer) and
polyethylene (bags, protective foam sheet).
Your system consists of materials which can be recycled
and reused if disassembled by a specialised company. Please
observe the local regulations regarding the disposal of
packaging materials, exhausted batteries and old equipment.
Installation
● Place the player on a flat, hard, and stable surface.
● There must be sufficient room in front of the player for the
drawer to open.
● In a cabinet, allows about 10cm (4 inches) of free space all
around the player for adequate ventilation.
● Do not expose your player to extreme temperatures or
humidity.
Maintenance
● When a disc becomes dirty, clean it with a
cleaning cloth. Wipe the disc from the
center out, in a straight line.
● Do not expose the player, batteries or
discs to humidity, rain, sand or excessive
heat (caused by heating equipment or
direct sunlight). Always keep the disc tray closed to avoid
dust on the lens.
● Do not use solvents such as benzene, thinner, commercially
available cleaners, or anti-static spray intended for colour
discs.
● The lens may cloud over when the player is suddenly
moved from cold to warm surroundings, making it
impossible to play a disc. Leave the player in the warm
environment until the moisture evaporates.
Introduction and General Information
INTRODUCTION AND GENERAL INFORMATION
2
pg 001-023/LX3xxx/22-Eng 4/16/02, 1:21 PM6

7
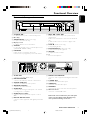
English
1 STANDBY ON y
– to switch between power on and standby modes.
2 Disc Tray
3 OPEN/CLOSE 0 (in Disc mode only)
– to open or close the disc tray.
4 Display screen
– to display details for user’s information.
5 SOURCE
– to select the desired source or external input source
(TV/AV, DISC, TUNER or AUX).
6 PROGRAM
– in Disc mode, to programme disc tracks.
– in Tuner mode, to programme preset radio stations.
Functional Overview
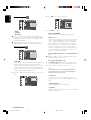
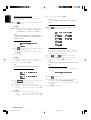
Front and Rear panels
VOLUME
P
R
E
V
P
L
A
Y
/
P
A
U
S
E
N
E
X
T
S
T
O
P
STANDBY
ON
DV D VIDEO DIGITAL SURROUND SYSTEM
OPEN/CLOSE
SOURCE PROGRAM
1 2 3 4 5 6 78 79 0 !
FUNCTIONAL OVERVIEW
7 PREV S / NEXT T
– in Disc mode, press to skip to the previous/next
chapter/track.
– in Disc mode, hold down to fast reverse/forward the
disc.
– in Tuner mode, to tune to a lower or higher radio
frequency.
8 STOP Ç (in Disc mode only)
– to stop playing the disc.
9 PLAY/PAUSEÉÅ (in Disc mode only)
– to start or interrupt disc playback.
0 VOLUME
– to adjust the master volume.
! n
– to connect headphones.
1 SCART OUT
– connect to a TV with SCART input.
2 MW/FM ANTENNA
– connect to the MW loop antenna or FM antenna.
3 CENTER LINE OUT
– connect to an additional centre speaker.
4 WOOFER LINE OUT
– connect to an active subwoofer.
5 AUDIO OUT
– connect to the analogue audio inputs of an external
recording device or amplifier.
6 AUDIO IN (TV / AUX)
– connect to the analogue audio outputs of a TV or
VCR.
7 DIGITAL OUT-OPTICAL
– connect to audio equipment with digital-optical audio
input.
8 DIGITAL OUT-COAXIAL
– connect to audio equipment with digital-coaxial audio
input.
9 S-VIDEO OUT
– connect to a TV with S-video input.
0 VIDEO OUT
– connect to a TV with video input.
! SPEAKERS
– connect to the front, center and surround speakers.
@ AC Power Cord
– connect to a standard AC outlet.
VIDEO
OUT
VIDEO
OUT
S-VIDEO
OUT
S-VIDEO
OUT
FM
(75 )
MW
ANTENNA
ANTENNA
MW/FM
MW/FM
CENTER
CENTER
LINE OUT
LINE OUT
LINE OUT
LINE OUT
WOOFER
WOOFER
AUDIO OUT
AUDIO OUT
AUDIO IN
AUDIO IN
L
R
TV
TV
AUX
AUX
COAXIAL
COAXIAL
OPTICAL
OPTICAL
DIGITAL OUT
DIGITAL OUT
FL CFR SLSR
++
(4 )
SPEAKERS
SPEAKERS
MANUFACTUREDUNDER LICENSEFORM DOLBY
MANUFACTUREDUNDER LICENSEFORM DOLBY
LABORATORIES,
LABORATORIES,
DOLBY
DOLBY
LABORATORIES,
LABORATORIES,
INC.
INC.
ALL RIGHTSRESERVED.
ALL RIGHTSRESERVED.
LABORATORIES.CONFIDENTIAL UNPUBLISHED
LABORATORIES.CONFIDENTIAL UNPUBLISHED
WORKS.
WORKS.
1992-1997
1992-1997
DOLBY
DOLBY
AND
AND
THE
THE
DOUBLE-D SYMBOLARE TRADEMARKSOF DOLBY
DOUBLE-D SYMBOLARE TRADEMARKSOF DOLBY
CLAS S 1
LASER PRODUCT
AVIS:RISQUEDE CHOCELECTRIQUE-NEPASOUVRIR
CAUTION
CAUTION
1 2 3 4
5
6 8 9 0 !
7
@
Caution: Do not touch the inner pins of the jacks
on the rear panel. Electrostatic discharge may
cause permanent damage to the unit.
pg 001-023/LX3xxx/22-Eng 4/16/02, 1:21 PM7

8
English
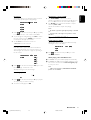
Notes for remote control:
– First, select the source you wish to control by
pressing one of the source select keys on the remote
control (DISC or TUNER, for example).
– Then select the desired function (
É
,
S
,
T
for example).
1 SOURCE
– to select the desired source (TV/AV, DISC, TUNER or
AUX).
2 DISC MENU (disc mode only)
– to enter or exit the disc contents menu.
3 SYSTEM MENU (disc mode only)
– to enter or exit the system menu bar.
4 3 4 1 2
– in Tuner mode, to select a preset radio station
number (1 or 2).
– to select movement direction in disc contents menu /
system menu bar.
FUNCTIONAL OVERVIEW
1
2
3
4
7
5
6
8
9
0
!
4
($
@
#
(%
(^
(&
(5
((
()
(¡
*
Remote Control
5 S / T
– in disc mode, press to skip to the previous/next
chapter/track.
– in disc mode, hold down to fast reverse/forward the
disc.
– in Tuner mode, to tune to a lower or higher radio
frequency.
6 ÉÅ
– to start or interrupt disc playback.
7 Ç
– to stop playing the disc.
8 SURROUND
– to select multichannel surround (Dolby Digital, DTS
or Dolby ProLogic) or stereo sound effect.
9 SOUND
– to select the various sound effects : CONCERT,
DRAMA, ACTION, SCI-FI, CLASSIC, JAZZ, ROCK or
DIGITAL.
0 REPEAT
– to repeat chapter, track or disc.
! REPEAT A-B
– to repeat a specific section on a disc.
@ SUBW +/-
– to adjust the subwoofer’s level.
REAR +/-
– to adjust the rear (surround) speakers’ level.
CENTER +/-
– to adjust the centre speaker’s level.
TV VOL +/-
– to adjust Philips television’s volume level.
# SLEEP
– to set the sleep (auto-off) timer function.
$ DIM
– to select different brightness for the display screen.
% NIGHT (DVD mode only)
– to optimise the dynamics of the sound output.
^ MUTE
– to interrupt or resume sound reproduction.
& RESUME
– to continue disc playback after an interruption.
* OK
– to exit or confirm the selection.
( VOL +/-
– to adjust the volume level.
) Numeric Keypad (0-9)
– to enter a track/title number of the disc.
– to enter a number of preset radio stations.
¡ y
– to switch to standby mode.
pg 001-023/LX3xxx/22-Eng 4/16/02, 1:21 PM8

9
English
IMPORTANT!
– Before connecting the AC power cord to the
wall outlet, ensure that all other connections have
been made.
– Never make or change any connections with
the power switched on.
– The type plate is located at the rear or bottom
of the system.
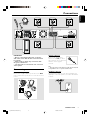
Connecting antennas
MW Indoor Loop Antenna
Connect the supplied MW loop antenna to the MW
jack. Position the loop antenna to receive the clearest
sound.
Fix the claw
to the slot
MW
FM Indoor Antenna
Connect the supplied FM
antenna to the FM jack. Move
the antenna in various directions
until the clearest signal is
received.
Note:
– Keep the antenna as far away as possible from the TV, VCR
or any radiation source to prevent unwanted noise.
FM Outdoor Antenna
For better FM reception, use a 75 ohm coaxial cable (not
supplied) to connect the system to an outdoor FM antenna
as shown.
AM
FM
(75 Ω)
Connections
CONNECTIONS
VIDEO
OUT
VIDEO
OUT
S-VIDEO
OUT
S-VIDEO
OUT
FM
(75 )
MW
ANTENNA
ANTENNA
MW/FM
MW/FM
CENTER
LINE OUT
LINE OUT
LINE OUT
WOOFER
AUDIO OUT
AUDIO OUT
AUDIO IN
AUDIO IN
L
R
TV
TV
AUX
AUX
COAXIAL
COAXIAL
OPTICAL
OPTICAL
DIGITAL OUT
DIGITAL OUT
FL CFR SLSR
++
(4 )
SPEAKERS
SPEAKERS
MANUFACTURED UNDER LICENSEFORM DOLBY
MANUFACTURED UNDER LICENSEFORM DOLBY
LABORATORIES,
LABORATORIES,
DOLBY
DOLBY
LABORATORIES,
LABORATORIES,
INC.
INC.
ALL RIGHTS RESERVED.
ALL RIGHTS RESERVED.
LABORATORIES.CONFIDENTIAL UNPUBLISHED
LABORATORIES.CONFIDENTIAL UNPUBLISHED
WORKS.
WORKS.
1992-1997
1992-1997
DOLBY
DOLBY
AND
AND
THE
THE
DOUBLE-D SYMBOLARE TRADEMARKSOF DOLBY
DOUBLE-D SYMBOLARE TRADEMARKSOF DOLBY
CLAS S 1
LASER PRODUCT
AVIS:RISQUE DECHOC ELECTRIQUE-NEPAS OUVRIR
CAUTION
CAUTION
pg 001-023/LX3xxx/22-Eng 4/16/02, 1:21 PM9

10
English
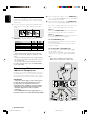
Connecting the speakers
Connect the supplied speaker systems using the supplied
speaker cables by matching the colours of the jacks and
speaker cables.
1 Press up (or down) the speaker’s jack and fully insert the
stripped portion of the speaker cable into the jack, then
release.
12 mm
abc
2 Connect the subwoofer’s audio input to the WOOFER
LINE OUT jack and the speakers as follows :
Speakers
- +
Front Left (FL) black white
Front Right (FR) black red
Centre (C) black green
Surround Left (SL) black blue
Surround Right (SR) black grey
Notes:
– Ensure that the speaker cables are correctly connected.
Improper connections may damage the system due to short-
circuit.
– For optimal sound performance, use the supplied speakers.
– Do not connect more than one speaker to any one pair of
+/- speaker jacks.
– Do not connect speakers with an impedance lower than
the speakers supplied. Please refer to the SPECIFICATIONS
section of this manual.
Connecting a TV and
additional components
You must connect a TV to the DVD system in order to use
the DVD player. You can connect other audio and audio/
visual components to the DVD system in order to use the
Home Cinema Audio System’s surround sound capabilities.
IMPORTANT!
– There are various ways to connect the system
to a TV (as shown in the illustration). You only
need to make one of the best connections,
depending on the capabilities of your TV system.
– Always refer to the instruction manual of the
connected equipment to make an optimal
connection.
– Some DVD discs have anti-copying devices, so
you will not able to record the disc through a VCR.
CONNECTIONS
● Use the supplied audio cables to connect AUDIO IN jacks
to the corresponding AUDIO OUT jacks on the TV, VCR or
other audio/visual components.
● Use the supplied Scart cable to connect SCART OUT
jack to the corresponding SCART VIDEO IN jack on a TV.
If your TV is not equipped with a Euroconnector, you can
select one of the following alternative connections :
Option 1
Connect the S-VIDEO OUT jack to the S-Video input
jack on the TV using a S-Video cable (not supplied) .
Option 2
Connect the VIDEO OUT jack to the video input jack on
the TV using a video cable (not supplied).
Use the AUDIO OUT jacks
– for connecting to an amplifier, audio system or TV with
analogue audio inputs.
– for connecting to a CD or Tape recorder to make an
analogue recording.
Use the OPTICAL or COAXIAL jacks
– for connecting to an amplifier with DTS, Dolby Digital
decoder or CD recorder.
You will need to set the DVD system’s digital output to
“ALL” (refer to “Preparations - System setup (DVD)”).
Notes:
– MP3 audio is not available on the digital output.
– Digital recording is only possible on a CD or VCD.
VIDEO
OUT
VIDEO
OUT
S-VIDEO
OUT
S-VIDEO
OUT
FM
(75 )
MW
ANTENNA
ANTENNA
MW/FM
MW/FM
CENTER
CENTER
LINE OUT
LINE OUT
LINE OUT
LINE OUT
WOOFER
WOOFER
AUDIO OUT
AUDIO OUT
AUDIO IN
AUDIO IN
L
R
TV
TV
AUX
AUX
COAXIAL
COAXIAL
OPTICAL
OPTICAL
DIGITAL OUT
DIGITAL OUT
++
SPEAKERS
MANUFACTUREDUNDER LICENSEFORM DOLBY
LABORATORIES,
DOLBY
LABORATORIES,
INC. ALLRIGHTS RESERVED.
LABORATORIES.CONFIDENTIAL UNPUBLISHEDWORKS. 1992-1997
DOLBY AND THEDOUBLE-D SYMBOLARE TRADEMARKSOF DOLBY
CAUTION
O
P
T
IC
A
L
IN
C
O
A
X
IA
L
IN
or
or
or
pg 001-023/LX3xxx/22-Eng 4/16/02, 1:21 PM10

11
English
Inserting batteries into the
remote control
1 Open the battery compartment.
2 Place the batteries in the
compartment with the correct
polarity as indicated by “+“ and “-“
symbols.
3 Close the cover.
CAUTION!
– Remove batteries if they are exhausted or will
not be used for a long time.
– Do not use old and new or different types of
batteries in combination.
– Batteries contain chemical substances, so they
should be disposed off properly.
Switching on the system
1 After completing all the connections, connect the AC
power cord of the player and subwoofer to the power
outlet.
2 Press STANDBY ON to switch on the last selected
source.
3 Adjust the SOURCE button (or press TV/AV, DISC,
TUNER or AUX) to select the input source.
➜ The selected source will be displayed.
● For viewing a DVD or VCD disc, a TV set needs to be
connected (refer to “Connections - Connecting a TV and
additional components”).
Switch on the TV and set to the correct video in channel
(for example, EXT1, EXT2, AV1, AV2). Refer to your TV
instruction manual for details.
➜ The default screen appears on the TV.
● You can connect other external components to the DVD
system in order to use the Home Cinema Audio System’s
surround sound capabilities. For example, connect to a TV
and select TV/AV as the input source or connect to a VCR
and select AUX as the input source.
Setting up the surround sound
system
You must connect all the speakers and set up the system
properly in order to enjoy the Digital Cinema experience at
home (refer to “Connections - Connecting the speakers”).
You will have the feeling of being in the middle of the action
because sound is coming from everywhere around you.
The subwoofer can enhance the bass performance of your
system dramatically.
IMPORTANT!
Please sit at your usual listening position in order
to set up the speaker balance correctly.
Placing the speakers
To obtain the best surround effect, place the speakers as
follows.
1 Place the front left and right speakers at equal distances
from the TV and at an angle of approximately 45 degrees
from the listening position.
2 Place the centre speaker above or below the TV so the
centre channel’s sound is localised.
3 Place the surround speakers at normal listening ear level
facing each other or mounted on the wall.
4 Place the subwoofer on the floor near the TV.
Notes:
– To avoid magnetic interference, do not position the front
speakers too close to your TV.
– If the rear surround speakers are installed farther away
from the listening position than the front and centre speakers,
it will weaken the surround effect.
– All speakers should be securely installed to prevent
accidents and improve sound quality.
Preparations
PREPARATIONS
pg 001-023/LX3xxx/22-Eng 4/16/02, 1:21 PM11

12
English
Changing the volume level
You can change the speakers’ sound distribution to suit
your surround sound needs.
● Press CENTER +/- to adjust the level of the centre
speaker.
➜ “CNT +XX DB” is displayed.
● Press REAR +/- to adjust the level of the rear
surround speakers.
➜ “RE +XX DB” is displayed.
Note:
–“XX” denotes the volume level between -15dB to 10dB.
Setting up the subwoofer
1 Use the supplied subwoofer cable to connect the
subwoofer’s audio input jack to the WOOFER LINE
OUT of the DVD system.
2 Connect the subwoofer’s AC power cable to the wall
socket and switch on the power.
➜ It will automatically switch on when receiving an audio
signal input. If there is no audio signal input, it will switch off
automatically.
3 Select the phase polarity at the rear of the subwoofer at
either 0
o
or 180
o
to determine better bass reproduction
effect in certain listening environment.
4 Press SUBW +/- to adjust the volume level of the
subwoofer (-15dB to 10dB).
➜ “SUB +XX DB” is displayed.
System Setup (DVD)
The system setup is carried out via the TV, enabling you to
customise the DVD system to suit your particular
requirement. If the preferred options selected are not
available on a disc, then the disc’s own preference will be
used.
IMPORTANT !
To access the System Setup menu, playback must
be stopped.
General operation
1 Press SYSTEM MENU.
➜
icon will be highlighted in the menu bar on the TV
screen.
2 Press 4 to activate the System Setup menu.
3 Use 1 2 34 keys to toggle through the functions and
select your preferred option.
4 Press OK to confirm a highlighted selection.
5 To exit the System Setup menu, press SYSTEM MENU
or OK.
The following items are available :
Setting the picture
– TV Shape
Select the aspect ratio of the TV to be connected.
4:3 PS (default setting)
– If you have a conventional TV set and your DVD is not
formatted for widescreen viewing, use this setting. A wide
picture is displayed on the whole TV screen with a portion
automatically cut off.
4:3 LB
– If you have a conventional TV set and your DVD is
formatted for widescreen viewing, use this setting. Wide
bands will be is displayed on the upper and lower portions
of the TV screen.
16:9
– If you have a widescreen TV set, use this setting (you
must also set your widescreen TV to “full size”).
PREPARATIONS
pg 001-023/LX3xxx/22-Eng 4/16/02, 1:21 PM12

13
English
PREPARATIONS
Note:
– If your DVD is not encoded to allow you to change the
aspect ratio, TV shape cannot be changed.
– TV System
Allows you to select the colour system matching the
connected TV set.
AUTO (default setting)
– If the connected TV is multi system, select this mode.
The output format will be in accordance with the video
signal of the disc.
NTSC
– If the connected TV is NTSC system, select this mode.
It will change the video signal of a PAL disc and output in
NTSC format.
PAL
– If the connected TV is PAL system, select this mode.
It will change the video signal of a NTSC disc and output in
PAL format.
– Video Out
Video out selection enables you to choose the type of
video output suitable for your receiver.
¶ Select SCART (default setting), if you have connected the
video output to your TV using the Scart jack.
¶ PR PB Y (this feature is not available for this model)
¶ Select S-VIDEO if you have connected the video output
to your TV using S-Video jack.
– Screen Saver
If set to ON, when you leave the system in stop or pause
mode for more than one minute, the screen saver will be
activated. The default setting is OFF.
Setting the sound
– Digital Output
Digital output selection enables you to specify the type of
digital output suitable for your amplifier or receiver.
¶ Select ALL (default setting), if you have connected the
digital output (COAXIAL or OPTICAL) to a multichannel
decoder receiver.
¶ Select PCM 96K if the external component is capable of
processing digital signal input with sampling rates of 96 kHz.
¶ Select PCM 48K if the external component is incapable of
processing 96 kHz digital signal input, then convert to
standard signal with sampling rates of 48 kHz.
¶ Select OFF to deactivate the digital output (COAXIAL or
OPTICAL).
– Night Mode
Set night mode to on to level out the volume. For
example, the disc will play at the same sound level
throughout the movie. The default setting is OFF.
Night function can also be accessed via the
remote control.
– Center Delay
If the listening position is closer to the centre speaker than
the front speakers, you can set the center delay time to
improve the surround sound effect.
Options : 5ms, 3ms, 2ms, 1ms or OFF (default setting).
– Rear Delay
If the listening position is closer to the rear surround
speakers than the front speakers, you can set the rear delay
time to improve the surround sound effect.
Options : 15ms, 12ms, 9ms, 6ms (default setting), 3ms or
OFF.
– Test Tone (disc mode only)
If set to ON, the system will test the speaker settings. The
test signal is generated through the left, centre, right, and
surround speakers. The default setting is OFF.
16:9
(Wide screen)
4:3 LB
(Letter Box)
4:3 PS
(Pan Scan)
pg 001-023/LX3xxx/22-Eng 4/16/02, 1:21 PM13

14
English
Setting the language
– Audio
– Subtitle
– Disc Menu
● This is to select the audio language, subtitle language and
the language used on TV screen menus or DVD menus that
will always be used for every disc to be played back. The
default setting is English.
● If the language selected is not available on the disc, the
original language designated by each disc will be selected.
Setting the features
– Parental
Enables setting of playback limitation level. Some DVDs may
have a parental level assigned to the complete disc or to
certain scenes on the disc. The rating levels are from 1 to 8
and are country dependent. You can prohibit the playing of
certain discs that are not suitable for your children or have
certain discs played with alternative scenes.
1 Enter the 4-digit code. If necessary, enter the code a second
time.
2 Use 34 keys to select a rating level.
3 Press OK to confirm.
Rating - NO PARENT
If parental control is not activated, it will play all discs.
Rating - 1 to 8
If the player’s parental level is set below 8, only discs with a
lower or equal level will play. For example, if the player is
set to 5, only discs with ratings of 5, 4, 3, 2 and 1 will be
played. Higher rated scenes will not be played unless an
alternative that has the same rating or lower is available on
the disc. For example, consider a disc that generally is
suitable for most audiences, and it is rated at level 2 for the
most part. However, in the middle, there are also scenes
rated at 5 (not suitable for children).
To play a higher rated disc or scene than the level
set
● Enter the 4-digit cord before resetting the rating level to a
higher number (go to “Password”).
If you forget the 4-digit code
1 Press Ç four times when prompted for the password
and the system will change back to the default password.
2 Go to “Password” and enter your new code.
Note:
– Some DVDs are not encoded with a rating though the
movie rating is printed on the disc jacket. The rating level
feature does not work for such discs.
– Password
To set a new password for the parental control or to
change the password. The password supplied as default is
1234.
– Menu Language
Select the language for on screen display.
– Defaults
If RESET is selected, all the items in the setup menu will be
reset to default setting.
PREPARATIONS
pg 001-023/LX3xxx/22-Eng 4/16/02, 1:21 PM14

15
English
Selecting the surround sound
mode
IMPORTANT!
– For proper surround sound, make sure you have
followed the “Connections” and “Preparations”
procedures fully.
– The centre and surround speakers only operate
when the system is set to surround sound mode
and the source material being played is recorded
or broadcast in Dolby Digital, DTS or Dolby Pro
Logic surround sound.
– Stereo broadcasts or recordings will produce
some surround channel effects when played in a
surround mode. However, mono sources will not
produce any sound from the surround speakers.
● Press SURROUND to select surround or stereo mode.
➜ The availability of the various surround sound modes
depend on the number of speakers used and the incoming
sound information available on the disc. The available output
modes are shown below.
Dolby Digital Surround
Dolby Digital (also known as AC-3 or Dolby 5.1) and
MPEG Multichannel delivers a realistic and dynamic sound
similar to theatre and cinema. It requires connection of all
five speakers (front left/right, centre, surround left/right) and
subwoofer for correct Dolby Digital Surround sound
reproduction. Each channel plays its own unique role in
providing the right sound. Front left, centre and right join
two surround speakers to reproduce high, mid and bass
frequencies in five full-range channels of surround. Bass
rumble, explosions and low frequency effects you feel are
delivered through the subwoofer. A large number of DVD
discs have been recorded in Dolby Digital Surround.
DTS Surround
The DTS Surround is a cinema surround sound format that
offers superior digital audio performance. DTS offers more
clarity and definition especially for higher tones. The better
sound quality is a result of the limited sound compression
(3:1 instead of 11:1 for Dolby Digital) and the 20-bit
resolution.
Dolby Pro Logic Surround
The Dolby Pro Logic Surround system is a specially
encoded two-channel analogue format that will produce
sound through four speaker channels (front left, centre,
front right, mono surround) when a Dolby Pro Logic
Decoder is used. It is also compatible with stereo systems
but the user will only have two-channel (front left & right)
of sound.
Matrix
A new surround playback system that delivers amazingly
rich and convincing five-channel surround outputs (front
left/right, centre, surround left/right).
VSS (Virtual Surround Sound)
The ProLogic MPEG or Dolby Digital surround channel is
processed by a ‘virtualiser’ DSP to add surround effect from
just the two front speakers.
Stereo
All sound is reproduced and played through the front left
and right speakers. This enables standard stereo
reproduction.
Selecting the digital sound
effect
The digital sound effects allow you to select from various
pre-set modes that control the frequency bands of sound
to optimise certain musical styles. It greatly enhances the
excitement and enjoyment of your favourite music.
● Press SOUND repeatedly to select the available sound
effect.
When playing a DVD/VCD, select :
– CONCERT, DRAMA, ACTION or SCI-FI
When playing a CD or in Tuner or Aux mode,
select :
– CLASSIC, JAZZ, ROCK or DIGITAL
Volume control
Adjust VOLUME button (or press VOL +/-) to
increase or decrease the volume level.
➜ “VOL XX” is displayed. “XX”denotes the volume level.
For Philips TVs only
● Press TV VOL +/- on the remote control to adjust the
TV’s volume level.
To listen through the headphones
● Connect the headphones plug to the n socket at the
front of the player.
➜ The speakers will be muted.
To switch off the volume temporarily
● Press MUTE.
➜ Playback will continue without sound and "MUTE" is
displayed.
● To restore the volume, press MUTE again.
Dimming the display screen
● Press DIM repeatedly to select different levels of
brightness for the display screen : HIGH, MID or LOW.
Basic Functions
BASIC FUNCTIONS
pg 001-023/LX3xxx/22-Eng 4/16/02, 1:21 PM15

16
English
Discs information
TITLE 1 TITLE 2
CHAPTER 1 CHAPTER 2 CHAPTER 1 CHAPTER 2 CHAPTER 3
DVD-VIDEO DISC
● DVD video discs may have one or more Titles, and each
Title may have one or more Chapters.
● Playback stops at the end of each Title.
TRACK 1 TRACK 2
INDEX 1 INDEX 2 INDEX 1 INDEX 2 INDEX 3
VIDEO CD
● Video CDs may have one or more Tracks, and each Track
may have one or more Indexes.
● To make easy and convenient access, you can move
between Tracks and Indexes.
● Some Video CDs have Play Back Control (PBC), which is a
predefined playback sequence stored on the disc (refer to
“Special VCD/SVCD features”).
2 3 5 6 7 8 9 10 11 12 ...41
TRACKS
AUDIO CD
● Audio CDs contain only Tracks.
Basic playback
CAUTION!
– Do not move the disc player during playback, as
doing so may damage the DVD system.
– Do not push on the disc tray or put any objects
other than disc on the disc tray. Doing so may
cause the disc player malfunction.
1 Press STANDBY ON y or
POWER y to switch the system
on.
2 Press OPEN/CLOSE 0 to open
the disc tray.
3 Load a disc with the label side
facing up.
4 Press OPEN/CLOSE 0 again to
close the tray.
➜ There will be a short delay while the player identifies
the disc and reads the menu from the disc.
● Some discs will start playing automatically, and others will
display the Disc Contents Menu on the TV screen. If the
menu is presented, use 341 2 keys to highlight your
selection and press OK to confirm. To select a play option,
press numeric keypad (0-9).
5 PressÉÅ to start playback.
Notes:
– Your player will not play discs that have a region code
different from the region code of your player.
– If the inhibit icon appears on the TV screen when a
button is pressed, it means the function is not available
on the disc you are playing.
To interrupt playback
● PressÉÅ.
➜ The picture freezes and the sound will be muted.
● To resume playback, pressÉÅ again.
To stop playback
● Press Ç.
Skipping to another track/chapter
● Press S or T repeatedly during playback to skip
backward or forward. Each press will take the disc to the
beginning of the previous or next track/chapter.
Note:
– If the REPEAT function has been set, pressing
S
or
T
will replay the same track/chapter.
To skip to the beginning of the current track/
chapter during playback
● Press S once.
To go directly to any track/chapter
● Use the numeric keypad (0-9) to enter the number of
the desired track/chapter.
Fast Search
1 Hold down S or T about two seconds to fast
reverse or forward the disc.
2 To resume normal play, pressÉÅ .
Continue playback from the last stop point
● In stop mode and when a disc has not been ejected, press
RESUME to resume playback from the point at which it
stopped.
To cancel the resume mode
● Press Ç again.
Notes:
– When the player is disconnected from the power supply or
the disc tray is opened, the resume option will be cancelled
automatically.
– The resume option may not be available on some discs.
Operations
OPERATIONS
POWER ON/OFF
pg 001-023/LX3xxx/22-Eng 4/16/02, 1:21 PM16

17
English
Repeat play
You can only select the repeat play mode during playback.
For DVD - Repeat chapter/title/disc
● Press REPEAT repeatedly to select the following :
➜ “R-1” – repeat chapter.
➜ “R-A” – repeat title/disc.
For VCD/CD/MP3-CD - Repeat track/disc
● Press REPEAT repeatedly to select the following :
➜ “R-1” – repeat the current track.
➜ “R-A” – repeat the entire disc.
Notes:
– Repeat play might not work correctly with some DVDs.
– For VCD, repeat play is not possible during PBC playback.
Repeat A-B
You can play a specific section in a chapter/track repeatedly.
1 Press REPEAT A-B at your chosen starting point.
2 Press REPEAT A-B again at your chosen end point.
➜ The passage will now repeat continuously.
3 To resume normal play, press REPEAT A-B again.
Note:
– The section A and B can be set only within the same
chapter/track.
Programme favourite tracks
You can play the contents of the disc in the order you want
by programming the order of the tracks to be played. Up to
99 tracks can be stored.
1 While playback is stopped, select or press PROGRAM to
enter programme mode.
➜ “P 00:00” is displayed.
2 Use the numeric keypad (0-9) to input the track
number in the order you want.
➜ If you attempt to programme more than 99 tracks,
"FULL" is displayed.
3 Press OK to store the track.
● Repeat steps 2-3 to store other tracks.
4 To start programme play, pressÉÅ .
5 To stop playback, press Ç once.
6 To cancel the programme, press Ç again.
Programme function can also be accessed via the
menu bar
1 Press SYSTEM MENU and select from the menu
bar.
2 Repeat steps 2-6 listed above to programme your
favourite tracks.
Special DVD/VCD features
A number of operations can be carried out directly via
the multiple menu bars on the TV screen without
interrupting disc playback.
From the left,
SETUP MENU ™ SUBTITLE ™ LANGUAGE ™ SLOW
™ FAST REVERSE ™ FAST FORWARD ™ STATUS
From the left,
TITLE SEARCH ™ CHAPTER SEARCH ™ TIME
SEARCH ™ ZOOM ™ ANGLE ™ STEP ™
PBC ON/OFF
From the left,
PROGRAM
IMPORTANT!
Some operations may be different or restricted,
depending on the disc format. Refer to the jacket
or case of the disc you are playing.
1 Press SYSTEM MENU.
➜ The menu bar will be displayed across the top of the
TV screen.
2 Press 1 or 2 to move through the menu bar.
3 Press 4 to select the highlighted icon and use 34 keys
to select your preferred option.
4 Press OK to confirm a highlighted selection.
5 To exit, press SYSTEM MENU or OK.
Changing subtitle language
This operation works only on DVDs with multiple subtitle
languages.
● Select
from the menu bar and press 4 key to select
the desired language.
OPERATIONS
pg 001-023/LX3xxx/22-Eng 4/16/02, 1:21 PM17

18
English
OPERATIONS
Changing sound track language
This operation works only on DVDs with multiple
soundtrack language.
● Select
from the menu bar and press 4 key to select
the desired language.
For VCD :
● Press 4 to select the desired audio channels for sound :
LEFT VOCAL ™ RIGHT VOCAL ™ MONO LEFT
™ MONO RIGHT ™ STEREO ™ LEFT VOCAL
Note:
– When the desired language is not selected even after
pressing the button several times, it means the language is not
available on the disc.
Playing in slow motion mode
1 Select from the menu bar and press 4 key to select
the required slow motion speed :
SF x2 ™ SF x4 ™ SF x8 ™ SR x2 ™ SR x4 ™ SR x8 ™
SLOW OFF
(SF) = slow forward
(SR) = slow reverse
For VCD :
1 Press 4 key to select the required slow motion speed :
(forward) : SF x1 ™ SF x2 ™ SF x3 ™ OFF
2 To resume normal play, pressÉÅ.
Note:
– The sound will be muted during slow-motion play.
Searching for a particular passage
1 Select or from the menu bar to select fast reverse
search or fast foward search respectively.
2 Press 4 key to select the required search speed :
(reverse) : FR x2 ™ FR x4 ™ FR x6 ™ FR x8 ™ OFF
(forward) : FF x2 ™ FF x4 ™ FF x6 ™ FF x8 ™ OFF
For VCD :
2 Press 4 key to select the required search speed :
(reverse) : FR x1 ™ FR x2 ™ FR x3 ™ FR x4 ™ OFF
(forward) : FF x1 ™ FF x2 ™ FF x3 ™ FF x4 ™ OFF
3 To resume normal play, pressÉÅ.
Note:
– The sound will be muted during fast reverse or forward
search.
Display the disc information during playback
● Select
from the menu bar and press 4 key to select
the following display informations :
DVD
VCD (PBC ON)
Moving to another title/chapter
Some discs may contain more than one title or chapter. If
the disc has a title or chapter menu recorded on it, you can
start playback from the selected item.
1 Select (title) or (chapter) from the menu bar.
2 Use numeric keypad (0-9) to select a desired title/
chapter number and press OK to start playback.
Note:
– Selecting a title or chapter might not be possible on certain
discs.
Playback from a selected point
This function allows you to start playing at any chosen time
on the disc.
1 Select from the menu bar.
2 Enter hours, minutes and seconds from left to right in the
time edit box using the numeric keypad (0-9).
➜ Each time an item has been entered, the next item will
be highlighted.
3 PressÉÅ to start playback.
pg 001-023/LX3xxx/22-Eng 4/16/02, 1:22 PM18

19
English
OPERATIONS
Zooming in
This function allows you to enlarge the picture on the TV
screen and to pan through the enlarged image.
1 Select from the menu bar and press 4 key repeatedly
to select a zoom factor : x1.5 ™ x2.0 ™ x4.0 ™ OFF.
2 To pan through the enlarged image, press OK to confirm
the zoom selection and use 1 2 34 keys to move the
zoomed picture left, right, up and down.
3 To exit ZOOM mode, select zoom factor to
“ZOOM OFF” from the menu bar.
Viewing from another angle
If the disc contains sequences recorded from different
camera angles, this allows you to view the picture from
different angles. The selections of angle are depending on
the disc format.
● Select from the menu bar and press 34 keys to select
the desired angle : 1/4, 2/4, 3/4 or 4/4.
➜ Playback changes to the selected angle.
Advancing by frames
1 Select from the menu bar and press 4 key to play the
disc step by step (one frame each step).
2 To resume normal play, press ÉÅ.
Checking the contents of DVD
1 Press DISC MENU on the remote control.
➜ If the current title has a menu, the menu will appear on
the screen. Otherwise, the disc menu will be displayed.
2 Use 1 2 34 keys to select the desired title or chapter,
followed byÉÅ or OK.
➜ The selected title or chapter starts playing.
Notes:
– The details of operation might differ depending on the DVD
disc.
– Selecting a title or disc might not be possible on certain
DVD discs.
Special VCD/SVCD features
Playback Control (PBC)
PBC playback allows you to play Video CDs interactively,
following the menu on the display.
● Select in the menu bar and press 4 key to select
PBC ON or PBC OFF.
When playing a disc with PBC function
● If “PBC OFF”, the system will start playback automatically.
● If “PBC ON”, the PBC menu (if available) will appear on the
TV screen for selection. Use the numeric keypad (0-9)
to enter your choice.
Note:
– If PBC mode is switched on, TIME SEARCH and REPEAT
functions are not available.
pg 001-023/LX3xxx/22-Eng 4/16/02, 1:22 PM19

20
English
Special MP3-CD features
– JPEG format
– Max. 12 characters
– Max. nested directory is 7 levels
– The max. album number is 32
– Supported VBR bit-rate
– Supported sampling frequencies for MP3 disc are :
32 kHz, 44.1 kHz, 48 kHz
– Supported Bit-rates of MP3 disc are: 32, 64, 96, 128,
192, 256 (kbps)
– The disc reading time may exceed 30 seconds due to
the large number of songs compiled onto one disc.
MP3-CD menu
1 Press DISC MENU to switch on the MP3-CD menu.
➜ The album menu appears on the TV screen.
2 To select a desired album, press 341 2 and followed by
OK orÉÅ to confirm.
➜ The title menu appears on the TV screen.
3 To select a desired title, press 341 2 and followed by OK
orÉÅ to start playback.
● You can also use the numeric keypad (0-9) to enter
your choice.
If the MP3-CD menu is switched off
● You can only play the existing selected title by pressing
ÉÅ button. While in playback mode, press S / T to
select the previous/next title.
➜ The title number will be displayed.
Only the following functions are possible for MP3 disc.
– STOP / PLAY / PAUSE / OK
– REPEAT (TITLE/ALBUM/DISC)
OPERATIONS
pg 001-023/LX3xxx/22-Eng 4/16/02, 1:22 PM20
Page is loading ...
Page is loading ...
Page is loading ...
-
 1
1
-
 2
2
-
 3
3
-
 4
4
-
 5
5
-
 6
6
-
 7
7
-
 8
8
-
 9
9
-
 10
10
-
 11
11
-
 12
12
-
 13
13
-
 14
14
-
 15
15
-
 16
16
-
 17
17
-
 18
18
-
 19
19
-
 20
20
-
 21
21
-
 22
22
-
 23
23


Philips LX-3000D/25S User manual
- Category
- Home audio sets
- Type
- User manual
Ask a question and I''ll find the answer in the document
Finding information in a document is now easier with AI
Related papers
-
Philips MX3660D/30 User manual
-
-
-
-
-
Philips DVD870 DesignLine User manual
-
-
-
-
Other documents
-
COBY electronic TV-DVD1260 User manual
-
Koss KS4192 User manual
-
-
VIETA DVD-50 Owner's manual
-
Eltax Vision User manual
-
Technicolor - Thomson Stereo System DPL911VD User manual
-
-
Hitachi HTD-K160 User manual
-
 SENZ SDVD20 DVD SPILLER Owner's manual
-
Curtis TDVD6048 User manual
