

1
How to install the software of ZNS8022
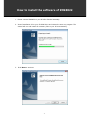
1. Please connect ZNS8022 to your PC after finished assembly.
2.
Insert Installation CD to your CD-ROM drive and initiate the auto-run program. The
wizard will run and install all necessary files to your PC automatically.
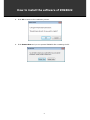
3.
Click
Next
to continue.

2
How to install the software of ZNS8022
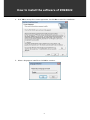
4.
Click
YES
to accept the License Agreement. Or click
No
to cancel the installation.
5.
Select a language to install then click
OK
to continue.

3
How to install the software of ZNS8022
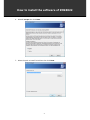
6.
Select
I accept
then click
Next
7.
Select the path to install DriveClone then click
Next
.
.

4
How to install the software of ZNS8022
8.
Click
OK
to continue the installation process.
9.
Click
Restart Now
and you can operate ZNS8022 after restarting the PC.

5
How to start the software
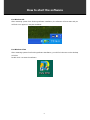
For Windows XP
After restarting system from finishing software installation, the software will auto start and you
will find a icon appear in tray bar as below:
For Windows Vista
After restarting system from finishing software installation, you will find a shortcut on the desktop
as below.
Double-click it to start the software.

6
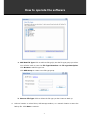
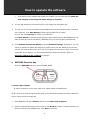
How to operate the software
Data Backup Function Key
Press the
DATA BACKUP
button to enter FILES BACKUP SHEET.
1.
You can create a new full file backup or select
Incremental File Backup
box to select a
former job and create incremental file backup.
NOTE: If you select Incremental File Backup, you can choose to examine the detail information
of all created backup jobs, modify the time and date to run scheduled Incremental File Backup,
click Back Up Now to run Incremental File Backup immediately, or delete the job that is no
longer required (Refer to Schedule of File Backup for details).
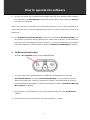
2.
Enter a name for your new job.
3.
Select the file(s) you want to back up. You can also click
Add Files/Folders
or
Add File
Types
to add file type, folder or individual file to back up according to your needs. Click
Next
to continue. You can set the maximum number of backup versions you want to back up in this
step. ZNS8022 will always store a fixed number of the most recent backup versions you set.
Add Files/Folders:
Click to select the files or folders you want to add from Windows
Explorer.
Add File Types:
Click to enter
Select File Types
interface as below.

7
How to operate the software
a.
Add New File Type:
Click to add new file type(s) into the file type group you select.
You will also need to enter the
File Type Extension
and
File type description
.
Click
Browse
to add file type icon.
Click
Add Group
to create a new file type group.
b.
Remove File Type:
Click to delete the file type you don’t want to back up.
4.
Select a location on a hard drive, USB storage medium, or a network location to store the
backup file. Click
Next
to continue.

8
How to operate the software
5.
You can now review the information and settings that have been specified. After reviewing
your selections, click
Start Backup
to start backing up the file(s).You can also click
Previous
to modify your selections.
NOTE: Some files may not be able to be copied because they are in use by other applications. It
is recommended that you close all applications and files you want to back up prior to start the
backup job.
6.
Click
Schedule Incremental Backup
to specify your preferred
Schedule Settings
. You
can choose to repeat the backup operation at a certain time of the day. The shortest time
interval is 1 day. The longest time interval is 7 days. You can also view details of your backup,
run System Snapshot, or delete a backup (Refer to
Schedule of File Backup
for details).
OS Backup Function Key
Press the
O.S. BACKUP
button to enter BACKUP SHEET.
1.
You can create a new complete backup or update the existing backup by selecting
Incremental Backup
. By selecting
Incremental Backup,
you can choose to view the
detail of the backup file, modify the schedule to create an incremental backup, start the
incremental backup immediately, or delete the selected job. (Refer to
Schedule of Back Up
My Computer
for details).
2.
Enter a name (1-50 characters) for your new complete backup file. Click
Get Started
to
continue.
3.
Select the hard drive and partition(s) you want to back up, or image.

9
How to operate the software
NOTE:
If there is only one hard drive installed in the PC, you can skip selecting the partition(s)
you would like to protect.
If there is more than one hard drive, you can choose to back up any partition(s) of any
hard drive(s).
You can select to image one or more partitions from a hard drive simultaneously. If you
prefer to back up the entire hard drive, select a source hard drive instead of partitions.
4.
Select a destination location on a hard drive, USB storage medium, or a network location to
store the image file.
NOTE:
If you want to store the image on a network location, you can select the location through
Windows and My Network Places directly.
If you have a CD/DVD writer (USB recorders are supported), you can burn the image
onto a blank CD/DVD. The CD/DVD burned by ZNS8022 can be used as a Recovery
CD/DVD.
If you select a location on the network, you may be prompted to provide a username and
password. If your system does not respond when you try to save disk image to a
network location, please contact your network administrator to check your connection
status or access privileges.
If you choose to store the complete backup on a location of the hard drive where the
operating system is installed, System Snapshot will be disabled. You can enable System
Snapshot after you finish complete backup.
5.
Click
Next
to select a compression method between None, Medium and High. Compressed
images will save disk space, however will take more time during image creation and data
recovery.
OPTION:
You can select Enable password protection to password protect your image files. Once a
password is set, it will be required when you attempt to use the image file.
In the Image Splitting option, select a file size for a single volume of the split image. If
you select automatic, ZNS8022 will automatically split the image according to the file
system type of the destination partition.

10
How to operate the software
If you want to verify whether the backup file is usable, you can select the box Check the
data integrity of the image file when backup is complete.
6.
You can add description of the backup file in the Image File Description box.
7.
You can now review the information and settings that have been specified. After reviewing
your selections, click
Start Backup
to begin copying data into an image.
You can also click
Previous
to modify your selections.
Click
Start Backup
to start the backup process. If the system is busy, and ZNS8022 can not
start the backup process successfully, ZNS8022 will try to back up again automatically.
8.
Click
Schedule Incremental Backup
to specify
Schedule Settings
. By doing so, you can
choose to repeat the update the image at a certain time of the day based on pre-set time
interval. The shortest time interval is 1 day. The longest time interval is 7 days. You can also
view detail of your backup, run Incremental Backup or delete the backup. (Refer to
Schedule of Back Up My Computer
for details)
RESTORE Function Key
Press the
RESTORE
button to enter RESTORE SHEET.
a. Restore My Computer
To restore a partition or the entire hard drive, please follow the steps below:
NOTE: There must have enough free disk space on the destination partition to hold the data that
will be restored from the image file.
1.
Start ZNS8022 and select
Restore
and then click
Restore My Computer
.
2.
Select a Complete backup job from the list or click
Browse
to select a complete backup job
that is not listed in the dropdown list. Click
Next
to continue.

11
How to operate the software
NOTE: If you want to select an image file which is stored on the network, you may be prompted
to provide username and password to access the network stored image file.
3.
You can restore from the complete backup point plus any incremental back up files. Click
Next
to continue.
4.
Select a partition or an entire hard drive to restore. Click
Next
to continue.
5.
Select a destination partition or unallocated space to restore the image file. Click
Start
Restore
to continue.
NOTE: An image file may contain backup data of more than one partition. You can select and
restore only one partition at a time.
If you want to restore the entire hard drive, click the drive entry only.
6.
Click
OK
to begin the restoration process. Or click
Cancel
to return to Main Console.
7.
Click
Finish
to complete the restoration process.
b. Restore Files
To restore file(s), please follow the steps below:
1.
Select
Restore
and then click
Restore Files
.
2.
Select a backup image file you want from the drop down list. You can also click
Browse
to
select it from another location on your computer. Click
Get Started
to continue.
3.
Select the file you want to restore. In the selection area, all of the backed up files with all
available versions are listed in a standard Windows folder structure. Check the file(s) you
want to restore. If backup data is stored on CD/DVDs, please have all of the necessary discs
before the restoration. If backup data is stored on multiple discs, insert the last volume discs
first. Please then follow the on-screen instructions.

12
How to operate the software
Under Restore files to option, select a location to save the restored files:
If New folder on my desktop is selected, the restored files will be saved in a new folder on
your desktop, with the original folder hierarchy preserved as it was backed up previously.
If Original location is selected, the restored files will be saved in their original locations.
The files in this location will be replaced by the back up files. It is recommended that you
back up this location prior to restore.
NOTE: If several versions of a file are selected, the files will be restored to the same place with the
version number appended to the file name.
If Another folder is selected, click Choose a folder to specify a folder on your local hard
drive to contain the restored files. The restored files will be kept in their original folder
hierarchy.
4.
Click
Start Restore
to continue.
5.
Click
OK
to begin the restoration process. Or click
Cancel
to exit.
6.
Click
Return to Main Console
to complete the process.
c. Preview Backup Image
To restore an individual file or folder:
1.
Click
Preview Backup Image
directly on the main interface of Restore.
2.
Select an image you want to preview
and click
Next
or click
Browse
to select an image that
is not listed in the dropdown choice. Click
Next
to continue.
3.
Select a complete backup point or an incremental backup point and click
Next
.
4.
Select the partition you want to preview and click
Mount
to begin previewing the image.
5.
You can now browse and copy data on the preview drive in Windows Explorer.

13
How to operate the software
d. un-mount all preview partitions
After you have finished restoring an individual file or folder, you can un-mount the preview
partition.
1.
Click
Tools
and then select
Close Preview Drives
or
click
Close Preview Drives
on the
interface of Quick Start
.
2.
Click
OK
to begin the process.
Other Function
a. Clone
With ZNS8022, you can clone (duplicate) a partition or hard drive to another without any lost or
altered data.
a-1. Clone Drive
Clone Drive duplicates one hard drive to another. It eliminates the need to re-install the operating
system, drivers and applications, and enables you to upgrade a new hard drive with only mouse
clicks.
NOTE:
To use this function, you need to have at least two hard drives on your PC
The target hard drive should have enough space to store the data of the source hard drive
1.
Select
Clone
and then click
Clone Drive
.
2.
Select the Source Disk (top pane) and then the Destination Disk (bottom pane). You can
choose to modify the Destination Partition Size automatically or manually by selecting
Modify the destination partition size.
You can also choose not to modify the Destination
Partition Size by selecting
Keep the partition size of the destination drive the same as
the source drive
. Click
Next
to continue.
NOTE: If you select Keep the partition size of Destination Hard Drive the same as the
Source Hard Drive, please skip to step 4.
If the Hard Drive you want to clone is going to boot your system, for best result, please select
Keep the partition size of Destination Hard Drive the same as the Source Hard Drive.

14
How to operate the software
3.
You can alter the Destination Partition size by double-clicking the entry of Destination
Partition and change the size in a popup dialog box. Click
Next
to continue.
4.
After confirming your selections, click
Start Clone
to begin the cloning process or you can
click
Previous
to change your settings. You can start the clone process by clicking
Start
Clone
. If the system is busy, Data Ditto will try to clone again automatically.
5.
Click
Finish
to complete the process.
a-2. Clone Partition
With ZNS8022, you can copy data from the source partition into the destination partition.
1.
Select
Clone
and then click
Clone Partition
.
2.
Select the Source Hard Drive, and then select a Source Partition (top pane).
NOTE:
If there is only one hard drive installed in a PC you can skip the drive selection step and
proceed to selecting a partition.
You can only choose one partition at a time.
The Source Partition and the Destination Partition cannot be the same.
3.
Select the Destination Hard Drive, and then select Destination Partition (bottom pane). Click
Next
to continue.
NOTE: The selected destination partition must have enough space to hold the data of the source
partition.
4.
After confirming your selections, click
Start Clone
to start the duplicating process or you can
click
Previous
to change your selections. You can start the cloning process by clicking
Start
Clone
. If the system is busy, ZNS8022 will try to clone again automatically.
5.
Click
Finish
to complete the process.

15
How to operate the software
b. Recovery CD/ DVD
A Recovery CD/DVD is a disc containing backup data. It allows end users to restore backed up
partition(s) or entire drives from these CD/DVDs
b-1. Create a Recovery CD/DVD
1.
Start ZNS8022. Select
Back Up
and then click
Back Up My Computer
.
2.
Enter a name (1-50 characters) for your Backup file. Click
Get Started
to continue.
3.
Select the Source Hard Drive, and then select the Source Partition(s) to be backed up. Click
Next
to continue.
NOTE:
If there is only one hard drive installed in a computer, you can skip selecting the partition(s)
you would like to protect.
If there is more than one hard drive, you can choose to back up any partition(s) of any hard
drive(s).
You can select to image one or more partitions from a hard drive simultaneously. If you
prefer to back up the entire hard drive, select a source hard drive instead of partitions
4.
Click on
My Computer
and select your CD/DVD Drive. Click
Next
to continue.
5.
Click
Next
to select a compression method between None, Medium and High. Compressed
images will save disk space, however will take more time during image creation and data
recovery.
Optional:
You can select Enable password protection to set a password to access your image files.
Once a password is set, you will be prompt for password when you attempt to use the
image file.
In the Image Splitting option, select a file size for a single volume of the split image. If you
select automatic, ZNS8022 will automatically split the image according to the file system
type of the destination partition.

16
How to operate the software
If you want to verify whether the backup file is valid, you can select the box Check the
data integrity of the image file when backup is complete.
6.
Add description of the backup file in the Image File Description box.
7.
Review the information and settings that have been specified. Click
Start Backup
to begin
copying data into an image or click
Previous
to modify your selections. You can complete
the backup by clicking
Start Backup
. If the system is busy, ZNS8022 will try to back up
again automatically.
NOTE:
If the size of the backup data exceeds the writable disc capacity, ZNS8022 will automatically
split the image into several volumes and burn onto different discs. It will prompt you to
insert another disc when needed.
If there are some data on the disc, you will be asked whether you wish to erase the disc. If
you want to continue, click Erase. Click Change to insert another blank CD/DVD, or click
Cancel to stop burning.
b-2. Restoring from a Recovery CD/DVD
1.
Insert the Recovery CD/DVD and select
Restore
and then click
Restore My Computer.
2.
Click
Browse
to select the restore point from the CD/DVD.
3.
Select a partition or an entire hard drive to restore.
4.
Select a destination partition or unallocated space to restore the image file. Click
Next
to
begin the process.
Note: An image file may contain backup data of more than one partition. You can select and
restore one or more partitions at a time.
If you want to restore the entire hard drive, click the drive entry only.
5.
Click
OK
to begin restoration process. Or click
Cancel
to return to Main Console.

17
How to operate the software
You can also restore the partition or hard drive directly through CD/DVD Rom.
1.
Restart your computer and enter BIOS. Set CD/DVD ROM to be the first bootable device.
2.
Insert the Recovery CD/DVD and start up the computer. The system will enter the Pre-OS
mode.
3.
Click
OK
to continue. Click
Cancel
to exit and restart your computer.
4.
Enter your serial number and click
OK
to begin restoration.
5.
Click
OK
to complete the process and restart your computer.
c. Start-up Disc
c-1.
Create Start-up Disc
1.
Click
Start-up Disc
to start creating the start-up disc
2.
Insert a blank CD into your CD/DVD Drive and click
Get Started
to continue
3.
Click
Finish
to return to Main Console
c-2. Use Start-up Disc
1.
Insert the Start-up Disc and restart your PC, and then enter BIOS to set the CD/DVD ROM as
the first boot device.
2.
After entering ZNS8022 Pre-OS Console, you can then modify your network settings, check
image integrity and restore drives.

18
How to operate the software
d. Main Console
d-1. Quick Start
1.
Files Backup -
Start automatically or manually save copies of select files or folders on your
hard drive.
2.
Back Up My Computer
- Back up your entire system.
3.
Clone Drive -
Create a 1:1 copy of your hard drive. More than one hard drive will need to
exist in the system for this functionality to work.
4.
View File Versions -
View the file versions you have created and select a backup file to
restore.
5.
Update My Disk Image -
Modify the pre-set backup schedule setting.
6.
Close Preview Drives
– Close all the previewed drives with Complete Backup image.
d-2. Schedule
1.
Schedule of Back Up My Computer
-
You must first create a complete backup of your
system prior to see the following functionalities.
1-1.
Detail -
View detailed information about the backup jobs you have created, including its
description, source, destination and schedule setting.
1-2.
Edit Schedule -
Specify the frequency to back up additional changes since the last back
up. You can choose to run the backup every 1-7 day(s). If you wish to automatically
run the scheduled backup job when the system starts up after you miss the scheduled
time of backup, check the
Execute Schedule Job while starting system after miss
schedule box.
1-3.
Back Up Now -
Start to back up the incremental changes immediately.
1-4.
Delete -
Delete the selected jobs.

19
How to operate the software
Note: Schedule Definition of Back Up My Computer
1. Back up files will be created according to the pre-set backup schedule.
2. If the system is busy, Data Ditto will not able to run the scheduled backup job. Data Ditto
will try it again automatically.
3. If you turn off your computer before reaching the scheduled backup time and you have
selected Execute Schedule Job while starting system after miss schedule, Data Ditto will
start the backup process as soon as you turn on your computer. If you have not selected
Execute Schedule Job while starting system after miss schedule, Data Ditto will start the
backup process at the next scheduled backup time.
4. If you changed the time of your operating system and the time you changed is later than
the scheduled backup time, Data Ditto will start the back up process. If the time you
changed is earlier than the scheduled backup time, Data Ditto will start the back up
process according to the pre-set schedule
2.
Schedule of File Backup
2-1.
Detail -
View the detailed information about the backup jobs you have created, including
its description, source, destination and schedule setting.
2-2.
Edit Schedule -
Specify your preferred
Schedule Settings
of the backup job you have
created
.
2-3.
Add Files -
Add files, folders or file types to your file backup list. Refer to
File Backup
for more details.
2-4.
Back Up Now -
Backup the selected job immediately
2-5.
Delete -
Delete the selected job.
Note: Schedule Definition of Back Up Files
1. If you changed the time of your operating system and the time you changed is later than
the scheduled backup time, ZNS8022 will start the backup process 10 minutes from the
current time. If the time you changed is earlier than the scheduled backup time,
ZNS8022 will start the backup process according to the pre-set schedule set.
2. If your system is turned off during your scheduled backup time, ZNS8022 will start the
backup process immediately after you start the system.
Page is loading ...
-
 1
1
-
 2
2
-
 3
3
-
 4
4
-
 5
5
-
 6
6
-
 7
7
-
 8
8
-
 9
9
-
 10
10
-
 11
11
-
 12
12
-
 13
13
-
 14
14
-
 15
15
-
 16
16
-
 17
17
-
 18
18
-
 19
19
-
 20
20
-
 21
21


Ask a question and I''ll find the answer in the document
Finding information in a document is now easier with AI
Other documents
-
 Paragon Backup Backup & Recovery 12 Home User guide
-
Paragon PSG-134-SEG-VL2-4 User manual
-
ACRONIS True Image Echo server for linux User guide
-
-
 Paragon Backup Backup & Recovery 14 Home User guide
-
 Paragon Backup Backup & Recovery 11 Home User manual
-
MSI Backup & Recovery 10 Suite User manual
-
 Paragon Drive Drive Backup 11.0 Server User manual
-
 Paragon Drive Drive Backup 11.0 Workstation User manual
-
 Paragon Backup Backup & Recovery 15 Home User manual


