Page is loading ...

Installation Guide of Telescope Drive Master
Encoder-adapter for SkyWatcher AZ-EQ6 mounts
First of all, thank you very much for purchasing our product called “Telescope Drive Master” and
congratulation for your decision. This system will improve the tracking accuracy of your
SkyWatcher AZ-EQ6 mount in equatorial mode dramatically independently from its original
periodic error amplitude because both periodic and aperiodic errors of your mount will
completely be eliminated using our real time, ultra high precision correction system, without
using conventional autoguider. We guarantee that your tracking error will remain within 2” (two
arc-second) range ptv total (or ±1”) or less within 95% of your exposure time.
To achieve this unbelievable result, before the installation of your Telescope Drive Master, you
need to complete a very accurate polar alignment process of course. Please find our proposed
method to do that on the companion CD ROM or among www.telescopedrivemaster.com website’s
documents.
TDM controlling system contains two main logical units or parts: a high precision encoder unit
(encoder and its mechanical adapter) attached directly onto the RA shaft of the mount and an
electronic device (a sort of “black-box” with connectors), which receives the electrical signals
arriving from the encoder unit and sends control instructions to the mount’s driver via its auto-
guider input connector. So you will need to install the mechanical elements and the electronic
device as well but do not worry: both of them can be done very easily.
Please find the drawing and description of electronic connections to be set in relevant part of
User’s Guide because this schematic is the same for every telescope mount. In this document
you will find the mount specific instructions for mechanical adapter and encoder installation only.
Before starting it is highly important to emphasize that both encoder unit and its adapter
elements are sensitive mechanical parts!!! Do not drop any of them; do not stress them during
installation!!! Handle with care! Any damages of these parts can destroy product’s accuracy.
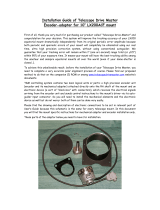
Just Allen-wrenches, a Torch screwdriver (size#T9), Philips screwdriver and an open ended
spanner (size#22) will be needed for installation. Please find the main parts of the adapter in
the picture below.

Before assembling parts during installation, please always check and clean all of the threads and
surfaces of the lower end of the RA shaft and encoder adaptor elements if necessary. Use clean
clothes (not nylon!) for smooth surfaces and a dry toothbrush to clean the internal and/or
external thread(s) of the RA hollow shaft if it is necessary. Only the clean and tight mechanical
contact between surfaces will provide correct mechanical coupling and positions.
Step 1:
Remove the polar scope rotating it in counterclockwise direction. (If you want to complete rough
polar alignment using polar scope, please do it before this step.)
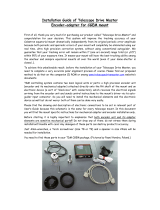
Step 2:
Now, using a Philips screwdriver, please remove the pointer of the polar scope scale as you can
see in the picture below.

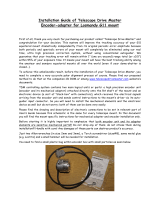
Step 3:
Next step is attaching encoder shaft into the hollow shaft of RA axis. Do not touch the long
cylindrical surface of the encoder shaft with any metal tool (e.g. pliers)!!! Use open ended
spanner (size 22mm) only at the root of this part clockwise, as you can see below in the picture,
and tighten it well enough. This part cannot have any offset compared to the RA axis. If shaft-
threads and connecting surfaces are clean enough, the thread profile-angle will have to be able
to centralize geometrical axes without any problem.
Step 4:
Now, join and push the black three legged stator ring onto the shiny ring of the rotating friction
brake of the RA shaft completely. You need to keep the position where the RA fixing pin of the
mount is between the two neighboring legs of the adapter stator as you can see in the picture
below. The third leg has to be on the back side, somewhere around the location of the polar
scope pointer.

Applying the three M6 sunk-screws (enclosed) on the adapter stator legs, please fix the stator
in the right position.
Step 5:
Now, please loosen each screw (2x4pcs) of the coupling of the encoder a little bit, but remove
completely just two black ones. In this way you can detach the front part of the coupling and you
have more room to place and fix it to its location as per below. Please read the coupling
installation guide as well:
http://mda-telescoop.com/index.php?option=com_content&view=article&id=63&Itemid=98

Step 6:
Now, please check the released clamps on both front and back side of the encoder and push the
encoder firmly onto the previously installed and clean steel shaft. Please do NOT apply hammer
on encoder!!! You just need to push it gently by hand. Using Torch screw (size#T9) tighten the
screws well in the clamping rings, at the bottom of the encoder at first. You can reach the screw
on the front side via one of the gaps created especially for this purpose onto the flat springs of
the coupling.
Step 7:
Finally, tighten every screw of the flat springs well in the coupling with a curved Allen wrench.

After encoder installation, you will be able to use the break lever of the RA shaft on normal way
rotating it to the right position to fix the RA shaft in desired position.
As you can see in the picture below, the mount can be adjusted to pole position below roughly 65
degree altitude (North Canada, North Scandinavia and Siberia) without modifying the horizontal
platform of the mount.
Congratulation, you successfully installed the encoder onto your equatorial mount and you have
finished the most difficult part of the installation process!!!
You just need to create cable connections among telescope electric units according to the
relevant part of the User’s Guide.
Additionally, please find several useful tips and tricks in the User’s Guide of TDM and other
documents found on www.telescopedrivemaster.com website.
/