Page is loading ...

Home » comfee » Comfee CO-A181A (BK) 18L Retro Air Fryer Toaster Oven Instruction Manual
Contents
1 Comfee CO-A181A (BK) 18L Retro Air Fryer Toaster
Oven
2 IMPORTANT SAFEGUARDS
3 PARTS AND ACCESSORIES
4 FEATURES AND BENEFITS
5 BEFORE YOUR FIRST USE
6 OPERATION
7 CARE & CLEANING
8 ABOUT COMPANY
9 Documents / Resources
10 Related Posts
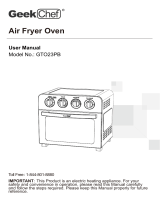
Comfee CO-A181A (BK) 18L Retro Air Fryer Toaster Oven
Comfee CO-A181A (BK) 18L Retro Air Fryer Toaster Oven
Instruction Manual
Manuals+ — User Manuals Simplified.

IMPORTANT SAFEGUARDS
When using an electrical appliance, basic safety precautions should always be followed, including the following:
1. Read all instructions.
2. Unplug from outlet when not in use and before cleaning. Allow to cool before cleaning or handling, putting on
or taking off parts.
3. Do not touch hot surfaces. Use handles, or knobs.
4. To protect against electrical shock, do not place
any part of the Air Fryer Oven in water or other liquids. See instructions for cleaning.
5. This appliance should not be used by or near children or individuals with certain disabilities.
6. Do not operate any appliance with a damaged cord or plug, or after the appliance has malfunctioned or has
been dropped or damaged in any way or is not operating properly. Return the Air Fryer Oven to the store or
retailer where purchased for examination or repair, or adjustment.
7. The use of accessory attachments not recommended may cause injury.
8. Do not use outdoors.
9. Do not let cord hang over the edge of the table or countertop, where it could be pulled on inadvertently by
children or pets, or touch hot surfaces, which could damage the cord.
10. Do not place Air Fryer Oven on or near a hot gas or electric burner or in a heated oven.
11. Do not use this Air Fryer Oven for anything other than its intended purpose.
12. Extreme caution should be exercised when using containers constructed of materials other than metal or glass
in the oven.
13. To avoid burns, use extreme caution when removing Air Fryer Oven accessories or disposing of hot grease.
14. When not in use, always unplug the unit. Do not store any materials other than manufacturer’s recommended
oven proof accessories in this Air Fryer Oven.
15. Do not place any of the following materials in the Air Fryer Oven: paper, cardboard, plastic and similar
products.

16. Do not cover Crumb Tray or any part of the oven with metal foil. This will cause over heating of the oven.
17. Oversize foods, metal foil packages and utensils must not be inserted in the Air Fryer Oven, as they may
involve a risk of fire or electric shock.
18. A fire may occur if the Air Fryer Oven is covered or touching flammable materials such as curtains, draperies or
walls, when in operation.Do not store any items on top of the appliance when in operation. Do not to operate
under wall cabinets.
19. Do not clean with metal scouring pads. Pieces can break off the pad and touch electrical parts, involving a risk
of electric shock.
20. Do not attempt to dislodge food when the Air Fryer Oven is plugged into electrical outlet.
21. Warning: To avoid possibility of fire, NEVER leave Air Fryer Oven unattended during use.
22. Use recommended temperature settings for all cooking/baking,roasting and Air Frying.
23. Do not rest cooking utensils or baking dishes on glass door.
24. Turn the ON/Oven Timer and the ON/Toaster Timer dials to the OFF position to turn off the Air Fryer Oven.
25. Do not operate your appliance in an appliance garage or under a wall cabinet.When storing in an appliance
garage, always unplug the unit from the electrical outlet. Not doing so could create a risk of fire, especially if the
appliance touches the walls of the garage or the door touches the unit as it closes.
26. Extreme caution must be used when moving an appliance containing hot oilor other hot liquids.
27. To disconnect, turn any control to “off”, then remove plug from wall outlet.
28. A fire may occur if the Air Fryer Oven is covered or touching flammable material, including curtains, draperies,
walls, and the like, when in operation. Do not store any item on top of the appliance when in operation.
SAVE THESE INSTRUCTIONS
Please read and keep these instructions handy. These instructions will help you use your Air Fryer Oven to its
fullest so that you will achieve consistent, professional results.
SPECIAL CORD SET INSTRUCTIONS
A short power-supply cord is provided to reduce the risks resulting from becoming entangled in or tripping over a
longer cord.Extension cords are available and may be used if care is exercised in their use.If an extension cord is
used, the marked electrical rating of the extension cord must be at least as great as the electrical rating of the
appliance, and the longer cord should be arranged so that it will not drape over the countertop or tabletop, where it
can be tripped over unintentionally or pulled on by children.
NOTICE
This appliance has a polarized plug (one blade is wider than the other). As a safety feature, this plug will fit in a
polarized outlet only one way. If the plug does not fit fully in the outlet, reverse the plug. If it still does not fit,
contact a qualified electrician. Do not attempt to defeat this safety feature.
FOR HOUSEHOLD USE ONLY NOT INTENDEDFOR COMMERCIAL USE
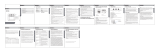
PARTS AND ACCESSORIES

A.Rotisserie spit assembly
B.Wire rack
C.Baking pan
D.Air fryer basket
E. Fetch rack
F. Removable crumb tray
G. Rolling cage
H . Air fryer oven
A. Rotisserie Spit assembly
Use for roasts and whole chicken. Force Shaft lengthwise through meat and center. Slide Forks onto shaft from
either end into meat, then lock in place with Set Screws. There are indentations on the shaft for the set screws.
You can adjust the screws closer to the middle if needed but never but never outward towards the ends.
B. Wire rack
The Wire Rack can be used in three rack positions, bottom, middle, and top.
C. Baking pan
The Baking/Drip Pan is can be placed in any of the three rack positions.
D. Air fryer basket
The Air Fryer Basket is grated to allow air to pass through the basket for even cooking. The Air Fryer Basket
should be placed in the middle rack position unless a recipe states otherwise.
E. Fetch rack
The Fetch Rack is easily to take out roasted whole chicken.
F Removable crumb tray
The Removable Crumb Tray slides out from the bottom front of the Air Fryer Oven for easy cleaning. Always
ensure that the Removable Crumb Tray is placed underneath the bottom heating elements whenever the oven is

being used.
G.Rolling cage
The Rolling cage is used to cook small food that needs to be rotated, such as french fries and chicken nuggets.
FEATURES AND BENEFITS
1. POWER ON LIGHT
Indicator light will turn on and remain lit when oven is in use.
2. ON/OFF TIME knob
Use to select time for adjusting.
3. TEMPERATURE °F knob
Use to select temperature for adjusting.
4. FUNCTION knob
Use to select different cooking functions.
5. Light Button
Push the button to turn on the interior oven light. The light will not work if the power is off.
Oven Rack
Rack have 3 rack positions, top, middle and bottom position.

BEFORE YOUR FIRST USE
Unpack the Air Fryer Oven and remove all packaging materials. Clean the Air Fryer Oven according to the Care
& Cleaning section of this manual.
Place the Air Fryer Oven, on a flat, stable, level surface. Ensure that the oven is 2 to 4 inches away from the
wall or any other objects.
We recommend performing a trial run of your Air Fryer Oven to eliminate any protective substance from the
heating elements. Conduct the trial run in a well-ventilated area as a small amount of smoke and odor may be
detected. This is normal and should be expected.
OPERATION
Operating your Oven
1. The time can be adjusted, if user need different time, can turn Time knob to adjust the mode. The timer
can be set to 0-60 minutes to adjust the requirements of different foods for the baking time. Turn on the
timer,when the light in the furnace chamber is on, a clear ring will be heard at the end of timing, and the
lighting in the furnace chamber will be off.
2. Mechanical timer, try to avoid frequent positive and negative rotation of timer.
Note: when the baking time is set to less than 20 minutes, please turn the timer knob to more than 20
minutes, and then turn it to the required time. The temperature of inside entire cavity may deviate in
practice when oven working, but it will not affect the use of the product. Please do not stay away from the
oven during baking to avoid the surface of food is burnt in a long time.
3. The temperature can be adjusted, if user need different temperature, can turn Temperature knob to
adjust the mode. The temperature can be set to warm 450 °F to adjust the requirements of different
foods for the baking temperature.
Warm
Set the Temperature Dial to 200-450 °F. Set the Function Dial to Warm. Then turn the Timer Dial to the desired
warming time to start the oven and begin warming. The power light will illuminate. The timer will ring once
when the cycle is complete and the oven will power off when the time expires. To stop warming, turn the Timer

Dial to the OFF position.
Broil
Set the Function Dial to Broil . Set the Temperature Dial to 200-450 °F.
Then turn the Timer Dial to the desired cooking time to turn on the oven and begin broiling. The power
light will illuminate. The timer will ring once when the cycle is complete and the oven will power off when
the time expires.
To stop broiling, turn the Timer Dial to the OFF position.
Broiling Tips:
Never use glass oven dishes to broil.
Be sure to keep an eye on food – items can get dark quickly while broiling.
Toast
Fit Oven Rack into Position 2. If toasting two items, center them in the middle of the Oven Rack. Four items
should be evenly spaced – two in front, two in back. Six items should be evenly spaced – three in front, three in
back. Set the Function Dial to Toast. Set the Temperature Dial to desired temperature. Then turn the Timer Dial
to the desired cooking time to start the oven and begin toasting. The oven power light will illuminate. When
completed, the timer will ring and turn off. To stop toasting, turn the Timer Dial to the OFF position.
Bake or Bake
Set the function to Bake or Bake. Set the Temperature Dial to desired temperature. Then turn the Timer Dial to
the desired cooking time to start the oven and begin baking (It is recommended to preheat oven for 5 minutes
prior to baking. Incorporate this into the total baking time). The power light will turn on. The timer will ring once
when the cycle is complete and the oven will power off when the time expires. Place the pan in Position 2 for
baking. For chicken or other large items, the pan can be in Position 1. To stop operation, turn the Timer Dial to
the OFF position.
Air Fry
Place the Air Fryer Basket onto the Baking Pan or Oven Rack. Air Fry in rack Position 2. Set the Function Dial
to Air Fry. Set Temperature Dial to desired temperature. Then turn the Timer Dial to the desired cooking time to
turn on the oven and begin Air Frying. The oven power light will illuminate. The timer will ring once when the
cycle is complete and the oven will power off when the time expires. To stop Air Frying, turn the Timer Dial to
the OFF position.
Rotisseries
Set the Function Dial to Rotisseries . Set Temperature Dial to desired temperature.Then turn the Timer Dial to
the desired cooking time to turn on the oven and begin Rotisseries. The oven power light will illuminate. The
timer will ring once when the cycle is complete and the oven will power off when the time expires. To stop
Rotisseries, turn the Timer Dial to the OFF position.
CARE & CLEANING
Unplug your Air Fryer Oven and allow it to completely cool before cleaning. Do not use abrasive cleaners, as
they will damage the finish. Simply wipe the exterior with a clean, damp cloth and dry thoroughly. Apply
thecleaning agent to a cloth, not directly onto the Air Fryer Oven. Do not use excess pressure when cleaning
the area of the control panel as it could cause the text to be removed over time.
To clean the interior walls and bottom of the oven (remove the Removable Crumb Tray first) use a damp
soapycloth or sponge. Never use harsh abrasives or corrosive products including oven cleaner sprays. These

could damage the oven surface. Never use steel wool pads on the Air Fryer Oven or accessories.
The Wire Rack, Baking/Drip Pan, Air Fryer Basket and Removable Crumb Tray should be hand-washed in
hot,sudsy water or use a nylon scouring pad or nylon brush. These parts are not dishwasher safe.
Always clean the Removable Crumb Tray after each use. Excess food particles could cause smoking and will
be hard to remove from tray. To remove baked- on grease or burnt food particles you can soak the Removable
Crumb Tray in hot, sudsy water or use nonabrasive cleaners. Never operate the oven without the Removable
Crumb Tray in place.
The Rotisserie Spit, Forks, Screws and Removal Tool can be cleaned with a cloth or sponge in hot, sudsy
water. For stubborn stains soak them in hot sudsy water prior to cleaning.
The top interior of the Air Fryer Oven should be cleaned to remove excess grease that may accumulate after
cooking greasy foods or after using the rotisserie function. Doing so will prevent smoking in the oven during
subsequent uses.
ABOUT COMPANY
Manufacturer: Midea America Corp.
Tel: 866-646-4332
Email: officialservice@comfeeappliance.com
Made in china
Documents / Resources
Comfee CO-A181A (BK) 18L Retro Air Fryer Toaster Oven [pdf] Instruction Manual
CO-A181A BK, 18L Retro Air Fryer Toaster Oven, Air Fryer Toaster Oven, 18L Retro Toaster Ov
en, Toaster Oven, Oven
Manuals+,
/