Page is loading ...

INSTALLATION GUIDE
Nuheat Mat Pre-built electric
floor heating mat

nVent.com/NUHEAT | 2

nVent.com/NUHEAT | 3
TABLE OF CONTENTS
SECTION 1: INSTALLATION PREPARATION
1.1 Product Overview ..........................................................................................................4
1.2 How To Order .................................................................................................................5
1.3 Installation Guidelines ..................................................................................................6
1.4 Before You Start ........................................................................................................... 7
1.5 Insulation & Resistance Tests ................................................................................... 8
1.6 Mat Resistance Log .................................................................................................... 9
SECTION 2: INSTALLATION
2.1 Securing Nuheat Mat to the Suboor ............................................................... 10–11
2.2 Install Flooring - Tile and Stone ............................................................................... 12
2.3 Install Flooring - Laminate/Engineered Wood ...................................................... 13
SECTION 3: ELECTRICAL CONNECTIONS & GUIDELINES
3.1 Electrical Connections ........................................................................................14–15
3.2 Electrical Guidelines ................................................................................................... 16
SECTION 4: WARRANTY INFORMATION
4.1 Warranty Information ................................................................................................ 17
SECTION 5: THERMOSTATS & CONTROLS
5.1 Thermostats & Controls ............................................................................................ 18

nVent.com/NUHEAT | 4
1.1 PRODUCT OVERVIEW
nVent NUHEAT Mats bring soothing heat to the following surfaces:
• Tile
• Stone
• Laminate
• Engineered wood
• Luxury vinyl
Standard & Custom Mats are pre-built floor heating systems that do not require any on-site
manipulation during installation, significantly reducing installation time. Being pre-built also
ensures even heat distribution as the heating wires are precisely machine-spaced during
production. Thinset is applied to the subfloor, the Mat is pressed into the thinset, and flooring
can be installed immediately. nVent NUHEAT Mats are compatible with all standard subfloor
material and are only 1/8” thick, making them ideal for installations where minimal height
buildup is desired.
Standard Mats are available in over 70 sizes – squares and rectangles of various dimensions –
and are available off-the-shelf. A single standard mat can provide adequate floor heat coverage
for typical, rectangular spaces. Installers can also combine multiple standard mats to heat the
desired area. Standard Mats are offered in 120 V and 240 V configurations, producing 12 W/ft2.
When full coverage cannot be achieved with Standard Mats, in areas with curves, angles, or
obstructions, Custom Mats are available to provide perfect coverage in any space. Custom
Mats are offered in 120 V and 240 V configurations producing 12 W/ft2 or 15 W/ft2 upon
request. Custom Mats typically ship in 5 to 7 business days. Actual lead time varies and
will be confirmed upon quotation and/or order.
SECTION 1: INSTALLATION PREPARATION

nVent.com/NUHEAT | 5
1.2 HOW TO ORDER
1.21 NUHEAT STANDARD MATS
Step 1 – Determine perimeter dimensions
Step 2 – Refer to Nuheat Standard Mat table to view available sizes. Determine if one or
multiple standard mats can be used to cover the desired area.
Step 3 – Locate a Nuheat distributor using ‘Where To Buy’ tool on www.nuheat.com.
Single Standard Mat Multiple Standard Mats
1.22 NUHEAT CUSTOM MATS
When full coverage cannot be achieved with Standard Mats, in areas with curves, angles, or
obstructions, Custom Mats are available to provide optimal coverage.
1. Submit an accurately measured floor plan indicating all obstructions such as floor vents
or islands via an nVent NUHEAT distributor (measuring instructions and where-to-buy
information available at nVent.com/NUHEAT). Be sure to indicate the voltage(s) and the
position of the thermostat(s) on the floor plan.
2. The nVent NUHEAT Design Team will work with you and your distributor to confirm
dimensions. Please ensure installer contact information is provided to facilitate rapid
design turnaround.
3. The nVent NUHEAT Design Team will produce a design and quotation (typical quote
turnaround time is 24 hours). Once dimensions and payment are confirmed, Custom Mats
typically ship in 5 to 7 business days. Actual lead time varies and will be confirmed upon
quotation and again upon order. Next day air shipment is available upon request.
Custom Mat
SECTION 1: INSTALLATION PREPARATION

nVent.com/NUHEAT | 6
1.3 INSTALLATION GUIDELINES
• The installation of this heating product shall be in accordance with the manufacturer’s
instructions and in accordance with the Canadian Electrical Code Part 1 or the National
Electrical Code (US) whichever is applicable.
• This equipment shall be installed only by qualied personnel who are familiar with the
construction and operation of the apparatus and risks involved.
• Caution should be taken to guard against risk of electric shock, re and bodily injury during
the installation of this equipment.
• Nuheat Mat should be connected to a dedicated electrical circuit.
• It is mandatory to install a class “A” GFCI or GFCI circuit breaker with each Nuheat Mat
installation.
All Nuheat thermostats come equipped with a built-in class “A” GFCI.
• Do not use sharp tools or power tools to clean grout lines. Cleaning grout lines with sharp
tools or power tools may damage the Nuheat Mat System and will void the Nuheat warranty.
• Indicate on the electrical panel which circuit is used for the electric oor heating system.
• Suboor must be prepared in accordance to ANSI specications.
• Nuheat Mat cannot be overlapped, crossed, cut, shortened or modied.
• The ambient air temperature must be above 10 ˚C or 50 ˚ F when the Nuheat Mat Floor
Heating System is installed.
• For concrete slab suboors, we recommend insulating the slab prior to installing Nuheat Mat.
Insulation will improve the upward heat transfer from the mat to the ooring surface and
improve heat up time.
SECTION 1: INSTALLATION PREPARATION

nVent.com/NUHEAT | 7
1.4 BEFORE YOU START
1.41 ASSEMBLE REQUIRED TOOLS
• Multimeter/Ohmeter
• ¼” x ¼” square notched trowel
• Grouting oat/lightweight roller
• Sponge
• Latex-modied thinset
• Thinset mixer
• Large bucket
• Duct tape
• Thermostat sensor probe (included with thermostat)
FIGURE 1.21: Assemble required tools
1.42 PRE-INSTALLATION GUIDELINES
Avoid the following activities that may damage the Nuheat Mat:
• Connecting the mat to power when folded
• Stapling
• Nailing
• Folding, bending overlapping mats
• Using grout scrapers or utility knives to clean grout lines may damage the mat and void
Nuheat warranty.
• Clean grout lines with a sponge as you go.
1.43 DRY FIT AND ROUTE COLD LEAD PATH
Position Nuheat Mat to t contours of room. Route a path for the cold lead to the electrical box.
The cold lead CANNOT cross over on top of the Nuheat Mat. Nuheat Standard Mats can be
ipped in any direction to place cold leads closer to thermostat location.
SECTION 1: INSTALLATION PREPARATION

nVent.com/NUHEAT | 8
1.5 INSULATION & RESISTANCE TESTS
If insulation or resistance tests do not pass the requirements at any point of the installation,
halt installation immediately and contact NUHEAT Customer Care at
1.800.778.WARM(9276) or email nuheatinfo@nVent.com.
1.51 INSULATION TEST
To ensure the heating wire is fully insulated:
1. With digital multimeter, set it to measure resistance/ohms. If using an ohmeter, set it to the
200 ohm setting.
2. Place one multimeter clip on the metal braid wire (ground). Place the other multimeter clip
on the white wire (red wire for 240 V Nuheat Mats).
3. Conrm the reading on the multimeter/ohmeter is OL or innity (open circuit).
4. Repeat steps 2-3 to check the reading between the metal braid wire (ground) and the other
wire (black).
1.52 RESISTANCE TEST
To ensure the heating wire is fully insulated:
1. With digital multimeter, set it to measure resistance/ohms. If using an ohmeter, set it to the
200 ohm setting.
2. Place one multimeter clip on the white wire (red wire for 240 V Nuheat Mats). Place the other
multimeter clip on the black wire.
3. Conrm the reading on the multimeter/ohmeter is within +10% / -5% of the factory
resistance listed on the white tag that is attached to the cold lead. The white tag contains
information including factory resistance readings, model number, manufacture date and
amperage ratings.
4. Record the resistance test readings in the table on page 7.
Nuheat Mat must be tested before, during and after installation to validate
the warranty.
SECTION 1: INSTALLATION PREPARATION

nVent.com/NUHEAT | 9
1.6 MAT RESISTANCE LOG
1.61 MAT RESISTANCE LOG
For warranty and troubleshooting purposes, the mat resistance log must be completed and
remain with the end user.
MAT RESISTANCE LOG
Mat Model Number
Factory Measured Resistance
Resistance Test Ohms Reading (Before Installation)
Resistance Test Ohms Reading (During Installation)
Resistance Test Ohms Reading (After Installation)
Failure to record resistance tests in the above table will void the NUHEAT warranty.
To submit your warranty, visit www.nuheat.com and ll out the online warranty card.
1.62 FLOOR SENSOR PROBE TEST
To ensure the oor sensor probe is not damaged:
1. With a digital multimeter (or ohmmeter), set the device to the 20KΩ (Kilohms) setting.
2. Place a multimeter clip on each of the wires. It does not matter which clip is attached to
which wire. Some multimeters do not have the 20KΩ (Kilohms) setting. Find a suitable
multimeter that has this setting.
3. Conrm the reading on the device is between 8-12KΩ (Kilohms) at room temperature.
4. If test readings do not pass requirements at any point of the installation, halt installation
immediately and contact NUHEAT Customer Care at 1.800.778.WARM(9276) or
email [email protected].
SECTION 1: INSTALLATION PREPARATION

nVent.com/NUHEAT | 10
2.1 SECURING MAT TO THE SUBFLOOR
2.11 SECURING MAT TO THE SUBFLOOR
1. Prepare thinset mixture.
2. Spread thinset onto suboor.
Use ¼ in x ¼ in square notched trowel to spread ¼ in layer of acrylic/latex modied
thinset onto suboor. Work on one manageable section at a time.
FIGURE 2.12: Spread thinset onto suboor
3. Place Nuheat Mat onto fresh thinset.
FIGURE 2.13: Place mat onto fresh thinset
4. Press Nuheat Mat into thinset.
Press Nuheat Mat rmly into thinset with grout oat or lightweight roller. Create
100% contact between Nuheat Mat, thinset and suboor. Press out air bubbles
underneath mat. Route cold lead(s) to electrical box.
SECTION 2: INSTALLATION

nVent.com/NUHEAT | 11
2.1 SECURING MAT TO THE SUBFLOOR
2.11 SECURING MAT TO THE SUBFLOOR (CONTINUED)
5. Perform insulation and resistance test on page 6.
6. Secure oor sensor probe.
Duct tape the oor sensor probe on top of the Nuheat Mat. The probe’s tip should
be between the heating wires. Ensure the probe’s tip is located in an area that can
represent the overall oor temperature and away from other heating/cooling sources
(ie. heat ducts vents, direct sunlight, drafts caused by large windows/doors, areas
covered by rugs or xed furniture). The probe wire can cross on top of the
heating wire(s).
FIGURE 2.16: Secure oor sensor probe
SECTION 2: INSTALLATION

nVent.com/NUHEAT | 12
2.2 INSTALL FLOORING - TILE & STONE
2.21 INSTALL FLOORING - TILE & STONE
1. Apply thin layer of thinset.
Use ¼ in x ¼ in square notched trowel to spread minimum ¼ in layer of acrylic/latex
modied thinset on top of Nuheat Mat as per manufacturer’s instructions.
FIGURE 2.21: Install tie/stone ooring
2. Install tile/stone as per manufacturer’s instructions.
3. Clean grout lines.
Do not use sharp tools or power tools to clean grout lines; doing so may damage
Nuheat Mat.
FIGURE 2.23: Clean grout lines
4. Perform insulation and resistance test on page 6.
5. Make electrical connections.
Before activating Nuheat Mat, ensure setting compound has fully cured.
Refer to setting compound manufacturer’s specications for cure times.
Installation of Nuheat Mat is now complete.
SECTION 2: INSTALLATION

nVent.com/NUHEAT | 13
2.3 INSTALL FLOORING - LAMINATE/
ENGINEERED WOOD
2.31 INSTALL FLOORING - LAMINATE/ENGINEERED WOOD
1. Apply smooth layer of thinset.
Use smooth trowel to spread minimum ¼ in layer of acrylic/latex modied thinset on
top of Nuheat Mat. Ensure thinset layer is level and smooth.
Self-leveling compounds may also be used. Allow thinset or self-leveller
to cure as per manufacturer’s instructions.
2. Perform insulation and resistance test on page 6.
3. Install laminate/engineered wood ooring.
Install vapor barrier, if applicable, and underlay as per manufacturer’s instructions.
Install laminate/engineered wood oor as per manufacturer’s instructions.
4. Make electrical connections.
Before activating Nuheat Mat, ensure setting compound has fully cured.
Refer to setting compound manufacturer’s specications for cure times.
Installation of Nuheat Mat is now complete.
SECTION 2: INSTALLATION

nVent.com/NUHEAT | 14
3.1 ELECTRICAL CONNECTIONS
3.11 ELECTRICAL CONNECTIONS
1. Connect the tin plated copper ground braid/wire of the Nuheat Mat to the ground screw or
ground conductor inside the electrical box using approved wire connectors.
2. Attach corresponding lead wires to electrical box using CSA Certied/UL Listed cable
ttings. Make electrical connection only after ooring is complete.
3. Nuheat Mat must be connected to minimum 14AWG supply conductors.
Supply conductors shall be suitable for residential wiring according to local
and national electrical code.
When controlling multiple mats with one thermostat, all mats may be connected directly to the
thermostat provided the total amperage does not exceed the 15-amp maximum load of the
Nuheat thermostat. Alternatively, the mat cold leads can be run to a separate electrical box and
connected to the Nuheat thermostat using suitable electrical house wiring. Consult with your
electrician to determine the best method for your installation.
In all cases, ensure the electrical box can easily t all of the connections.
Risk of electric shock and re. Damage to supply conductor insulation
may occur if conductors are routed less than 2 in (51 mm) from heating wire.
Refer to installation instructions for recommended means of routing supply
conductors.
4. Ax supplied orange label to panel board beside appropriate circuit indicating branch circuit
supplying power to Nuheat Mat.
5. Ax the supplied “Concealed Area Warning” label to adjacent points of access to concealed
areas in which installed heating products are accessible.
6. Ax the supplied “Radiant Floor Heating” sticker to the room control for the Nuheat Floor
Heating System.
SECTION 3: ELECTRICAL CONNECTIONS

nVent.com/NUHEAT | 15
3.1 ELECTRICAL CONNECTIONS
3.11 ELECTRICAL CONNECTIONS (CONTINUED)
All wiring must follow specications set out in Part 1 of Canadian Electrical Code, or Article
424 of the National Electrical Code ANSI/ NFPA 70, or whichever is applicable to local electrical
inspection regulations and authorities. All Nuheat thermostats are equipped with built-in
Class “A” GFCI protection. If Nuheat Mat is connected directly to a Nuheat thermostat, a
non-GFCI equipped breaker should be used. If the Nuheat Mat is controlling an external relay
for a separate circuit, it is mandatory to install a Class “A” GFCI or GFCI circuit breaker for the
external/separate circuit.
The cold leads of Nuheat Mat may need to be routed inside suitable conduit according to local
electrical codes. Check with the local authority having jurisdiction to determine requirements.
NEC/CEC rules state that the cold lead tag must remain on the cold lead. The tag
contains critical information necessary for testing, warranty and troubleshooting
purposes. Do not remove the tag for any reason.
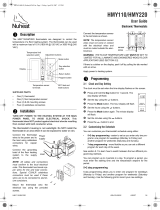
Wiring Diagram for Nuheat Signature,
Home & Element Thermostats
Terminals for the floor sensor are located
on the FRONT side of the thermostat base
(not illustrated). Wires of the floor sensor
go into terminals C and D only (no polarity).
Nuheat (Black)
Line (Black)
Nuheat White (120V) or Red (240V)
Line White (120V) or Red (240V)
Updated December 2015
Nuheat Mat(s)
SECTION 3: ELECTRICAL CONNECTIONS

nVent.com/NUHEAT | 16
3.2 ELECTRICAL GUIDELINES
3.21 ELECTRICAL GUIDELINES
• The installation of this heating product shall be in accordance with the manufacturer’s
instructions and in accordance with the Canadian Electrical Code Part 1 or the National
Electrical Code (USA), whichever is applicable.
• This equipment shall be installed only by qualied personnel who are familiar with the
construction and operation of the apparatus and risks involved.
• Caution should be taken to guard against electric shock, re and bodily injury during the
installation of this equipment.
• De-energize power circuits before installation or servicing.
• Nuheat Mat should not be connected to power until the Nuheat Mat is fully installed and
covered by ooring material.
• Suboor must be prepared in accordance with ANSI specications.
• The heating portion of the Nuheat Mat shall not touch, cross over, or overlap itself.
• Do not install Nuheat Mat in direct contact with or within 0.25 in (6.5 mm) of any combustible
surfaces or materials (excluding wood-based substrates).
• The minimum bending radius of the cold lead is 2 in (51 mm) and heating wire is
0.625 in (16 mm).
• The ambient temperature must be above 10°C or 50°F when Nuheat Mat is installed.
• As per National Electrical Code (US) and Canadian Electrical Code (CAN), Nuheat Mat must
be installed on a dedicated circuit for heating appliances/devices (additional Nuheat Mats,
baseboard heaters, electric replaces, etc.).
• Nuheat Mat is designed for indoor oor heating applications in general use (-X) in US and
Canada and in wet (-W) areas in Canada.
• Minimum distance of 1.5 in (38.1 mm) between adjacent heating devices.
• Total combined R-values of all oor coverings must not exceed R-2.5.
• Nuheat Mat should not be altered.
• Nuheat Mat is not for installation in pool and spa areas, nor outdoor use.
• Do not place objects directly on top of the oor that could impede/trap heat emanating from
the oor heating system including but not limited to ush-to-oor furniture, rubber or memory
foam mats, and mattresses. These objects could cause unsafe temperatures to be reached
underneath these objects which may cause damage
to the object and/or the ooring material.
3.22 TROUBLESHOOTING
Should you have any questions or diculties installing or controlling your Nuheat Mat,
please consult our comprehensive troubleshooting FAQ section at www.nuheat.com.
SECTION 3: ELECTRICAL CONNECTIONS

nVent.com/NUHEAT | 17
4.1 WARRANTY INFORMATION
4.11 WARRANTY INFORMATION
NUHEAT offers a 25-Year Limited Product Warranty and/or 25-Year Limited Total Care*
Warranty when installed by a nVent NUHEAT Certied PRO Installer.
The online warranty registration form must be completed at www.nuheat.com within
thirty (30) days from the date of installation and kept by the homeowner, together with a copy
of the commissioning report, relevant invoice, and photographs, showing the product(s) in their
entirety after installation but before the installation of the ooring material.
* Total Care Warranty is an upgrade of our standard product warranty and additionally covers
repair or replacement of the Product and restoring the oor in its original state or, if not
possible, to an equivalent standard, at no cost to the Buyer. In order to remedy the defect,
nVent must have access to 1 m² (10 ft²) of the oor covering material.
SECTION 4: WARRANTY

nVent.com/NUHEAT | 18
5.1 THERMOSTATS & CONTROLS
SECTION 5: CONTROLS
Nuheat Signature
Wi- – Enabled Floor Heating Thermostat
• WiFi-enabled
• 3.5” Color touchscreen
• Energy usage monitor
• 7-day programmability
• Dual-voltage (120 V & 240 V)
Nuheat Home
Universal Floor Heating Thermostat
• 3.5” Color touchscreen
• Energy usage monitor
• 7-day programmability
• Dual-voltage (120 V & 240 V)
Nuheat Element
Non-programmable Thermostat
• Manual temperature control
• Dual-voltage (120 V & 240 V)

nVent.com/NUHEAT | 19
5.1 THERMOSTATS & CONTROLS
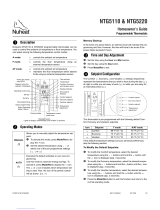
nVent Nuheat Install Pro Alarm
nVent NUHEAT Install Pro Alarm (AC0200) is an electrical fault indicator
that simultaneously monitors the hot, neutral and ground wires during
installation of any line voltage oor heating system. If a wire is damaged
during installation, the Install Pro Alarm will sound an alert, prompting the
installer to stop and correct the problem before continuing.
AC0200 replaces the Mat Sense Pro (AC0100) and offers several
improvements…
• Louder alarm tone
• Longer operating time
• More easily replaceable 9-volt battery (included)
Use an Install Pro Alarm with every installation to ensure the system is
installed without undetected damage

North America
Tel: +1.800.778.9276
Fax: +1.604.529.4404
nVent.com/NUHEAT
©2022 nVent. All nVent marks and logos are owned or licensed by nVent Services GmbH or its aliates.
All other trademarks are the property of their respective owners. nVent reserves the right to change specications without notice.
NUHEAT-IM-H59307-MatInstallationGuide-EN-2205
/