Page is loading ...

HMY110/HMY220 400-619-000-E 4/20/07 1/4
The HMY110/HMY220 thermostats are designed to control the
temperature of a floor heating system. The thermostats can be used
with a maximum load of 15 A (1800 W @ 120 VAC or 3600 W @ 240
VAC).
SUPPLIED PARTS
• One (1) thermostat
• One (1) floor temperature sensor
• Four (4) 6-32 mounting screws
• Four (4) solderless connectors
TURN OFF POWER TO THE HEATING SYSTEM AT THE MAIN
POWER PANEL TO AVOID ELECTRICAL SHOCK. This
thermostat does NOT protect against electrical shocks resulting
from contact with both conductor wires.
The thermostat’s housing is not watertight. Do NOT install the
thermostat in an area where it can be exposed to water or rain.
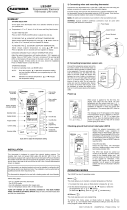
Connect the thermostat
wires to the power and to
the load using solderless
connectors for copper
wires.
Connect the grounding
braid of the floor heating
system to the supply
ground.
NOTE: All cables and connections
must conform to the local electrical
code. This thermostat has tinned cop-
per wires for line and load connec-
tions. Special CO/ALR solderless
connectors must be used if these
wires are to be connected to alumin-
ium conductors.
Mount the thermostat onto the
electrical box using the provided
screws.
Connect the temperature sensor
to the terminals as shown.
NOTE: The temperature sensor
wires must not come in contact
with the electrical wires and
must be routed outside the elec-
trical box.
WARNING: THE FLOOR TEMPERATURE LIMIT MUST BE SET TO
'LIMITED' FOR ALL LAMINATE AND ENGINEERED WOOD FLOOR
APPLICATIONS (SEE SECTION 5.2).
If there is a sticker on the display, peel it off by pulling the tab marked
with an arrow.
Apply power to heating system.
3.1 Clock and Day Setting
The clock must be set when the time display flashes on the screen.
nPress and hold the Day button for 1 second. The
day display will flash.
oSet the day using the buttons.
pPress the Mode button. The hour display will flash.
qSet the hours using the buttons.
rPress the Mode button again. The minute display
will flash.
sSet the minutes using the buttons.
tPress the button to end.
3.2 Customizing the Schedule
You can customize your thermostat's schedule using either:
•5+2 day programming - easier to set as you enter only two pro-
grams: one program for weekdays (Monday to Friday) and
another program for weekends (Saturday and Sunday).
•7-day programming - more flexible as you can set a different
program for each day of the week.
See section 5.1 to learn how to switch between the two different pro-
gramming methods.
You can program up to 4 periods in a day. To program a period, you
must enter the starting time and the temperature setpoint for the
period.
5+2 day programming
5-day programming allows you to enter one program for weekdays
(Monday to Friday) and another program for weekends (Saturday
and Sunday). Use the following grid to record your new settings.
nDescription 1.
oInstallation 2.
Floor
Sensor
Floor Temp
Adjustment buttons
Day selection
button
Program button
Mode button
Return button
Temperature limit
selection switch
Display
GFCI test and
reset buttons
Temperature sensor
terminals
Power
supply
Load
pProgramming 3.
Floor
Sensor
Floor Temp
sensor
wires
HMY110/HMY220
User Guide
Electronic Thermostats
400-619-000-E (Nuheat) ENG.fm Page 1 Friday, April 20, 2007 1:32 PM

HMY110/HMY220 400-619-000-E 4/20/07 2/4
•To enter the programming mode: Press and hold
the Pgm button for 1 second. Once inside the pro-
gramming mode, you can perform the operations
below.
•To select the program days: Press Day until the
desired days are displayed (MO TU WE TH FR for
Monday to Friday or SA SU for Saturday and Sun-
day.
NOTE: To program the same settings (time and temperature) for
a selected period for the entire week (7 days), press and hold
the Day button for 1 second. The settings will now be the same
for that period for the entire week.
•To set a period:
nPress the Pgm button until the P1 appears on the screen.
The start time, temperature and period number will appear.
The start time display will flash.
oSet the start time using the buttons. The time is set in 15-
minute increments. Hold the button to scroll faster.
NOTE: To skip a period, press and hold the Pgm button and
the button simultaneously. The time and temperature
display for that period will disappear. Press the Pgm button
to skip to the next period.
pPress the Mode button. The temperature display will flash.
qSet the temperature using the buttons.
•To go to the next period: Press the Pgm button.
• Repeat steps 1 to 4 to program the remaining periods (P2, P3,
P4).
•To exit the programming mode: Press the button.
7-day programming
5+2 day programming is the default programming method; to select
7-day programming, see section 5.1. 7-day programming allows you
to set a different program for each day of the week. Use the following
grid to record your new settings.
•To enter the programming mode: Press and hold
the Pgm button for 1 second. Once inside the pro-
gramming mode, you can perform the operations
below.
•To select a program day: Press the Day button until
the day is displayed. (MO: Monday, TU: Tuesday,
WE: Wednesday, TH: Thursday, FR: Friday,
SA: Saturday and SU: Sunday).
NOTE: To program the same settings (time and temperature) for
a selected period for the entire week (7 days), press and hold
the Day button for 1 second. The settings will now be the same
for that period for the entire week.
•To set a period:
nPress the Pgm button until P1 appears on the screen. The
start time, temperature and period number will appear. The
start time display will flash.
oSet the start time using the buttons. The time is set in 15-
minute increments. Hold the button to scroll faster.
NOTE: To skip a period, press and hold the Pgm button and
the button simultaneously. The time and temperature
display for that period will disappear. Press the Pgm button
to skip to the next period.
pPress the Mode button. The temperature display will flash.
qSet the temperature using the buttons.
•To go to the next period: Press the Pgm button.
• Repeat steps 1 to 4 to program the remaining periods (P2, P3,
P4).
•To exit the programming mode: Press the button.
4.1 Display
Depending on the thermostat’s configuration, the screen can be per-
manently backlit or the backlight can be activated when any button is
pressed (see section 5.1). In the latter case, the backlight will remain
on for 12 seconds.
4.2 Temperature Setting
The thermostat normally displays the current floor temperature.
• To view the programmed temperature, press either of the
buttons once.
• To change the programmed temperature, press either of the
buttons until the desired temperature is displayed.
Periods Settings Monday to Friday Saturday and Sunday
P1 Start Time
Temperature
P2 Start Time
Temperature
P3 Start Time
Temperature
P4 Start Time
Temperature
Periods Settings Program days
MO TU WE TH FR SA SU
P1 Start Time
Temperature
P2 Start Time
Temperature
P3 Start Time
Temperature
P4 Start Time
Temperature
qBasic Operation 4.
Period number
Temperature
Heating power indicator
(the number of bars
varies according to the
current power output)
Time
Automatic mode
Appears when the
setpoint is displayed
Manual mode
If the thermostat is
configured for 12-hour
display, make sure PM
appears when setting
an afternoon time.
Day
400-619-000-E (Nuheat) ENG.fm Page 2 Friday, April 20, 2007 1:32 PM

HMY110/HMY220 400-619-000-E 4/20/07 3/4
4.3 Automatic Mode
Use automatic mode if you want the thermostat to follow
a programmed schedule. At the start of a programmed
period, the temperature will change according to the
schedule you programmed.
To use the automatic mode, press the Mode button until
the clock icon appears on the screen. The current
period number will appear.
Pre-programmed schedule
The following schedule has been programmed at the factory using
the 5 +2 day programming method. One program is used for Monday
to Friday and another program is used for Saturday and Sunday. To
program a new schedule, see section 3.2.
Temporary Bypass
If you modify the temperature (using the buttons) when the ther-
mostat is in automatic mode, the thermostat temporarily bypasses
the current programmed temperature. Your floor will remain at this
temperature for the next two hours. (The clock icon will flash dur-
ing this time.) You can cancel the bypass by pressing the Mode but-
ton.
4.4 Manual Mode
In manual mode, the programmed schedule is not
followed. Use this mode if you wish to set the
temperature manually.
To use the manual mode, press the Mode button until
the hand icon appears on the screen and set the
temperature using the buttons.
Your floor will remain at this temperature until the
manual mode is turned off. To turn manual mode off,
press the Mode button until the clock icon appears.
4.5 Off Mode / Vacation Mode
Use the Off mode to cut power to the floor heating
system. This mode is useful in the summer or when
heating is not required for an extended period of time.
To place the thermostat in Off mode, press the Mode
button until the message OFF appears on the screen.
After 5 seconds, the message will disappear and
current time and day will appear.
4.6 Configuring the Thermostat as a Power Regulator
The thermostat can be configured as a power regulator with no tem-
perature feedback (see section 5.1). This feature is useful in any of
the following conditions:
• The temperature sensor is not connected to the thermostat.
• You wish to control the heating power without accounting for the
floor temperature.
• The temperature sensor is defective.
The thermostat will display the percentage of heating power instead
of displaying the temperature.
NOTE: When the heating power is displayed instead of the tempera-
ture, °F or °C does not appear on the screen.
When configured as a power regulator, the numeric value on the
screen represents the percentage of the maximum output not the
actual temperature. To set the power, use the buttons.
4.7 Error Codes
The following error codes can appear at the top of the display.
LO: The measured temperature is below 32°F (0°C).
HI: The measured temperature is above 140°F (60°C).
E1: The temperature sensor is defective or not connected.
E2: The temperature sensor is shorted.
5.1 Configuration settings
• To access the configuration settings, simultaneously press and
hold the Pgm and Day buttons for 1 second.
• To jump from one setting to the next, press the Mode button.
The configuration settings will appear in the order shown below
(from left to right).
• To toggle between the selections, use the buttons.
• To exit the configuration settings, press the button.
Periods Temperature Start Times
MO TU WE TH FR SA SU
P1 88°F (31°C) 6:00 a.m.
P2 74°F (23.5°C) 9:00 a.m. --
P3 88°F (31°C) 5:00 p.m. --
P4 74°F (23.5°C) 11:00 p.m.
rConfiguration 5.
Time
display
Temperature
display
Programming
method
Backlight
On
Power
regulator
Early Start
Configuration settings Selections
NOTE: The default settings are inside the gray cells.
Time display 12 h 24 h
Temperature display °F °C
Programming method a
a. This setting specifies the schedule programming method (see
section 3.2).
5+2 days 7 days
Backlight On b
b. When this setting is set to Y, the screen is permanently backlit.
When set to N, the backlight is activated for 12 seconds when a
button is pressed.
NY
Power regulator c
c. Enable this setting (Y) to configure the thermostat as a power
regulator (see section 4.6).
NY
Early Start d
d. Early Start can be used in Automatic mode only. When this func-
tion is enabled, the thermostat calculates the optimal time to start
heating in order to obtain the desired temperature by the set time.
The thermostat re-assesses the start time daily based on the pre-
vious day’s results.
YN
400-619-000-E (Nuheat) ENG.fm Page 3 Friday, April 20, 2007 1:32 PM

HMY110/HMY220 400-619-000-E 4/20/07 4/4
5.2 Floor temperature limit for laminate and engineered floors
WARNING: THE FLOOR TEMPERATURE LIMIT MUST BE SET TO
'LIMITED' FOR ALL LAMINATE AND ENGINEERED WOOD FLOOR
APPLICATIONS.
You must limit the floor temperature as shown in the following table.
The temperature limit switch is on the front of the thermostat, above
the temperature sensor terminals. (You may need to remove the wall-
plate to expose the switch.)
The GFCI protects against risks of electrocution caused by a current
leakage. If the leakage current exceeds 5 mA, the GFCI will automat-
ically trigger, thus cutting power to the floor heating system. To indi-
cate the fault, the Test and Reset buttons will illuminate.
To ensure that the GFCI is always in working order, test it once the
thermostat is installed and on a monthly basis thereafter.
nIncrease the setpoint temperature sufficiently to start heating.
oWait for about 5 seconds until the heating power indicator
appears on the screen.
pPress the Test button.
Successful: The Test and Reset buttons illuminate. This means
the GFCI is working and has cut power to the heating system.
Press the Reset button to return power to the heating system
(the Test and Reset button lights will go off). Return the temper-
ature setpoint to the desired value.
Unsuccessful: The Test and Reset button lights flash. This
means the GFCI is defective and will not provide any protection.
The button lights will continue to flash until the thermostat is
replaced.
WARNING: If the Test and Reset buttons illuminate during normal
operation, check if the fault was caused by external interference such
as a halogen light or an electric motor. In this case, reset and test the
GFCI. However, if the fault occurs again for unknown reasons, cut
power to the heating system from the main electrical panel and have
the installation verified by an electrician.
If the power failure exceeds 2 hours, only the thermostat’s clock must
be re-adjusted. When power returns, the thermostat returns to the
mode of operation preceding the power outage.
Display range: 32°F to 140°F (0°C to 60°C)
Display resolution: 1°F (0.5°C)
Minimum setpoint: 40°F (5°C)
Maximum setpoint: 82 or 104°F (28 or 40°C)
depending to the thermostat configuration
Setpoint interval: 1°F (0.5°C)
Storage temperature: -4°F to 120°F (-20°C to 50°C)
Dimensions (HxWxD): 2.7 x 3.5 x 2 inches (69 x 89 x 52 mm)
GFCI rating: 5 mA Class A
Approval: c CSA us
NUHEAT INDUSTRIES ONE (1) YEAR LIMITED WARRANTY
This product is guaranteed against workmanship defects for a one-year
period following the initial date of purchase. During this period, NUHEAT
will repair or replace, at our option and without charge, any defective
product which has been used under normal conditions.
The warranty does not cover delivery costs and does not apply to prod-
ucts poorly installed or randomly damaged before, during or after installa-
tion. This warranty cancels and replaces any other manufacturer's
express or implied warranty as well as any other company commitment.
NUHEAT cannot be held liable for related or random damages before,
during or after the installation of this product. The defective product as
well as the purchase invoice must be returned to the place of purchase or
mailed, prepaid and insured, to the following address:
Switch Position Floor Types Temperature Limit
Normal ceramic, concrete 104°F (40°C)
Limited laminate, engineered wood 82°F (28°C)
sGFCI Test 6.
tPower Outage 7.
uTroubleshooting 8.
PROBLEM SOLUTIONS
Heating is always On. Check the thermostat wiring.
Thermostat indicates
that heating is On when
it is not.
Check the thermostat wiring.
Thermostat is hot.
Under normal operation, the thermo-
stat housing may reach a temperature
between 95°F (35°C) and 104°F
(40°C).
Wrong temperature is
displayed.
Verify that the sticker on the thermo-
stat’s screen has been removed.
Temperature does not
change according to the
programmed schedule.
Check that the thermostat is in Auto-
matic mode. Check the schedule and
clock settings.
Time display is flashing. The thermostat was without power for
more than 2 hours.
The °F or °C does not
appear.
The thermostat has been configured
as a power regulator and therefore
displays the percentage of heating
power instead of the temperature.
vSpecifications 9.
HMY110 model HMY220 model
Supply 120 VAC, 50/60 Hz 240 VAC, 50/60 Hz
Maximum load 15 A (1800 W) 15 A (3600 W)
;Warranty 10.
NUHEAT INDUSTRIES LTD.
USA
6920 Salashan Parkway
Building D-200
Ferndale, WA 98248
CANADA
1689 Cliveden Avenue
Delta, BC
V3M 6V5
1 (800) 778-9276
www.nuheat.com
NUHEATTM is a registered trademark of Nuheat Industries LTD.
PROBLEM SOLUTIONS
400-619-000-E (Nuheat) ENG.fm Page 4 Friday, April 20, 2007 1:32 PM
/