Page is loading ...

Date Issued: 11/17/17 IS-44029-US
We’re here to help 866-558-5706
Hrs: M-F 9am to 5pm EST
CAUTION – RISK OF SHOCK –
Disconnect Power at the main circuit breaker panel or main fuse
box before starting and during the installation.
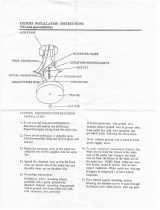
1) Take threaded pipe[1] from parts bag and screw in screw
collar loop[2] a minimum of 6 mm (1/4”). Lock into place with
hexnut[3].
2) Run another hexnut down threaded nipple almost touching
rst hexnut. Now screw threaded pipe into mounting strap[4].
Mounting strap must be positioned with extruded thread faced
into outlet box[5]. Threaded nipple must protrude out the back
of mounting strap. Screw third hexnut onto end of threaded
nipple protruding from back of mounting strap.
3) Connect mounting strap to outlet box.
4) Unscrew the threaded ring[6] from screw collar loop. Take
canopy[7] and pass over screw collar loop. Approximately
one half of the screw collar loop exterior threads should be
exposed. Adjust screw collar loop by turning assembly up or
down in mounting strap. Remove canopy.
5) After desired position is found, tighten both top and bottom
hexnuts up against the bottom and top of the mounting strap.
6) Slip canopy over screw collar loop and thread on threaded
ring. Attach chain[8] (with xture connected) to bottom of
screw collar loop. Unscrew threaded ring, let canopy and
threaded ring slip down. Attach chain to xture if required.
7) Weave electrical wire and ground wire through chain links no
more than 3 inches apart. Pass wire through threaded ring,
canopy, screw collar loop, threaded pipe and into outlet box.
8) Grounding instructions: (See Illus. A or B).
A) On xtures where mounting strap is provided with a
hole and two raised dimples. Wrap ground wire from
outlet box around green ground screw, and thread into
hole.
B) On xtures where a cupped washer is provided. Attach
ground wire from outlet box under cupped washer and
green ground screw, and thread into mounting strap.
If xture is provided with ground wire. Connect xture ground
wire to outlet box ground wire with wire connector. (Not pro-
vided.) After following the above steps. Never connect ground
wire to black or white power supply wires.
GREEN GROUND
SCREW
CUPPED
WASHER
OUTLET BOX
GROUND
FIXTURE
GROUND
DIMPLES
WIRE CONNECTOR
OUTLET BOX
GROUND
GREEN GROUND
SCREW
FIXTURE
GROUND
A
B
Connect Black or
Red Supply Wire to:
Connect
White Supply Wire to:
Black White
*Parallel cord (round & smooth)
*Parallel cord (square & ridged)
Clear, Brown, Gold or Black
without tracer
Clear, Brown, Gold or Black
with tracer
Insulated wire (other than green)
with copper conductor
Insulated wire (other than green)
with silver conductor
*Note: When parallel wires (SPT I & SPT II)
are used. The neutral wire is square shaped
or ridged and the other wire will be round in
shape or smooth (see illus.)
Neutral Wire
4
3
1
7
6
2
8
9
18
15
16
17
10
3
13
3
14
11
12
OPTIONAL DOWNLIGHT SETUP
5
9) Make wire connections. Reference chart below for correct con-
nections and wire accordingly.
10) Raise canopy to ceiling.
11) Secure canopy in place by tightening threaded ring onto screw
collar loop.
12) Thread the threaded pipe[9] (with hex nut attached) into the
hickey[10] until the hex nut meets the hickey. To mount the
lights as a downlight option, follow step 13. If not, proceed
to step 14.
13) Loosen the hexnuts inside the wiring body[11] that support
each arm. Flip the arms with lights facing downward.
14) Raise the xture up to the threaded pipe.
15) Make wire connections, reference the chart on step 10. Be
sure the wires are inside the housing, and raise the wire body
into the top cap[12], passing the pipe through the hole in the
bottom.
16) Raise the bottom cap[13] to the wire body, and pass the hole
over the pipe.
17) Thread a hexnut[3] onto the threaded pipe. Tighten to secure.
18) Thread the nial[14] onto the threaded pipe, and tighten to
cover the hexnut.
19) Carefully raise glass[15] to the xture. Slip the smaller opening
over the socket[16] and rest the glass onto the socket cover[17].
20) Thread socket ring[18] onto socket. Tighten socket ring to
secure glass in place. (DO NOT over tighten.)
21) Insert recommended bulb (not supplied).
22) Repeat steps 19-21 for remaining sockets.

Estamos aquí para ayudarle 866-558-5706
Horario: Lunes-Viernes 9am a 5pm EST (hora ocial del este)
PRECAUCIÓN – RIESGO DE DESCARGA ELÉCTRICA –
Desconecte la electricidad en el panel principal del interruptor
automático o caja principal de fusibles antes de comenzar y
durante la instalación.
Date Issued: 11/13/17 IS-44029-US
ANTES DE INSTALAR:
Todas las instalaciones deben cumplir con las normas nacionales y
locales de códigos. Si tiene alguna duda sobre la instalación, pón
gase en contacto con un electricista calicado.
1) Tomar rsca niple de bolsa de piezas y tornillos en el lazo del
collar del tornillo un mínimo de 6 mm (1/4”) [1] [2]. Trabe en su
lugar con tuerca hexagonal [3].
2) Bajan niple roscado casi tocando la primera tuerca hexagonal
Tuerca hexagonal otra. Ahora Atornille tubo roscado correa
de montaje [4]. Correa de montaje debe colocarse con el hilo
sacado frente a caja de salida [5]. Niple roscado debe sobre-
salir por la parte trasera de la ménsula de montaje. Tornillo
tuerca hexagonal tercera al extremo del niple roscado que
sobresale de la parte trasera de la ménsula de montaje.
3) Conecte la correa de montaje a la caja de salida.
4) Desenroscar el anillo roscado de lazo del collar del tornillo [6].
Dosel y pase sobre lazo del collar del tornillo [7]. Aproximada-
mente la mitad del lazo del collar Tornillo rosca exterior debe
ser expuesto. Ajuste el lazo del collar del tornillo girando mon-
taje arriba o abajo en la correa de montaje. Quitar el protector.
5) Después de encontrar la posición deseada, apriete las tuercas
hexagonal superior e inferior contra la parte inferior y superior
de la correa de montaje.
6) Deslizar el dosel sobre el anillo del collar de tornillo y roscar
en roscado anillo. Conecte la cadena [8] (con el accesorio
conectado) a la parte inferior de la atornillar el lazo del collar.
Desenrosque el anillo roscado, el anillo roscado se desliza
hacia abajo. Si es necesario, conecte la cadena al accesorio.
7) Armadura de cable eléctrico y cable a tierra a través de la
cadena de enlaces separados no más de 3 pulgadas. Pasar
el alambre a través del dosel, lazo del collar del tornillo, anillo
roscado, tubo roscado y en caja de salida.
8) Instrucciones de conexión a tierra de: (ver Fig. A o B)
A) En artefactos donde se suministra la abrazadera de
montaje con un agujero y dos depresiones onduladas.
Envuelva el conductor de tierra de la caja de salida
alrededor del tornillo de tierra verde y atornille en el
agujero.
B) En artefactos donde se suministra una arandela
cóncava. Fije el conductor de tierra de la caja de salida
debajo de la arandela cóncava y el tornillo de tierra
verde y enrosque en la abrazadera de montaje.
Si se suministra el artefacto con conductor de tierra. Conecte
el conductor de tierra del artefacto al conductor de tierra de
la caja de salida con conector de tierra después de seguir los
pasos anteriores. Nunca conecte el conductor de tierra a los
alambres de alimentación eléctrica negros o blancos.
ARANDELA
CONCAVA
TIERRA DE LA
CAJA DE SALIDA
TORNILLO DE TIERRA,
VERDE
DEPRESIONES
TIERRA
ARTEFACTO
CONECTOR DE ALAMBRE
TIERRA DE LA
CAJA DE SALIDA
TORNILLO DE TIERRA,
VERDE
TIERRA
ARTEFACTO
A
B
Conectar el alambre de
suministro negro o rojo al
Conectar el alambre de
suministro blanco al
Negro Blanco
*Cordon paralelo (redondo y liso)
*Cordon paralelo (cuadrado y estriado)
Claro, marrón, amarillio o negro
sin hebra identificadora
Claro, marrón, amarillio o negro
con hebra identificadora
Alambre aislado (diferente del verde)
con conductor de cobre
Alambre aislado (diferente del
verde) con conductor de plata
*Nota: Cuando se utiliza alambre paralelo
(SPT I y SPT II). El alambre neutro es de forma
cuadrada o estriada y el otro alambre será de
forma redonda o lisa. (Vea la ilustracíón).
Hilo Neutral
CONFIGURACIÓN DE
DOWNLIGHT OPCIONAL
9) Haga les conexiones de los alambres. La tabla de referencia
de abajo indica las conexiones correctas y los alambres cor-
respondientes.
10) Levante el pabellón al techo.
11) Pabellón segura en su lugar apretando el anillo roscado al lazo
del collar del tornillo.
12) Enrosque el tubo roscado [9] (con la tuerca hexagonal unida)
en el garo [10] hasta que la tuerca hexagonal se encuentre
con el garo. Para montar las luces como una opción de
downlight, siga el paso 13. Si no, continúe con el paso 14.
13) Aoje las tuercas hexagonales dentro del cuerpo del cableado
[11] que soportan cada brazo. Voltear los brazos con las luces
hacia abajo
14) Levante el accesorio hasta el tubo de roscado.
15) Haga conexiones de cables, consulte la tabla en el paso 10.
Asegúrese de que los cables estén dentro de la carcasa y
eleve el cuerpo del cable hacia la tapa superior [12], pasando
la tubería a través del oricio en la parte inferior.
16) Levante la tapa inferior [13] al cuerpo del cable y pase el ori-
cio sobre la tubería.
17) Enrosque una tuerca hexagonal [3] en la tubería roscada.
Aprieta para asegurar.
18) Enrosque el remate [14] en el tubo roscado, y apriete para
cubrir la tuerca hexagonal.
19) Levante con cuidado el vidrio [15] al accesorio. Deslice la
abertura más pequeña sobre el zócalo [16] y apoye el vidrio
sobre la cubierta del zócalo [17].
20) Enrosque el anillo de toma [18] en el zócalo. Apriete el anillo
de socket para asegurar el vidrio en su lugar. (NO apriete
demasiado)
21) Inserte el bulbo recomendado (no incluido).
22) Repita los pasos 19-21 para los sockets restantes.
4
3
1
7
6
2
8
9
18
15
16
17
10
3
13
3
14
11
12
OPTIONAL DOWNLIGHT SETUP
5
/