Page is loading ...

ATTACH YOUR RECEIPT HERE
Questions, problems, missing parts? Before returning to your retailer, call our customer
service department at 1-866-389-8827, 8 a.m. - 6 p.m., EST, Monday - Thursday, 8 a.m. -
5 p.m., EST, Friday.
1
AB15207
Serial Number
Purchase Date
Project Source
®
is a registered trademark
of LF, LLC. All rights reserved.
Lowes.com
ITEM #0344428
SEMI-FLUSHMOUNT
CEILING FIXTURE
MODEL #FJ10-067-1
Français p. 8
Español p. 15

2
3
PACKAGE CONTENTS
Long
mounting
screw
Qty. 2
Wire nut
Qty. 3
Short
mounting
screw
Qty. 2
Mounting
bracket
(Not actual
size)
Qty. 1
SAFETY INFORMATION
WARNING
CAUTION
PREPARATION
HARDWARE CONTENTS (shown actual size)
B
AA
B
BB
B B
CC
DD
Please read and understand this entire manual before attempting to assemble, operate or install
the product.
• TURN OFF ELECTRICITY at main fuse box (or circuit breaker box) before beginning
installation by removing fuse (or switching off circuit breaker).
• MINIMUM 90°C SUPPLY CONDUCTORS.
• CONSULT A QUALIFIED ELECTRICIAN TO ENSURE CORRECT BRANCH CIRCUIT
CONDUCTOR.
• If in doubt about electrical installation, consult a licensed electrician.
Before beginning assembly of product, make sure all parts are present. Compare parts with
package contents list and hardware contents list. If any part is missing or damaged, do not attempt
to assemble the product.
Estimated Assembly Time: 20 minutes
Tools Required for Assembly (not included): Flathead screwdriver, Phillips screwdriver, Pliers,
Electrical tape, Wire cutters, Safety glasses.
Helpful Tools (not included): Wire strippers, Step ladder.
PART DESCRIPTION QUANTITY
A Ceiling plate 1
B Lamp holder 1
C Glass shade 1
D Nut (preassembled to Lamp holder (B)) 1
E Finial (preassembled to Lamp holder (B)) 1
Lowes.com
Lowes.com
A
B
C
D
E

5
4
ASSEMBLY INSTRUCTIONS
Hardware Used
Hardware Used
1
6
x 2
x 2
x 2
x 1
Short mounting screw
Long mounting screw
Long mounting screw
Mounting bracket
B
B
B
B
BB
CC
CC
DD
ASSEMBLY INSTRUCTIONS
6. Install light bulbs (not included). Use two 60-watt
max. standard-base bulbs or two 13-watt standard-
base CFL bulbs.
Hardware Used
4
x 3
Wire nut
B
AA
AA
4. Attach wire nuts (AA). Tape wire nuts (AA)
and wires together.
5
1. Attach the mounting bracket (DD) by tightening
the short mounting screws (BB) securely
into the outlet box (not included). Attach the
long mounting screws (CC) into the mounting
bracket (DD).
3
3. Strip 3/4 in. of insulation from wire ends.
Twist stripped ends together with pliers (not
included), black to black (power) and white to
white (neutral). Attach copper wire to ground
wire. Helpful hint: If necessary, attach copper
ground wire to grounded outlet box.
5. Place the ceiling plate (A) over the outlet box.
Both heads of the long mounting screws (CC)
should come out through the large ends of the
key holes. Twist the ceiling plate (A) until
heads of long mounting screws (CC) slide
into the narrow end of key holes. Fully tighten
long mounting screws (CC) to secure the
ceiling plate (A).
Lowes.com
Lowes.com
DD
BB
CC
2
2. Pass the wires of the lamp holder (B) through the
center hole on the ceiling plate (A), then place the
spring on the lamp holder (B) into the center hole.
A
B
CC
A
or

7
6
CARE AND MAINTENANCE
• Shut off main power supply before wiping product with damp cloth or window cleaner. Do not
use abrasives.
TROUBLESHOOTING
PROBLEM POSSIBLE CAUSE CORRECTIVE ACTION
WARRANTY
The manufacturer warrants all of its lighting xtures against defects in materials and workmanship
for one (1) year from the date of purchase. If within this period the product is found to be defective
in material or workmanship, the product must be returned, with a copy of the original sales receipt
as proof of purchase in the original carton, to the place of purchase. The manufacturer will, at its
option, repair, replace or refund the original purchase price to the consumer. This warranty does
not cover xtures becoming defective due to misuse, accidental damage, improper handling and/or
installation and specically excludes liability for direct, incidental or consequential damages. As
some states do not allow exclusions or limitations on an implied warranty, the above exclusions
and limitations may not apply to you. This warranty gives you specic legal rights, and you may
have other rights that vary from state to state.
REPLACEMENT PARTS LIST
For replacement parts, call our customer service department at 1-866-389-8827, 8 a.m. - 6 p.m.,
EST, Monday - Thursday, 8 a.m. - 5 p.m., EST, Friday.
PART DESCRIPTION PART #
AA Wire nut 375-022000
BB Short mounting screw 109-042600
CC Long mounting screw 109-043200
DD Mounting bracket 139-103000
Lowes.com
Printed in China
Lowes.com
Project Source
®
is a registered trademark
of LF, LLC. All rights reserved.
Bulb won’t light. 1. Bulb is burned out.
2. Power is off.
3. Faulty wire connection.
4. Faulty switch.
1. Replace light bulb.
2. Make sure power supply is on.
3. Check wiring.
4. Test or replace switch.
Fuse blows or circuit
breaker trips when
light is turned on.
Crossed wires or power wire is
grounding out.
Check wire connections.
BB CC
DD
AA
7
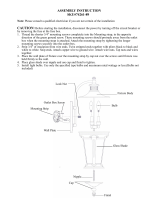
ASSEMBLY INSTRUCTIONS
7. Take off the nial (E) and nut (D) from the lamp
holder (B). Then pass the threaded nipple of lamp
holder (B) through the glass shade (C), nut (D),
and nial (E), and secure them back to the
threaded nipple.
B
C
E
D
/