PLEXIDOR FITTING INSTRUCTIONS
Medium and Large Door Units
Tools you will need:
Drill Level or Plumb Line
1/2” Drill Bit Jig Saw with a Wood or Metal Blade
3/8” Drill Bit Ruler
Felt Tip Pen Center Punch
Hammer Phillips Head/Flat Head Screwdrivers
Your Plexidor must be fitted with springs at the top and in a true vertical position or it will not work
properly. Please check this with a level or plumb line.
1. See Owner's Manual for correct position of pet door.
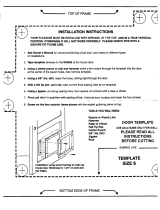
2. Tape template securely to the INSIDE of house door.
3. With a center punch and hammer make a firm indent through the template into the door at the
center cross of the 12 holes. Then remove template.
4. With a 1/2” drill bit, make the four corner holes (marked A), drilling right through the door.
Ease pressure when breaking through.
5. With a 3/8” drill bit, make the four holes (marked B), drilling right through the door.
6. With a 3/8” drill bit, make the four holes (marked C), drilling only 3/4” deep.
7. With a felt tip pen and rule, mark out on door the thick dashed sawing lines (marked D).
8. With a Jig Saw, cut along sawing lines.
9. Place pet door in position with springs at top. Spring mechanisms must be able to operate freely.
DO NOT REMOVE SPRING COVERS.
10. Use the 4 long 2” 10-32 machine screws to join the interior frame to the 2 exterior frame pieces
which have threaded inserts. The inserts should point inwards. Make sure the square edge of the
exterior sides and exterior bottom pieces are towards the inside of the pet door. Do not over-
tighten the screws. Test pet door for free movement.
11. Complete exterior frame by screwing top gutter and lower piece to house door, using the 4
small #6 screws.
PARTS LIST QUANTITY
Plexidor 1
Exterior Sides 2
Exterior Bottom 1
Exterior Top/Gutter 1
Security Plate 1
Keys 2
2” 10-32 Machine Screw 4
3/4” #6 Screw 4


