Page is loading ...

Installation Guide
GenStone products are designed to provide a realistic look of stone or rock. Although installation of GenStone is much easier than
traditional masonry applications, proper installation requires good planning and preparation.
Please keep in mind that each application varies somewhat, therefore we recommend you read this entire guide before beginning
your project. When calculating the amount of GenStone you will need to purchase, remember that you will need additional square
footage for unique cuts, such as gable end walls or areas around windows. A minimum of a 5% of additional square footage is
recommended for timely completion of your job. It is also recommended that additional panels be purchased or some scrap pieces
are kept in case a repair is needed.
When planning your work, here are some steps to consider.
• Forthebestresults,youwillwanttocreaterandompatternswithevengroutlinesandstaggeredjoints.
• Whenplanningyourpattern,keepinmindthatthereare4patternsofpanels.Thepatternnumberisontherightshiplapedge
of the panel toward the top. You will want to avoid installing the same panel number either side-by-side or directly above or
below the same numbered panel. You will want to sort panels and lay them out before starting each row.
• Nowstaggerverticalgroutlinesandcheckthathorizontallinesareuniforminwidthandspacingbetweenpanels.Checkfor
level with each row.
Tools Recommended:
Powercircularsaw Framingsquare
Power drill/screw driver Wood rasp
Hammer Caulkinggun(for10oztube)
Hand saw Screw driver bits
Utility knife Safety glasses
Chalkline Gloves
Tapemeasure Sponge
Pencil Calking
Level
Optional Tools:
Tablesaw,routerorroutertable
Compoundmitersaw
Jig saw
Powersander(belt,orbital,oscillating)
HammerdrillforconcreteorCMU
Fasteners recommended are exterior (coated) star drive or square drive
screws.
MAKESUREtoobserveandobeyallsafetyrulesandrecommendations
set forth by tool manufacturers and local, state, and federal authorities for
any building project including all applicable building codes.
•Be sure to use appropriate safety equipment when installing GenStone
including gloves, eye protection and dust mask.
•Checklocalbuildingcodesforapplication.
•GenStonepanelsareintendedtobeusedasanexteriorsidingproduct.If
youareinterestedinaninteriorapplication,visitwww.Enterrastone.com.

Measuring and Marking:
Ifyouplantouseacircularorhandsaw,itisbesttomeasureandmarkontheback,atsideofthepanel.Usealevelorotherstraight
edge, pencil or marker, and a tape measure to mark the cut line. If you plan to cut using a table saw, it would be better to mark a
pointonthepanelsurfaceandusetheatsidedownonthetable.Sealallcutedgeswithcolormatchedcaulkortouchuppaintto
protect from UV.
Cutting and Trimming:
Afterfollowingthemarkinginstructionsaboveyouarenowreadytocut.Touseacircular
saw, cutting along the mark on the back, you will need to protect the face of the panel as
youholditinplaceonasmoothattable.Placingthepanelatsidedownonthesawworks
bestifusingatablesaw.Forcuttingofledgersandsmallerpiecesacompoundmitersawis
bestbutahandsaworjigsawwillalsowork.Forapplicationsrequiringcutoutsforitems
such as hose bibs, electrical plates, or lights mark from the back and then cut out using a
keyholesaw,jigsaw,oraholesawonadrill.BecauseGenStoneproductsarehandmadeand
go through a manufacturing process there are occasionally minor blemishes at the edge of
thepanels.Theseareeasilycorrectedbyslighttrimmingwithautilityknifeorbysanding.
Someinstallationsmayrequireanewnegativeshiplapedgebecutintoaside.Thiscanbe
done with a table saw, a router or router table, or if neither of these is available a circular saw
preferablywithaguide.Useapaneltodeterminetheheight(onatablesaw)ordepth(with
acircularsaw)tosettheblade.Thisshouldbeequaltothehorizontalcutoftheshiplapedge
(approximately1").Oncethebladeisset,makethecutthenresettheheight(ordepth)to
matchthedepthcutoftheshiplapedge(approximately½")effectivelycuttingarectangle
of material out of the corner. A router or router table can also be used to remove this material
leaving the new negative ship lap edge.
Application and Prep:
GenStone products are
designed to be applied to a
variety of substrates. These
include concrete wall, CMU
(cinder block), brick, hard
stucco, cement backer boards,
OSB, plywood, at board
siding,anddrywall.Regardless
of the substrate, the surface
should be clean and free of
debris or loose pieces. If your
application includes adhesive on the back side make sure that the substrate is free from
residues, oils, or any other substance that would cause poor bonding. It is imperative to use
ahighqualityexteriorgradescrewwithadequatecompositionorcoatingtoattachthepanel.
GenStonepanelshavebothapositiveshiplapedgeandanegativeshiplapedge.Thepositive
shiplapedgeistheedgethatprotrudesfromthepanelformingalip.Thenegativeshiplapedgeisanundercutinthepanelforming
avoidthatthepositiveedgetsinto.Thepositiveedgealwaysneedstogouptothetopside.
It’s best not to sit panels in the hot, direct sunlight for longer periods of time prior to installation as this may cause expansion.

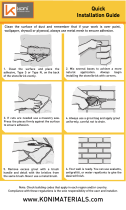
Asyoulayoutyourwall,youwilltyourGenStonepanelstothebuilding,whichwillrarelybesquare,true,orasasmallmodication
tothepanels(especiallyonyourrst/bottomrowandcorners)maybenecessary.Thesecompensationscanbemadebytrimming
withautilityknifeorsandertoensureanaccurateinstallation.Tobeginthelayout,usealeveltomarkalineacrossthesubstrate
atorabovethetopedgeofyourbottomrowofpanels.Thiswillgiveyouareferenceasyourunyourpanelsandallowyoutokeep
yourinstallationsquare.Repeatingtheselinesasyouprogressupthewallwillallowyoutomakeanynecessaryadjustmentsand
maintainanaccurateinstallation.Beginyourinstallationinthelowerleftcornerandproceedtotherightdownthewallwiththat
row.Itiscriticalthatthisrstrowbeastrueaspossiblebecauseallotherpanelsbuildfromthispoint.IfyouareusingGenStone
cornersstartbyttingthecornerrstandthenthepanelnexttoitforyourrstrow.
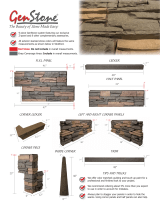
Outside Corners:
GenStone offers the following solutions for outside corners which are available to match all varieties of GenStone panels and are
thebestwaytonishacorner.Theseincludea“Z”shapedcornerpiece,leftcornerpanelandrightcornerpanel.Wheninstallinga
corner piece mark a plum line on both sides of the corner far enough away from the actual corner so they are visible for reference
whentesttting.Startatthebottomtesttandtrimtherstcornerforthebestoveralltonbothsideskeepinginmindthatcorners
haveapositiveedgethatgoestothetop.Becausecornersareoftenoutoftrue,thismayincludeshavingminimalamountsfromthe
backsideofthepanel,beingcautiousnottoreducethethicknesstoomuch.Forsomeoutsidecornersthatarenot90degree(such
as45or22½degreeturns)andforinsidecorners,miteringisanoption.Ifpossible,whenmitering,itisbesttomiterclosertothe
middleofthepanelasopposedtotheend,thusachievingamoresolidstoneappearance.Thesecornerscanbelightlysandedand
lledwitheitherGenStonegroutorapaintableexteriorgradellerandthen,ifneeded,touchedupwithSherwinWilliamsSuper
Paint.
Installrstcornerpieceatthebottom.With“z”shapedcornerpieces,youmaycontinueinstallationupthecornerofthewallto
the desired height. With corner panels, you will want to alternate left and right panels as you move up the wall in order to achieve
a staggered, natural random pattern.
• Measure, mark and cut to length the
rstcornerpieceorpaneltobeinstalled
at the lower left of the building or wall
area.
• Fit the rst piece using the chalk line
asyourhorizontalguide.(Note:Ifusing
a wood rasp, it takes very little time to
customteachpiecetothewall.)
• Makesuretouseadequatesealantsand/
ornisheswhenjoiningotherproducts
and around penetrations, windows or
doors.

Installation of Panels:
Secure the top of the panel:
• Placescrewsinthepositiveshiplapedgeevery8"nearthebottomoftheedge.
• Countersinkscrewstoadepthofupto1/8".
Secure the bottom of the panel:
• Startinganinchortwoabovethebottomofthepanel,place3or4screws
evenly along the nearest grout line.
• Ifnogroutlineisavailable,youmayscrewintothefaceofthepanel.Sink
these screws in hard to see areas of the panel and hide these with color
matched caulk.
• Apply color matched caulk to screw holes using a glove-protected nger
to blend in the caulk to match surrounding contours. Optional touch up
paint kits are available to help blend caulked areas.
Applya¼"beadofGenStonecolormatchedcaulkingorpolyurethane
construction adhesive to all positive edges to ensure a water-tight barrier.
Thispositiveshiplapedgeshouldalwaysbeupright.
• Workingfromlefttoright,followthechalklineasyoucontinuetobuildtherstrow.
• Remembertoselectandarrangepanelsbycolorandpatterntoachievethebestoverallappearance.
• Repeattheinstallationprocessbyworkinglefttorightforthesecondandeachremainingrow.
• Customttingpanelsisaccomplishedbyusingapowercircularsaw,handsaw,jigsaw,utilitysawandwoodrasp.

Fitting the last panel:
Measurethegapbetweenthelastinstalled panelsfromlefttoright.Measurefromtheinside
groutline(forrandomrock)orfromtheinsideproductedge(forstackedstone)totheinside
negativelipedgeoftherightendpieceorcorner.(Yourtapewillneedtogetbehindthepanelto
accomplishthis).Thismeasurementrepresentstheoverallpanellengthcutoff.
• Layingoutandmarking:Usingadarkcoloredmarkingpenandsquare,markontheback
sideofthepaneltheoverallpanellengthcutoffasmeasuredinthepreviousstep.Makesure
youhavemeasuredfromthepointsdesignatedbythearrows.Checkthatyouaremeasuring
from the correct end of the panel.
• Forthescorecut(toprovideaproperoverlap)subtractthewidthofthepositivelipfrom
theoverallpanellengthcutoffmeasurement.Markasecondlineparalleltotherstlineto
indicate this measurement.
Score cutting and cutting the panel to length:
• Scorecutting:Beforemakingtherst(scorecut),settheripdepthtomatchthedepthofthe
panel’sexistingnegativelipdepth.
• Cutting panel to length: reset your blade to the appropriate (manufacturer’s
recommended)through-cutsettingsothatyoucansafelycutthepaneltolength.(Pleasenote:
Followallsafetyprecautionsprovidedbythemanufactureroftheequipmentortoolsyou
workwith.Weshowthismodelandripdepthadjustmentstyleforillustrationpurposes.)
Score cut:
• Thescorecutshouldcloselymatchthedepthofthenegativelip.
• Cuttolengthpanelend.
Final cut:
• Standthepanelonend.
• Alignthehandsawbladebetweentheedgeofthenegativeandpositivelipsatopposingtop
andbottompanelsides.Cutthroughuntilthesectionfallsout.
Inside Corners:
Using a framing square or straight edge, mark a line on the back of the panel consistent with where you
want the inside corner to be.
Set your saw at 45°. Make your rst cut, following the line previously
marked in step one.
Keepingthesamesideup,rotatethepanel180°.Preparetomakeyournext
cut,usingthepreviouscutonthesurfaceofthepanelasaguide.Keepyour
sawsetat45°.Youmaychoosetoclampapieceofwoodorsimilarstraight
edge to use as a guide.
Nowremoveanyburrsusingautilityknife,sandpaper,oranetoothsaw.
Placethenewlycutpiecestogetherandtrimthejointasnecessarytoachieveatightt.This
process is very similar to making miter cuts when doing trim work. Use caulk and touch up
paintasnecessaryforthenerdetailstohelpachieveanished,professionallook.

Installing a Ledger:
Toinstallaledgerpieceapplyadhesivetothebackoftheledgerandtothetoppositiveshiplapedgeofthepanelthatisalready
attachedtothesubstrate.Thenttheledgerpieces’negativeshiplapdownontothepositiveedge.Proceedbytoescrewing(shooting
ascrewatanangle)theledgerpiecefrombothendsbeingcertaintocountersinkthescrewdeepenoughtowherethescrewhead
doesnotstickoutwhichwouldpreventatightttothenextledgerpiece.Thescrewusedforshootingthroughthesidewillbe
longerthantheothersinordertoprovidegoodbiteintothesubstrate.Continuebyshootingalongerscrewinthecenteroftheledger
throughthefacecountersinkingbyabout1/8".Coverthisandallholeswiththegrout.
RegardlessofwhichvarietyofGenStoneproductisused,anavailablecolormatchedgroutoraclearPLPremiumadhesivemust
be used between the shiplap edges to adhere the panels together. Applying the adhesive between the positive and negative ship lap
edges ensures a good seal between panels.
Applying Over Cement:
ThismethodofapplicationwouldbeusedforCMU,brick,oranyothercementproduct.Alwayskeepthe“positivelip”ofpanel
up.UsingPLpolyurethanepremiumconstructionadhesive(widelyavailable)onthebackofthepanels,applyapproximately3/8"
verticalbeadsinatight“s”patternat12"intervalsstartingatoneedge.ApplyGenStone’stextured,color-matchedcaulktothe
positivelipbeforeanchoring.InconjunctionwiththeadhesiveyouwillneedtouseacementscrewsuchasaTapcon.Roto-hammer
thepilotholebeforeinsertingorscrewingconcreteanchors.Thenusingaforstnertypebit,countersinkanchorhole.Screwheads
shouldbecountersunk1/8"andthencoveredwithGenStonecolormatchgrout.Thesescrewswillholdthepanelinplacewhilethe
adhesivesetsaswellasincreasethedurabilityoftheinstall.Onescrewineachcornerofapanelisadequate.Screwsshouldbeof
sufcientlengthtopenetratethepanelandbiteenoughintoyoursubstratetoholdtight.
Always keep the “positive
lip” of the panel up.
Drive concrete anchor to a
depth of 1/8” below ush.
Roto-hammer the pilot hole
before inserting or screwing
concrete anchors.
Photo showing a forstner type
bit for countersinking anchor
hole and one of many types
of concrete anchors.
Apply polyurethane adhesive
designed for use with concrete to
the back of the panel.
Apply GenStone’s textured,
color-matched caulk to the
anchor hole.
Apply GenStone’s
textured, color-matched
caulk to the positive lip
before anchoring.

Important Note on Caulking:
Surface Prep: Cleanallsurfaces.Jointsmustbeclean,frost-free,andfreeofoil,greaseoranyothercontaminants.Avoidcontact
with alcohol and other solvent cleaners during cure. Use open cartridges the same day. Priming is not necessary for the application
of caulking to Genstone panels.
Application: Recommendedtemperaturesare40-100degreesFahrenheit.ForbestperformanceSikaFlexshouldbegunnedonto
thepositiveshiplapedgeofthepanelsnottoexceed1/2" ofthickness.Caulkingistobeappliedbetweenpanelsonthepositive
shiplap;thereforewillnotbeseen.ForcoveringupscrewheadsbothcaulkingandaGenstonepaintkitwouldbeneeded.When
installingledgersthecaulkingwillbegunnedinbetweenthejointsofconnectingpieces,againnottoexceed1/2" of thickness.
Applying Over Wood:
Thismethodofapplicationwouldbeusedoverplywood,OSB,oranyotherwoodsidingproduct.Ifapplyingoverasidingitmust
bearelativelyatpanel.Manylapsidingsmayhavetoomuchheightdifferenceatthelapjoint.Afterapplyingamoisturebarrier
(permanufactures’instructions)youcanuseanexteriorgradescrewtoattachthepanel.Screwsshouldbeplacedaboutevery8"on
thepositiveedgesofeachpanel.Takecarenottoplacethescrewtooclosetoanedgeofthematerial.Thisshouldbeabout½"from
asingleedgeand1½"fromacorner.Inadditionyouwillneedtoplace3screwsonthebottompartofthepanel.Whenplacing
thesescrewslocatetheminthegroutlinesafewinchesupfromthebottomedge.Alsoonescrewshouldbeplacedinthehorizontal
groutlineinthemiddleofthepanelabout6"fromtheleftedge.Thesescrewsshouldbecountersunk1/8"andcanthenbehidden
with the application of the grout.
Applying Over Exterior Gypsum Board:
Whenusing GenStone on anexterior gypsum board withthe use ofadhesiveproceed as inthe above described procedurefor
application over cement. Screws must be long enough to penetrate the panel and bite into the stud behind.. Additional screws are
needed as well where the panel overlaps a stud. It is possible depending on the stud layout of the wall that you may only cross over
two studs but if available shoot screws in each stud that the panel overlaps. At each stud a screw should be placed in the positive
ship lap and at least one in the grout joint on that same stud.
Applying to a Steel Building:
Toapplytoasteelbuildingabackerboardmustbeused.ThisprovidesabufferbetweenthebuildingandtheGenStone.Thisis
necessarybecauseofthepropertiesofasteelbuilding.ThissubstrateneedstobeplywoodorOSBofatleast½"thick.Thisboard
needstobeattachedsecurelytothebuildingusingaconstructionadhesiveandscrews.Oncetheboardisattachedyoucanfollow
the same above procedure for applying to wood.
Windows, Doors and Roof Lines:
1"deeptrimorJ-channelisrecommendedaroundallopenings.YoumayalsousetheGenStonetrimpieces.Securepaneldeep
enoughtoprotectedgeandcoverexposededgeswithcolormatchedcaulkortouchuppaint.
Foroutletorxtureholes,markthebacksideofthepanelandcutdesiredopeningwithajigsaworholesaw.Sealcutedgeswith
caulking and touch up paint.
Repairing:
MinordamagetoGenStoneproductscanberepairedbypaintingoverthedamagedareawithourconvenientpaintkits.Caulking
oranexteriorgradellercanbeusedonlargerareasneedingrepair.Iftheareaislargerormoreseverelydamagedasectioncanbe
removedandreplacedbyanothersection.Cuttingasectionoffthewallcanbedonewithasharpbladeorarotarysaw.Scrapethe
area clean and use the old piece as a template to cut out the new piece. Screw and or glue the replacement section in and paint and
caulk as necessary making sure that all areas are covered.
Panel Replacement:
• Loosenpanelandsurroundingpanelsbylocatingthefastenerheadsandbackingoutscrews.
• Removepaneltobereplaced.
• Replacepanelwithmatchingpanel.
• Fastenallloosepanelsandapplycolormatchedcaulk.
Maintenance and Cleaning:
GenStone panels require very little maintenance and should be cleaned using water or warm water, or warm water and a mild soap.
Waterpressurefromagardenhoseandtheuseofasoftbristlebrushwillbesufcient.Donotuseapressurewasher,particulate
orsandblastingdevice,orharshchemicals(bleach,acids,anddetergents.)Removingallthatispossibleandthenusingtouchup
paintingcantaketheplaceofexcessiveabrasionmethodstorejuvenatethelook.
/