HR SERIES
HEAT RECOVERY VENTILATOR (HRV)
INSTALLATION AND WIRING INSTRUCTIONS
READ AND SAVE THESE INSTRUCTIONS
Models HR100V, HR160H, HR220H
RESIDENTIAL USE ONLY
PP0923
09/2013

Page 2
IMPORTANT - PLEASE READ MANUAL BEFORE INSTALLATION
CONTENTS
TO REDUCE OR AVOID THE HAZARDS OF ELECTRIC SHOCK AND FIRE:
CAUTIONS CONCERNING THE OPERATION AND FULL EFFICIENCY OF THIS PRODUCT:
CAUTION: Do not install in a cooking area or connect directly to any appliance. Turn off all integral disconnects before servicing.
NOTICE:
Prior to installing, serious consideration must be taken to insure this ventilation system will operate properly if integrated to
any other type of mechanical system, i.e. a forced air system, or an air handling unit. To insure proper operation & compatibilities of both
system, it is required that the airow’s of the Heat Recovery Ventilator (HRV) be balanced, by following the procedures found in this
manual.
LIMITATIONS: The product is for residential applications only. Must be installed in accordance with all national and local regulations,
building and safety codes.
SECTION PAGE
1. Ventilation requirements . . . . . . . . . . . . . . . . . . . 3
2. Fitting equivalent lengths . . . . . . . . . . . . . . . . . . 4
3. Types of Installations . . . . . . . . . . . . . . . . . . . . 5
4. Installation Kit . . . . . . . . . . . . . . . . . . . . . . . . 7
5. Finding a suitable installation area for HRV . . . . . . . . . 7
6. Installation of the HRV . . . . . . . . . . . . . . . . . . . . 7
7. Insulated Flex from Unit to Outside Wall. . . . . . . . . . . 8
8. Condensation Drain Line . . . . . . . . . . . . . . . . . . 8
9. Dedicated Electric Receptacle . . . . . . . . . . . . . . . 8
10. Outside Fresh Air and Exhaust Air Hoods . . . . . . . . . 9
11. The matrix™ High Performance Ventilation Hood . . . . . 9
12. Benets of the Duotrol™ System. . . . . . . . . . . . . 10
13. Balancing the unit . . . . . . . . . . . . . . . . . . . . 10
14. Controls Connection . . . . . . . . . . . . . . . . . . . . 12
15. Wiring Diagrams for furnace interlock systems . . . . . . 13
16. Troubleshooting . . . . . . . . . . . . . . . . . . . . . 14
17. Maintenance . . . . . . . . . . . . . . . . . . . . . . . 15
18. Warranty . . . . . . . . . . . . . . . . . . . . . . . . . . 15
• Before servicing or cleaning the HRV system, always remove the
power cord from the AC wall outlet.
• To reduce the hazards of electric shock or re, do not perform
any service to the HRV system other than those stated in the
operating manual instructions.
• To reduce the risk of electric shock, this ventilation system (HRV)
comes equipped with a 3-prong plug-in. This plug will t in a
polarized outlet only one way.
• Do not use ventilation system for outdoor application.
• Do not pull or twist power cord when disconnecting it from the
ventilation system. Grasp the plug rmly, not the cord.
• Do not modify the power plug in any way; if modied, risk of
electric shock re or even damage to the unit may occur.
• Do not use the ventilation system for removal of ammable
fumes, gases or connect directly to any appliances.
• Use a dedicated AC 120V outlet only.
• Do not obstruct or cover the air intake or air outlet of the ventilation
system.
• Do not modify, repair or disassemble this system. These tasks
are to be performed by authorized serviced personnel only. Fire,
electrical shock and/or bodily injury may occur if these warnings
are not followed.
• To prevent injuries, do not operate the ventilation system, while
servicing or maintaining. There are impeller wheels turning at a
very high speed that must fully stop rotating prior to accessing
the inside of the unit.
• Always assess the operation of the ventilation system on how
it may interact with vented combustion equipment (ie. Gas
Furnace, Oil Furnace, Combustion, Appliances, etc.)
• Do not use for swimming pool/spa applications.

Page 3
1. VENTILATION REQUIREMENTS
DETERMINE YOUR
VENTILATION NEEDS
INSTALLATION
How much fresh air do I need?
Good air quality is based in part
on the capacity of the home’s
ventilation system.
Usually, the HRV’s capacity is
measured in CFM (Cubic Feet
per Minutes) or L/s (Liters per
Seconds) of fresh air being
distributed in the living space.
The Room Count Calculation or
the Air Change per Hour Method
shows you how to determine
your ventilation needs.(see
chart on right)
A. Room Count Calculation
LIVING SPACE NUMBER OF ROOMS CFM (L/S) CFM REQUIRED
Master Bedroom ———— x 20 cfm (10 L/s) = ————
With Basement ———— x 20 cfm (10 L/s) = ————
Single Bedroom ———— x 10 cfm (5 L/s) = ————
Living Room ———— x 10 cfm (5 L/s) = ————
Dinning Room ———— x 10 cfm (5 L/s) = ————
Family Room ———— x 10 cfm (5 L/s) = ————
Recreation Room ———— x 10 cfm (5 L/s) = ————
Other ———— x 10 cfm (5 L/s) = ————
Kitchen ———— x 10 cfm (5 L/s) = ————
Bathroom ———— x 10 cfm (5 L/s) = ————
Laundry Room ———— x 10 cfm (5 L/s) = ————
Utility Room ———— x 10 cfm (5 L/s) = ————
TOTAL ventilation requirement (add last column) =
1 CFM = 0.47189 L/s
1 L/s = 3.6 m3/hr
B. Air Change per Hour Method
TOTAL cu ft X 0.35 per hr = total
Take total and divide by 60 to get CFM
Example: A 25’x 40’ house with basement
1,000 Sq. ft. x 8’ high x 2(1st oor + basement) = 16,000 cu. ft.
16,000 cu. ft. x 0.35 ACH = 5,600 cu. ft.
5,600 cu. ft. / 60 Minutes = 93.3 CFM
93.3 CFM IS YOUR VENTILATION NEED

Page 4
2. FITTING EQUIVALENT LENGTHS
- Flex pipe equivalent length is
smooth pipe x2
- Flex tting equivalent length
is smooth tting x2
- 45º perimeter pipe elbow
equivalent length = 5 ft. (1.52 m)
NOTE: Where ex duct is used
to make 45º elbow equivalent
length = 10 ft. (3.0 m)
- Y-equal sides
equivalent length = 10 ft. (3.0 m)
- Y-Side branch
equivalent length =
35 ft. (10.7 m)
- Round plastic diffuser
equivalent length = 100 ft. (30.5 m)
NOTE: Maximum airow assumes
diffuser is in full open position.
- Tee take-off
equivalent length =
50 ft. (15.24 m)
- Angle boot
equivalent length = 30 ft. (9.14 m)
- 90º perimeter pipe elbow
equivalent length = 10 ft. (3.0 m)
NOTE: Where ex duct is used
to make 90º elbow equivalent
length = 20 ft. (6.1 m)
- Round wall cap spring
damper or screen
equivalent lengths =
60 ft. (18.29 m)
- Wall grill 50% free area
equivalent length = 15 ft. (4.6 m)
- Increaser/Reducer
equivalent length
= 8 ft. (2.43 m)

Page 5
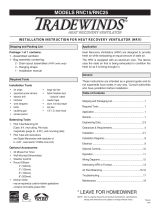
3. TYPES OF INSTALLATIONS
INDEPENDENT
SYSTEM
INSTALLATION
This application uses a devoted
duct system for the supply
and the exhausting of stale air
accumulated in the home.
It is recommended to install
fresh air grilles in all bedrooms
and living areas. Exhaust the
stale air from the bathroom,
kitchen and laundry room. (see
gure 3.1)
IMPO R TANT:
For optimal
performance of your HRV, the
installation of an optional 6” round
galvanized backdraft damper is
required on the fresh air to home
duct work.
gure 3.1
EXHAUST AT THE
SOURCE AND
SUPPLY IN THE
RETURN
This application uses a devoted
duct system for the exhausting
of stale air accumulated in the
home. The fresh air is dumped
into the return air duct and is
distributed thru the home by
the existing supply air ductwork
of the forced air system. (see
gure 3.2)
Make sure when using this
application that your fresh air
duct connection to the forced air
system return air duct is not less
than 10ft (3 m) upstream of the
return plenum connection to the
forced air system. Check with
your local code or the forced air
system’s manufacturer. The HRV
and forced air system must be
in continuous mode, to achieve
maximum comfort and to avoid
cross-contamination.
NOTE TO INSTALLER:
Dwellings with multiple forced
air systems requires one HRV
per system.
Insure the unit runs in
conjunction with forced air
system (Ref. wiring diagram for
furnace interlock)
gure 3.2
* For minimum distance between return and forced
air system, check with your local building codes
and forced air system manufacturer.
From Bathroom
or Kitchen To living space
HRV
Forced Air System
6'
(1.83 m)
A
B
18" (457 mm)
A+B=NOT LESS THAN 10FT (3 M)*
IMPO R TANT: The duct bringing outdoor air to the
return air plenum must be equipped with a manual
dumper to balance the outdoor airow.
IMPO R TANT:
For optimal performance of your HRV, the installation of an optional 6" round galvanized backdraft
damper is required on the fresh air to home duct work. When performing duct connections, always use approved
tools and material. Also use steel duct connections for these type of installs.

Page 6
4. INSTALLATION KIT
INSTALLATION
KIT FOR HR100V
INCLUDES:
• 4 Collars
• 4 Caps, Pressure Taps
• 1 Condensation Drain Line
• 1 Drain Adapter with Nut
• 12 screws (#10 x 11/4”)
• 2 screws (#8 x 3/8”)
• AC 120V power cord
• Wall Mounting Bracket
gure 4.1
5. FINDING A SUITABLE INSTALLATION AREA FOR HRV
The HRV unit should be installed in a mechanical room or as close to an outside wall as possible. This would assure a short run of
insulated exible duct.
The HRV unit must always be installed in an area where the air is tempered to avoid freezing of the condensate line. The contractor
should install the unit in an area that is very accessible to allow the homeowner easy access for maintenance.
It is very important to install an electric receptacle (115v) near the HRV, a separate circuit breaker is also recommended. You should have
access to a condensate drain near the HRV to avoid the use of condensate pump.
3. TYPES OF INSTALLATIONS (CONTINUED)
EXHAUST AND
SUPPLY IN THE
RETURN
When using this application make
sure that there is minimum 3 feet
(0.9 m)between the fresh air and
exhaust air connections of the
HRV in the return air duct.
(see gure 3.3)
Make sure when using this
application that your fresh air
duct connection to the forced air
system return air duct is not less
than 10ft (3 m) upstream of the
return plenum connection to the
forced air system. Check with
your local code or the forced air
system’s manufacturer. The HRV
and forced air system must be
in continuous mode, to achieve
maximum comfort and to avoid
cross-contamination.
NOTE TO INSTALLER:
Dwellings with multiple forced
air systems requires one HRV
per system.
Insure the unit runs in
conjunction with forced air
system (Ref. wiring diagram for
furnace interlock)
gure 3.3
* For minimum distance between return and forced
air system, check with your local building codes
and forced air system manufacturer.
IMPO R TANT: Building and combustion
appliance installation codes do not allow return
air grilles or openings such as "breather tee" or
indirect connections in an enclosed room that is
susceptible to spillage of combustion appliances.
IMPO R TANT:
For optimal performance of your HRV, the installation of an optional 6" round galvanized backdraft damper is required on the fresh air to
home duct work. When performing duct connections, always use approved tools and material. Also use steel duct connections for these type of installs.
To living space
HRV
Forced
Air System
6'
(1.83 m)
3ft (0.9 m)
MINIMUM
DISTANCE
A
18" (457 mm)
Simplied Connection
2"
(51 cm)
Indirect Connection Breather Tee
A+B=NOT LESS THAN 10FT (3 M)*
B
IMPO R TANT: The duct bringing outdoor air to the
return air plenum must be equipped with a manual
dumper to balance the outdoor airow.
INSTALLATION KIT
FOR HR160H AND
HR220H INCLUDES:
• 4 Collars
• 1 Condensation Drain Line
• 1 Drain Adapter with Nut
• 16 screws (#10 x 5/8”)
• 4 screws (#10 x 1”)
• 4 Washers
• AC 120V power cord
TIP TO INSTALLER:
Removing the core unit will
facilitate your job.
gure 4.2

Page 7
6. INSTALLATION OF THE HRV
IMPORTANT Minimum
installation requirements
A) Minimum two 2"x 4" (50.8
mm x 101.6 mm) wood wall
studs and minimum 3⁄8" (9.5
mm) thick drywall is required
to secure the HRV wall
bracket.
B) Support for weight of 80
lbs, which includes HRV,
duct connections and
accessories.
Proper installation requires that
the unit be secure to the wall. If
there is no wall studs available,
please secure a 3⁄4" plywood
to wall studs then fasten wall
mounting bracket to plywood.
TIP TO INSTALLER: If the unit
is not level, improper drainage
will occur and could lead to
moisture and leakage problems.
It is recommended to use
approximately 16 inches of
exible duct between the HRV
and your rigid duct. The ex
duct is mounted the same way
to the HRV as the insulated ex.
gure 6.1 Installation of the wall bracket. Secure with two #10 x 11⁄4" screws.
gure 6.2 Hang HRV to wall mounting
bracket.
gure 6.3 When completing the
procedure make sure that the HRV is
leveled.
gure 6.4 Proceed to secure HRV to
bracket with the two #8 x 3⁄8" screws.
TIP TO INSTALLER: Place
HRV on a stepladder to ease
the hanging process. If the unit
is not level, improper drainage
will occur and could lead to
moisture and leakage problems.
It is recommended to use
approximately 16 inches of exible
duct (supplied in kit) between the
HRV and your rigid duct. The ex
duct is mounted the same way to
the HRV as the insulated ex.
gure 6.5 Attach your four straps to the
oor joist making sure that you attach
thru the washers and the grommets.
gure 6.6 Pull on the middle strap and
gently push upward on the unit. Then
repeat procedure on other side.
gure 6.7 When completing the
procedure make sure that the HRV is
leveled.
Installation of the HR100V
Installation of the HR160H and HR220H

Page 8
7. INSULATED FLEX FROM UNIT TO OUTSIDE WALL
8. CONDENSATION DRAIN LINE
9. DEDICATED ELECTRIC RECEPTACLE
TIP TO INSTALLER: To ensure
a better installation and to avoid
an undesired bend in the duct,
align the duct with the collar
before securing over the four
hooks.
The Fresh air from outside and
the Exhaust air to outside from
the termination ducts to the
HRV must be fully insulated
of thermal insulation ducts to
minimize heat loss and gain.
All tapes, mastics, and
nonmetallic clamps used for
eld installation of exible ducts
shall be listed and labeled to
Standard UL 181B - Closure
Systems for Use With Flexible
Air Ducts and Air Connectors.
Insert the threaded drain adapter
thru the bottom of the HRV and
hand tighten the plastic nut, and
with a wrench tighten the nut
another half turn to assure a
better seal.
Install the condensate line
(included in drain kit). Insert
condensate tubing by pushing
clear plastic line over drain
adapter. Make condensate trap
by looping the clear plastic
tubing. This procedure is to
avoid foul odor to enter the HRV.
IMPO R TANT: Always consult
a certied technician to insure
proper installation of main
power.
NOTE: If LED light on the
Duotrol remains green, motors
not energized controls do not
operate. Polarization in main AC
outlet are inverted.
It is recommended that the HRV
have a dedicated receptacle with
115v. It is not recommended to
connect unit with an extension
cord.
gure 7.1 Insert vinyl duct over the
hooks and seal with a Tie wrap.
gure 7.2 Insert insulation inside the
collar.
gure 8.1 Make a loop in condensate line, not be subject to
freezing temperatures.
gure 8.2
Use a condensate pump if you don’t have access
to a drain.
gure 9.1 Insert the power cord on top of the unit. Press
rmly to make sure the power cord is secure.
Once insulated ex is attached to the collar, slide collar in keeper
section, xed collar to the unit with four screws supplied in
installation kit.
gure 9.2 It is recommended that the HRV have a dedicated
receptacle with 115v. It is not recommended to connect unit
with an extension cord. If no receptacle is available please
call an electrical contractor and have one installed. Insure
polarized is correct
gure 7.4 Slide collar on the unit.
IMPO R TANT:
Always consult
your national and local regulations,
building and safety codes.
gure 7.3 Finish by taping the duct on
the collar.
Air Connector A category of
exible duct not meeting the
requirements of an Air Duct per
UL 181 Standard (not tested for
ame penetration, puncture and
impact) and having limitations
on use, length and location as
dened by NFPA 90A and 90B.
Air Connectors are identied by
a “round shape” listing label of
the listing agency.
Air Duct A category of exible
duct tested and classied
as to the Surface Burning
Characteristics in accordance
with the UL 181 Standard
Air Ducts are identied by a
“rectangular shape” listing label
of the listing agency.
WARNING:
Always x and
secure the 5" or 6 collars with the
screws supplied. Avoiding this
critical step the unit will accumulate
condensation.

Page 9
10. OUTSIDE FRESH AIR AND EXHAUST AIR HOODS
TIP TO INSTALLER: We
recommend and it is good
practice to have a minimum of
6ft (1.83 m) between the supply
and exhaust vents, unless using
a concentric vent design to
prevent contamination of intake
air.
NOTE:
Outdoor air intake
hoods shall be located to avoid
contamination from sources such
as:
• Exhaust air openings
• Driveways (auto exhaust)
• Combustion appliances
• Gas meters, oil ll pipes
• Garbage containers
• Attics or crawl spaces
• Under deck or other areas of
questionable air quality
gure 10.1 Locating Outside Hoods
6ft (1.83 m)
18" (457 mm)
IMPO R TANT:
Always consult your national
and local regulations, building and safety
codes.
gure 7.4 Slide collar on the unit.

Page 10
11. BENEFITS OF THE DUOTROL™ SYSTEM
MODE SELECTOR
• Intermittent
• Continuous
• Off
SPEED ADJUSTMENT
• Increase Speed (+)
• Decrease Speed (–)
ACTS AS A MODE SELECTOR
INTERMITTENT: When the selector switch is in the intermittent
position the HRV will only run when there is a call for ventilation
by any control. At that time the unit will run on high speed until the
condition is satised.
CONTINUOUS: When the selector switch is in the continuous
position the HRV will run continuously on pre set speed except
when there is a call for override by any control.
OFF: When the selector switch is in the off position the HRV will not
come on even if there’s a call for ventilation by any control.
+ BUTTON: Increase the speed of the selected motor.
– BUTTON: Decrease the speed of the selected motor.
DUOTROLTM BALANCING
SYSTEM PROCEDURES, STEPS 1
THROUGH 8.
Step 1: Press the (+) and (–) buttons
simultaneously until you see the yellow light.
Once the indicator light turns yellow you are in
balancing mode.
Step 2: When in balancing mode the selector
switch becomes the motor selector switch.
INTER (Right Motor), CONT (Both Motors) and
OFF (Left Motor)
Step 3: Once the total cfm needed is determined,
you can start balancing the HRV. Set your fresh
air supply by selecting the «OFF» position on the
DuotrolTM. Install your magnehelic gauge and air
ow grid in the fresh air duct.
Step 4: Press the (–) button to decrease the cfm
or press the (+) button to increase the cfm.
Step 5: Then perform the same operation on the
stale air side by selecting the «INTER» position
on the DuotrolTM.
Step 6: The «CONT» position will allow you to
adjust the cfm on both motors proportionately (if
necessary).
Step 7: Once this is completed, you have set the
high speed on your HRV. To lock balancing mode
you must press (+) and (–) buttons simultaneously
and release. The indicator light will turn green to
indicate normal operation mode.
Step 8: Once high speed is set and locked,
switch to continuous on the DuotrolTM. By using
(+) and (-) buttons set low speed on the HRV.
USING THE SELECTOR SWITCH
TIP TO INSTALLER: When on Balancing Mode,
the Selector Switch allows you to choose the
motor you want to set.
A) CLOSED DUOTROL COVER
1. INTER (Exhaust Motor)
2. CONT (Both Motors)
3. OFF (Supply Motor)
B) OPEN DUOTROL COVER
1. UP (Exhaust Motor)
2. MIDDLE (Both Motors)
3. DOWN (Supply Motor)
WITH THE DUOTROL™
SYSTEM
GREEN LIGHT
MODE SELECTOR
YELLOW LIGHT
BALANCING MODE
12. BALANCING THE UNIT

Page 11
Connecting the Magnehelic gauge to the collar balacing taps, then proceed to section 13 (on page 10)
DuotrolTM Balancing System Procedures and follow the Steps 1 through Step 8.
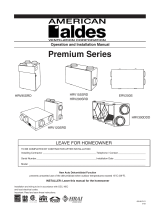
12. BALANCING THE UNIT (CONTINUED)
WITH THE DUOTROL
SYSTEM AND
THE INTEGRATED
BALANCING TAPS
AND MAGNEHELIC
GAUGE.
BALANCING CHART
The balancing chart is based
on a Delta P (DP) measurement
(also located on the access
panel of the ventilation system)
NOTE: To perform a proper
install, the External Static
Pressure (ESP) needs to be
measured at each of the 4
stations. Then proceed to
measure the Delta P(DP) to
determine the corresponding
airow (e.g. 50 CFM), then
do the iteration until the unit is
balanced both the (ESP and
airows).
HIGH (Exhaust Air to Outside)
LOW (Exhaust Air from Home)
LOW (Fresh Air from Outside)
HIGH (Fresh Air to home)
HIGH (Exhaust Air to Outside)
LOW (Exhaust Air from Home) Magnehelic gauge
Magnehelic gauge
Balancing Tap Connection*
LOW (Fresh Air from Outside)
HIGH (Fresh Air to home)
Balancing Chart when using collar pressure taps.
Pressure Fresh Air Exhaust Air
Pa in. wg L/s CFM L/s CFM
50 0.20 44 93 43 90
62 0.25 41 87 40 85
75 0.30 39 83 37 79
87 0.35 37 79 36 77
100 0.40 35 74 36 76
112 0.45 33 69 34 71
125 0.50 30 65 32 67
137 0.55 29 61 28 60
150 0.60 26 56 24 51
162 0.65 24 50 22 47
175 0.70 22 46 19 41
187 0.75 19 41 17 36
199 0.80 17 36 15 31
WITH AN
AIRFLOW GRID &
MAGNEHELIC GAUGE
Magnehelic Gauge with Air Flow Grid Inserting Air ow grid in duct Seal Air ow grid in duct with duct tape.
*IMPORTANT:
Once balancing is complete, insure all four pressure taps are sealed with the rubber caps.
Pressure taps (9753K74) supplied in the installation kit.

Page 12
13. CONTROLS CONNECTION
HRRD-1
(2 wires)
CAUTION:
Minimum wire requirements is LVT18 CSA/UL 4 strain to insure proper connection.
HRRD-3P
(4 wires)
R
G
B
W
G
R
B G R
R W B G
To Casing
Screw
for Ground
R W B G
Jumper
JP-4*
2 Relays
1 Relay
LVC Version 1
LVC Version 2
Jumper
JP-4*
R
G
B
W
G
R
B G R
R W B G
To Casing
Screw
for Ground
R W B G
Jumper
JP-4*
2 Relays
1 Relay
LVC Version 1
LVC Version 2
Jumper
JP-4*
HRT-3 TIMER
(3 wires)
R
G
B
W
G
R
B G R
R W B G
To Casing
Screw
for Ground
R W B G
Jumper
JP-4*
2 Relays
1 Relay
LVC Version 1
LVC Version 2
Jumper
JP-4*

Page 13
14. WIRING DIAGRAMS FOR FURNACE INTERLOCK SYSTEMS
STANDARD FORCED AIR
INTERLOCKING WIRING
A relay is normally used when tying
a ventilation system to the forced
air distribution system. Our Duotrol
System is equipped with an internal
relay that will activate the forced air
system’ ventilator when there is a
demand from the HRV . The Duotrol
System will activate the INTERLOCK
relay during the following modes:
Continuous, Override,Recirculation
and Defrost. See wiring diagram.
ALTERNATE FORCED AIR
INTERLOCKING WIRING
Some forced air system thermostat
will activate the cooling system when
tied using the «Standard forced air
interlocking wiring».
If you have identify this type of
thermostat you must proceed with
the «Alternate Forced Air Wiring».
LOCATING THE
WIRING DIAGRAM
NOTE TO INSTALLER:
Wiring
Diagram for the entire line of HRV
Models are placed on the back of
each Exhaust motor bracket.
CAUTION:
Thermostat that control
A/C system must use the Alternate
Interlock Wiring Diagram.
Low Voltage HRV Controller
Low Voltage HRV Controller
Thermostat
Legend: -------- Field Installed Low Voltage
Figure 14.1 Standard forced air wiring diagram
Figure 14.2 Alternate forced air wiring diagram
Legend: -------- Field Installed Low Voltage
Force Air System
Force Air System
*Before tying the HRV to a
forced air system, always
refer to system’s manual or
manufacturer.
WARNING:
Always disconnect the unit prior to making any connections. Failure to disconnecting the power could result in electrical shock
or can damage the electronic boards, wall controls and/or unit.
CAUTION:
Minimum wire requirements is LVT18 CSA/UL 4 strain to insure proper connection.

Page 14
15. TROUBLESHOOTING
QUESTION / ITEM DIAGNOSIS / SOLUTION
• HRV not running • Verify breaker in main electrical panel
• Verify the HRV is in the ON position
• Verify the all wall controls switch on the HRV are activated to supply power to the unit
• Unplug HRV verify if the controller is wired correctly to the connection box on the side of the unit
• Verify main outlet polarization
• Air is too dry • Reduce the humidity level on the controller
• Reduce continuous airow rate
• Switch ventilation mode from continuous to intermittent
• Humidier recommended if heating source is a forced air system
• Air too humid • Suggest continuous operation of HRV
• Increase humidity level on dehumidistat
• Increase continuous airow rate
• Insufcient ventilation, check capacity
• Internal source of moisture, e.g. heating wood store in basement, possible leaks or poor insulation R-value and or
dryer is venting in basement
• Vibration or noise • Verify that vibration mounting straps, hanging chains or wall bracket is used for hanging the units.
• Verify that exible duct connections are use between the HRV and the rigid duct.
• Verify that the motors are operating and are not obscured by any debris
• Insure motor moves freely with turning by hand.
• Cold air • Misplaced supply outlets
• Defrost no operating correctly
• The HRV not properly balanced
• High airow on furnace continuous mode
• Insure HRV is interlock when integrated with forced air system
• Contamination or Pollutants • Insure proper clearance of ventilation hoods from source of contaminants
Refer to section 10. Outside Fresh Air and Exhaust Air Hoods.
• Condensation • Verify that the HRV is level to insure proper drainage
• Verify that the duct connection are x and secured with screws to the HRV.
• Verify the cold side duct connections are fully insulated and that vapor barrier is taped to insure a proper seal.
• Look for signs of crushed section, failing duct straps, puncture vapor barrier, missing insulation.
• Insure proper seal of vapor barrier to outside wall.
• Look for sign of water accumulation/leakage/dripping
• Verify that the drain connection is not kinked; the “P” trap is not to close to unit or obscured with debris.

Page 15
16. MAINTENANCE
ROUTINE MAINTENANCE
SEVEN-STEP MAINTENANCE
SCHEDULE
With routine preventative
maintenance, you can avoid
unnecessary problems, ensure
the effectiveness of your HRV,
and prolong its life. For additional
specic instructions, refer to your
HRV operating manual or ask the
contractor who installed or services
the HRV to demonstrate the proper
maintenance procedures.
WARNING:
BE SURE TO DISCONNECT THE
ELECTRICAL POWER BEFORE
SERVICING YOUR SYSTEM
1. Clean or replace air lters.
Filters, which are located within
the HRV should be cleaned
every two to three months. Filters
should be vacuumed rst, then
washed with a mild soap and
water. Most washable lters will
last several years before needing
to be replaced.
2. Clean the exterior intake and
exhaust vents of obstructions.
Check the outside vents regularly
to ensure that the screen
openings are not obstructed by
grass, bushes, leaves, snow or
other debris.
3. Clean and inspect the heat-
exchange core and aluminum
louvers (Ref. Fig. 17.1 for proper
orientation of louvers). Twice
a year and clean it as required
(consult your owner’s manual
for in
structions on inspecting and
cleaning the core). A build-up of
dust and dirt can restrict airow and
reduce the efciency of your HRV.
After inspection and cleaning, make
sure the core is replaced right-
side-up.
4. Clean the condensate drain and
pan. Twice a year, check the
condensate drain and tubing to
ensure that they are open and
free-owing. The tubing can be
disconnected for cleaning. The
condensate drain must have a
“trap” in the tubing that traps a
quantity of water – to prevent air
from entering the HRV via this
tubing
5. Service the fans. The fans
on the HRV’s are designed to
operate continuously without
lubrication. Inspect the blower
fans periodically for dirt on the
blades, and remove it by gently
brushing the blades or using a
vacuum cleaner.
6. Clean the grilles and inspect
the ductwork. Clean the grilles
when they are dusty. At least
once a year, visually inspect the
ductwork leading to and from the
HRV. Damaged ducts can lead to
condensation problems, including
wet insulation, water on the oor
and, ice build-up. If the insulation
itself is damaged.
7. Arrange for an annual servicing.
Your HRV should undergo annual
general servicing by a certied
contractor and who is familiar with
your HRV. If possible, have your
furnace and HRV serviced at the
same time; this will result in less
inconvenience and cost than two
separate visits.
WARRANTY
S&P warrants the polypropylene heat recovery core against defects in material and workmanship for a lifetime from the date of original installation; and all
other components to be free from defects in material and workmanship for ve (5) years. Any units or parts which prove to be defective and are reported
during the warranty period will be replaced at our option when returned to our factory, transportation prepaid. Deterioration or wear by heat, abrasive ac-
tion, chemicals, improper installation or operation or lack of normal maintenance shall not constitute defects, and are not covered by warranty.
S&P will not be responsible for any installation, removal or re-installation costs or any consequential damage resulting in failure to meet conditions of
any warranty.
LIMITATION OF WARRANTY AND LIABILITY
This warranty does not apply to any such S&P product or parts which have failed as a result of faulty installation or abuse, or incorrect electrical connec-
tions or alterations, made by others, or use under abnormal operating conditions or misapplication of the products and parts.
S&P will not approve for payment any repairs made outside the factory without prior written consent.
The foregoing shall constitute our sole and exclusive warranty and our sole and exclusive liability and is in lieu of all other warranties, whether written,
oral, implied or statutory. There are no warranties which extend beyond the description of the page hereof. Seller does not warrant that said goods and
articles are of merchantable quality or that they are t for any particular purpose. The liability of seller on any claim of any kind, including negligence,
for any loss or damage arising out of or connected with, or resulting from the sale and purchase of the products and parts covered by this proposal,
acknowledgement, order or from the performance or breach of any contract pertaining to such sale or purchase, or from the design, manufacture, sale,
delivery, resale, installation, technical direction of installation, inspection, repair, operation or use of any products or parts covered by this proposal, ac-
knowledgement, order or furnished by seller shall, in no case exceed the price allocable to the products or parts thereof which give rise to the claim and
shall terminate one (1) year after the shipment of said products and parts.
In no event, whether as a result of breach of contract, or warranty or alleged negligence, defects, incorrect advice or other causes, shall seller be liable for
special or consequential damages, including, but not limited to, loss of prots or revenue, loss of use of the equipment or any associated equipment, cost
of capital, cost of substitute equipment, facilities or services, down time costs, or claims of customers of the purchaser for such damages. S&P neither
assumes nor authorizes any persons to assume for it any other liability in connection with the sale of its fan products and parts. Some states do not allow
the exclusion or limitation of incidental or consequential damages, so all of the above limitations or exclusions may not apply to you.
SAFETY ACCESSORIES WARNING:
The responsibility for providing safety accessories for equipment supplied by S&P is that of the installer and user of this equipment. S&P sells its equip-
ment with and without safety accessories, and accordingly it can supply such safety accessories upon receipt of order.
17. WARRANTY

/