Page is loading ...

The expert for industrial and automotive communication
Hardware Manual
iPC-I 320/PCI
Intelligent PC/CAN Interface

IXXAT
Headquarter US Sales Office
IXXAT Automation GmbH IXXAT Inc.
Leibnizstr. 15 120 Bedford Center Road
D-88250 Weingarten USA-Bedford, NH 03110
Tel.: +49 (0)7 51 / 5 61 46-0 Phone: +1-603-471-0800
Fax: +49 (0)7 51 / 5 61 46-29 Fax: +1-603-471-0880
Internet: www.ixxat.de Internet: www.ixxat.com
Support
In case of unsolvable problems with this product or other IXXAT products
please contact IXXAT in written form by:
Fax: +49 (0)7 51 / 5 61 46-29
e-Mail: [email protected]
Copyright
Duplication (copying, printing, microfilm or other forms) and the electronic
distribution of this document is only allowed with explicit permission of
IXXAT Automation GmbH. IXXAT Automation GmbH reserves the right to
change technical data without prior announcement. The general business
conditions and the regulations of the license agreement do apply. All rights
are reserved.
Document number: 4.01.0044.20000
Version: 2.5

Contents
1 Introduction....................................................................................5
1.1 Overview ............................................................................. 5
1.2 Features............................................................................... 5
1.1 Block diagram ...................................................................... 6
2 Installation ..................................................................................7
2.1 Hardware installation ......................................................... 7
2.2 Software installation .......................................................... 7
3 Configuration .............................................................................8
3.1 Settings on the interface .................................................... 8
3.1.1 Disable Toggle ..........................................................................8
3.1.2 Providing current supply via CAN plug.......................................9
3.1.3 Reset button and LED ...............................................................9
3.1.4 GND pin for testing purpose .....................................................9
3.2 Design of the CAN plugs..................................................... 9
3.3 Pin assignment.................................................................. 10
3.3.1 Connection between CAN controllers and bus transceivers.......10
3.3.2 Serial RS232 interface .............................................................12
4 Architecture ..............................................................................13
4.1 PC side memory assignment............................................. 13
4.1.1 DPRAM...................................................................................13
4.1.2 Semaphores............................................................................13
4.1.3 Reset of the µC from the PC ....................................................14
4.1.4 Triggering the interrupt on the µC through the PC...................14
4.1.5 Interrupt Acknowledge ...........................................................14
4.2 µC-side memory assignment ............................................ 14
4.2.1 Program memory....................................................................15
4.2.2 Data memory..........................................................................15
4.2.3 Loader/application mode ........................................................15
4.2.4 Harvard Mode ........................................................................17
4.2.5 Von-Neumann Mode ..............................................................18
4.3 Triggering an interrupt on the PC..................................... 18
4.4 Interrupthandling on the PC............................................. 18
1.2 CAN Controller................................................................... 19
4.5 Serial interface .................................................................. 20
Copyright IXXAT Automation GmbH iPC-I 320/PCI - Manual, Version 2.5
3

Contents
5 Programmers Information........................................................21
Appendix .........................................................................................22
Technical Data...........................................................................22
Appendix B ...............................................................................23
Factory settings ........................................................................23
Appendix C ...............................................................................24
Supply sources for data sheets ................................................24
Copyright IXXAT Automation GmbH iPC-I 320/PCI - Manual, Version 2.5
4

Introduction
1 Introduction
1.1 Overview
With the IXXAT PC/CAN interface iPC-I 320/PCI you have purchased a high-quality
electronic component which has been developed and manufactured according to
the latest technological standards.
The aim of this manual is to help you familiarize yourself with your interface, also
referred to in the following as iPC-I 320/PCI. Please read this manual before be-
ginning with the installation.
The manual also describes, among other things, the hardware architecture of the
interface, knowledge of which is required in order to create your own applica-
tions on the interface.
If you are using the interface with the IXXAT VCI driver or other IXXAT software,
you can leave out Section 4 and 5.
1.2 Features
The most important technical features are as follows:
• Design as PCI board
• 32 bit memory mapped access (needs 8 kBytes memory address space and 16
Byte I/O address space)
• base address and PC interrupts via PCI Plug’n Play bios
• Microcontroller DALLAS 80C320 clocked with 22,1184 MHz (code compatible
with INTEL 8032)
• one ore two CAN circuits with Philips SJA1000 CAN controller clocked with 16
MHz
• 4 kBytes Dual-Port-RAM, 8 semaphore registers
• 2 x 64 kBytes flash memory
• up to 63 kBytes code can be downloaded
• up to 2 x 56 kBytes XDATA-RAM addressable
• optional one serial RS232 interface
• CAN bus interface according to ISO/IS 11898 on board (optional galvanic de-
coupled); alternative bus interfaces available by a piggyback board
• optional one or two CAN protection circuits on-board
• download capability (Intel-HEX-file format); max 63 kByte code
• different memory architectures available (Harvard, von-Neumann)
• EMC safe design (4 layer PCB)
Copyright IXXAT Automation GmbH iPC-I 320/PCI - Manual, Version 2.5
5

Introduction
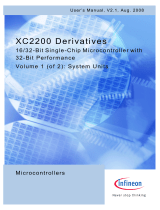
1.1 Block diagram
FLASH
CAN Bus
A 0..15
PC
iPC-I320/PCI
AD 0..7
A 0..15
SRAM Address
Decoder
2. CAN
Controller
SJA1000/82527
CAN Bus-
Ankopplung
Address
Latch
RESET
1. RS232
TxD RxD
CAN High
CAN Low
1. CAN
Controller
SJA1000/82527
CAN Bus-
Ankopplung
PCI-Bus
PCI-Target Controller
(DPRAM and Flags)
Microcontroller
DS80C320
Fig. 1-1: Block diagramm iPC-I 320/PCI
Copyright IXXAT Automation GmbH iPC-I 320/PCI - Manual, Version 2.5
6

Installation
2 Installation
2.1 Hardware installation
For all work on the PC and interface, you must be statically discharged. The work
must be carried out on an earthed, anti-static work-mat.
Carry out the following work in sequence:
(1) Switch the PC off and remove the mains plug.
(2) Open the PC according to the instructions of the PC-manufacturer and de-
termine a suitable plug-in space.
The interface is designed according to the PC-standard and can be easily
built into the computer. Do not use force when plugging in.
(3) Ensure that the interface is held safely in place in the PC.
(4) If your interface is assembled with 2 isolated CAN-circuits, you must fix the
additional slot plate and plug in the header on the interface (see Section
3.2).
(5) Close the PC; the hardware installation is now completed.
2.2 Software installation
To operate the interface, a driver is required.
For the installation of the CAN driver VCI under Win95/98/NT/2000, please read
the VCI installation manual.
Copyright IXXAT Automation GmbH iPC-I 320/PCI - Manual, Version 2.5
7

Configuration
3 Configuration
3.1 Settings on the interface
The diagram Fig. 3-1 shows the positions of the plugs and jumpers on the inter-
face.
Fig. 3-1: iPC-I 320/PCI interface
3.1.1 Disable Toggle
With the jumper JP2 the toggle of the memory architecture from the PC can be
disabled. Within position 1-2 of the jumper, the interface always starts up in ap-
plication mode after reset. In this position the program starts within the Flash
memory (Bank 0). In this mode, bank-switching of the XDATA RAM is possible on
the interface.
Toggle JP2
possible (Default, Loader mode) 1-2 open
not possible (Application mode) 1-2 closed
Copyright IXXAT Automation GmbH iPC-I 320/PCI - Manual, Version 2.5
8

Configuration
3.1.2 Providing current supply via CAN plug
With the solder jumpers JP3, JP4, JP5, JP9, JP10 and JP11, the VCC (5V) or GND
signals can be connected to the CAN plug of the two CAN circuits. For this, the
jumpers given in the following table have to be closed.
Pin board X6/X8
Pin - Signal
Default
setting
CAN
circuit 1
CAN
circuit 2
3 - GND Closed JP5 JP9
6 - GND Open JP3 JP10
9 - VCC Open JP4 JP11
Attention: This voltage may be loaded with max. 100 mA.
If the bus transceiver is electrically isolated, GND and VCC are also connected
electrically isolated from the interface to the plug board via the solder jumpers.
3.1.3 Reset button and LED
With the order option "developer version", the reset button SW1 and the LED D5
is assembled in addition to the a serial interface. The LED is controlled by the mi-
crocontroller via port 3.4, whereby the LED is on with a low signal (bit on 0). It is
to be observed that the port pin 3.4 is also led out onto the pin boards X5 and
X7.
3.1.4 GND pin for testing purpose
There is a connection on the iPC-I 320/PCI for an earth pin. In the figure connec-
tion is marked as JP6 and on the circuit board with the abbreviation GND next to
the drill hole.
3.2 Design of the CAN plugs
One (common) or two isolated high-speed bus transceivers according to ISO/IS
11898 may be present on the interface. The signals of the first bus transceiver
connect with the 9-pin sub-D-pin/bush X3/X2. If two isolated bus transceivers are
assembled, the signals for the CAN bus of the second bus transceiver connect
with the header X4.
A version without bus transceiver is available as a further option. In this case the
signals are led out onto two pin boards each (X5/X6 for the first CAN circuit,
X7/X8 for second CAN circuit). This enables alternative bus transceivers to be im-
plemented.
A CAN protective circuit, consisting of a special CAN coil is also available as an
option. The circuit suppresses faults and short spikes on the CAN lines.
Copyright IXXAT Automation GmbH iPC-I 320/PCI - Manual, Version 2.5
9

Configuration
3.3 Pin assignment
The following plugs are on the interface:
Plug Name
CAN1 X2, X3
X5, X6
CAN2 (isolated from CAN1) X4, X7, X8
RS232 interface (optional) X1
3.3.1 Connection between CAN controllers and bus transceivers
The signals of the CAN controllers 1/2 and up to four port pins of the microcon-
troller connect with X5/X7.
Pin no. X5/X7 Signal
1 VCC
2 GND
3 Port 1.3
4 RX0
5 RX1
6 TX1
7 TX0
8 Port 3.4
9 Port 1.2
10 Port 3.5
Copyright IXXAT Automation GmbH iPC-I 320/PCI - Manual, Version 2.5
10

Configuration
X6 leads the signals of the first bus transceiver to the 9-pin X3 plug (male) and
the 9-pin plug (female) X2.
Pin no. X6 Pin no. X2/X3 Signal name
1 1
2 2 CAN Low
3 3 GND (via JP5)
4 4
5 5
6 6 GND (via JP3)
7 7 CAN High
8 8
9 9 VCC (via JP4)
10 -
With electrically isolated bus transceivers the signals GND and VCC are also elec-
trically isolated from the GND and VCC signals of the interface.
X8 leads the signals of the second bus transceiver to the 10-pin header X4.
Pin no. X8 Pin no. X4 Signal
1 1
2 3 CAN Low
3 5 GND (via JP9)
4 7
5 9
6 2 GND (via JP10)
7 4 CAN High
8 6
9 8 VCC (via JP11)
10 10
With electrically isolated bus transceivers the signals GND and VCC are also elec-
trically isolated from the GND and VCC signals of the interface.
If the CAN protective circuit is assembled on the circuit board, the signals
CAN-Low and CAN-High are connected from X6 (X8) via the protective circuit
with X2/X3 (X4).
Copyright IXXAT Automation GmbH iPC-I 320/PCI - Manual, Version 2.5
11

Configuration
3.3.2 Serial RS232 interface
The serial interface can be optional assembled. The signals of the RS232 interface
are connect with X1.
Pin no. X1 Signal Sub D9 pin
1
2
3 RxD 2
4
5 TxD 3
6
7
8
9 GND 5
10
Copyright IXXAT Automation GmbH iPC-I 320/PCI - Manual, Version 2.5
12

Architecture
4 Architecture
4.1 PC side memory assignment
Communication with the PC is made via a 8 kByte memory zone in which the 4
kbyte DPRAM, 8 semaphore registers and 2 flags (Reset and µC-interrupt) are
placed.
0000h
1000h
1400h
1800h
1BFFh
DPRAM (4 kByte)
Semaphoren
Reset iPCI320
INT µC (INT2)
(base address)
Fig. 4-1: PC side memory assignment
4.1.1 DPRAM
Generally the DPRAM can be accessed from both sides simultaneously. However,
this only applies if it is not the same address. In this case differentiation is made
between the types of access. Reading from both sides is unproblematic here.
However, if writing occurs from one side and reading from the other, the reading
side receives either the old data or the data just written. If writing occurs simulta-
neously from both sides onto the same memory cell, an access conflict occurs.
Using so-called semaphores can prevent this collision.
4.1.2 Semaphores
Semaphores, also referred to in this context as semaphore registers, are special
memory cells in the DPRAM. They are in a zone which is isolated from the actual
DPRAM.
The DPRAM used has eight of such semaphore registers. For their selection, only
the three lower value address lines are important, i.e. the eight registers are re-
flected just as frequently in the range from 1000h to 13FFh (PC side) or from
F000h to F3FFh (µC side).
For more information on DPRAM and its semaphore registers, please see the data
sheet of the IDT 71342 (addresses in Appendix C).
Copyright IXXAT Automation GmbH iPC-I 320/PCI - Manual, Version 2.5
13

Architecture
4.1.3 Reset of the µC from the PC
By writing a defined value (reset value) in a random address of the memory range
from 1400h to 17FFh, a reset of the microcontroller is triggered on the interface.
The value written in the memory cell states in which memory architecture the in-
terface should be switched after the reset. If the DIP switch 8 (SW1-8) is set to
ON, there is no toggle of the memory architecture. The interface then always re-
mains in the loader mode and executes the program contained in the EPROM.
The following table shows the reset bit patterns for the toggle. X means irrele-
vant:
Mode Bit
7
Bit
6
Bit
5
Bit
4
Bit
3
Bit
2
Bit
1
Bit
0
Loader/Application X X X X X 0 X 0
Harvard X X X X X X 0 1
von-Neumann X X X X X X 1 1
Flash loader (MC stopped) X X X X X 1 0 0
Flash loader (MC running) X X X X X 1 1 0
4.1.4 Triggering the interrupt on the µC through the PC
By writing a random value in a memory address in the range from 1800H to
1BFFh, an interrupt is triggered on the input INT2 of the microcontroller.
4.1.5 Interrupt Acknowledge
By setting the corresponding bit 8 at offset 50h in the configuration register of
the PCI controller, an interrupt request triggered by the microcontroller is ac-
knowledged and resetted.
4.2 µC-side memory assignment
The interface can be operated in 3 different memory modes:
• Loader/application-mode (Flash as code memory, RAM as data memory)
• Von-Neumann-mode (common code and data memory in the RAM)
• Harvard-mode (separate code and data memory in the RAM)
After switching on, the interface is always in the loader-mode. In this mode the
program contained in the Flash on the interface is executed.
Copyright IXXAT Automation GmbH iPC-I 320/PCI - Manual, Version 2.5
14

Architecture
4.2.1 Program memory
The program code for iPC-I 320/PCI can be loaded on the RAM memory or can be
run directly from Flash (it depends on the chosen memory mode). A program
code of up to 63 kBytes can be loaded on iPC-I 320/PCI. The size of the code
memory varies in the different memory modes of iPC-I 320/PCI:
• Loader mode 63,75 kBytes Flash as code memory 256 bytes
of common code and data memory
• von-Neumann mode 63 kBytes plus 256 bytes of common code
and data memory
• Harvard mode 63 kBytes code memory 256 bytes of common
code and data memory
4.2.2 Data memory
The size of the data memory also depends on the selected mode:
• Loader mode 63 kBytes data memory for a loadable program (loader
mode) (becomes code memory in von-Neumann and
Harvard-Mode) 2x56 kBytes data memory (application
mode) 256 bytes of common code and data memory
• von Neumann mode 56 kBytes plus 256 bytes of common memory for code
and data
• Harvard mode 56 kBytes data memory 256 bytes of common code and
data memory
4.2.3 Loader/application mode
In the loader/application mode 63.75 kBytes Flash memory are available for the
program code. In the Flash memory, a loader or an application can be firmly im-
plemented.
As shown in Figure 4-4, 56 kBytes of memory are available in the XDATA area of
the controller, in which the application data can be placed. If the interface is op-
erated in "Disabled toggle" mode (see 3.1.1), the RAM-BANK 0 in the XDATA area
can be displayed by writing a random value in the address range between FC00h
and FCFFh, the RAM-BANK 1 by writing between FD00h and FDFFh.
Access to the DPRAM, the semaphores and the CAN-controllers (only in applica-
tion mode) also occurs via XDATA address areas.
An address area of 256 bytes exists in all memory modes from address FF00h to
address FFFFh which is always accessible as von-Neumann memory. Programs
working with self-modifying code can place the code to be modified in this area.
Copyright IXXAT Automation GmbH iPC-I 320/PCI - Manual, Version 2.5
15

Architecture
0000h
F000h
FF00h
not used
Semaphores
DPRAM
60K
RAM
CODE XDATA 0000h
FFFFh
Flash
63,75 k
Bank 1
3K
RAM F300h
F200h
512 Bytes
Fig. 4-2: Memory layout when loading programs into the RAM
0000h
FF00h DPRAM, FFF0-FFFF
Flash
63,75k
Bank 0/1
0000h
FF00h
Select F1
Select F0
not
used
DPRAM
4k
FE00h
FD00h
1000h
Fig. 4-3: Memory layout when loading programs into the Flash
Copyright IXXAT Automation GmbH iPC-I 320/PCI - Manual, Version 2.5
16

Architecture
0000h
E000h
F000h
FD00h
FE00h
FF00h
not used
Semaphores
DPRAM
CAN 1
CAN 2
2x 56K
RAM
CODE XDATA 0000h
FFFFh
Flash
63,75k
Bank 0
Sel. BANK 0
Sel. BANK 1
not used
FC00h
F800h
F400h
Fig. 4-4: Memory layout in application mode (activated by jumper)
4.2.4 Harvard Mode
In Harvard-mode the programmer has the largest possible memory pool available
(see Fig. 4-5). Programs which are loaded via the loader into the code area can
contain a maximum of 63.25 kbytes code. 0.75 kbytes (from F000h to F2FFh) of
the available address space must remain unused, since in loader-mode, because
of the DPRAM displayed here as well as the semaphores, it is not possible to write
in this area.
0000h
E000h
F000h
FF00h
not used
Semaphores
DPRAM
CAN 1
CAN 2
56K
CODE XDATA 0000h
FFFFh
60K
not used FC00h
F800h
F400h
F000h
F300h
3K
FF00h
FFFFh
Fig. 4-5: Memory layout in Harvard mode
Copyright IXXAT Automation GmbH iPC-I 320/PCI - Manual, Version 2.5
17

Architecture
4.2.5 Von-Neumann Mode
The Von-Neumann mode provides applications with the smallest usable storage
area (see Fig. 4-6). The advantage of this mode is that debuggers such as Keil
TS51 can also be implemented, as the whole usable code area can be modified
by the software itself.
In the area of the CAN controller, of the DPRAM and of the semaphore register,
the storage is decoded as Harvard-storage when accessed.
0000h
E000h
F000h
FF00h
not used
Semaphores
DPRAM
CAN 1
CAN 2
56K
CODE XDATA 0000h
FFFFh
not used FC00h
F800h
F400h
F000h
F300h
3K
FF00h
FFFFh
4K
E000h
Fig. 4-6: Memory layout in von-Neumann mode
4.3 Triggering an interrupt on the PC
The microcontroller can trigger an interrupt at the PC by writing a low impulse of
at least 50 ns length on the portpin 1.7. Then the PCI target controller triggers an
interrupt at the PC. The interrupt service routine on the PC has to acknowledge
the interrupt request. Only then a new interrupt can be triggered.
4.4 Interrupthandling on the PC
For enabling the interrupt system on the microcontroller system at first the Bit 6,
Offset 4Ch in the configuration register of the PCI controller must be set. The ac-
tual interrupt state of the card is represented in bit 2, offset 4Ch of the configura-
tion register of the PCI controller (1 = interrupt request by MC).
The signal is stays "1" until the PC deactivates it by activating an interrupt ac-
knowledge signal (Bit 8, Offset 50h of the PCI controller).
The card supports the shared PCI interrupt handling according to PCI-SPEC 2.1.
Copyright IXXAT Automation GmbH iPC-I 320/PCI - Manual, Version 2.5
18

Architecture
4.5 CAN Controller
Up to two CAN controllers can be present on the interface. These can be control-
lers of the types Philips SJA1000 or INTEL 82527. With the PC/104 version, the
first CAN controller is always a Philips SJA1000, the second CAN controller can be
assembled via an optional plug-in circuit board.
The first CAN controller is displayed in the range from F400h to F7FFh, the sec-
ond CAN controller in the range from F800h to FBFFh in the XDATA area of the
microcontroller. When the individual storage area is accessed, the corresponding
CAN controller is automatically selected. The exact registration description can be
found in the relevant data books of INTEL or Philips (web-addresses in
Appendix C). Both CAN controllers have a frequency of 16 MHz.
CAN controller Start
address
INT on
DS80C320
HW reset
with port
TX0 dis-
able with
port
1. CAN controller F400h INT0 P1.0 P1.5
2. CAN controller F800h INT1 P1.1 P1.6
The CAN controllers are reset by a high-level (bit on 1) of the port bits to P1.0
and P1.1 respectively. After reset of the microcontroller, it should be ensured that
the two CAN controllers are in reset mode. The application on the interface must
ensure that the two port bits are set to 0.
It is possible, with a high level (bit on 1) of the port bits 1.5 and 1.6, to prevent
the INTEL 82527 CAN controller from transmitting. For this, the TX0 line of the
CAN controller to the bus coupling is interrupted. After a reset of the microcon-
troller, it is the task of the application to set the bit to 0, in order to enable
transmission.
It should be ensured that the Output Control Register of the Philips SJA1000 CAN
controller is loaded with the value 5Eh. To ensure correct functioning of the IN-
TEL 82527 CAN controller, the value 41h must be written in the CPU interface
register of the INTEL 82527 after each reset of the CAN controller.
Since the INTEL 82527 CAN controller has a relatively slow CPU interface, it is
necessary to insert wait states when accessing the CAN controller. The DALLAS
DS80C320 microcontroller has the CKCON register (SFR Register 8Eh) for this
purpose. The value 100b must be entered in bits 2, 1 and 0 of the CKCON regis-
ter (corresponds to 6 wait states when accessing the XDATA area). Depending on
the application, it is helpful to set the wait states only when accessing the CAN
Copyright IXXAT Automation GmbH iPC-I 320/PCI - Manual, Version 2.5
19

Architecture
controller. If parts of a program is only working with data from the RAM, the
wait states should be cancelled.
For the Philips SJA1000, 4 wait states (010b) are sufficient.
4.6 Serial Interface
One serial interface according to the RS232C standard can be assembled on the
card. The interface is operated by the microcontroller via the integrated serial in-
terface of the DS80C320 on the port pins P3.0/P3.1.
Copyright IXXAT Automation GmbH iPC-I 320/PCI - Manual, Version 2.5
20
/