Page is loading ...

User Instructions
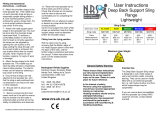
Deluxe Sling Head Support
Range
Polyester Mesh
General Safety Warning
Please ensure these instructions
are fully read and implemented.
Failure to do so may result in
injury to the user. Retain in a safe
place for future reference.
In the interest of safety;
Persons using this equipment
should have received appropriate
training or instruction.
Hoisting transfers should only be
attempted following a
comprehensive risk assessment
and should be performed in
accordance with local Moving &
Handling Guidelines.
Intended Use
The Deluxe Sling range is designed
to suit a wide range of users and
transfer needs, including bathing, and
use in swimming or hydrotherapy
pools. They can be used on hoists
fitted with a conventional spreader
bar (i.e. with hooks at either end from
which looped straps may be
suspended)
If you are unsure about compatibility
with the spreader bar contact NRS
customer services, contact details
overleaf.
Sling Guide
Size
Extra Small
Small Medium Med/large Large
Colour Code
Sling Code
M07189 M07190 M07207 M07219 M07220
Client
Measurements
Shoulder to
Sacrum
340-400mm
131⁄2 - 153⁄4"
400-550mm
153⁄4- 211⁄2 "
550-700mm
211⁄2 -271⁄2 "
550-700mm
211⁄2 -271⁄2 "
700-800mm
271⁄2 -311⁄2 "
Maximum User Weight
27
1
/
2
"st
175kg
UI/ M07189/ M07190/ M07207/ M07219/ M07220/1113/Issue7
NRS Healthcare
Sherwood House, Cartwright Way,
Forest Business Park, Bardon Hill,
Coalville, Leicestershire.
LE67 1UB UK
Tel. Main Office: 0330 100 00 98
Tel. Customer Services: 0845 120 4522
Email: customerservice@nrs-uk.co.uk
www.nrs-uk.co.uk
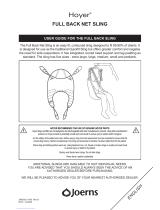
Fitting and Operational
Instructions – continued;
4 - Bring the external leg straps over
the client’s legs and thread the left
external straps through the adjacent
internal loop. Repeat for right leg.
5 - By pulling gently upwards on the
external leg straps, it should be
clear that the client's legs are fully
enclosed by the Sling, with the
straps crossed between the client’s
thighs. If this has not been achieved,
undo the straps and go back to step
3 and repeat.
6 - Attach the shoulder straps to the
hoist spreader bar. (The middle loop
on each shoulder strap will give a
reasonably upright sitting position.)
A more reclined position can be
achieved by using a longer loop. For
a more upright posture choose a
loop closer to the sling.
7 - Attach the leg straps to the hoist
spreader bar. The middle loop on
each leg strap will give a reasonably
natural sitting position. The client’s
knees can be raised by selecting a
loop closer to the Sling.
If required, attach the head support
straps to the spreader bar, and
adjust to ensure the appropriate
level of head support will be
provided
8 - Ensure that all loops are fully
attached to the spreader bar, and
that the sling is well positioned and
not attached in any way to the seat
or other obstacle.
9 - Ensure client is secure and
comfortable.
10 - Raise the hoist spreader bar to
lift the client just off the surface.
Check that all loops are connected
and the client is secure and
comfortable prior to completing the
transfer.
11 - Do not attempt to adjust or
detach any strap while the patient is
being hoisted.
Fitting from the Lying position
Roll the client onto the sling,
ensuring that the Bottom edge of
the Head Support panel is level with
the base of the neck, and the
bottom edge is positioned just below
the coccyx. Follow instructions from
point 3 of the seated position
instructions

CAREFULLY EXAMINE
ALL STITCHING
Fitting and Operational
Instructions
Before every lift, visually
inspect the sling to ensure it is
fit for purpose. Refer to the
Inspection Routine section of
this guide for the
recommended method. If in
doubt do not use the sling.
In the interest of safety;
Persons using this equipment
should have received
appropriate training or
instruction.
Hoisting transfers should only
be attempted following a
comprehensive risk
assessment and should be
performed in accordance with
local Moving & Handling
Guidelines.
Fitting from the seated position
1 - Place the Sling behind the
client with the bottom edge of the
head support panel level with the
base of the client’s neck.
2 - Position the sling by pulling
the bottom edge briskly from left
to right and back again, the
bottom edge of the Sling can be
positioned 25-50 mm under the
client’s buttocks.
3 - Pass the internal leg straps
between the client’s legs and
thread the left loop through the
right.
CHECK:
• All Stitching MUST be intact.
• There should be no
Material Degradation
around stitching.
Cleaning Instructions:
Note: The head support stiffening bars
(Positioned in the head support section of
the sling) MUST be removed before the
sling is washed.
• Machine wash warm at up to 70ºC
• For effective decontamination, wash
at greater than 65ºC for at least 10
minutes
• Do not use bleach, biological
detergents or detergents containing
bleach.
• Do not spot clean with strong
chemicals
• Do not iron.
• Do not dry clean
• Tumble dry only on ‘cool’ setting or
air dry at very low temperatures.
Special Note:
After use in a swimming or hydrotherapy
pool slings must immediately be rinsed
thoroughly in cool, tap water, and dried.
Inspection Information
The following notes are a guide to the
recommended inspection procedures for
slings.
If carried out thoroughly, at regular
intervals, lifting and hoisting operations
can be carried out with confidence, and
the risk of injury due to sling failure is
significantly reduced.
Before every lift, visually inspect the
slings structural integrity. Use the
diagrams as a guide. If there are any
signs of damaged fabric or stitching do
not use.
If you are unsure, do not use the sling,
withdraw from service immediately. The
product should then be either discarded,
or clearly labelled:
“Not for use” and assessed at the
earliest opportunity by a competent
individual.
A visible nick – even of
only 1mm SHOULD BE
DEEMED UNSAFE
STRAPPING INSPECTION
Sling Inspection procedure;
The following procedure is
recommended to help ensure that
lifting and hoisting operations can
be carried out with confidence and
the risk of accident due to sling
failure is minimised.
• Open the sling out fully on a
flat surface.
• Check all retaining straps for
cuts, nicks or degradation of
any kind.
• Carefully check all stitching.
• Check the material near to any
attachment points.
• Pay particular attention to the
areas of high stress as shown
in diagrams.
• Checks should be carried out
to both sides of the sling in the
same manner.
• Discolouration may also
indicate fabric degradation.
Areas of High
Stress
A few loose strands are
ACCEPTABLE
/