
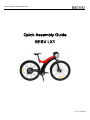
Quick Assembly Guide - BESV LX1
Quick Assembly Guide
BESV LX1
V. 1.0, Jan. 2015

Quick Assembly Guide - BESV LX1
1
Contents
1.What’s in the Box.........................................................................................................................................2
1.1Main Box Contents..........................................................................................................................2
1.2Accessory Box Contents................................................................................................................2
2.Assembly Procedures.................................................................................................................................3
2.1Front Wheel......................................................................................................................................3
2.2Front Fender and Reflector............................................................................................................5
2.3 Pedal.......................................................................................................................................................6
2.4 Battery.....................................................................................................................................................7
2.5 Saddle & Seat Post...............................................................................................................................8
2.6 Rear Light...............................................................................................................................................9
3Checklist......................................................................................................................................................10

Quick Assembly Guide - BESV LX1
2
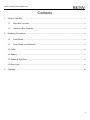
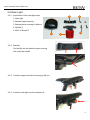
1. What’s in the Box
1.1 Main Box Contents
1. Main Bike Assembly
2. Accessory Box
3. Saddle/Seat Post Set
4. Front Wheel
5. Front Fender
1.2 Accessory Box Contents
1. Product Documentation
2. Charger
3. Pedals
4. Rear Light & Reflector
5. Quick Release (QR) for the
Front Wheel
6. Key
7. Front reflector and screw sets for front fender
2
3
5
1
4
2
4
3
1
67
5

Quick Assembly Guide - BESV LX1
3
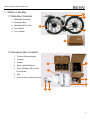
2. Assembly Procedures
2.1 Front Wheel
2.1.1 Unpack the front wheel and the
main bike assembly.
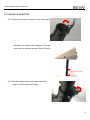
2.1.2 Insert the wheel into the fork end.
Attention: The disk should be
placed between the brake pads.

Quick Assembly Guide - BESV LX1
4
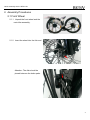
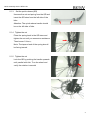
2.1.3 Set the quick release (QR)
Unscrew the nut and spring from the QR and
insert the QR stem from the left side of the
bike.
Attention: The quick release handle should
be on the left side of bike.
2.1.4 Tighten the nut
Place the spring back in the QR stem and
tighten the nut until you encounter resistance.
Then loosen 1/4 turn。
Note: The tapered end of the spring should
be facing inward.
2.1.5 Tighten the nut
Lock the QR by pushing the handle upwards
until parallel with fork. Turn the wheel and
verify the rotation is smooth

Quick Assembly Guide - BESV LX1
5
2.2 Front Fender and Reflector
2.2.1 Fender parts introduction
1. Front Fender & Support
2. Fix Plate*2
3. M5 Screw*2
4. Front Reflector
5. Fender screw with washers
2.2.2 Place the fix plate at the bottom
of the front fork and loosely
secure with the M5 screw.
2.2.3 Place front fender and support
with the end of the support
going into the fix plate.
2.2.4 Place the front reflector at the
top of the fork where the
fender meets the fork, then
loosely secure with the fender
screw.
2.2.5 Adjust the fender position,
and then tighten the screws
at the reflector and at the fix plate.
Note: When securing the reflector to the fork, make sure the placement order is fork,
fender and then reflector.
3
2
1
45

Quick Assembly Guide - BESV LX1
6
R
L
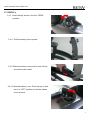
2.3 Pedal
2.3.1 Take out the pedal.
2.3.2 Set up the right pedal
Note: There is a mark “R” on one of the
pedal. Assemble it onto the right
crank clockwise.
2.3.3 Set up the left pedal
Take another pedal and assemble it to
the left crank counterclockwise.

Quick Assembly Guide - BESV LX1
7
2.4 Battery
2.4.1 Insert the key and turn it to the “OPEN”
position.
2.4.2 Pull the battery cover upward.
2.4.3 Slide the battery in and push it until it firmly
connects to the socket.
2.4.4 Close the battery cover. Push the key in and
turn it to “OFF” position to lock the battery
cover in place.

Quick Assembly Guide - BESV LX1
8
2.5 Saddle & Seat Post
2.5.1 Open the seat post clamp and insert the seat post。
Attention: the depth of the seat post. The seat
post must be inserted at least 10cm (3.9inch).
2.5.2 Set the saddle face forward and adjust the
height. Lock the seat post clamp.
10cm(3.9inch)

Quick Assembly Guide - BESV LX1
9
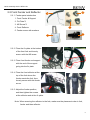
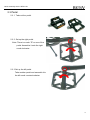
2.6 Rear Light
2.6.1 Introduction of the rear light parts.
1. Rear light
2. Bracket upper housing.
3. Bracket lower housing & reflector
4. M4 Nut*2
5. M4*L15 Screw*2
2.6.2 Bracket.
Put the M4 nut into bracket upper housing.
Set under the saddle.
2.6.3 Combine upper and lower housing by M4 nut.
2.6.4 Insert the rear light into the bracket rail.
5
24
3
1

Quick Assembly Guide - BESV LX1
10
3 Checklist
3.1 Check the tire pressure is normal.
3.2 Check the function of the brakes, derailleur, and chain.
3.3 Check the function of the electric module and the battery power. Please refer to LX1 user
manual.
-
 1
1
-
 2
2
-
 3
3
-
 4
4
-
 5
5
-
 6
6
-
 7
7
-
 8
8
-
 9
9
-
 10
10
-
 11
11


Ask a question and I''ll find the answer in the document
Finding information in a document is now easier with AI
Related papers

Other documents
-
 Pacific Cycle Mountain Bicycles; BMX Bicycles User manual
-
Currier Tech Ezip Owner's manual
-
Behringer X V-AMP LX1-X User manual
-
Raleigh PERFORMANCE HYBRID BIKE Assembly Manual
-
-
 Avigo DUAL SUSPENSION MOUNTAIN BICYCLES User manual
-
 Mongoose MULTI SPEED Owner's manual
-
Schwinn Hollywood User manual
-
Huffy Multi-Speed Bicycle Owner's manual
-
Husky T-124C Owner's Manual And Assembly Manual


