
User guide
User guide
English
|
Français
|
Español
|
Português
简体中文
|
繁體中文
|
Bahasa Melayu

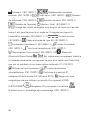
ResMed.com/AirMiniApp

English 1
ENGLISH
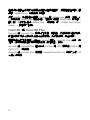
Welcome
The ResMed AirMini™ system combines ResMed’s AirMini self-
adjusting pressure machine, masks and the AirMini by ResMed™ App.
WARNING
Read this entire guide before using the machine.
CAUTION
In the US, Federal law restricts this device to sale by or on the order
of a physician.
Indications for use
The AirMini self-adjusting system is indicated for the treatment of
obstructive sleep apnea (OSA) in patients (female patients with mild to
moderate OSA when using AutoSet™ for Her treatment mode)
weighing more than 66 lb (30 kg).
It is intended for home and hospital use.
Contraindications
Positive airway pressure therapy may be contraindicated in some
patients with the following pre-existing conditions:
• severe bullous lung disease
• pneumothorax
• pathologically low blood pressure
• dehydration
• cerebrospinal fluid leak, recent cranial surgery, or trauma.
Adverse effects
You should report unusual chest pain, severe headache, or increased
breathlessness to your prescribing physician. An acute upper respiratory
tract infection may require temporary discontinuation of treatment.

2
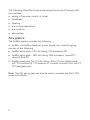
The following side effects may arise during the course of therapy with
the machine:
• drying of the nose, mouth, or throat
• nosebleed
• bloating
• ear or sinus discomfort
• eye irritation
• skin rashes.
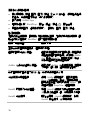
At a glance
The AirMini system includes the following:
• AirMini: the AirMini machine, power supply unit, drawstring bag
and one of the following:
• AirMini setup pack - F20: Air tubing, F20 connector OR
• AirMini setup pack - N20: Air tubing, N20 connector, HumidX™,
HumidX Plus OR
• AirMini mask pack for P10: Air tubing, AirFit P10 for AirMini mask
(M), P10 cushion (S), P10 cushion (L), HumidX, HumidX Plus, AirFit™
P10 headgear clips.
Note: The F20 set up pack can also be used to connect the AirFit F30
mask with AirMini.

English 3
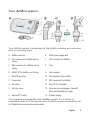
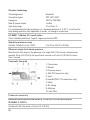
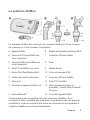
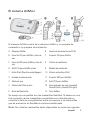
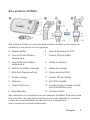
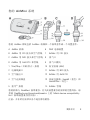
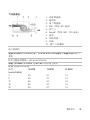
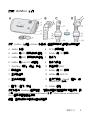
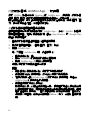
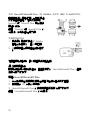
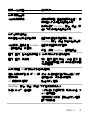
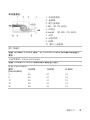
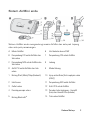
Your AirMini system
Your AirMini system is comprised of the AirMini machine and one mask
pack or one setup pack.
A AirMini machine 6 20W power supply unit
B F20 connector for AirMini and air
tubing
7 F20 connector for AirMini
C N20 connector for AirMini and air
tubing
8 Vent
D AirFit P10 for AirMini and tubing 9 Vent module
1 Start/Stop button 10
Anti Asphyxia Valve (AAV)
2 Power inlet 11 N20 connector for AirMini
3 Air outlet 12 AirFit P10 for AirMini
4 Air filter cover 13 Heat moisture exchanger - HumidX
(blue) and HumidX Plus (gray)
5
Bluetooth
®
button
14 AirMini tubing
Your machine is compatible with ResMed masks. For a full list of
compatible masks for this device, see the Mask device compatibility list
on ResMed.com/downloads/masks.

4
Note: Not all masks are available in all regions.
Make sure all parts and accessories used with the machine are
compatible. For compatibility information, refer to ResMed.com for
more information.
Your AirMini machine is designed to work with ResMed’s AirMini app.
However, the AirMini app is not essential to operate the machine. For
more information on the AirMini app, refer to Using your machine with
the AirMini app or the AirMini app Patient eHelp.
HumidX and HumidX Plus
The HumidX and HumidX Plus are waterless humidifiers. These are
designed to provide more comfort by improving the moisture level in
the air you breathe and offering relief from possible dryness.
The HumidX is a good starting point for finding the right level of
humidification. The HumidX Plus will improve the humidity level further
and is useful when the ambient humidity level is very low (eg, high
altitudes, on an aircraft).
The HumidX and HumidX Plus can be used with the N20 connector for
AirMini and AirFit P10 for AirMini only.
The HumidX and HumidX Plus must be replaced within 30 days of
opening the HumidX/HumidX Plus pack.

English 5
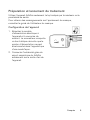
Setting up and starting therapy
Using your mask
Use your AirMini machine only as directed by your physician or
healthcare provider.
For information on fitting your mask, refer to the mask user guide.
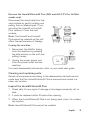
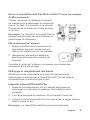
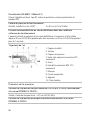
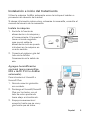
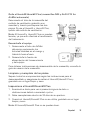
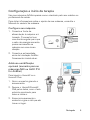
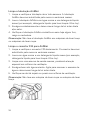
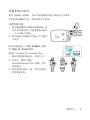
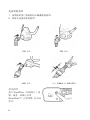
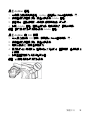
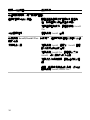
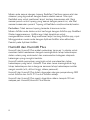
Set up your machine
1. Plug the power supply unit
into the machine and the
power outlet. The connector
has an angled edge so that
the power cord can only be
inserted into the machine
one way.
2. Connect the gray end of the
AirMini tubing firmly to the
air outlet.
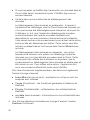
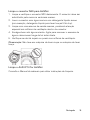
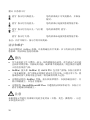
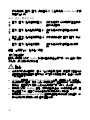
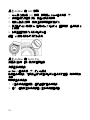
Add optional humidification
(for N20 or AirFit P10 for
AirMini masks only)
To insert the HumidX or HumidX
Plus:
1. Open the connector by gently
twisting it.
2. Hold the HumidX/HumidX Plus
at the sides, with the colored
side pointing down and insert
it.
3. Gently push together the
connector and twist until it
locks in place.

6
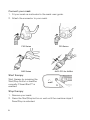
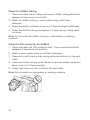
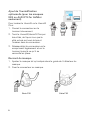
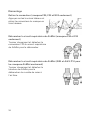
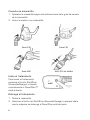
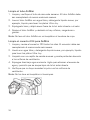
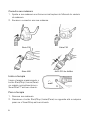
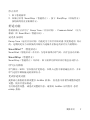
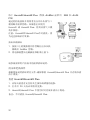
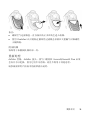
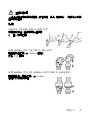
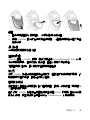
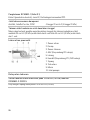
Connect your mask
1. Fit your mask as instructed in the mask user guide.
2. Attach the connector to your mask.
F20 Series
F30 Series
N20 Series
AirFit P10 for AirMini
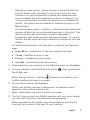
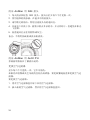
Start therapy
Start therapy by pressing the
Start/Stop button or breathe
normally if SmartStart™ is
enabled.
Stop therapy
1. Remove your mask.
2. Press the Start/Stop button or wait until the machine stops if
SmartStop is activated.

English 7
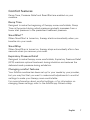
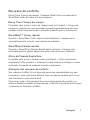
Comfort features
Ramp Time, Pressure Relief and SmartStart are enabled on your
machine.
Ramp Time
Designed to make the beginning of therapy more comfortable, Ramp
Time is the period during which pressure gradually increases from a
lower start pressure to the prescribed treatment pressure.
SmartStart™
When SmartStart is turned on, therapy starts automatically when you
breathe into your mask.
SmartStop
When SmartStop is turned on, therapy stops automatically after a few
seconds when you remove your mask.
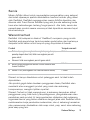
Expiratory Pressure Relief
Designed to make therapy more comfortable, Expiratory Pressure Relief
(EPR) maintains optimal treatment during inhalation and reduces the
delivered mask pressure during exhalation.
Changing comfort features
Your AirMini machine has been set up for your needs by your provider,
but you may find that you want to make small adjustments to comfort
settings to make your therapy more comfortable.
For more information about comfort settings, or for information on
changing these settings, refer to the AirMini app Patient eHelp.

8
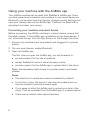
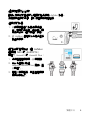
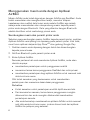
Using your machine with the AirMini app
Your AirMini machine can be used with ResMed’s AirMini app. Once
you have paired and connected your machine to your smart device via
Bluetooth, you can start and stop therapy, change comfort settings and
view your therapy data via the AirMini app. Data sent via Bluetooth is
encrypted to protect your privacy.
Connecting your machine and smart device
Before connecting the AirMini machine to a smart device, ensure that
the latest version of the AirMini app is installed on the smart device. If
not, download the app from the App Store
SM
or the Google Play store.
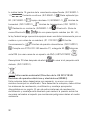
1. Ensure your machine is set up correctly and plugged into a power
source.
2. On your smart device, enable Bluetooth.
3. Open the AirMini app.
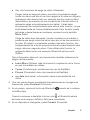
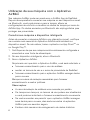
The first time you open the AirMini app, you will be asked to:
• provide consent for the use of analytics
• accept ResMed’s terms of use and privacy notice
• provide consent for the AirMini app to upload data to the cloud
Select the necessary check boxes to provide consent and accept
policies.
Notes:
• The check box for analytics consent is selected by default.
• From time to time, the terms of use may be updated and you
may be required to provide consent again.
• If you agree to allow the AirMini app to upload your data to the
cloud, it will be uploaded from the AirMini app to a secure server.
• There are two distinct data upload features:

English 9
Background data upload – allows the app to upload all data that
has not already been uploaded to the cloud without any user
interaction (ie, app automatically uploads data whenever new
data is available and active internet connection is present). You
must provide consent to enable this feature as it is disabled by
default. This feature can be enabled or disabled anytime on the
More screen.
On-demand data upload – clinician or patient-initiated feature that
uploads all data that has not already been sent to the cloud. This
feature can be used by clinician or patient regardless if
background data upload consent has been provided. To use this
feature, the app must have active Bluetooth connection with the
AirMini.
For additional information, links are also provided on the Welcome
page:
• Learn More – explanation of the way analytics are used
• Terms – ResMed’s terms of use
• Privacy – ResMed’s privacy notice
• my data – information about data privacy.
4. Once selections are complete on the Welcome page, tap Continue.
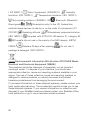
5. On your machine, press the Bluetooth button
when prompted by
the AirMini app.
When the light starts to flash blue
, Bluetooth is enabled on your
AirMini machine and ready to connect.
6. On your smart device, tap Connect.
When your AirMini machine is discovered, the machine name
appears in the machine selection list.
7. Select the machine name from the list to connect.
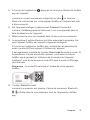
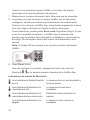
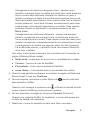
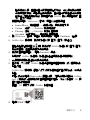
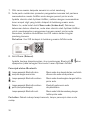
8. The first time you pair your AirMini machine with your smart device,
you will need to perform the authentication procedure.
When prompted by the AirMini app, authenticate by entering the
four-digit key located on the back of your machine.

10
Alternatively, you can tap Scan code. If permission has not been
granted already, you will be prompted by the AirMini app to allow
the use of your smart device's camera and then to position the
machine’s QR code within the camera's viewing frame.
Note: The QR code is located on the back of your AirMini machine.
9. Tap Done.
When successfully connected, the Bluetooth connection icon
is
displayed in the top right corner of the AirMini app.
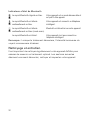
Bluetooth status indicators
Bluetooth indicator light is flashing
blue.
Your machine is in discoverable mode and
ready for pairing.
Bluetooth indicator light is constantly
blue.
Your machine is connected to your
smartphone.
Bluetooth indicator light is constantly
white (airplane mode).
Bluetooth on your machine is disabled.
Bluetooth indicator light is off. Your machine is not connected to your
smartphone.
Note: Once therapy starts, the indicator light will start to fade.

English 11
Cleaning and maintenance
It is important that you regularly clean your AirMini machine to make
sure you receive optimal therapy. The following sections will help you
with disassembly, cleaning and checking your machine.
WARNING
• As part of good hygiene, always follow cleaning instructions.
Some cleaning products may damage the air tubing and affect
its function, or leave harmful residual vapours that could be
inhaled if not rinsed thoroughly.
• The AirMini connectors and AirFit P10 for AirMini contain a vent
system to prevent carbon dioxide build-up in the mask. The vent
system must be kept clean and clear of contamination in order
to function correctly. Blocking or modifying the vent system
may result in excessive carbon dioxide rebreathing.
• Regularly clean your AirMini tubing, connectors and mask
components to receive optimal therapy and to prevent the
growth of germs that can adversely affect your health.
• Regularly inspect the HumidX/HumidX Plus and follow the
cleaning and maintenance instructions to prevent the growth of
germs that can adversely affect your health.
CAUTION
If any visible deterioration of a system component is apparent
(cracking, discoloration, tears etc.), the component should be
discarded and replaced.

12
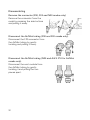
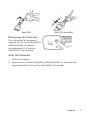
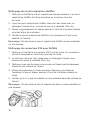
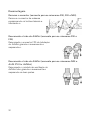
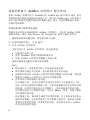
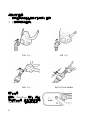
Disassembling
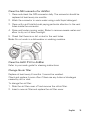
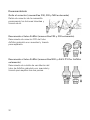
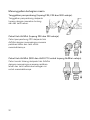
Remove the connector (F30, F20 and N20 masks only)
Remove the connector from the
mask by pressing the side buttons
and pulling it away.
Disconnect the AirMini tubing (F30 and F20 masks only)
Disconnect the F20 connector from
the AirMini tubing by gently
twisting and pulling it away.
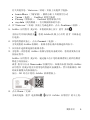
Disconnect the AirMini tubing (N20 and AirFit P10 for AirMini
masks only)
Disconnect the vent module from
the AirMini tubing by gently
twisting it and pulling the two
pieces apart.

English 13
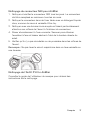
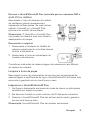
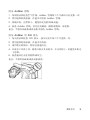
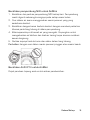
Remove the HumidX/HumidX Plus (N20 and AirFit P10 for AirMini
masks only)
Disconnect the mask tube from the
vent module by gently twisting and
pulling the two pieces apart. If you
are using the HumidX or HumidX
Plus, remove it from the vent
module.
Note: The HumidX and HumidX
Plus cannot be washed as this will
affect the performance of therapy.
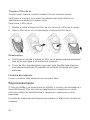
Unplug the machine
1. Disconnect the AirMini tubing
from the machine by pressing
the side buttons on the cuff and
pulling it away.
2. Unplug the power supply unit
from the power outlet and the
machine.
For mask disassembly instructions, refer to your mask user guide.
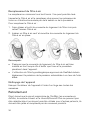
Cleaning and replacing parts
Detach all components according to the disassembly instructions and
make sure that the HumidX/HumidX Plus is removed and stored in a
clean, dry location.
Inspect the HumidX/HumidX Plus
1. Check daily for any signs of damage or blockages caused by dirt or
dust.
2. It must be replaced within 30 days after opening.
3.
When the HumidX/HumidX Plus is not being used, store it in a clean,
dry location.
Note: HumidX/HumidX Plus cannot be washed.

14
Clean the AirMini tubing
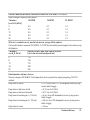
1. Clean and check the air tubing each week. AirMini tubing should be
replaced at least every six months.
2. Wash the AirMini tubing in warm water using a mild liquid
detergent.
3. Rinse thoroughly and allow to dry out of direct sunlight and/or heat.
4. Check the AirMini tubing and replace it if there are any holes, tears
or cracks.
Note: Do not wash the AirMini tubing in a dishwasher or washing
machine.
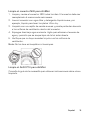
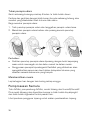
Clean the F20 connector for AirMini
1. Clean and check the F20 connector daily. The connector should be
replaced at least every six months.
2. Wash in warm water using a mild liquid detergent.
3. Clean with a soft bristle brush paying particular attention to the vent
holes.
4. Rinse well under running water. Shake to remove excess water and
allow to dry out of direct sunlight.
5. Check that there is no dirt or dust in the vent holes.
Note: Do not wash in a dishwasher or washing machine.

English 15
Clean the N20 connector for AirMini
1. Clean and check the N20 connector daily. The connector should be
replaced at least every six months.
2. Wash the connector in warm water using a mild liquid detergent.
3. Clean with a soft bristle brush paying particular attention to the vent
holes inside the connector.
4. Rinse well under running water. Shake to remove excess water and
allow to dry out of direct sunlight.
5. Check that there is no dirt or dust in the vent holes.
Note: Do not wash in a dishwasher or washing machine.
Clean the AirFit P10 for AirMini
Refer to your mask guide for cleaning instructions.
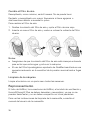
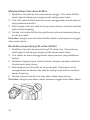
Change the air filter
Replace at least every 6 months. It cannot be washed.
Check and replace it more often if there are any holes or blockages
caused by dirt or dust.
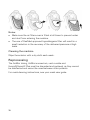
To change the air filter:
1. Slide the air filter cover off and remove the old air filter.
2. Insert a new air filter and replace the air filter cover.

16
Notes:
• Make sure the air filter cover is fitted at all times to prevent water
and dust from entering the machine.
• The use of ResMed approved hypoallergenic filter will result in a
small reduction in the accuracy of the delivered pressure at high
leaks.
Cleaning the machine
Wipe the exterior with a dry cloth each week.
Reprocessing
The AirMini tubing, AirMini connectors, vent module and
HumidX/HumidX Plus must be discarded and replaced, as they cannot
be disinfected and cannot be used between other patients.
For mask cleaning instructions, see your mask user guide.

English 17
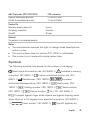
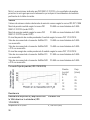
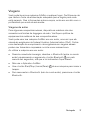
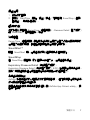
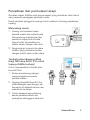
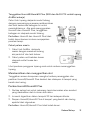
Traveling
You can take your AirMini machine with you wherever you go. Make
sure you have the appropriate power supply for the region you are
traveling to. For information on purchasing, contact your care provider.
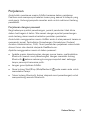
Traveling by airplane
For some airlines, medical devices do not count toward carry-on
luggage limits. Please check with your airline for their policy regarding
medical equipment.
You can use your AirMini machine on a plane as it meets the Federal
Aviation Administration (FAA) requirements. Air travel compliance
letters can be downloaded and printed from ResMed.com.
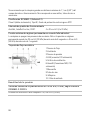
When using the machine on an airplane:
• When connected to power, disable Bluetooth (enter airplane mode)
by pressing and holding the Bluetooth button
for at least ten
seconds until the indicator light is white.
• Do not use the AirMini app.
• Use the Start/Stop button
on your machine to start therapy,
• To reconnect Bluetooth (exit airplane mode), press the Bluetooth
button.

18
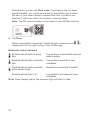
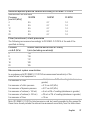
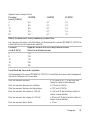
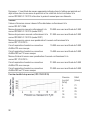
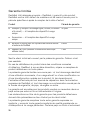
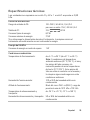
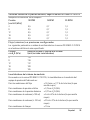
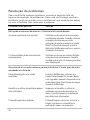
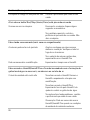
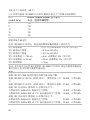
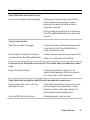
Troubleshooting
If you have any problems, have a look at the following troubleshooting
topics. If you are not able to fix the problem, contact your care provider
or ResMed. Do not try to open the machine.
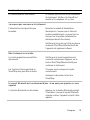
Problem/possible cause
Solution
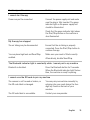
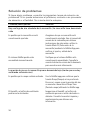
Air is leaking from around my mask / Mask is too noisy
Mask may be fitted incorrectly. Make sure your mask is fitted correctly.
See your mask user guide for fitting
instructions or run the Mask Fit function
using the AirMini app to check your mask
fit and seal.
The AirMini system may be assembled
incorrectly.
Make sure your AirMini system is correctly
assembled. Refer to Setting up and starting
therapy for more information.
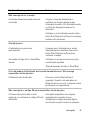
Air pressure in my mask seems too low / It feels like I am not getting enough air
Ramp may be in progress. Using the AirMini app, confirm the Ramp
function has been enabled. If so, wait for
air pressure to build up or turn Ramp Time
off using the AirMini app.
HumidX or vent might be blocked. Inspect the HumidX and vent for blockages
or damage. Refer to Cleaning and
maintenance for more information.
HumidX may be wet. The HumidX should be dry when starting
therapy. Check if HumidX is wet and
replace as necessary.
Page is loading ...
Page is loading ...
Page is loading ...
Page is loading ...
Page is loading ...
Page is loading ...
Page is loading ...
Page is loading ...
Page is loading ...
Page is loading ...
Page is loading ...
Page is loading ...
Page is loading ...
Page is loading ...
Page is loading ...
Page is loading ...
Page is loading ...
Page is loading ...
Page is loading ...
Page is loading ...
Page is loading ...
Page is loading ...
Page is loading ...
Page is loading ...
Page is loading ...
Page is loading ...
Page is loading ...
Page is loading ...
Page is loading ...
Page is loading ...
Page is loading ...
Page is loading ...
Page is loading ...
Page is loading ...
Page is loading ...
Page is loading ...
Page is loading ...
Page is loading ...
Page is loading ...
Page is loading ...
Page is loading ...
Page is loading ...
Page is loading ...
Page is loading ...
Page is loading ...
Page is loading ...
Page is loading ...
Page is loading ...
Page is loading ...
Page is loading ...
Page is loading ...
Page is loading ...
Page is loading ...
Page is loading ...
Page is loading ...
Page is loading ...
Page is loading ...
Page is loading ...
Page is loading ...
Page is loading ...
Page is loading ...
Page is loading ...
Page is loading ...
Page is loading ...
Page is loading ...
Page is loading ...
Page is loading ...
Page is loading ...
Page is loading ...
Page is loading ...
Page is loading ...
Page is loading ...
Page is loading ...
Page is loading ...
Page is loading ...
Page is loading ...
Page is loading ...
Page is loading ...
Page is loading ...
Page is loading ...
Page is loading ...
Page is loading ...
Page is loading ...
Page is loading ...
Page is loading ...
Page is loading ...
Page is loading ...
Page is loading ...
Page is loading ...
Page is loading ...
Page is loading ...
Page is loading ...
Page is loading ...
Page is loading ...
Page is loading ...
Page is loading ...
Page is loading ...
Page is loading ...
Page is loading ...
Page is loading ...
Page is loading ...
Page is loading ...
Page is loading ...
Page is loading ...
Page is loading ...
Page is loading ...
Page is loading ...
Page is loading ...
Page is loading ...
Page is loading ...
Page is loading ...
Page is loading ...
Page is loading ...
Page is loading ...
Page is loading ...
Page is loading ...
Page is loading ...
Page is loading ...
Page is loading ...
Page is loading ...
Page is loading ...
Page is loading ...
Page is loading ...
Page is loading ...
Page is loading ...
Page is loading ...
Page is loading ...
Page is loading ...
Page is loading ...
Page is loading ...
Page is loading ...
Page is loading ...
Page is loading ...
Page is loading ...
Page is loading ...
Page is loading ...
Page is loading ...
Page is loading ...
Page is loading ...
Page is loading ...
Page is loading ...
Page is loading ...
Page is loading ...
Page is loading ...
Page is loading ...
Page is loading ...
Page is loading ...
Page is loading ...
Page is loading ...
Page is loading ...
Page is loading ...
Page is loading ...
Page is loading ...
Page is loading ...
Page is loading ...
Page is loading ...
Page is loading ...
Page is loading ...
Page is loading ...
Page is loading ...
Page is loading ...
Page is loading ...
Page is loading ...
Page is loading ...
Page is loading ...
Page is loading ...
Page is loading ...
Page is loading ...
Page is loading ...
Page is loading ...
Page is loading ...
Page is loading ...
Page is loading ...
Page is loading ...
Page is loading ...
Page is loading ...
Page is loading ...
Page is loading ...
Page is loading ...
Page is loading ...
Page is loading ...
Page is loading ...
Page is loading ...
Page is loading ...
Page is loading ...
Page is loading ...
Page is loading ...
Page is loading ...
Page is loading ...
Page is loading ...
Page is loading ...
Page is loading ...
Page is loading ...
Page is loading ...
Page is loading ...
Page is loading ...
Page is loading ...
Page is loading ...
Page is loading ...
Page is loading ...
Page is loading ...
Page is loading ...
Page is loading ...
Page is loading ...
Page is loading ...
Page is loading ...
Page is loading ...
Page is loading ...
Page is loading ...
-
 1
1
-
 2
2
-
 3
3
-
 4
4
-
 5
5
-
 6
6
-
 7
7
-
 8
8
-
 9
9
-
 10
10
-
 11
11
-
 12
12
-
 13
13
-
 14
14
-
 15
15
-
 16
16
-
 17
17
-
 18
18
-
 19
19
-
 20
20
-
 21
21
-
 22
22
-
 23
23
-
 24
24
-
 25
25
-
 26
26
-
 27
27
-
 28
28
-
 29
29
-
 30
30
-
 31
31
-
 32
32
-
 33
33
-
 34
34
-
 35
35
-
 36
36
-
 37
37
-
 38
38
-
 39
39
-
 40
40
-
 41
41
-
 42
42
-
 43
43
-
 44
44
-
 45
45
-
 46
46
-
 47
47
-
 48
48
-
 49
49
-
 50
50
-
 51
51
-
 52
52
-
 53
53
-
 54
54
-
 55
55
-
 56
56
-
 57
57
-
 58
58
-
 59
59
-
 60
60
-
 61
61
-
 62
62
-
 63
63
-
 64
64
-
 65
65
-
 66
66
-
 67
67
-
 68
68
-
 69
69
-
 70
70
-
 71
71
-
 72
72
-
 73
73
-
 74
74
-
 75
75
-
 76
76
-
 77
77
-
 78
78
-
 79
79
-
 80
80
-
 81
81
-
 82
82
-
 83
83
-
 84
84
-
 85
85
-
 86
86
-
 87
87
-
 88
88
-
 89
89
-
 90
90
-
 91
91
-
 92
92
-
 93
93
-
 94
94
-
 95
95
-
 96
96
-
 97
97
-
 98
98
-
 99
99
-
 100
100
-
 101
101
-
 102
102
-
 103
103
-
 104
104
-
 105
105
-
 106
106
-
 107
107
-
 108
108
-
 109
109
-
 110
110
-
 111
111
-
 112
112
-
 113
113
-
 114
114
-
 115
115
-
 116
116
-
 117
117
-
 118
118
-
 119
119
-
 120
120
-
 121
121
-
 122
122
-
 123
123
-
 124
124
-
 125
125
-
 126
126
-
 127
127
-
 128
128
-
 129
129
-
 130
130
-
 131
131
-
 132
132
-
 133
133
-
 134
134
-
 135
135
-
 136
136
-
 137
137
-
 138
138
-
 139
139
-
 140
140
-
 141
141
-
 142
142
-
 143
143
-
 144
144
-
 145
145
-
 146
146
-
 147
147
-
 148
148
-
 149
149
-
 150
150
-
 151
151
-
 152
152
-
 153
153
-
 154
154
-
 155
155
-
 156
156
-
 157
157
-
 158
158
-
 159
159
-
 160
160
-
 161
161
-
 162
162
-
 163
163
-
 164
164
-
 165
165
-
 166
166
-
 167
167
-
 168
168
-
 169
169
-
 170
170
-
 171
171
-
 172
172
-
 173
173
-
 174
174
-
 175
175
-
 176
176
-
 177
177
-
 178
178
-
 179
179
-
 180
180
-
 181
181
-
 182
182
-
 183
183
-
 184
184
-
 185
185
-
 186
186
-
 187
187
-
 188
188
-
 189
189
-
 190
190
-
 191
191
-
 192
192
-
 193
193
-
 194
194
-
 195
195
-
 196
196
-
 197
197
-
 198
198
-
 199
199
-
 200
200
-
 201
201
-
 202
202
-
 203
203
-
 204
204
-
 205
205
-
 206
206
-
 207
207
-
 208
208
-
 209
209
-
 210
210
-
 211
211
-
 212
212
-
 213
213
-
 214
214
-
 215
215
-
 216
216
-
 217
217
-
 218
218
-
 219
219
-
 220
220
-
 221
221
-
 222
222
-
 223
223
-
 224
224
-
 225
225
-
 226
226
-
 227
227
-
 228
228
-
 229
229


Ask a question and I''ll find the answer in the document
Finding information in a document is now easier with AI
in other languages
- français: ResMed AirMini Mode d'emploi
- español: ResMed AirMini Guía del usuario
- português: ResMed AirMini Guia de usuario
Related papers
-
ResMed AirMini User guide
-
ResMed AirFit N20 for Her Size guide
-
ResMed AirTouch N20 CPAP Nasal Mask Fitting Owner's manual
-
ResMed AirFit F30i User guide
-
ResMed AirFit P10 Assembly Instructions
-
-
-
-
ResMed AirMini FCC Owner's manual
-
ResMed P10 User manual
Other documents
-
Stairmaster AirFit Owner's manual
-
Gima 53701 Owner's manual
-
Apex Digital XT Fit User manual
-
Vax Air Mini Complete Owner's manual
-
Vax C86-VC-T-B User manual
-
 Sefam Ecostar Practitioner And Home Care Provider Manual
-
Philips HU4801/30 User manual
-
Bard Magic3 Go Quick start guide
-
Panasonic SCPMX100BEG Operating instructions
