Page is loading ...

Kramer Electronics, Ltd.
USER MANUAL
Models:
SV-551, SV-551 ALC
Processor / Switcher SummitView™ Essentials Kit

Contents
i
Contents
1 Introduction 1
2 Getting Started 1
PART I Your SummitView™ System 2
3 Overview 2
3.1 Your SummitView™ Essentials Kit and SV-551 ALC 2
3.2 Quick Start Configuration Setup 3
3.3 8-Step Essentials Kit Quick Installation Guide 4
PART II The SV-551 SummitView™ Processor/Switcher 6
4 Defining the SV-551 SummitView™ Processor/Switcher 6
4.1 DDC Support 9
PART III Detailed Installation Instructions 10
4.2 Defining the RC-63DL Room Controller 10
4.3 Defining the SV-301 and SV-302 Wall Plates 12
4.4 SV-301 and SV-302 (U.S.) 13
4.5 SV-301 and SV-302 (England and Europe) 14
4.6 Connecting the Wall Plates 15
4.7 Operating the SV-551 Remotely 17
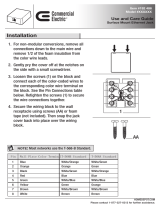
5 Installing Optional Ceiling Speakers 18
5.1 Choosing the Best Location 18
5.2 Cutting the Ceiling Tile 18
5.3 Installing the Closed-back Ceiling Speakers 19
5.4 Painting the Speaker 23
5.5 Connecting Several Speakers 23
5.5.1 Adjusting the Tap Selector 24
5.6 Connecting the SV-551 SummitView™ Processor/Switcher 25
5.7 Operating the SV-551 Remotely 26
5.8 Installing the SV-551 in a 19” RK-551 Rack (Option) 27
PART IV Further information 28
6 ADA Requirements 28
7 Customizing the Controllers' Buttons and Labels 30
7.1 Backlit Buttons 30
7.2 Button Labels Sheet 31
8 Wiring the CAT 5 LINE IN/LINE OUT RJ-45 Connectors 31
8.1 Wiring the CAT 5 RJ-45 Terminals (U.S.) 32
8.2 Wiring the Terminal Block Connector (England and Europe) 32

KRAMER: SIMPLE CREATIVE TECHNOLOGY
Contents
ii
9 SummitView™ System Cables 33
10 SummitView™ Cable Termination (Connector-to-Cable) 35
11 Technical Specifications 37
12 Detachable SummitView™ Essentials Kit Check List 39
Figures
Figure 1: SV-551 SummitView™ Processor/Switcher 7
Figure 2: SV-551 Processor/Switcher Underside 7
Figure 3: Connecting the SV-301 to the SV-551 15
Figure 4: Connecting the SV-302 to the SV-551 16
Figure 5: Connecting the SV-303/SV-304/SV-305 to the SV-551 17
Figure 6: Closed-back Ceiling Speakers 19
Figure 7: Installing the Closed-back Ceiling Speakers 20
Figure 8: Wiring a Pair of Speakers to the SV-551 21
Figure 9: Plugging and Securing the Cables 21
Figure 10: Tighten the Mounting Tabs 22
Figure 11: Closed-back Ceiling Speaker Schematic Diagram 24
Figure 12: Adjust Tap Selector 24
Figure 13: Connecting the SV-551 SummitView™ Processor/Switchers 25
Figure 14: Wiring the K-Net Connector 26
Figure 15: Overhead and Side Clearance Requirements 28
Figure 16: High/Low Forward, Side, and Over Obstruction Reach Limit Requirements 30
Figure 17: Sample "Button Labels" Sheet 31
Figure 18: Stickers affixed to Cables 36
Tables
Table 1: Quick Installation Guide for the SummitView™ Standard Kit 4
Table 2: SV-551 Front, Rear, and Underside Features 7
Table 3: Defining the RC-63DL 11
Table 4: Defining the SV-301 and SV-302 (U.S.) 13
Table 5: Defining the SV-301 (England and Europe) 14
Table 6: Defining the SV-302 (England and Europe) 14
Table 7: Closed-back Ceiling Speakers Hardware Items 20
Table 8: CAT 5 Pinout (U.S.) 32
Table 9: Terminal block Connector Pinout (England and Europe) 33
Table 10: Cables included with the SV-551 SummitView™ Essentials Kit and SV-551 ALC 33
Table 11: Additional Recommended Cables for the SV-551 SummitView™ 35
Table 12: SummitView™ Cable Termination 35
Table 13: Technical Specifications of the SV-551 37
Table 14: SummitView™ Essentials Kit Check List 39

Introduction
1
1 Introduction
Welcome to Kramer Electronics! Since 1981, Kramer Electronics has been
providing a world of unique, creative, and affordable solutions to the vast range of
problems that confront the video, audio, presentation, and broadcasting
professional on a daily basis. In recent years, we have redesigned and upgraded
most of our line, making the best even better! Our 1,000-plus different models now
appear in 11 groups
1
Congratulations on purchasing your Kramer SummitView™ system! This user
manual comprises of four parts:
that are clearly defined by function.
PART I: A description of the SummitView™ system, its devices including a quick
start section
PART II: A definition of the SV-551 SummitView™ Processor/Switcher
PART III: Detailed installation instructions - installing the Wall Plates, the Ceiling
Speakers, and the SV-551 SummitView™ Processor/Switcher
PART IV: Further information
2 Getting Started
We recommend that you:
• Unpack the equipment carefully and save the original boxes and
packaging materials for possible future shipment
• Check that your SummitView™ Kit is complete. Use the check list in
Table 14 to verify the contents of the kit
• Review the contents of this user manual
2
1 GROUP 1: Distribution Amplifiers; GROUP 2: Switchers and Matrix Switchers; GROUP 3: Control Systems; GROUP 4:
Format/Standards Converters; GROUP 5: Range Extenders and Repeaters; GROUP 6: Specialty AV Products; GROUP 7: Scan
Converters and Scalers; GROUP 8: Cables and Connectors; GROUP 9: Room Connectivity; GROUP 10: Accessories and Rack
Adapters; GROUP 11: Sierra Products
2 Download up-to-date Kramer user manuals from http://www.kramerelectronics.com

KRAMER: SIMPLE CREATIVE TECHNOLOGY
Overview
2
PART I Your SummitView™ System
PART I describes the SummitView™ system and its devices
3 Overview
We have designed a complete and simple solution for the integration of media and
control in classrooms, training rooms and presentation rooms. SummitView™ is as
easy to use as it is to specify and install. The components that make up the
SummitView™ system are available as either standalone products or as a Kit with
everything included - wall plates, room controllers, amplifier, speakers, cable and
enclosures ready to be mounted to projection mounts is included. With
SummitView™ you get everything you need for a high end integrated media system –
just add the displays and sources. All the signals are transmitted over economical
CAT 5 cable and switched using the SV-551 Switcher/Processor. The
SummitView™ System controlled via the network is everything you need from the
company you can count on for quality products and the ultimate in customer support –
Kramer Electronics.
The SV-551 ALC version is aimed at installers who prefer to design their own
SummitView installations. The SV-551 ALC kit differs from the standard SV-551
kit only in regards to the contents of the box.
3.1 Your SummitView™ Essentials Kit and SV-551 ALC
This section defines the SummitView™ Essentials Kit and the SV-551 ALC box
contents.
The SummitView™ Essentials Kit contains:
• SV-551 Processor/Switcher
• RC-63DL Room Controller
• SV-301 and SV-302 Wall Plate Devices
• SPK-CC444 Speakers (ordered separately)
• Required cables (for full details see Section
9)
• Check List (see
Table 14)
• Screwdrivers (provided with the RC-62, RC-63 and SV-551)
The SV-551 ALC kit contains:
• SV-551 Processor/Switcher
• Reduced cable set (for details, see Section
9)
The following additional products are available for purchase (optional):

Overview
3
• SV-301, SV-302, SV-303, SV-304, and SV-305 Wall Plate Devices
1
• RC-62 Series (RC-62, RC-62L), RC-63A Series (RC-63A, RC-63AL),
and RC-63D Series (RC-63D, RC-63DL) Room Controllers
2
• SPK-CC688, SPK-CC448, SPK-CC348F Speakers
• MT-P9P 9” and MT-P6P 6” center pole sections for the SV-1 Mounting
Box which can be attached to any 1.5NFS projector mounting system
• SV-1 Pole Mounting Box which can be attached to any 1.5NFS projector
mounting system
• Additional TP cables (see Section
9)
The following items are not provided by Kramer:
• Projector (or display device)
• Screen (and mounting hardware)
• Source devices, such as, DVD/VCR player, scanner, or computer
To achieve the best performance:
• Consider the condition of the room—its size, the way it is arranged,
whether the walls and ceiling are drywall or cement—that may limit
where and how you can install SummitView™, where required, refer to
the ADA requirements (see Section
6)
Where an internal installation is impractical (for example, if the walls
and ceiling are constructed of cement and you do not want to drill inside
them), you can install the SummitView™ Kit externally, that is, install
the SV-551 in a rack (see Section
5.8)
• Connect only good quality connection cables and avoid interference from
neighboring electrical appliances and position your SummitView™ away
from moisture, and excessive sunlight
3.2 Quick Start Configuration Setup
Refer to the color configuration page included with your SummitView™ Kit.
1 Download the user manual: SV-301, SV-302, SV-303, SV-304, SV-305 from http://www.kramerelectronics.com
2 Download the user manual: RC-62, RC-63A and RC-63D Series from
http://www.kramerelectronics.com

KRAMER: SIMPLE CREATIVE TECHNOLOGY
Overview
4
3.3 8-Step Essentials Kit Quick Installation Guide
This data summarizes how to install your SummitView™ Essentials Kit (similar
principles apply if you are installing other SummitView™ configurations).
Table 1: Quick Installation Guide for the SummitView™ Standard Kit
Description
1 Prepare the openings for the Wall Plates
SV-301 and SV-302, and the Room
Controller RC-63DL
2 Route the wiring from the proposed
location of the SV-551 via:
1. Two STP cables
1
2. One STP cable to the intended
SV-302 location
to the intended
SV-301 location
3. K-NET cabling to the intended
RC-63DL location
4. Speakers cabling to the
speakers’ intended location
5. If the SV-551 and/or the RC-63DL
are to be used as room controllers,
route the appropriate control
cables to their intended locations
3 Install the Wall Plates by connecting the:
1. STP cables to the wall plates and installing the wall plate
2. BCP-KNET-50 cable to the RC-63DL and installing the RC-63DL
(see Section
7)
4 Install the Ceiling Speakers
1 There are two types of STP cable provided with SummitView™: CP-STP-50 (plenum-rated for the SummitView™ US) or C-STP-50
(non-plenum for the SummitView™ Europe)

Overview
5
Description
5 Connect the appropriate wiring—STP, and BCP-2S-25—from the wall
plates and the RC-63DL and from the SV-551 to the speakers
6 Connect the cables to the SV-551
7 Install the projector and the screen. Connect the projector to the
SV-551 video outputs using the supplied video cables. Connect the
RS-232 cable between the SV-551 and the projector.
8 Turn ON the SV-551 and the projector. By choosing the input
channels of the SV-551 (from the front panel buttons) and of the
projector you should be able to switch between inputs connected to
the different wall plates

KRAMER: SIMPLE CREATIVE TECHNOLOGY
Defining the SV-551 SummitView™ Processor/Switcher
6
PART II The SV-551 SummitView™ Processor/Switcher
PART II defines the SV-551 SummitView™ Processor/Switcher
4 Defining the SV-551 SummitView™ Processor/Switcher
The Kramer SV-551 SummitView™ Processor/Switcher is designed specifically
for the SummitView™ system and is an integral part of it. It fits inside the SV-1
housing. The SV-551 can only be controlled via the default RC-63DL or via one of
the other (optional) controllers: RC-62 and RC-62L, or the RC-63A, RC-63AL
and RC-63D. The SV-551 features CAT 5 video and audio inputs (including
optional DDC for VGA). It also has an IR output for video sources and features a
Master controller, as well as a power amplifier and audio line out. The SV-551
front panel controls include five input selector buttons, three LEDs, and a USB
port. It receives input signals via the RJ-45 CAT 5 connectors from the SV-301,
SV-302, SV-303, SV-304, and the SV-305 wall plate devices. The SV-551 RJ-45
CAT 5 inputs include: two for video, three for computers, and three DDC
connectors.
The SV-551 has a projector output on a 15-pin HD connector, one component
video on three RCA connectors, two composite video outputs, each on an RCA
connector, and an s-Video output on a 4p connector. In addition, the SV-551
features terminal blocks for a balanced stereo audio speakers output, terminal
blocks for an AUX input, 10V volume, relays, RS-232, and RS-485. The SV-551 is
controlled by one of Kramer's SV controllers (RC-62 or RC-63) via the proprietary
communication channel K-NET, and can also be controlled via the Ethernet and/or
the front panel input selector buttons. The SV-551 is 12VDC fed.

Defining the SV-551 SummitView™ Processor/Switcher
7
Figure 1, Figure 2 and Table 2 define the SV-551 SummitView™
Processor/Switcher.
Figure 1: SV-551 SummitView™ Processor/Switcher
Figure 2: SV-551 Processor/Switcher Underside
Table 2: SV-551 Front, Rear, and Underside Features
#
Feature
Function
1 POWER LED Lights when receiving power to the unit
2 AUTO LED Lights when the unit is configured to automatically identify and select
an input according to a set priority
3 LOCK LED Lights when the front panel buttons are locked

KRAMER: SIMPLE CREATIVE TECHNOLOGY
Defining the SV-551 SummitView™ Processor/Switcher
8
# Feature Function
4
INPUT Buttons
(used for testing)
VIDEO 1 Press to select the video source 1
5 VIDEO 2 Press to select the video source 2
6 PC 1 Press to select the PC 1 source
7 PC 2 Press to select the PC 2 source
8 PC 3 Press to select the PC 3 source
9 PROGRAM Connector Connect to a computer for configuration of the unit (a USB cable is
provided with the Controller)
10 ETHERNET Connector Connects to the PC or other Controller through computer networking,
for control and configuration of the unit. Default IP settings:
Address 192.168.1.39, port 50000, subnet mask 255.255.255.0
11 K-NET
1
PIN GND is for the Ground connection;
PIN B (-) and PIN A (+) are for RS-485,
and PIN +12V is for powering the unit.
For details of how to connect K-NET, see
Connector
Figure 14
12 LINE OUT Terminal Block Connect to an external audio amplifier
13 TERM DIP-switches DIP-switches for line termination of the unit (DIP-switch 1 is for KNET,
DIP-switch 2 is for RS-485)
14 RS-232 DB 9M Port Connects to the projector for projector control
15 PROJECTOR 15-pin HD
connector
Connects to the projector
16 SPKR Terminal Block Connect to the left and right speakers
17 AUX IN Terminal Block Connect to an additional audio source for mixing it with the audio line
level input (talk over)
18 10V VOL Terminal Block Connect to an external potentiometer on a wall plate
2
19
to adjust the
volume of the speakers
RELAY Terminal Block Connect to a room item (such as lighting, screen settings, blinds, and
so on)
20 RS-232 Terminal Block Connect to the RS-232 connector on the A/V equipment or a PC or other
Serial Controller
21 RS-485 Terminal Block Connect to the RS-485 detachable terminal block on a switcher or PC
22 IR OUT Terminal Block Control a machine via an IR Emitter
23 CV RCA Connector Connect to the composite video 1 input of the projector
24 CV RCA Connector Connect to the composite video 2 input of the projector
25 s-Video 4p Connector Connect to the s-Video input of the projector
26 PR RCA Connector
27 Y RCA Connector Connect to the component video input of the projector
28 PB RCA Connector
29 VIDEO 1 RJ-45 Connector Connect to the video 1 source via the CAT 5 socket on the rear of the
SV-302 or SV-303
1 K-NET is a proprietary Kramer protocol for interconnecting Kramer units
2 For example, the RC-63A

Defining the SV-551 SummitView™ Processor/Switcher
9
# Feature Function
30 PC 1 RJ-45 Connector Connect to the PC 1 source via the CAT 5 socket on the rear of the
SV-301.
Alternatively, connect to a Component video source (via the
SV-304 or the SV-305). The relevant DDC connector, when also
connected, can be used for IR control of that source
31 PC 2 RJ-45 Connector Connect to the PC 2 source via the CAT 5 socket on the rear of the
SV-301.
Alternatively, connect to a Component video source (via the
SV-304 or the SV-305). The relevant DDC connector, when also
connected, can be used for IR control of that source
32 PC 3 RJ-45 Connector Connect to the PC 3 source via the CAT 5 socket on the rear of the
SV-301.
Alternatively, connect to a Component video source (via the
SV-304 or the SV-305). The relevant DDC connector, when also
connected, can be used for IR control of that source
33 VIDEO 2 RJ-45 Connector Connect to the video 2 source via the CAT 5 socket on the rear of the
SV-302 or SV-303
34 DDC 1 RJ-45 Connector
Connect
1
35
to the CAT 5 socket on the rear of the SV-301 (DDC option)
DDC 2 RJ-45 Connector
Connect
1
to the CAT 5 socket on the rear of the SV-301 (DDC option)
36 DDC 3 RJ-45 Connector
Connect
1
to the CAT 5 socket on the rear of the SV-301 (DDC option)
37 12V DC +12V DC connector for powering the unit
38 FIRMWARE UPGRADE
Switch
For technical support use only
39 FACTORY RESET Button Press and hold while powering up the unit to reset the audio,
switching and Ethernet settings to their factory default values
4.1 DDC Support
When establishing a VGA connection between a PC or laptop and a display device,
a set of parameters known as EDID are exchanged between them, which is carried
over the DDC channel. In some PC graphic cards and laptops, this information
exchange is essential for proper VGA OUT operation.
When the SV-551 is connected to the SV-301 with two STP cables it supports
DDC communication between the connected PC or laptop and the Display device
used, thus ensuring trouble free VGA transmission.
For proper operation of the DDC support, select the appropriate PC IN channel of
the SV-551 before turning on the VGA OUT of your laptop.
1 Connect to the DDC for the transfer of specification data from the display device to the source properties, such as maximum resolution
and color depth. The video card can then use this information to ensure that the user is presented with valid options for configuring the
display

KRAMER: SIMPLE CREATIVE TECHNOLOGY
Defining the SV-551 SummitView™ Processor/Switcher
10
PART III Detailed Installation Instructions
PART III covers these topics: installing the Wall Plates, the Ceiling Speakers and the SV-551
We recommend that after deciding where you want to install the screen and the
projector, you install in this order, the:
1. Cables and wires.
2. Room Controller and wall plates (see Section
4.2 and Section 4.3).
3. Ceiling speakers (see Section
5).
4.2 Defining the RC-63DL Room Controller
This section defines the default Kramer SummitView™ RC-63DL Room
Controller, which is included as part of the SummitView™ Essentials Kit.
The RC-62 and RC-63A are also available for additional purchase (optional).
Refer to the separate user manual: RC-62, RC-63A and RC-63D Series
1
9
. Note,
that each SummitView™ kit comes with the appropriate set of cables included (see
Section ). Each room controller can be used as:
• A system controller for the SummitView™ system when connected via
K-Net cable to the SV-551 SummitView™ Processor/Switcher. When
used in this way no programming of the room controller is needed
• An advanced, standalone, wall-mounted room controller. When used in
this way programming of the room controller is required
2
The Kramer RC-63DL is a 2 Gang wall plate. It features 6 front panel buttons
designed in 2 groups; 1 group of 2 buttons, and another group of 4 buttons. Each
group can be programmed according to the user's requirements. LCD and plastic
cap variations are available. It has a digital volume control adjustment knob with 5
LEDs.
The RC-63DL includes 2 relays for the simplified and centralized control of room
functions (such as lighting, closing blinds, screen settings, and so on), an IR output,
a bi-directional RS-232 port, and 2 K-Net ports. In addition, the RC-63DL
features an IR-learner for the customized control of external sources, absorbing the
IR commands from different remote transmitters. A USB port is included for
programming the RC-63DL via a computer.
Table 3 defines the RC-63DL.
1 It includes these models: RC-62, RC-62L (the RC-62 Series); RC-63A and RC-63AL (the RC-63A Series) and RC-63D and RC-63DL
(the RC-63D Series)
Download it from
http://www.kramerelectronics.com
2 Refer to the separate online “K-Config Configuration Guide” at
http://www.kramerelectronics.com

Defining the SV-551 SummitView™ Processor/Switcher
11
Table 3: Defining the RC-63DL
1
#
Feature
Function
1 SOURCE
Buttons
These 4 configurable backlit
buttons can set up any
supported command
(see Section 8.1
)
"SOURCES" is printed on the panel, or it
is left blank to affix your own label (see
Figure 17 in Section 7), or an LCD version
on a blue background is available that
displays up to 8 characters at once
(programmed via the USB port) and
includes rolling text
2 DISPLAY
Buttons
These 2 configurable backlit
buttons can set up any
supported command (see
Section
7.1)
" DISPLAY " is printed on the panel, or it is
left blank to affix your own label (see
Figure 17 in Section 7), or an LCD version
on a blue background is available that
displays up to 8 characters at once
(programmed via the USB port) and
includes rolling text
3 VOLUME
LED
Lights red, indicating
maximum volume
4 VOLUME
LEDs
Lights green, indicating
volume level
5 VOLUME
Knob
Rotate clockwise to increase
the level
#
Feature
Function
1 FIRMWARE
UPGRADE Switch
For technical support use only
2 K-NET TERM
Switch
For line termination
3 PROGRAM (USB)
Connector
Connect to a computer for unit
configuration
4 IR IN Receiver Receives IR remote commands
5 RELAY Connections Connect to room items (such as
lighting, screen settings, blinds,
and so on)
6 IR Connections Control a machine via an IR
Emitter
7 RS-232
Connections
Connect to the RS-232 connector
on the A/V equipment or a PC or
other Serial Controller
8 K-NET 2
Connections
On K-NET 1 and K-NET 2, PIN
GND is for the Ground
connection
2
9
; PIN B (-) and PIN
A (+) are for RS-485, and PIN
+12V is for powering the unit
K-NET 1
Connections
(K-Net is a proprietary protocol for interconnecting
Kramer units)
10 FACTORY RESET
Button
Press and hold while powering
up the unit to reset the audio,
switching and Ethernet settings
to their factory default values
11 Grounding Screw Connects to the grounding wire
1 US version is shown. For the European version, see the RC-62, RC-63A and RC-63D Series user manual
2 The ground connection is sometimes connected to the shield of the RS-485 cable (in most applications, it is not connected)

KRAMER: SIMPLE CREATIVE TECHNOLOGY
Defining the SV-551 SummitView™ Processor/Switcher
12
4.3 Defining the SV-301 and SV-302 Wall Plates
The SV-301 and SV-302 are included as part of the SummitView™ Essentials Kit.
Note, that each SummitView™ kit comes with the appropriate set of cables
included (see Section
9
). STP cabling 50' (15.24m)
1
9
long is provided for these wall
plates (see Section ) with the Essentials Kit. When required, longer STP cabling
can be used, but we recommend a maximum distance of 100' (30.48m). Exceeding
this recommended distance may result in reduced image quality. For the TP pinout
see Section
8.
The SV-301, SV-302, SV-303, SV-304 and SV-305 are also available for
additional purchase (optional)
2
4.4. Section and Section 4.5 define the SV-301 and
SV-302 for the United States and Europe respectively. When purchased separately,
SV wall plates are supplied without cables. For details regarding recommended TP
cables, refer to Section 9
.
Advanced
User Tip
The SV-302 IR OUT port enables remote IR control (this requires the
appropriate programming of the SV-551) over the source connected
to it (a DVD player, a VHS player and so on).
1 Plenum-rated for the SummitView™ US version; non-plenum for the SummitView™ Europe
2 Download the user manual: SV-301, SV-302, SV-303, SV-304, SV-305 from
http://www.kramerelectronics.com

Defining the SV-551 SummitView™ Processor/Switcher
13
4.4 SV-301 and SV-302 (U.S.)
Table 4 defines the front and rear views of the SV-301 and SV-302.
Table 4: Defining the SV-301 and SV-302 (U.S.)
SV-301
2 RJ-45 Connectors
SV-302
1 RJ-45 Connector
#
Feature
Function
1 ON LED Lights red when receiving power
(when no signal is detected);
lights green when receiving a
signal
2 COMPUTER
IN 15-pin HD
Connector
Connect to the computer
graphics source
3 AUDIO IN
3.5mm Mini
Plug
Connects to the audio source
#
Feature
Function
1 L AUDIO IN
RCA Connector
Connect to the left
analog audio source
2 ON LED Lights red when
receiving power (when
no signal is detected);
lights green when
receiving a signal
3 R AUDIO IN
RCA Connector
Connect to the right
analog audio source
4 VIDEO IN RCA
Connector
Connect to the composite
video source
5 IR OUT 3.5mm
Mini Plug
Connect to a machine via
an IR Emitter

KRAMER: SIMPLE CREATIVE TECHNOLOGY
Defining the SV-551 SummitView™ Processor/Switcher
14
4.5 SV-301 and SV-302 (England and Europe1
The SV-301 and SV-302 are 1 Gang wall plate inserts. The SV-301 has two
terminal block connectors at the rear and the SV-302 has one.
)
Table 5: Defining the SV-301 (England and Europe)
2
#
Feature
Function
1 ON LED Lights red when receiving
power (when no signal is
detected); lights green
when receiving a signal
2 COMPUTER IN
15-pin HD
Connector
Connect to the computer
graphics source
3 AUDIO IN 3.5mm
Mini Plug
Connects to the audio
source
Table 6: Defining the SV-302 (England and Europe)
2
#
Feature
Function
1 ON LED Lights red when receiving
power (when no signal is
detected); lights green when
receiving a signal
2 L AUDIO IN
RCA Connector
Connect to the left analog
audio source
3 R AUDIO IN
RCA Connector
Connect to the right analog
audio source
4 VIDEO IN RCA
Connector
Connect to the composite video
source
5 IR OUT 3.5mm
Mini Plug
Connect to a machine via an
IR Emitter
1 The European versions are equipped with easy terminals, see Section 8.2
2 When mounting in Belgium and Germany, use the standard WP Adapter

Defining the SV-551 SummitView™ Processor/Switcher
15
4.6 Connecting the Wall Plates
The wall plates should be connected to the corresponding inputs on the SV-551
using the supplied or optional STP cables
1
9 (see Section ). The SV-301 has two
RJ-45 CAT 5 connectors (one for DDC and one for PC (Video/Audio/Power (US
version)), as
Table 4 defines, and comes with two STP cables. The SV-302 has one
RJ-45 CAT 5 connector (U.S. version) and comes with one STP cable.
To connect the SV-301, as the example in
Figure 3 illustrates (see also the
separate color illustration referred to in Section
5.6):
1. Connect the computer graphics source (for example, a laptop) to the Computer In
15-pin HD connector and to the unbalanced stereo Audio In 3.5mm mini jack on
the front of the SV-301, for example, using a Kramer C-GMA/GMA cable (VGA
HD15M +Audio jack to VGA HD15M +Audio jack)
2
2. On the rear of the SV-301, connect the RJ-45 CAT 5 connector marked:
.
“DDC” to the DDC 1 INPUT on the SV-551
“PC” to the PC 1 INPUT on the SV-551
Figure 3: Connecting the SV-301 to the SV-551
1 There are two types of STP cable provided with SummitView™: CP-STP-50 (plenum-rated for the SummitView™ US) or C-STP-50
(non-plenum for the SummitView™ Europe). Other STP cables can also be used. However, when using longer STP cables, image
quality can be impaired
2 Not supplied. The complete list of Kramer cables is on our Web site at
http://www.kramerelectronics.com

KRAMER: SIMPLE CREATIVE TECHNOLOGY
Defining the SV-551 SummitView™ Processor/Switcher
16
To connect the SV-302, as the example in Figure 4 illustrates, do the following:
1. On the front of the SV-302, connect the:
Composite video source (for example, a DVD player) to the yellow RCA
connector, and to the unbalanced stereo audio RCA connectors
IR OUT 3.5mm mini plug via an IR Emitter
1
2. On the rear of the SV-302, connect the RJ-45 CAT 5 connector to the VIDEO
1 INPUT on the SV-551.
Control cable directly onto
the IR sensor window of the controlled device (for example, a DVD
player)
Figure 4: Connecting the SV-302 to the SV-551
In addition, you can connect the:
• SV-303 (optional), which accepts an s-Video source on a 4p connector
and unbalanced stereo audio on RCA connectors. The input signals are
converted via an RJ-45 CAT 5 connector at the rear, and transmitted to
the SV-551. The SV-303 also has an IR out 3.5mm mini plug connector
(connection to the SV-551 is similar to the SV-302)
• SV-304 (optional), which accepts a component video source on three
1 The Emitter contains a small infrared LED housed in a miniature, mouse shaped, black plastic shell. It emits visible red light in
addition to IR (infrared) control signals when activated by IR commands sent to it by IR receivers or other controllers. The Emitter
Control Cable comes with a clear adhesive film included on the emitter housing for attachment to the IR window of the controlled
component and pieces of double-sided clear adhesive tape included for replacement purposes

Defining the SV-551 SummitView™ Processor/Switcher
17
RCA connectors, as well as a digital audio (S/PDIF) input on an RCA
connector. The input signals are converted via an RJ-45 CAT 5 connector
at the rear and transmitted to the SV-551. The SV-304 also has an IR out
3.5mm mini plug connector as an option using a second RJ-45 connector
(connection to the SV-551 is similar to the SV-301. The second DDC
STP cable is only needed when using the IR OUT connector of the
SV-304)
• SV-305 (optional), which accepts a component video source on three
RCA connectors and unbalanced stereo audio on RCA connectors. The
input signals are converted via an RJ-45 CAT 5 connector at the rear and
transmitted to the SV-551. The SV-305 also has an IR out 3.5mm mini
plug connector as an option using a second RJ-45 connector (connection
to the SV-551 is similar to the SV-301. The second DDC STP cable is
only needed when using the IR OUT connector of the SV-305)
Figure 5: Connecting the SV-303/SV-304/SV-305 to the SV-551
4.7 Operating the SV-551 Remotely
The SV-551 can be operated remotely via Ethernet over a LAN using the Kramer
Site-CTRL
™
software. For details see the Site-CTRL and Web Access Online User
Guide
1
1 Available from
.
http://www.kramerelectronics.com
/