Page is loading ...

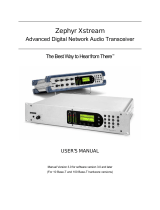
Zephyr Xport
Field Audio Transceiver
USER’S GUIDE
Manual Version 1.0 for software version 1.0 and later
17 February, 2003

The Xport's Front Panel
LCD Display
Audio Level metering
Modem connection status
Menu access
NAV Key
Allows for easy menu access.
NAV also acts as an "escape"
key when in a menu selection.
Menu Navigation and
Selection Keys
Mixer Section
Straightforward, easy to use
mixer has Mic & Line inputs.
Local mix ability permits a mix
of the IFB audio with the send
audio for headphone and PA
feeds.
Stowable Knobs
Allow you to set it and forget
it, preventing accidental
changes.
MIX Control
For convenient adjustment of
the ratio of the Send and
Receiv e audio in the
headphone & Monitor Mix
Outputs.
Numeric Keypad
Used to enter numerical &
text information. Used for
dialing.
Auto Key
Allow a c c e s s t o s t o r ed D I AL &
LOCATION Setups
Dial & Drop Keys
Used for manual dialing.
(See the inside rear cover for information on the rear panel)

Zephyr Xport
Field Audio Transceiver
USER’S GUIDE
Manual Version 1.0 for software version 1.0 and later
17 February, 2003

ZEPHYR
XPORT
USER’S GUIDE
II CHAPTER 1 - INTRODUCING THE XPORT
Customer Service
We support you...
By phone/Fax in the USA.
Customer service is available from 9:30 AM to 6:00 PM USA Eastern Time, Monday through Friday at
+1 216.241.7225.
Fax: +1 216.241.4103.
By phone/Fax in Europe.
Service is available from Telos Europe in Germany at +49 81 61 42 467.
Fax: +49 81 61 42 402.
By E- Mail.
The address is: support@telos- systems.com.
Via World Wide Web.
The Telos Web site has a variety of information which may be useful for product selection and
support. The URL is: http://www.telos- systems.com/support/default.htm.
Feedback
We welcome feedback on any aspect of the Telos Zephyr Xport or this manual. In the past, many
good ideas from users have made their way into software revisions or new products. Please contact us
with your comments.
Telos Systems
2101 Superior Avenue
Cleveland, OH 44114
USA
+1 (216) 241-7225
Fax: +1 (216) 241-4103
Telos Europe
Johannisstra βe 6
85354 Freising
Germany
+49 81 61 42 467
Fax: +49 81 61 42 402

ZEPHYR
XPORT
USER’S GUIDE
CHAPTER 1 - INTRODUCING THE XPORT iii
IMPORTANT NOTE:
The Zephyr
XPORT
's POTS LINE interface is intended for use with analog loop start telephone
lines. This jack should not be connected to other types of lines, such a proprietary telephone jack
present in many office telephone systems. See Section 3 for more information. In order to comply
with Telecom regulations, the COUNTRY setting must be set appropriately before use.
Updates
The operation of the Telos Zephyr
XPORT
is determined largely by software. Periodic updates
may become available - to determine if this is the case check our web site. Contact us to determine
if a newer release is more suitable to your needs.
Our Telos electronic newsletter has announcements of major software updates for existing
products, as well as keeping you up to date on the latest Telos and Omnia product releases. To
subscribe go to:
http://www.telos- systems.com/support/default.htm
Trademarks
Telos Systems, the Telos logo, Zephyr, ZephyrExpress, Zephyr Xstream, Zephyr Xport and the
phrase "The Best Way to Hear From There" are trademarks of TLS Corporation. All other
trademarks are the property of their respective holders.
Copyright
Copyright © 2002 by TLS Corporation. Published by Telos Systems, who reserves the right to make
improvements or changes in the products described in this manual, which may affect the product
specifications, or to revise the manual without notice. All rights reserved.
Notice
All versions, claims of compatibility, trademarks, etc. of hardware and software products not made
by Telos mentioned in this manual or accompanying material are informational only. Telos
Systems makes no endorsement of any particular product for any purpose, nor claims any
responsibility for operation or accuracy.
Warranty
This product is covered by a one year limited warranty, the full text of which is included in the
section 7 of this manual.
Service
You must contact Telos before returning any equipment for factory service. Telos Systems will
issue a Return Authorization number, which must be written on the exterior of your shipping
container. Please do not include cables or accessories unless specifically requested by the
Technical Support Engineer at Telos. Be sure to adequately insure your shipment for its
replacement value. Packages without proper authorization may be refused. US customers please
contact Telos technical support at +1 (216) 241- 7225. All other customers should contact your
local representative to arrange for service.
We strongly recommend being at the unit when you call, so our Support Engineers can verify
information about your unit and the conditions under which the problem occurs. If the unit must
return to Telos, we will need your serial number, located on the rear panel.

ZEPHYR
XPORT
USER’S GUIDE
IV CHAPTER 1 - INTRODUCING THE XPORT
Test Lines
To aid you in testing and demonstrating your Zephyr
XPORT
, Telos Systems has the following
test numbers available:
• USA: +216 781.9310 or 216 781.9311 (Layer III Dual transmit @ 32 KHz sample rate for
Zephyr/Zephyr Xstream + aacPlus @ 48 kHz SR for Xport).
• Germany: (49) 81 61 42 061 Dial this number twice (Layer III Dual transmit @ 32 KHz sample
rate for Zephyr/Zephyr Xstream + aacPlus @ 48 KHz SR for Xport).
• Germany: (49) 81 61 42 062 (Layer II Mono @ 48 KHz) for Zephyr/Zephyr Xstream.
Notices and Cautions
e
CAUTION:
THE INSTALLATION AND SERVICING INSTRUCTIONS IN THIS MANUAL ARE FOR USE BY
QUALIFIED PERSONNEL ONLY. TO AVOID ELECTRIC SHOCK, DO NOT PERFORM ANY
SERVICING OTHER THAN THAT CONTAINED IN THE OPERATING INSTRUCTIONS UNLESS
YOU ARE QUALIFIED TO DO SO. REFER ALL SERVICING TO QUALIFIED PERSONNEL.
e
WARNING:
TO REDUCE THE RISK OF ELECTRICAL SHOCK, DO NOT EXPOSE THIS PRODUCT
TO RAIN OR MOISTURE. KEEP LIQUIDS AWAY FROM THE VENTILATION
OPENINGS IN THE TOP AND REAR OF THE UNIT. DO NOT SHOWER WITH THE
UNIT.
e
WARNING!
This equipment is designed to be operated from a power source that includes a third
“grounding” connection in addition to the power leads.
Do not defeat this safety feature. In addition to creating a potentially hazardous
situation, defeating this safety ground will prevent the internal line noise filter from
functioning.
w
IMPORTANT SAFETY INFORMATION!
If fuse replacement is required, please note: For continued protection
against fire, replace fuse only with same type and value.
e

ZEPHYR
XPORT
USER’S GUIDE
CHAPTER 1 - INTRODUCING THE XPORT v
e
WARNING:
ZEPHYR XPORT USES CONVECTION COOLING. DO NOT BLOCK THE
VENTILATION OPENINGS IN THE TOP AND REAR OF THE UNIT.
FAILURE TO ALLOW PROPER VENTIUALATION COULD DAMAGE THE
UNIT OR CREATE A FIRE HAZARD.
DO NOT PLACE THE UNIT ON A CARPET, BEDDING, OR OTHER
MATERIALS THAT COULD INTERFERE WITH THE REAR PANEL
VENTILATION OPENINGS.
DO NOT STACK MORE THAN 3 UNITS HIGH.
This symbol, wherever it appears, alerts you to the presence
of uninsulated, dangerous voltage inside the enclosure –
voltage which may be sufficient to constitute a risk of shock.
This symbol, wherever it appears, alerts you to important
operating and maintenance instructions. Read the manual.
TO PREVENT RISKS OF
ELECTRIC SHOCK,
DISCONNECT POWER
CORD BEFORE SERVICING
USA CLASS A COMPUTING DEVICE INFORMATION TO USER. WARNING:
This
equipment generates, uses, and can radiate radio-frequency energy. If it is not installed and
used as directed by this manual, it may cause interference to radio communication. This
equipment complies with the limits for a Class A computing device, as specified by FCC Rules,
Part 15, Subpart J, which are designed to provide reasonable protection against such
interference when this type of equipment is operated in a commercial environment. Operation of
this equipment in a residential area is likely to cause interference. If it does, the user will be
required to eliminate the interference at the user’s expense.
NOTE: Objectionable interference
to TV or radio reception can occur if other devices are connected to this device without the use
of shielded interconnect cables. FCC rules require the use of only shielded cables.
CANADA WARNING: “This digital apparatus does not exceed the Class A limits for
radio noise emissions set out in the Radio Interference Regulations of the Canadian Department
of Communications.” “Le present appareil numerique n’emet pas de bruits radioelectriques
depassant les limites applicables aux appareils numeriques (de les Class A) prescrites dans le
Reglement sur le brouillage radioelectrique edicte par le ministere des Communications du
Canada.”
SAFETY CAUTION: “To reduce the risk of fire, use only N0. 26 AWG gauge
Telecommunications line cord to connect between your Xport and the telephone circuit.”

ZEPHYR
XPORT
USER’S GUIDE
VI CHAPTER 1 - INTRODUCING THE XPORT
A note from the CEO
It's been nearly 10 years since Telos brought you the original Zephyr – the first product
in the world to use MP3, and the first to bring all the necessary pieces for ISDN remotes
together in one easy- to- use and reliable package. In 2001, we offered you the latest
MPEG technology and numerous improvements with the introduction of the Zephyr
Xstream family of codecs. Together, these have become among the most successful and
enabling tools in broadcasting’s digital era.
Unless you enjoy reading user manuals for the thrill, you presumably have the new
Zephyr
XPORT
at hand, and you will be using it with an ordinary telephone line to
connect to a Zephyr Xstream ISDN codec. Prepare to hear the highest fidelity low- bitrate
coding method on Earth, aacPlus, in action. For the first time, you will experience FM-
like audio over analog telephone lines – with surprisingly detailed highs and fuzz- free
clarity, on both speech and music. You will also experience remarkable stability. Because
the studio side is connected digitally, modem performance is considerably more reliable
than with POTS- only schemes.
Maybe you are thinking, "What took you so long?" Those with long memories may recall
that we had a POTS codec prototype using MP3 at the NAB radio show many years ago,
before any others were marketed. However interesting the demo, we decided MP3 and
the other codecs around at that time were just not up to our snuff on quality over
modems.
All the while since, we’ve been keeping our eyes and ears open. We knew POTS Telco, we
knew codecs, and we knew ISDN, so we knew what we were looking for. Now, finally, all
the pieces have come together to let us give you all the right stuff.
My guiding principle at Telos is to make the stuff I would have wanted for myself when I
was in the CE game. So, here’s another one I sure could have used! It’s really cool when
something like this one comes together so well.
So, go ahead and use this baby to shock and amaze. We are looking forward to hearing of
your experiences using the Xport…
Steve Church
February 2003

ZEPHYR
XPORT
USER’S GUIDE
CHAPTER 1 - INTRODUCING THE XPORT vii
Table of Contents
Table of Contents ...................................................................................................................................................... vii
1 INTRODUCING THE ZEPHYR
XPORT
................................................................1
Looking for Information? .......................................................................................................................................... 1
2 GETTING ORIENTED.............................................................................................3
2.1 Quick Start........................................................................................................................................................ 3
Connecting the Audio Inputs/Outputs....................................................................................................................... 4
Connecting to the Telephone Line ............................................................................................................................ 4
Powering Up............................................................................................................................................................... 5
Setting the Country .................................................................................................................................................... 5
Mixer Adjustments..................................................................................................................................................... 6
2.2 Placing Your First Call, to Telos.................................................................................................................... 6
2.3 What have we here?......................................................................................................................................... 8
Accessories ................................................................................................................................................................ 8
2.3.1 The front panel ................................................................................................................................................. 8
2.3.2 Frequently Used Menus; AUTO, DIAL, & DROP ..................................................................................... 12
2.3.3 The rear panel................................................................................................................................................. 13
3 THE DETAILS.......................................................................................................15
3.1 Telephone Connections ................................................................................................................................. 15
3.1.1 POTS .............................................................................................................................................................. 15
3.1.2 ISDN INTERFACE (Optional) .................................................................................................................... 16
3.2 Audio Connections & Mixer......................................................................................................................... 17
3.2.1 Audio Inputs................................................................................................................................................... 18
3.2.2 Audio Outputs................................................................................................................................................ 18
3.2.3 The AUX INTERFACE connector. ............................................................................................................... 19
3.2.4 The Interface Connector................................................................................................................................ 19
3.3 Setups ............................................................................................................................................................... 19
Dial Setups .............................................................................................................................................................. 20
Location Setups........................................................................................................................................................ 21
3.4 The Xport's ISDN interface.......................................................................................................................... 24
3.5 Connecting two Xports to the same ISDN circuit ..................................................................................... 25
Sharing ISDN in the USA & Canada...................................................................................................................... 25
Sharing ISDN worldwide ........................................................................................................................................ 26
3.6 Cell Phone Interfacing (the Aux Audio Interface) .................................................................................... 26
Connecting the Cell Phone to the Xport ................................................................................................................. 27
3.7 Feeding the Xport from a computer over Ethernet .................................................................................. 27
Telos Soundcard Emulator ...................................................................................................................................... 27

ZEPHYR
XPORT
USER’S GUIDE
VIII CHAPTER 1 - INTRODUCING THE XPORT
3.8 Remote Control .............................................................................................................................................. 29
4 FREQUENTLY ASKED QUESTIONS .................................................................30
5 WHAT TO DO IF… ...............................................................................................34
6 TECHNICAL & INSTALLATION INFORMATION...............................................38
6.1 Environmental Considerations .................................................................................................................... 38
Ventilation and ambient temperature ...................................................................................................................... 38
AC (mains) requirements......................................................................................................................................... 38
6.2 Installing the ISDN option ............................................................................................................................ 39
6.3 Enabling Phantom Power............................................................................................................................. 41
7 SPECIFICATIONS & WARRANTY......................................................................42
ZEPHYR XPORT LIMITED WARRANTY........................................................................................................ 44
8 REFERENCES......................................................................................................45
Ordering ISDN......................................................................................................................................................... 45
Applications Notes................................................................................................................................................... 45
Technology Articles................................................................................................................................................. 45
White Papers ............................................................................................................................................................ 46
w NOTE: To communicate with the Xport using the high
quality aacPlus POTS codec mode, the Zephyr Xstream at the
far end must be using version 2.5.0p or later software. For
information on updating the Zephyr Xstream see the Telos
web site: www.telos- systems.com
w NOTE: When using ISDN, be sure to connect the ISDN line
to the
XPORT
before powering up the unit.

ZEPHYR
XPORT
USER’S GUIDE
CHAPTER 1 - INTRODUCING THE XPORT 1
1 Introducing the Zephyr
XPORT
: Ordinary Phone Line – Extraordinary Audio
ISDN makes for great sounding remotes, but you can’t always get ISDN where and when you
want it. The
XPORT
lets you use ordinary analog telephone lines or ISDN in the field to connect
with the Zephyr Xstream ISDN codec in your studio.
The Xport features the highest fidelity low- bitrate coding method on Earth: MPEG AAC + the
ground- breaking Spectral Band Replication enhancement: aacPlus). For the first time, you will
experience FM- like audio over analog telephone lines with detailed highs and fuzz- free clarity –
for both speech and music.
XPORT
is the field side of a system that has Zephyr Xstream at the studio. Because the studio
side is connected digitally with ISDN, modem performance is considerably more reliable than
with POTS- only schemes.
To extract maximum reliability from real- world analog Telco lines,
XPORT
has a custom DSP-
based modem that lets us optimize for maximum performance with audio signals. Normal
modems are designed for non- real- time data, where a bad packet may be re- transmitted
without much consequence and “retraining” is not a major problem. With audio, this would
result in serious drop- outs. A modem for live audio requires a different set of trade- offs that are
not possible with off- the- shelf consumer modem chips.
Your studio Zephyr Xstream becomes a universal codec, connecting with both Xport and ISDN
codecs. This saves you money, rack space, operator training, telephone lines, and console/router
audio inputs and mix- minus outputs.
The
XPORT
’s integrated mixer handles two inputs and includes a return mixer to combine local
audio with the remote mix- minus feed. We’ve also included a multi- band automatic gain
control and limiter designed by the Omnia processing gurus. This was crafted to work in
harmony with the audio codec, and is another reason audio is the smoothest, cleanest possible.
The
XPORT
/Xstream combo is the best sounding, easiest to use and most reliable analog Telco
codec system ever offered to broadcasters. Because it lets you get double- duty out of your ISDN
codec and line, it is also cost- effective.
And, with the optional ISDN interface,
XPORT
takes advantage of ISDN as well.
Looking for Information?
We've taken great care to make the
XPORT
as easy to use as possible, keeping non- technical
users in mind. In fact, we expect that most users will be up and running long before they refer to
this guide. Section 4 has Frequently Asked Questions and Section 5 has troubleshooting tips.

ZEPHYR
XPORT
USER’S GUIDE
2 CHAPTER 1 - INTRODUCING THE XPORT
Here's where to turn for additional information:
Tell me more about the box.
Section 2 (Getting Oriented) will guide you step- by- step through setup and testing of the
XPORT
.
I've never used a codec or plugged in a telephone. What do I do with this box?
Section 2.1 (Quick Start) is for you. We provide step- by- step directions on how to plug in the unit and get
up and running promptly.
So where do I plug in my… audio gear? … telephone line? What does this jack do?
Section 3 (The Details) gives the details on the connectors, the mixer section and audio connectors,
telephone line connections, etc.
How do I create Auto Dial Setups?
How do I create Location Setups?
How do I connect the Xport to a cell phone?
We cover these features in Section 3.3.
I can transmit audio from my computer to the Xport over Ethernet? How?
This ability is covered in Section 3.7 (Feeding the Xport from a computer over Ethernet).
Something seems amiss. What now?
Section 5 (What to do if…) guides you through some simple tests to determine where your problem lies. If
you still can't make things work we are here to help. See page iii for contact information or email us at
How do I upgrade this thing?
Section 6 (Technical & Installation Information) covers technical information about your
XPORT;
enabling
Phantom Power, updating software, and installing the ISDN option.
What are the specs? Warranty?
Section 8 (Specifications and Warranty) covers this.
Where can I find additional information not included in this guide?
Section 7 (References) gives links to lots of additional information on the Telos website.

ZEPHYR
XPORT
USER’S GUIDE
CHAPTER 2 - GETTING STARTED 3
2 Getting Oriented
This Quick Start section will walk you step- by- step through setting the unit up and
placing calls. This section includes an introduction to the
XPORT
and includes the basic
information required to get you up and running in a hurry. First, we'll cover the front
and rear panels.
In Section 3 (The Details), we'll cover the audio section and mixer, as well as additional
details such as creating auto dials, using ISDN, use with a cell phone, and how to
transmit audio from your computer using Ethernet.
2.1 Quick Start
This section will get you up and running quickly. We will use a microphone and
headphones. We will place a call to the Telos test line so you can verify correct operation
of the unit.
h HOT TIP! The Xport is intended to be used in conjunction with a Telos Zephyr
Xstream back at the studio. An Xport cannot call another Xport, nor can it communicate
with POTS codecs that use proprietary coding methods.
The Xport can also be used to call any Telephone or hybrid, however in that case the
results will be standard telephone quality audio.
You have just opened the carton containing the latest Telos codec product. We know
how you feel. You don’t want to sit around and read a manual. You want to plug- in your
new Zephyr
XPORT
and hear what it can do. You want to connect to hear how audio
over POTS connections is better than ever. We know because we feel the same way when
we get a new, piece of gear.
As much as we understand your excitement, we ask you to please peruse the following to
get the most out of your Zephyr
XPORT
.
This manual is designed to instruct you on the basic capabilities of your Zephyr
XPORT
.
We also provide you with links to interesting and useful information about advanced
level features, audio coding, and digital telephony on our website. We hope you will take
the time to read the manual.
If you need to put the unit in service today, or have experience with other, similar
equipment, this section will allow you to get started quickly with your Zephyr
XPORT
.
“Quick Results” Are for You If You...
• Know how to dial a telephone call.
• Understand and have before you all of the items listed in the section that
follows called “What you need before you start.”
• Understand that these “Quick Results” only get you started and will not
answer all of your questions, or demonstrate all of the features, of the
Zephyr
XPORT
.

ZEPHYR
XPORT
USER’S GUIDE
4 CHAPTER 2 - GETTING STARTED
• Promise to read the full manual later.
Now, let’s get started.
What you need before you start…
To complete the following you will need:
• Your Zephyr
XPORT
• A standard "RJ- 11 style" telephone cable (supplied with the
XPORT
)
• A pair of headphones that use a standard 1/4 stereo connector
• A dynamic Microphone, together with a cable ending with a 3- pin XLR "male"
connector. Xport can be used with condenser microphones, but phantom power
must be enabled. This is beyond the scope of this section.
• A Plain Old Telephone line (analog loop start line).
Success, Step-by-Step:
Connecting the Audio Inputs/Outputs
You want to hear something, don’t you? Connections are needed for sending audio to
the remote location and receiving audio. You will need to provide a microphone and
headphones, along with an appropriate cable.
Headphones
Connect your headphones to the headphone jack
on the rear panel.
Microphone
Connect your dynamic microphone to the MIC. INPUT jack on the rear panel using
an appropriate cable (normally an XLR male to XRL female).
Connecting to the Telephone Line
Connect the modular cable to the jack on the
XPORT
labeled POTS LINE. Attach the
other end to the telephone jack. In some countries, you may need an adaptor. These are
readily available at most airports and many electronic stores.
w IMPORTANT NOTE! Xport is for use with "Plain Old (analog loop- start) Telephone
Service (it can also be used with ISDN, but we'll cover that later).
Be sure the line you connect to your Xport really is an analog line. In many offices, and
some hotels, you will find perfectly ordinary- looking phones that are connected to in-
house phone systems using special, proprietary lines. DO NOT connect your Xport to such
lines. See Section 3 for more information.

ZEPHYR
XPORT
USER’S GUIDE
CHAPTER 2 - GETTING STARTED 5
Ideally, you should check an unknown line by connecting an ordinary analog telephone
and attempting a call.
h
HOT TIP! The Xport uses the center pins of the 6- position miniature modular jack -
In parts of Europe we have seen the same type of jack using different pins. In this case,
you will need an adaptor.
Powering Up
Time to turn on the XPORT!
• Connect the provided IEC power cable to the
XPORT
.
• Connect the other end of the IEC cable to your AC (mains) power outlet.
The Zephyr Xport’s power input is universal, accepting anything from 100
to 240 Volt AC 50/60Hz.
• Flip the power switch, located just above the power cable connector, to the
“on” position (push in the side labeled “1”).
• Your Zephyr
XPORT
will start up. After about 40 to 60 seconds, the front
panel LCD display screen will be displayed:
Snd
════════
Rcv
════════
Idle
Modem Performance
Snd
════════
Rcv
════════
Basic Configuration
Setting the Country
The
XPORT
can be used on analog lines from all over the world. To achieve optimal
operation, you must tell it the country in which you are located. Follow these steps:
• Press the <NAV> button two times.
• Highlight the option COUNTRY by pressing the <6> key. The word "country"
should appear with white text on a black background.
• Press the <SEL> button. Use the <
5> & <6> keys to scroll through the list of
countries. If your country is not listed, use "USA" or "CTR 21". Once your country is
displayed press <SEL> to accept your selection or press <NAV> once to "escape"
without making a change.
• Press <NAV> once to get back to the main menu.

ZEPHYR
XPORT
USER’S GUIDE
6 CHAPTER 2 - GETTING STARTED
Mixer Adjustments
h HOT TIP! The Xport has "stowable" control knobs for the mixer functions. If the knob
is not protruding, push it in and release to make it accessible.
Microphone
Speak into your Microphone and adjust the MIC knob on the front panel to adjust the
level displayed on the Snd meter (at the top of the screen). If you cannot get adequate
level on the meter, even with the MIC knob turned all the way up, you will need to
change the Mic Gain setting in the first LCD menu.
Headphones
First, adjust the MIX knob to the 12 O'clock position (straight up). Next, turn the
headphone
knob all the way down. Put on your headphones and speak into the
microphone. Turn up the headphone
adjustment until you can hear yourself in the
headphones.
You are ready to place your first call.
2.2 Placing Your First Call, to Telos
Located less than a mile from the Rock ‘n’ Roll Hall of Fame, there is always something
interesting playing on the Telos test line. Let’s call Cleveland. If you prefer, you can call
our test line in Europe. That number is listed under “Test Lines” on page iii at the front
of this manual.
Follow these step-by-step instructions:
1. Remove your headphones.
2. Press the <DIAL> button once. Use the keypad to enter the Telos test line number.
Be certain to precede it with any number you may need to dial to access an outside
line (such as "9") and/or to place a long distance (such as "1") or international call.
The number is +1 216 781- 9310. Press the <DIAL> button again.
h HOT TIP! If your phone line has the feature "call waiting," you should temporarily
disable this by entering "*70" (or other special code) before the number to be dialed.
3. You should see a series of messages that say Modem Off Hook, Dialing Finished,
Modem Detected, Connecting., Connecting, Connecting…, Connected, and finally,
Connect Lock 0:00:01 .

ZEPHYR
XPORT
USER’S GUIDE
CHAPTER 2 - GETTING STARTED 7
If successful, the words "Connect Lock"
will appear along with a call duration
timer.
You should now see audio on the Receive
audio meter (labeled "Rcv") moving as the
audio is received from the test line.
Put on your headphones and listen. You may adjust the relative volume of your local
microphone audio and the audio from Telos by adjusting the MIX control on the
Xport's front panel.
4. Whether or not you have successfully connected, press the <DROP> button twice.
You want to be sure to disconnect, as this may be an expensive call.
5. If you have successfully connected, go on to the next section. If you have not, try
again. If you do not succeed, here are a few things to try:
• Wait an hour and try again. The Telos test line may be busy.
• If you need to dial a prefix (such as 9) try entering a pause after this digit and
before the rest of the number it by pressing <#> twice (a "," will be displayed)
when dialing.
• USA users should try calling using a different long- distance carrier. To do so,
insert the carrier’s seven- digit access code. The number to dial starts with any
prefix needed for you to get an outside line, followed by the long distance
access code, followed by the Telos test line number. See section 5 for additional
codes. Let us say you don’t need a prefix to dial out (and most people don’t)
and you want to use MCI. Dial:
1010222 1 216- 781- 9310
If this works, you should contact your local telephone company to determine
who your default long distance carrier is.
• Review the information in Section 5 (What if to do if…).
• Call Telos Customer Support for assistance. The Xport may provide error
messages under some circumstances. Have these messages ready when you
call, as they will help speed the process of solving your problem (see page iii).
What’s Next?
Now you are ready to call the world. Remember your promise to read the entire manual!
Reading the rest of this section will fill you in on the basics. Section 3 covers additional
features. Section 8 (References) gives references for information on seldom- used
features and other technical information.
Further assistance in using your Zephyr
XPORT
can be found in the HELP text that is
displayed whenever you select a menu item using the <SEL> key. You may wish to go
through the menus and select various items to learn more about what they do.
Snd
════════
Rcv
════════
Connect Lock 0:00:05
Modem Performance
Snd
════════
Rcv
════════

ZEPHYR
XPORT
USER’S GUIDE
8 CHAPTER 2 - GETTING STARTED
2.3 What have we here?
Time for a guided tour of your
XPORT
.
Accessories
A stand is available for the Xport to tip the unit up for easier viewing. Contact your Telos
representative to order Telos Part # 1451- 00199- 001.
A soft carry vase is also available. Request Telos Part # 2091- 00032
2.3.1 The front panel
THE MIXER SECTION
The
XPORT
's mixer section (pictured above) is easy to under stand. There are two
inputs: MIC and LINE. The mixed audio from these sources is fed to the Omnia
AGC/Limiter and to the codec for transmission to the far end.
This audio mix, together with the received audio is output on the headphone
and the
Monitor Mix Out jacks. The ratio of these two audio sources is determined by setting of
the MIX control.
See the inside rear cover of this manual for a block diagram of how the mixer functions.
THE DISPLAY AND USER INTERFACE
The Zephyr
XPORT
has two menus screens accessed by pressing the <NAV> button.
Repeated presses of this button, pages through the screens of options. The following
information is meant as a quick introduction only. Section 3 (The Details) covers the
menu selections in detail.

ZEPHYR
XPORT
USER’S GUIDE
CHAPTER 2 - GETTING STARTED 9
The Default Display
This is the display you will see most of
the time. It has bargraph meters for
Send and Receive audio levels, a status
line, and modem quality bargraphs for
each direction.
The Snd and Rcv modem quality
bargraph meters indicate the quality of
the connection moment- to- moment. A certain amount of fluctuation is normal.
However, if the readings stay below the line on the meter, you should hang up and
redial as soon as convenient.
The system monitors the quality of the connection in each direction, and will
prompt you if the connection has become unstable. You will have the option of
"retraining" the modem or shifting to "phone" mode should this happen.
This default display will appear after the system has been left idle for 120 seconds.
POTS Connection Status (see section 3.1.2 for ISDN Connection status)
The connection status indicates the status of the line as follows:
On Hook - POTS mode idle
Off hook - Line is in use
Modem Detected - Modem carrier has been detected and modem training begun
Connecting. - Modem "handshake start"
Connecting.. - Modem "Ranging" stage is complete
Connecting… - Modem "Training" stage complete
Connect - Modem connection is operational
Connect Lock - Modem connection is operational and aacPlus decoder has valid data
Renegotiation Request - Far end has authorized modem re- negotiation. Audio will be re-
established in 3- 5 seconds. Or, far end has dropped the call. Or, modem operation is no longer
possible, and system will revert to Phone mode.
Retrain Request - Modem connection will be re- negotiated.
Modem Lost Sync - Modem connection has been lost; unit reverting to phone mode
Warning Dialogues
In a few cases, the Xport will warn the operator about status of the modem
connection.
Marginal Performance – This indicates that the modem has detected marginal conditions that could
cause dropouts or instability. Often the problem is transient, and you can choose “IGNORE”. If you
see the dialogue more than once in a 10 minute period you may wish to choose “RETRAIN” or to
redial during a break in programming (Retrain will cause a short 5-6 second gap in audio). If you
cannot take a break, you can choose “PHONE” mode which will seamlessly switch to the telephone
quality mode until you can redial.
Bit Rate Too Low…Falling back to Phone Mode - The modem is unable to negotiate an acceptable
connection and therefore the connection has been established in “Phone” mode. You may wish to
try redialing.
Unacceptable Modem Performance…Falling back to Phone Mode – The modem connection has
failed and therefore the connection has been converted to “Phone” mode. You should redial when
convenient.
Snd
══════▪══
Rcv
══════▪══
Connect Locked 0:00:30
Modem Performance
Snd
══════▪══
Rcv
══════▪══
Send Audio Level
(Outbound)
Received Audio Level
(
Incomin
g)
Modem Quality
(Outbound)
Modem Quality
(Inbound)
Connection
Status

ZEPHYR
XPORT
USER’S GUIDE
10 CHAPTER 2 - GETTING STARTED
Lost Modem Sync…Falling back to Phone Mode – The modem connection has failed and therefore
the connection has been converted to “Phone” mode. You should redial when convenient.
The Menus
Repeated presses of the <NAV> button pages through the menu’s screens one at a
time.
Once a desired page of menu selections is shown on the display, you must highlight
and select the item to be changed (or field to be edited). The current selection will
be highlighted; i.e. it will be displayed with white text on a black background. Other
menu items (which are not highlighted) will be shown with black text on a white
background. You can change which item is highlighted using the <
5> & <6>
buttons.
h HOT TIP! The bottom line of the LCD display will give you a description of the
highlighted menu item. This context sensitive help will give you an indication of what an
item does. For more information about that item, push the <SEL> button.
Once the desired menu selection is highlighted, you must select it by pressing the
<SEL> button. The selected item will move to the top of the screen and detailed
information about that menu selection will be shown below it.
In the case of most menu items, you can now view the options for this item using
the <
5> or <6> buttons. Note that the option currently in effect has square
brackets “[ ]” around it.
w IMPORTANT TIP! If you change your mind, get lost, or otherwise panic, don’t worry.
Pressing <NAV> will de- select the item currently selected, without saving the changes in
progress.
In the case of numeric or alphanumeric text fields, you can begin entering text as
soon item has been selected with the <SEL> button. To erase previously entered
text, use the <
5> button.
w IMPORTANT TIP! Like many devices using telephone keypads, the Zephyr Xport uses
multiple presses of the various buttons of the keypad to enter all of the letters of the
alphabet, as well as the digits 0 through 9. We will cover this in detail below.
Let’s go through a couple of quick examples to see the Zephyr
XPORT
's menus in
action.
Example 1: Selecting a setting from a list (country):
1. From the default screen. press the <NAV> button two times. You ??? should see a
screen that looks like the following:
2. Now press the <6> button once so the menu item Country is highlighted (i.e. is
shown with white text on a black background). ??? as shown below:
/