Page is loading ...

EN
1
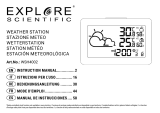
4-Day Weather Forecaster Station
Model: WMH601
USER MANUAL
CONTENTS
Introduction .............................................................. 2
Overview ................................................................... 2
Front View .............................................................. 2
Back View .............................................................. 3
Remote Sensor ...................................................... 4
Getting Started ......................................................... 4
Set up Remote Sensor ........................................... 4
Sensor Data Transmission ..................................... 4
Set Up Main Unit .................................................... 5
Weather Information Display ................................... 5
Regional Weather Information ............................... 5
Local Temperature and Humidity ........................... 7
Weather Warning Message .................................... 7
Clock .......................................................................... 7
To Manually Set Clock ........................................... 8
Alarm ......................................................................... 8
To Set Alarm ........................................................... 8
To Activate / Deactivate Alarm ............................... 8
To Silence Alarm .................................................... 8
Display Contrast ....................................................... 8
Backlight ................................................................... 8
Reset .......................................................................... 8
Specifications ........................................................... 9
Main Unit ................................................................ 9
Remote Thermo Sensor (THN132NS) ................... 9
Precautions ............................................................... 9
About Oregon Scientific ........................................ 10
EU-Declaration Of Conformity .............................. 10
WMH601_M_EU_EN_R4.indd 1 13-6-14 6:25

EN
2
INTRODUCTION
Thank you for selecting the Oregon Scientific™ 4-Day
Weather Forecaster Station (WMH601).
This wireless, plug and play weather station is capable of
receiving weather information from the whole of Europe.
European countries and cities are user-selectable,
allowing users to display the weather information of the
selected European city on the main unit.
NOTE Please keep this manual handy as you use
your new product. It contains practical step-by-step
instructions, as well as technical specifications and
warnings you should know about.
OVERVIEW
FRONT VIEW
1. DAY / NIGHT indicator
2. : Weather information signal reception indicator
3. RAIN PRECIP: Amount of precipitation
TEMP: Temperature indicator
4. Wind direction (user selected city)
5. SPEED: Wind speed
6. Today’s regional weather forecast
7. : Sensor batteries low
8. Indicates outdoor sensor reception status
1
6
7
8
9
10
23 45
11
WMH601_M_EU_EN_R4.indd 2 13-6-14 6:25

EN
3
IN / OUT: Local indoor and outdoor temperature
and indoor humidity
9. : Clock signal reception indicator
10. Country name / city name / clock / daily alarm
/ message
MD / DM: Calendar format
: Main unit batteries low
AM / PM: Morning / afternoon and evening indicator
indicates in alarm mode
indicates daily alarm is on
11. Next 3-day regional weather forecast with day /
night temperature and amount of precipitation (user
selected city)
BACK VIEW
1. SNOOZE / LIGHT: Activate snooze function; turn
on backlight
2. ALARM: Activate / deactivate alarm; set alarm
3. MODE: Toggle between time / calendar and
message display; set clock
4. UP: Increase value of the setting; display next
country / city; initiate sensor search with DOWN
5. DOWN: Decrease value of the setting; display
previous country / city; initiate sensor search
with UP
6. Wall mount hole
7. Battery compartment
1
2
3
4
5
6
8
7
9
WMH601_M_EU_EN_R4.indd 3 13-6-14 6:25

EN
4
8. RESET: Reset unit to default settings
9. ºC / ºF: Temperature unit
REMOTE SENSOR
1. LED status indicator
2. Wall mount hole
3. Battery compartment
4. RESET hole
NOTE The sensor included in this package
(THN132NS) does not measure humidity.
GETTING STARTED
SET UP REMOTE SENSOR
1. Slide open the battery door.
2. Insert battery, matching the polarities (+ / -).
3. Press RESET.
4. Close the battery door.
TIP Use alkaline batteries for longer usage and consumer
grade lithium batteries in temperatures below freezing.
SENSOR DATA TRANSMISSION
To search for a sensor:
Press and hold UP and DOWN.
For best results:
• Place the sensor within 100 m (300 ft) of the main unit.
• Position the sensor so that it faces the main unit,
minimizing obstructions such as doors, walls and furniture.
• Place the sensor out of direct sunlight and moisture.
• Place the sensor in a location with a clear view to
the sky, away from metallic / electronic objects.
• Position the sensor close to the main unit during cold
winter months as below-freezing temperatures may
affect battery performance and signal transmission.
1
2
3
4
WMH601_M_EU_EN_R4.indd 4 13-6-14 6:25

EN
5
The remote sensor reception icon will show the
following status:
ICON DESCRIPTION
Main unit is
searching for
sensor(s).
A channel has
been found.
The sensor
cannot be found.
NOTE The main unit will search only for already registered
sensor or new sensor reset within last 30 minutes. To
register a new sensor, reset sensor prior to search.
TIP The transmission range may vary depending on
many factors. You may need to experiment with various
locations to get the best results.
SET UP MAIN UNIT
NOTE Set up the remote sensor before installing the
main unit.
1. Remove the battery compartment cover.
2. Insert the batteries, matching the polarities.
3. Press RESET after each battery change.
NOTE Batteries should not be exposed to excessive
heat such as sunshine or fire.
WEATHER INFORMATION DISPLAY
REGIONAL WEATHER INFORMATION
NOTE Due to timing of the transmission of weather data,
it may take up to 24 hours to get a valid signal.
Initial synchronisation with Meteo Time can take from 2 to
12 hours. If the weather forecast icons do not appear after
a long period of time, please reset the product and place
it next to a window or a place with less signal interference.
This unit displays the current and next 3-day* weather
information of a user-selected regional city. indicates
strong signal reception of weather information.
* 4-day weather information (current and next 3-days) is
not available for all cities. Please refer to ‘Geographical
coverage’ addendum sheet for a list of cities and the
available forecasts for each city.
ICON LOCATION DESCRIPTION
Clock / Alarm /
Calendar /
Message area
Some cities’ data
are received
Today’s Weather /
Regional Weather
area
Data for the
selected city
received in the
past 48 hours
WMH601_M_EU_EN_R4.indd 5 13-6-14 6:25

EN
6
Clock / Alarm /
Calendar /
Message area
Most cities’ data
are received
Today’s Weather /
Regional Weather
area
Data for the
selected city
received in the
past 24 hours
(blinking)
Clock / Alarm /
Calendar /
Message area
During signal
testing, no signal
synchronized
Today’s Weather /
Regional Weather
area
Data for the
selected city
received in the
past 48 hours, with
message
(blinking)
Clock / Alarm /
Calendar /
Message area
During signal
testing, signal
synchronized
Today’s Weather /
Regional Weather
area
Data for the
selected city
received in the
past 24 hours, with
message
No icon
Clock / Alarm /
Calendar /
Message area
No information
received
Today’s Weather /
Regional Weather
area
No valid data for
the selected city
To select a city (within a selected country):
Press UP or Down.
To select a country:
Press and hold MODE. Then press UP or Down. Press
MODE to confirm.
For current weather information, the unit will display the
weather forecast icon, day / night temperature, amount
of precipitation and wind speed / direction.
For the next 3-day weather information, the unit will
display the weather forecast icon, day / night temperature
and amount of precipitation.
NOTE The table below lists the weather forecast icons
and their respective meanings.
Day-time
icon
Meaning
Night-time
icon
Sunny / Clear
Mainly cloudy
Cloudy
Foggy
WMH601_M_EU_EN_R4.indd 6 13-6-14 6:25

EN
7
Rain showers
Heavy rain
Deluge
Sultry
Sleet
Snowy
LOCAL TEMPERATURE AND HUMIDITY
NOTE Display of the local temperature and humidity is
automatically toggled between one another.
NOTE When the temperature is out of range, “HH.H”
and “LL.L” will be displayed until the temperature is within
range again.
WEATHER WARNING MESSAGE
When there is weather warning message, it is
automatically displayed in scrolling manner and toggled
with clock / calendar.
To review messages:
Press MODE repeatedly.
CLOCK
This product is designed to synchronize its clock
automatically with a clock signal:
• DCF-77signalofFrankfurt,Germany
NOTE Reception takes 2-10 minutes. If the signal is
weak, it can take up to 24 hours to get a valid signal.
If signal reception is unsuccessful, place your unit next
to a window.
Clock signal reception indicator:
STRONG
SIGNAL
WEAK SIGNAL NO SIGNAL
WMH601_M_EU_EN_R4.indd 7 13-6-14 6:25

EN
8
TO MANUALLY SET CLOCK
1. Press and hold MODE.
2. Press UP or Down to change setting options. The
settings order is: country, city, display contrast, +/-1
time zone, 12/24 hour format, hour, minute, year,
month-day / day-month, month, day and language.
3. Press MODE to confirm.
NOTE The language options are English (ENG), German
(DEU), French (FRA), Italian (ITA) and Spanish (ESP).
NOTE If the clock signal reception is strong, you are
unable to manually set the time.
ALARM
TO SET ALARM
1. Press ALARM to enter Alarm mode. indicates
in Alarm mode.
2. Press and hold ALARM to enter settings.
3. Press UP or Down to set hour and minute.
4. Press ALARM to confirm.
5. Press MODE to return to clock display.
TO ACTIVATE / DEACTIVATE ALARM
1. Press ALARM to enter Alarm mode. indicates
in Alarm mode.
2. Press ALARM repeatedly to activate or deactivate
alarm. indicates alarm is On.
3. Press MODE to confirm and return to clock display.
TO SILENCE ALARM
• PressSNOOZE / LIGHT to snooze alarm for 8 minutes.
OR
• Pressanykeytoturnthe alarmoffandactivateit
again after 24 hours.
DISPLAY CONTRAST
You can adjust the clarity level of the display. Press and
hold MODE until “CONTR” is shown, then select from
0 (lowest) to 15 (highest) by pressing UP or Down for
your preferred level of display contrast. Press MODE
to confirm.
BACKLIGHT
Press SNOOZE / LIGHT to activate LED backlight for
8 seconds.
RESET
Press RESET to return to the default settings.
WMH601_M_EU_EN_R4.indd 8 13-6-14 6:25

EN
9
SPECIFICATIONS
MAIN UNIT
Dimensions 190 x 40 x 125 mm
(L x W x H) (7.5 x 1.6 x 4.9 in)
Weight 360 g (13 oz)
without battery
Temperature range -5°C to 50°C (23°F to 122°F)
Humidity range 25% to 90%
Power 3 x UM-3 (AA) 1.5V batteries
REMOTE THERMO SENSOR (THN132NS)
Dimensions 96 x 50 x 22 mm
(L x W x H) (3.78 x 1.97 x 0.87 in)
Weight 50 g (1.76 oz)
without battery
Temperature range -20°C to 60°C
(-4°F to 140°F)
Signal frequency 433 MHz
Transmission range 100 m (300 ft) unobstructed
Transmission period Approximately every
60 seconds
Number of channels 1
Power 1 x UM-3 (AA) 1.5V battery
PRECAUTIONS
• Do not subject the unit to excessive force, shock,
dust, temperature or humidity.
• Do not cover the ventilation holes with any items
such as newspapers, curtains etc.
• Do not immerse the unit in water. If you spill liquid
over it, dry it immediately with a soft, lint-free cloth.
• Do not clean the unit with abrasive or corrosive materials.
• Do not tamper with the unit’s internal components.
This invalidates the warranty.
• Only use fresh batteries. Do not mix new and old batteries.
• Images shown in this manual may differ from the
actual display.
• When disposing of this product, ensure it is collected
separately for special treatment and not as normal
household waste.
• Placement of this product on certain types of wood
may result in damage to its finish for which Oregon
Scientific will not be responsible. Consult the furniture
manufacturer's care instructions for information.
• The contents of this manual may not be reproduced
without the permission of the manufacturer.
• Do not dispose old batteries as unsorted municipal
waste. Collection of such waste separately for
special treatment is necessary.
WMH601_M_EU_EN_R4.indd 9 13-6-14 6:25

EN
10
• Please note that some units are equipped with a
battery safety strip. Remove the strip from the
battery compartment before first use.
NOTE The technical specifications for this product and
the contents of the user manual are subject to change
without notice.
NOTE Features and accessories will not be available
in all countries. For more information, please contact
your local retailer.
ABOUT OREGON SCIENTIFIC
Visit our website www.oregonscientific.com to learn more
about Oregon Scientific products.
For any enquiry, please contact our Customer Services
Oregon Scientific Global Distribution Limited reserves
the right to interpret and construe any contents, terms
and provisions in this user manual and to amend it, at
its sole discretion, at any time without prior notice. To
the extent that there is any inconsistency between the
English version and any other language versions, the
English version shall prevail.
COUNTRIES RTTE APPROVAL COMPLIED
All EU Countries, Switzerland CH
and Norway N
EU-DECLARATION OF CONFORMITY
Hereby, Oregon Scientific, declares that 4-day Weather
Forecaster Station (model: WMH601) is in compliance
with the essential requirements and other relevant
provisions of Directive 1999/5/EC. A copy of the signed
and dated Declaration of Conformity is available on
request via our Oregon Scientific Customer Service.
WMH601_M_EU_EN_R4.indd 10 13-6-14 6:25

NL
1
INHOUD
Introductie ................................................................. 2
Overzicht ................................................................... 2
Voorkant ................................................................ 2
Achterkant ............................................................. 3
Buitensensor ......................................................... 4
Starten ....................................................................... 4
Instellen Buitensensoren ....................................... 4
Sensor Gegevens Verzending .............................. 4
Het Basisstation Installeren ................................... 5
Weergave Weergegevens ........................................ 5
Regionale Weerinformatie ..................................... 5
Lokale Temperatuur En Vochtigheid...................... 7
Weerwaarschuwingsberichten .............................. 7
Klok ............................................................................ 7
Klok Handmatig Instellen ...................................... 8
Alarm ......................................................................... 8
Alarm Instellen ...................................................... 8
Activeren / Deactiveren Alarm ............................... 8
Om Het Alarm Uit Te Zetten .................................. 8
Schermcontrast ........................................................ 8
Schermverlichting .................................................... 9
Reset .......................................................................... 9
Specificaties ............................................................. 9
Basisstation ........................................................... 9
Buitenthermosensor (THN132NS) ........................ 9
Waarschuwingen ...................................................... 9
Over Oregon Scientific .......................................... 10
EU Conformiteits Verklaring .................................. 10
4-Daagse Weeradviseur
Model: WMH601
HANDLEIDING
WMH601_M_EU_NL_R5.indd 1 13-6-25 12:03
/