Page is loading ...

Features:
• Fits 10" - 24" (25 - 61 cm) LCD at panel screens
• One-touch tilt for effortless positioning and adjustment of the screen
Installation and Assembly:
SmartMount™ Universal Tilt Wall Mount for 10" - 24"
(25 - 61 cm) LCD Flat Panel Screens
Models: ST630P, ST630P-S, ST630, ST630-S
ISSUED: 02-05-09 SHEET #: 201-9421-9 06-03-09
Max Load Capacity: 80 lb (36.3 kg)
©
U
L
USC

2 of 23
ISSUED: 02-05-09 SHEET #: 201-9421-9 06-03-09
Note: Read entire instruction sheet before you start installation and assembly.
Table of Contents
Parts List.................................................................................................................................................................................3
Installation to Single Wood Stud Wall .....................................................................................................................................4
Installation to Solid Concrete or Cinder Block ........................................................................................................................5
Attaching Adapter Plate to Flat Panel Screen ........................................................................................................................6
Installing and Removing Flat Panel Screen............................................................................................................................7
• Do not begin to install your Peerless product until you have read and understood the instructions and warnings
contained in this Installation Sheet. If you have any questions regarding any of the instructions or warnings, for US
customers please call Peerless customer care at 1-800-865-2112, for all international customers, please contact
your local distributor.
• This product should only be installed by someone of good mechanical aptitude, has experience with basic building
construction, and fully understands these instructions.
• Make sure that the supporting surface will safely support the combined load of the equipment and all attached
hardware and components.
• Never exceed the Maximum Load Capacity. See page one.
• If mounting to wood wall studs, make sure that mounting screws are anchored into the center of the studs. Use of
an "edge to edge" stud nder is highly recommended.
• Always use an assistant or mechanical lifting equipment to safely lift and position equipment.
• Tighten screws rmly, but do not overtighten. Overtightening can damage the items, greatly reducing their holding
power.
• This product is intended for indoor use only. Use of this product outdoors could lead to product failure and personal
injury.
• This product was designed to be installed on the following wall construction only;
WALL CONSTRUCTION HARDWARE REQUIRED
•Wood Stud Included
• Wood Beam Included
• Solid Concrete Included
• Cinder Block Included
•Metal Stud Do not attach except with Peerless Metal Stud Accessory Kit - ACC215;
•Brick Contact Qualied Professional
•Other or unsure? Contact Qualied Professional
WARNING
Tools Needed for Assembly
• stud nder ("edge to edge" stud nder is recommended)
• phillips screwdriver
• drill
• 5/16" (8 mm) bit for concrete and cinder block wall
• 5/32" (4 mm) bit for wood stud wall
• level

3 of 23
ISSUED: 02-05-09 SHEET #: 201-9421-9 06-03-09
G
C
D
E
F
A
B
H
I
ST630P ST630P-S
ST630 ST630-S
Description Qty Part #
Part # Part # Part #
A
hook bracket 1 095-1346 095-4346 095-1346 095-4346
B
tilt assembly 1 095-0359 095-0360 095-0359 095-0360
C
concrete anchor 2 590-0320 590-0320 590-0320 590-0320
D
M4 x 10 mm phillips screw 4 504-9012 504-9012 504-9012 504-9012
E
M4 x 20 mm phillips screw 4 504-9020 504-9020 504-9020 504-9020
F
retaining spacer 4 590-5005 590-5005 590-5005 590-5005
G
#14 x 2.5" wood screw 2 5S1-015-C03 5S1-015-C03 5S1-015-C03 5S1-015-C03
H
M5 x 6 mm screw 1 520-1023 520-1023 520-1114 520-1114
I
security driver 1 - - 560-1133 560-1133
Parts List
Before you begin, make sure all parts shown are included with your product.
Parts may appear slightly different than illustrated.

4 of 23
ISSUED: 02-05-09 SHEET #: 201-9421-9 06-03-09
Installation to Single Wood Stud Wall
Use a stud nder to locate the edges of the stud. Use of an edge-to-edge stud nder is highly recommended.
Based on its edges, draw a vertical line down the stud’s center. Place tilt assembly (B) on wall as a template,
making sure that the two mounting holes are over the stud centerline. Level tilt assembly, and mark the center of
the two holes. Drill two 5/32" (4 mm) dia. holes 2.5" (64 mm) deep. Make sure that the tilt assembly is level, secure
it using two #14 x 2.5" wood screws (G) as shown.
Skip to step 2.
G
B
• Installer must verify that the supporting surface will safely support the combined load of the equipment and all
attached hardware and components.
• Tighten wood screws so that wall plate is rmly attached, but do not overtighten. Overtightening can damage the
screws, greatly reducing their holding power.
• Never tighten in excess of 80 in. • lb (9 N.M.).
• Make sure that mounting screws are anchored into the center of the stud. The use of an "edge to edge" stud nder
is highly recommended.
• Hardware provided is for attachment of mount through standard thickness drywall or plaster into wood studs. Install-
ers are responsible to provide hardware for other types of mounting situations (not evaluated by UL).
WARNING
1

5 of 23
ISSUED: 02-05-09 SHEET #: 201-9421-9 06-03-09
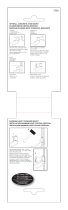
Make sure that tilt assembly (B) is level, use it as a
template to mark two mounting holes. Drill two 5/16"
(8 mm) dia. holes to a minimum depth of 2.5"
(64 mm). Insert anchors (C) in holes ush with wall
as shown (right). Place tilt assembly over anchors
and secure with two #14 x 2.5" screws (G). Level,
then tighten all fasteners.
G
CINDER BLOCK
SOLID CONCRETE
B
C
1
3
2
C
Drill holes and insert anchors (C).
Place plate (B) over anchors (C) and secure with screws (G).
Tighten all fasteners.
B
C
G
concrete
surface
1
Installation to Solid Concrete or Cinder Block
• When installing Peerless wall mounts on cinder block, verify that you have a minimum of 1-3/8" (35 mm) of actual
concrete thickness in the hole to be used for the concrete anchors. Do not drill into mortar joints! Be sure to mount
in a solid part of the block, generally 1" (25 mm) minimum from the side of the block. Cinder block must meet ASTM
C-90 specications. It is suggested that a standard electric drill on slow setting is used to drill the hole instead of a
hammer drill to avoid breaking out the back of the hole when entering a void or cavity.
• Concrete must be 2000 psi density minimum. Lighter density concrete may not hold concrete anchor.
• Make sure that the wall will safely support four times the combined load of the equipment and all attached hardware
and components.
WARNING
CUTAWAY VIEW
INCORRECT CORRECT
wall
plate
wall
plate
plaster/
dry wall
plaster/
dry wall
concrete
concrete
• Tighten screws so that wall plate is rmly attached,
but do not overtighten. Overtightening can damage
screws, greatly reducing their holding power.
• Never tighten in excess of 80 in. • lb (9 N.M.).
• Always attach concrete expansion anchors directly
to load-bearing concrete.
• Never attach concrete expansion anchors to
concrete covered with plaster, drywall, or other
nishing material. If mounting to concrete surfaces
covered with a nishing surface is unavoidable,
the nishing surface must be counter bored as
shown below. Be sure concrete anchors do not
pull away from concrete when tightening screws.
If plaster/drywall is thicker than 5/8" (16 mm),
custom fasteners must be supplied by installer (not
evaluated by UL).
WARNING

6 of 23
ISSUED: 02-05-09 SHEET #: 201-9421-9 06-03-09
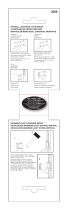
F
*For screens with
a hole pattern in a
pocket, spacers (F) go
between hook plate (A)
and screen.
FOR VESA
®
75 MOUNTING PATTERN:
Choose hole pattern as shown below. Attach hook
plate (A) to back of screen using four M4 x 10 mm
screws (D) as shown below.
*Note: If hole pattern is in a pocket, attach hook
plate (A) to back of screen using four M4 x 20
mm screws (E) and four retaining spacers (F) as
indicated below.
Attaching Adapter Plate to Flat Panel Screen
• If screws don't get three complete turns in the screen inserts or if screws bottom out and bracket is still not tightly
secured, damage may occur to screen or product may fail.
WARNING
D
FOR VESA
®
100 MOUNTING PATTERN:
Choose hole pattern as shown below. Attach hook
plate (A) to back of screen using four M4 x 10 mm
screws (D) as shown below.
D
2
A
A

7 of 23
ISSUED: 02-05-09 SHEET #: 201-9421-9 06-03-09
Attach screen to tilt assembly (B). Tighten
M5 x 6 mm screw (H) to lock screen to tilt assembly.
Note: For security models, use security driver (I) to
tighten M5 x 6 mm screws (H).
To remove screen from mount, loosen screw (H)
and lift screen off of mount.
Installing and Removing Flat Panel Screen
3
• Do not lift more weight than you can handle. Use ad-
ditional man power or mechanical lifting equipment
to safely handle placement of the screen.
• Failure to lock hook plate (A) with screw (H) can
cause screen to come off mount if hit accidentally.
• Do not tighten screws with excessive force.
Overtightening can cause damage to mount. Tighten
screws to 20 in. • lb (2.26 N.M.) maximum torque.
WARNING
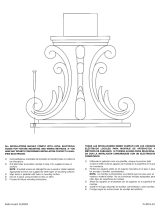
Adjust tension knob on right side of mount shown in
gure 4.1 to desired tension to balance your screen
size and weight.
Push or pull from top or bottom of screen to adjust
tilt as shown in gure 4.1. The tilt can be adjusted to
a maximum of 15° forward or 5° backward.
4
• Do not tighten screws with excessive force.
Overtightening can cause damage to mount. Tighten
screws to 40 in. • lb (4.5 N.M.) maximum torque.
• Be careful not to pinch ngers when pushing screen
from the bottom.
CAUTION
g.4.1
TENSION KNOB
A
SCREEN
H
B
g.3.1
© 2009, Peerless Industries, Inc. All rights reserved.
All other brand and product names are trademarks or registered trademarks of their respective owners.
Peerless Industries, Inc.
3215 W. North Ave.
Melrose Park, IL 60160
www.peerlessmounts.com

22 of 23
ISSUED: 02-05-09 SHEET #: 201-9421-9 06-03-09
© 2008 Peerless Industries, Inc.
Peerless Industries, Inc. establishes a warranty period of ve years for products manufactured or supplied by Peerless. This period commences from the date of
sale of the product to the original consumer, but will in no case last for more than six years after the date of the product’s manufacture. During the warranty period
such products will be free from defects in material and workmanship, provided they are installed and used in compliance with the instructions established by
Peerless Industries, Inc. Subject to applicable legal requirements, during the warranty period Peerless will repair or replace, or refund the purchase price of, any
such product which fails to conform with this warranty.
Any other warranties prescribed by the law which may apply with respect to such products also are limited in duration to the warranty period specied in this
Limited Five-Year Warranty.
This warranty does not cover damage caused by (a) service or repairs by the customer or a person who is not authorized for such service or repairs by Peerless
Industries, Inc., (b) the failure to utilize proper packing when returning the product, (c) incorrect installation or the failure to follow Peerless’ instructions or warnings
when installing, using or storing the product, or (d) misuse or accident, in transit or otherwise, including in cases of third party actions and force majeure.
In no event shall Peerless be liable for incidental or consequential damages or damages arising from the theft of any product, whether or not secured by a security
device which may be included with the product.
This Limited Five-Year Warranty is in lieu of all other warranties, expressed or implied, and is the sole remedy with respect to product defects. No retailer, dealer,
distributor, installer or other person is authorized to modify or extend this warranty or impose any obligation on Peerless in connection with the sale of any product
manufactured or supplied by Peerless.
This warranty gives specic legal rights, and you may also have other rights provided by the national legislation of the country in which you purchased such
product.
LIMITED FIVE-YEAR WARRANTY
www.peerlessmounts.com
© 2008 Peerless Industries, Inc.
Peerless Industries, Inc. establece un período de garantía de cinco años para los productos fabricados o suministrados por Peerless. Este período empieza en
la fecha de venta del producto al consumidor original, pero en ningún caso durará más de seis años después de la fecha de fabricación del producto. Durante
la vigencia de la garantía, dichos productos se encontrarán libres de defectos en sus materiales y fabricación, siempre que se instalen y usen de conformidad
con las instrucciones establecidas por Peerless Industries, Inc. Sujeto a los requisitos legales pertinentes, durante la vigencia de la garantía Peerless reparará o
reemplazará un producto que no cumpla con la presente garantía o reembolsará el precio de compra del mismo.
Cualquier otra garantía exigida por ley que podría ser aplicable con respecto a dichos productos también tendrá una vigencia limitada al período de garantía
especicado en la presente Garantía Limitada de Cinco Años.
La presente garantía no abarca los daños causados por (a) trabajos de servicio, mantenimiento o reparación hechos por el cliente o una persona que no está
autorizada por Peerless Industries, Inc. para realizar esos trabajos, (b) no utilizar un embalaje apropiado al devolver el producto, (c) una instalación incorrecta o
no seguir las instrucciones o advertencias de Peerless al instalar, usar o almacenar el producto, o (d) uso indebido o accidente, en tránsito o de otro modo, incluso
si se trata de acciones atribuibles a terceros o de casos de fuerza mayor.
Peerless en ningún caso será responsable de daños incidentales o indirectos o daños que surjan del robo de un producto, esté o no protegido por un dispositivo
de seguridad incluido con el producto.
La presente Garantía Limitada de Cinco Años reemplaza cualquier otra garantía expresa o implícita, y es la única reparación con respecto a defectos en el
producto. Ningún comerciante minorista, agente, distribuidor, instalador u otra persona, está autorizado para modicar o prolongar la presente garantía ni para
imponer una obligación a Peerless en relación con la venta de un producto fabricado o suministrado por Peerless.
La presente garantía otorga derechos legales especícos, y usted también podría tener otros derechos en virtud de la legislación nacional del país donde usted
compró el producto.
GARANTÍA LIMITADA DE CINCO AÑOS
www.peerlessmounts.com
Español
/