Page is loading ...

1
Power screwdriver or drill that accepts inter-
changeable bits*
Hammer
Tape measure
* A bit holder may be needed if using a drill with a
quick-change chuck.
Each product comes ready to assemble and install.
Check the next few pages to find the requirements
for installation based on the configuration of your
purchase.
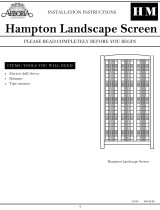
INSTALLATION INSTRUCTIONS
Landscape Screens & Wings
PLEASE READ COMPLETELY BEFORE YOU BEGIN ASSEMBLY
ITEMS/TOOLS YOU WILL NEED
LS
Andover Arch Screen
Andover Wing Panels
6/13 445.35.09
Win FREE Arboria Products
Give us feedback about this Arboria product and be entered into a drawing to win Arboria goods. It’s easy, go to
www.Arboria.com, choose a product then click on the link to review. Be sure to enter your email and telephone so
that we may contact you if you win. Upload a photograph for an extra chance to win. Visit www.Arboria.com for official
rules. No purchase necessary.

2
ARCH TO BASE ASSEMBLY
Landscape Screen Arch
Place the arch panel on top of the base panel centered over the
top rail. Make sure the lath patterns match.
Use the 2 1/2” screws to secure the arch panel to the base
panel through the 4 predrilled holes.
Be sure to let the screws follow the angle of the pre-drilled
holes.
INSTALLATION
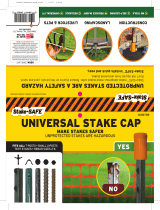
Screens are equipped with (2) 36” Steel Stakes for in-ground, freestanding installation.
These can be mounted to either the side or back of the Base Panel.
Placement of Stakes
If mounting the Stakes on the back of the Base Panel, drive the first stake 14” to 18” into
the ground in the desired location. Be sure to position the stake such that the “U” shape
faces the Panel. Measure 34” apart from this first stake and then drive your second stake
14” to 18” into the ground.
If mounting the Stakes on the side of the Base Panel, drive the first stake 14” to 18” into
the ground in the desired location. Measure 36.5” from this first stake, then drive your
second stake 14” to 18” into the ground.
If attaching Wing Panels to Base Panel stakes will need to be attached from the back.
Attaching Base Panel to Stakes
We recommend installing the screen so that the bottom of the posts are 1” above the
ground.
Use the 1 5/8” wood screws to secure the screen to the stakes. Screw through the holes
in the stake into the Panel frame and be sure to use the highest and lowest possible holes
on each stake.
Arch Top Panel
Rectangular Base Panel
Wood Screws - 2 1/2” (4)
Driver bit (if other than Phillips head)
Stakes (2) & Wood Screws - 1 5/8” (4)
CHECK BOX FOR THESE CONTENTS
Arch Panel
Base Panel

3
ATTACHING THE WINGS
Wing to Arch Assembly
If you want to install the Wings with your Arboria Arch Screen (base panel) there are two
ways to do so, depending on your preference as to final appearance.
If you would like the Wings and Arch to form a straight line (or have the Wings hinge
away from the front of the Arch Screen):
Place the Base Panel and Wing Panel side by side. Open the hinge and place one hinge
flap on the back of Wing and the other on the back of Base Panel, 6” from the top of the
Wing Panel. Using the ¾” hinge screws (see image), attach the hinge to both parts. Re-
peat 6” from the bottom using another hinge. Attach the second wing using the same
procedure.
If you would like the Wings to Arch attachment to form a concave shape (or have the
Wings hinge toward the front of the Arch Screen):
The hinge must be attached between the side edges of the Base Panel and the Wing Panel
side by side with the hinge pin facing outward (see image). Pivot the Wing Panel and
open the hinge and place one hinge flap on the edge of the Wing and the other on the
edge of the Base Panel, 6” from the top of the Wing Panel. Using the ¾” hinge screws,
attach the hinge to both parts. Repeat 6” from the bottom using another hinge. Attach
the second wing using the same procedure.
Landscape Screen Wings
Left-hand Wing Panel (staples facing back)
Right-hand Wing Panel (staples facing back)
Stakes (2) & Wood Screws 1 5/8” (4)
Hinges (4) 2 per wing
Hinge Screws (16) 8 per wing
NOTE: If you have purchased the Wing Panels without
the Arch Screen you will have 2 spare hinges.
EACH WING PAIR COMES WITH THE FOLLOWING:
Wing Panel to Wing Panel Attachment Assembly
Position Wings in the desired location and in the desired angle. Be sure to align panels
such that the staple-free face of each panel is to the desired side. Hinge placement will
affect how the Wing Panels connect. There are two basic choices:
1) Hinge on the back of Panels - Open hinge and place one flap on the back of each
Wing Panel, 6” from the top of the Wing Panel. Using the ¾” hinge screws (see im-
age at right). Attach the hinge to both parts. Repeat 6” from the bottom using another
hinge.
2) Hinge similarly, but between the panels to allow the opposite movement.
Wing Wing
Arch Screen
(Sold separately)

4
Division of LWO Corporation
3841 N. Columbia Blvd.
Portland, Oregon 97217
(503) 286-5372 (800) 459-8718
www.arboria.com
ATTACHING THE WINGS TO THE ARCH
INSTALLATION
We recommend completing the above attachment assemblies prior to
final installation.
Each pair of Wing Panels comes with (2) 36” Steel Stakes for in-ground,
freestanding installation. These can be mounted to either the side or
back of the Wing Panel frames.
Drive each stake 14” to 18” into the ground in the desired location on
the side or back of Panels. Be sure to position the stake such that the
“U” shape of the stake faces each Panel.
We recommend installing the screen so that the bottom of the posts are
1” above the ground.
Use the 1 5/8” wood screws to secure the screen to the stakes. Screw
through the holes in the stake into the Panel frame and be sure to use the
highest and lowest possible holes on each post.
/