Page is loading ...

Version 3.1 TX3 Telephone Access System Programming Manual 1
LT-979 Copyright November 2019
TX3 Series
Telephone Access System
Programming Manual

2 TX3 Telephone Access System Programming Manual Version 3.1
LT-979 Copyright November 2019
Copyright November 2019 Mircom Inc.
All rights reserved.
Mircom Telephone Access System Programming Manual Version 3.1
Microsoft, MS-DOS, Windows, and Windows 2000/NT/XP/Vista/7/8/10 are either registered
trademarks or trademarks of Microsoft Corporation in the United States and/or other countries.
Mircom
25 Interchange Way
Vaughan, Ontario
L4K 5W3
905.660.4655
http://www.mircom.com

Version 3.1 TX3 Telephone Access System Programming Manual 3
LT-979 Copyright 2019
Contents
1 Introduction 4
1.1 TX3 Systems 5
1.2 Features 6
1.3 Warranty and Special Notices 7
1.4 About This Manual 7
1.5 Contact Us 8
1.6 Viewing Resident List 8
2 Configuration 9
2.1 Keypad Navigation 10
2.2 Beginning Configuration 10
2.3 Accessing the Operation Menu 11
2.4 Viewing Configuration Information 13
2.5 Viewing the Time and Date 14
2.6 Configuration Menu 15
2.7 System Option 15
2.8 Database Menu 32
2.9 Schedule Menu 43
2.10 Holidays Menu 45
2.11 Set Time & Date 46
2.12 Factory Default 47
2.13 Input/Output 47
2.14 Correlations 49
2.15 Changing Passcodes 52
2.16 Test LCD 53
Warranty and Warning Information 54
Special Notices 59

4 TX3 Telephone Access System Programming Manual Version 3.1
LT-979 Copyright 2019
1 Introduction
This manual provides you with detailed instructions on how to configure the
TX3 Telephone Access System from the main entry panel keypad.
This manual must be read in its entirety before beginning the configuration.
Configuration must be performed by a qualified technician and must adhere to
the standards and special notices set by the local regulatory bodies.
Note: Mircom periodically updates panel firmware and
Configurator Software to add features and correct any minor
inconsistencies. For information about the latest firmware or
software visit the Mircom website at www.mircom.com.
For warranty and special notices information see the Warranty and Special
Notices chapter on page 54.
This manual explains
• The TX3 Telephone Access System
• How to configure the TX3 Telephone Access System

Introduction
Version 3.1 TX3 Telephone Access System Programming Manual 5
LT-979 Copyright 2019
1.1 TX3 Systems
The Mircom's TX3 series of telephone access systems provide high quality two-
way communication between residents and their visitors in a multi-unit dwelling
establishment.
The basic TX3 system consists of the TX3 Entry Panel and depending on the
application, may be integrated with a combination of Mircom Elevator
Restriction Units and Card Access Units. All access systems may be networked
together using an RS-485 connection.
The TX3 system is capable of providing ADC or NSL telephone access from a
single panel or from a networked system. The TX3 system also may consist of
one or more access systems networked together using an RS-485 connection.
The access system can be configured as an autodialer controller (ADC) or as a no
subscriber line (NSL) system. Both system setups can be configured for multiple
entrances with independent doors and control devices such as electric door locks,
cameras, and garage doors.
1.1.1 ADC and NSL Capability
A single TX3 Entry Panel supports full ADC and NSL telephone connectivity.
An ADC connection requires a dedicated subscriber telephone line service
connected to an outside telephone line. This mode lets the visitor call the tenant
and access their voice mail.
An NSL connection uses the existing building telephone lines for
communication and does not require a separate telephone line. This system may
consist of one or more entry panels connected to TX3-NSL-8M NSL Units,
typically located in the electrical/telephone room of a building. The NSL units
intercept all telephone lines into the building’s suites if the lines are not in use.
This mode lets the visitor call the tenant and access their voice mail and call
waiting.
1.1.2 Elevator Restriction Units
The TX3-ER-8 Elevator Restriction Unit limits building accessibility by
granting visitor access only to the destination floor.

6 TX3 Telephone Access System Programming Manual Version 3.1
LT-979 Copyright 2019
Introduction
1.2 Features
Features of the TX3 series include:
• Stainless steel front panel
• Universal Series enclosure with a built-in rain hood
• Large scrolling 8 x 20 LCD display that eliminates the need for an external
directory
• Back-lit 16 digit keypad with dedicated operational buttons for Page Up,
Page Down, Call and Info
• Provisions for postal lock and camera
• Multilingual Display and Voice Greeting (English, French-Canadian and
Spanish) that provides instructions on how to use the entry panel
• Concierge/Security Desk/Guard Phone capability
• Card Access Interface
• Supports both Auto Dialer (ADC) and NSL (no phone bill)
• Ability to network panels together (peer-to-peer)
• Hands free, full duplex communication
• Flexible one to four digit resident dial codes
• Dials up to 18 digit telephone numbers
• System can be configured locally using the keypad or a computer with the
TX3 configuration software
• Upload/download configuration files without taking the whole system
off-line
• Programming from one location
• Records a maximum of 5000 event logs
• Elevator restriction capability
• Schedule based call restrictions provide more security and flexibility
• Capability of one person testing of the NSL controller without using the
lobby panel
• Industry Canada and F.C.C. approved

Introduction
Version 3.1 TX3 Telephone Access System Programming Manual 7
LT-979 Copyright 2019
1.3 Warranty and Special Notices
Mircom values your business and always attempts to provide you with the very
best service.
Please see the Warranty and Special Notices chapter on page 54 for information
about the warranty and special notices about equipment use.
1.4 About This Manual
This manual provides comprehensive information on the configuration of the
TX3 Series Telephone Access System. Tasks are described in the order that they
are likely to be performed.
This manual applies to the following models:
• TX3-120U and TX3-120U-A/C
• TX3-200-8U, TX3-200-8U-A and TX3-200-8U-B/C
• TX3-1000-8U, TX3-1000-8U-A and TX3-1000-8U-B/C
• TX3-2000-8U, TX3-2000-8U-A and TX3-2000-8U-B/C
• TX3-200-4U-A and TX3-200-4U-B/C
• TX3-1000-4U-A and TX3-1000-4U-B/C
• TX3-2000-4U-A and TX3-2000-4U-B/C
• TX3-120C-A/C
• TX3-200-8C-A and TX3-200-8C-B/C
• TX3-1000-8C-A and TX3-1000-8C-B/C
• TX3-2000-8C-A and TX3-2000-8C-B/C
• TX3-200-8CH-A, TX3-1000-8CH-A and TX3-2000-8CH-A
• TX3-200-8UH-A, TX3-1000-8UH-A and TX3-2000-8UH-A
• TX3-2000-8K-A
1.4.1 Additional Documentation
For additional documentation, see the following Mircom literature:
• LT-995 TX3-CX Touch Screen Administrators Guide
• LT-968 TX3 Telephone Access System User’s Guide

8 TX3 Telephone Access System Programming Manual Version 3.1
LT-979 Copyright 2019
Introduction
1.5 Contact Us
1.5.1 Canada and USA
Phone: 905-660-4655
Toll Free: 1-888-660-4655
Fax: 905-660-4113
1.5.2 International
Phone: 905-660-4655
1.5.3 Website
http://www.mircom.com
1.6 Viewing Resident List
The TX3 Entry Panel LCD shows a scrollable view of the resident names and dial
codes. The LCD comes in a four or eight line LCD handset version. A paper
version of the resident list is also available.
To view the resident list
1. Press the up or down arrow keys on the Entry Panel keypad to scroll
through the list line by line.
or
To view the resident list page by page use the star key to scroll page up and
number key to scroll page down.
2. Key in the dial code associated with the resident you wish to speak to or
press the Telephone Key when the cursor is on the resident’s name. For the
handset version, first pick up the phone and then key in the dial code or
press the Telephone Key.
3. Once the resident grants entry permission, the door unlocks. For the
handset version, hang up the phone and proceed through the door.

Version 3.1 TX3 Telephone Access System Programming Manual 9
LT-979 Copyright 2019
2 Configuration
This chapter provides detailed information about the TX3 Telephone Access
System configurable functions.
This chapter explains
• Keypad Navigation
• Beginning Configuration
• Accessing the Operation Menu
• Viewing Configuration Information
• Viewing the Time and Date
• Configuration Menu
• System Option
• Database Menu
• Schedule Menu
• Holidays Menu
• Set Time & Date
• Factory Default
• Input/Output
• Correlations
• Changing Passcodes
•Test LCD

10 TX3 Telephone Access System Programming Manual Version 3.1
LT-979 Copyright 2019
Configuration
2.1 Keypad Navigation
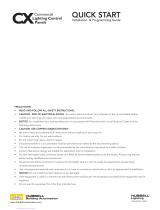
Figure 1 shows how to use the keypad when in CONFIGURATION MODE.
Note that the keypad buttons can have different functions when creating resident
entries. Refer to 2.8.1 Adding a New Record and Table 1: List of Screens for
more information.
Figure 1. Keypad Navigation
2.1.1 Exiting Configuration Mode
You can exit the configuration mode at any time.
To exit configuration mode
1. To exit the configuration mode, press the info key to return to the
previous menu.
2.2 Beginning Configuration
To configure the Telephone Access panel, you must first enter the configuration
mode.
In configuration
mode
Press to move
left.
*
In configuration
mode
Press to scroll up.
Press to scroll
down.
Press to cancel
the selection or exit
mode.
Press to enter
and confirm selection.
Press to move right for checking
and un-checking the check box.
#

Configuration
Version 3.1 TX3 Telephone Access System Programming Manual 11
LT-979 Copyright 2019
To enter configuration mode
1. Press .
The main menu appears with four choices.
To access the Operation menu see section 2.3.
To access the View Configuration Information menu see section 2.4.
To view the time and date see section 2.5.
2. Select Configuration, then press the telephone key. The passcode
message appears.
3. Enter your passcode, then press the telephone key.
or
If you have not set a personal passcode, press 3 3 3 3, then press the
telephone key. This number is the four-digit factory default. You are now
in configuration mode.
To continue with configuration see section 2.6.
2.3 Accessing the Operation Menu
The Operation Menu lets you view and delete logs.
Main Menu
1 Configuration
2 Operation
3 View Cfg Info
4 View time & dat
Enter the Passcode
[ _ _ _ _ _ _ _ _ _ ]

12 TX3 Telephone Access System Programming Manual Version 3.1
LT-979 Copyright 2019
Configuration
To access the operation menu
1. Press 9 9 9 9. The configuration information appears.
2. Press the (scroll down) to “Operation”.
3. Press the telephone key.
4. Enter your passcode, then press the telephone key.
or
If you have not set a personal passcode, press 3 3 3 3, then press the
telephone key. This number is the four-digit factory default.
5. The “Operation” menu appears.
To view logs
1. Press the arrow key to scroll to “View Logs” and press the enter
(telephone) key. The system information appears.
If you have just installed the system, following message appears.
Main Menu
1 Configuration
2 Operation
3 View Cfg Info
4 View time & dat
Operation Menu
1 View logs
2 Delete logs
Logging data not
present

Configuration
Version 3.1 TX3 Telephone Access System Programming Manual 13
LT-979 Copyright 2019
2. If recent events have occurred, such as, entering of dial codes and the
opening of the main door, this information appears along with the date and
time as follows.
The first four digits represent the index of logged events in sequence
from 1 (0001) up to 5000.
The following letter “D” indicates that the preceding number was a dial
code (D = dial code, K = keyless code).
The term “Acc:” represents the word “access”. The term “Yes” indicates
that access was granted.
3. Press info key to return to previous menu.
To delete logs
1. Press the arrow key to scroll to “Delete Logs” and press the telephone key.
The “Delete Logs” selection appears.
2. Use the up and down arrow keys to select the log and press the telephone
(enter) key to delete.
3. Press info key to return to previous menu.
2.4 Viewing Configuration Information
Configuration information includes the following:
• Hardware Version
User log info
Log: 190 of 5000
Event: Call Connect
Acc pt: N/A
Acc Code: D20
Jan 15 2010
12:22 pm
Delete Log
User log (s)
System log (s)
All log (s)

14 TX3 Telephone Access System Programming Manual Version 3.1
LT-979 Copyright 2019
Configuration
• Firmware Version
• Panel Type (for example, telephone access or card access)
• Model (for example, 200 names)
•Last Modified
• Configuration tool used (for example, Configurator or front panel)
• Panel ID
• RS485 Address
•IP Address
To view configuration information, you must first enter the configuration mode.
To select viewing mode
1. Press 9 9 9 9. The Main Menu appears. You may need to scroll up or
down to view the entire selection.
2. Press the (scroll down) to “View Cfg Info”.
3. Press the telephone key.
4. The system configuration information appears.
5. Press the info key to return to the previous menu.
2.5 Viewing the Time and Date
To view time and date
1. Press 9 9 9 9. The configuration information appears.
Main Menu
1 Configuration
2 Operation
3 View Cfg Info
4 View time & dat
Main Menu
1 Configuration
2 Operation
3 View Cfg Info
4 View time & dat

Configuration
Version 3.1 TX3 Telephone Access System Programming Manual 15
LT-979 Copyright 2019
2. Press the (scroll down) to “View time & date”.
3. Press the telephone key.
The display shows the time and date.
4. Press the info key to return to previous menu.
2.6 Configuration Menu
The Configuration Menu consists of the following configurable items.
• System Option
• Database Menu
• Schedule Menu
• Holidays Menu
• Set Time & Date
• Factory Default
• Input/Output
• Correlations
• Changing Passcodes
•Test LCD
For a description on how to configure these items see paragraphs 2.7 to 2.16.
2.7 System Option
Selecting “System Option” from the Configuration Menu gives you the
following configuration options:
• Tone/Pulse mode
•Line Type
• Main Door DTMF
• Aux Door DTMF
• Main door timer
• Aux door timer
• Talk timer
• Language
• Welcome Message

16 TX3 Telephone Access System Programming Manual Version 3.1
LT-979 Copyright 2019
Configuration
•Guard Phone
• Calling Sch
• Unlock Schedule
• Keycode Sch
• Call Wait Key
• Keypad Active
• No of rings
• Postal usage
• Scroll speed
• Day light saving
• Clock adjustment
• Elevator Rest Timer
• Speaker volume
•MIC volume
• Select Font (only available on 8-line display)
• Voice Help Option
• Auto Unlock Schedule
• DTMF Sensitivity
•Handset
For a description on how to configure these items see paragraphs 2.7.1 to 2.7.28
2.7.1 Tone/Pulse mode
Note: Although this option appears on the front panel, it is not
configurable. The telephone always operates in tone mode. Pulse
dialing is not available.
To access the Tone/Pulse option screen
1. Press the arrow key to scroll to “Tone/Pulse mode” and press the
telephone key. The tone/pulse selection appears.
2. Press the info key to return to the previous menu.

Configuration
Version 3.1 TX3 Telephone Access System Programming Manual 17
LT-979 Copyright 2019
2.7.2 Line Type
The Line Type function defines each of the 5 telephone lines as ADC, NSL or not
used. By default is line 1 is ADC and lines 2 to 5 as unused.
To define the line type operation
1. Press the arrow key to scroll to “Line Type” and press the telephone key.
The line selection appears.
2. Using the down arrow key to select L-1, and press the telephone (enter)
key. The line type selection appears.
3. Use the ‘*” and or “#” key to make a selection.
4. Press the telephone key to enter the selection.
5. Press the info key to return to the previous menu.
2.7.3 Main Door DTMF
The Main Door DTMF function defines the key the resident presses to open the
main door. The default key is 9.
To define the Main Door DTMF key
1. Press the arrow key to scroll to “Main Door DTMF” and press the
telephone key. The Main Door DTMF selection appears.
2. Use the up or down key to move to the key number.
Line Type
L-1
L-2
L-3
Select Line Type
[ x ] ADC Type
[ ] NSL Type
[ ] Unused
Main Door DTMF
[ x ] ‘9’
[ ] ‘0’

18 TX3 Telephone Access System Programming Manual Version 3.1
LT-979 Copyright 2019
Configuration
3. Use the * key to select the number and the telephone (enter) key to confirm
the DTMF code. Valid numbers are 1 to 9, * or #.
Note: Do not select 4 (this is used to refuse entry or disconnect).
Do not use the same number for the main door, auxiliary door, and
call waiting (call waiting works on NSL systems only).
If the Telephone Access System Panel has controller board model
MD-1245, do not select 1, 7, or *.
4. Press the info key to return to the configuration menu.
5. Press the info key to return to the previous menu.
2.7.4 Aux Door DTMF
The Aux Door DTMF function defines the key the resident presses to open the
auxiliary door. The default key is 6.
To define the Aux Door DTMF key
1. Press the arrow key to scroll to “Aux Door DTMF” and press the
telephone key. The Aux Door DTMF selection appears.
2. Use the up or down key to move to the key number.
3. Use the * key to select the number and the telephone (enter) key to confirm
the DTMF code. Valid numbers are 1 to 9, * or #.
Note: Do not select 4 (this is used to refuse entry or disconnect).
Do not use the same number for the main door, auxiliary door, and
call waiting (call waiting works on NSL systems only).
If the Telephone Access System Panel has controller board model
MD-1245, do not select 1, 7, or *.
4. Press the info key to return to the previous menu.
Aux Door DTMF
[ ] ‘6’
[ ] ‘7’
[ ] ‘9’

Configuration
Version 3.1 TX3 Telephone Access System Programming Manual 19
LT-979 Copyright 2019
2.7.5 Main Door Timer
The Main Door Timer function defines the length of time that the main door stays
unlocked after the resident opens the main door using the telephone keypad. The
default is 10 seconds.
To set the Main Door Timer
1. Press the arrow key to scroll to “Main Door Timer” and press the
telephone key. The Main Door Timer selection entry appears.
2. Use the up or down keys to select the number of seconds. Valid
programmable time is 1 to 60 seconds.
3. Press the info key to return to the previous menu.
2.7.6 Aux Door Timer
The Auxiliary Door Timer function defines the length of time that the auxiliary
door stays unlocked after the resident opens the auxiliary door using the
telephone keypad. The default is 10 seconds.
To set the Auxiliary Door Timer
1. Press the arrow key to scroll to auxiliary “Door Timer” and press the
telephone key. The Auxiliary Door Timer selection entry appears.
2. Use the up or down keys to select the number of seconds. Valid
programmable time is 1 to 60 seconds.
3. Press the info key to return to the previous menu.
2.7.7 Talk Timer
The Talk Timer function defines the length of time that a visitor may be on the
telephone with a resident. The default is 60 seconds.
Main Door Timer
[ 010 ]
Auxiliary Door Timer
[ 010 ]

20 TX3 Telephone Access System Programming Manual Version 3.1
LT-979 Copyright 2019
Configuration
To set the Talk Timer
1. Press the arrow key to scroll to “Talk Timer” and press the telephone key.
The Talk Timer selection entry appears.
2. Use the up or down keys to select the number of seconds. Valid time is
from 10 to 300 seconds.
3. Press the info key to return to the previous menu.
2.7.8 Language
The default language is English. Selecting Multi Language makes the opening
screen flip through messages in English, French, and Spanish. Once a key is
pressed, the language that is displayed on the screen at that moment will be used
for the rest of the messages.
To select a language
1. Press the arrow key to scroll to “Language” and press the telephone (enter)
key. The language selection appears.
2. Press the info key to return to the previous menu.
2.7.9 Welcome Message
The Welcome Message function lets you change the welcome message on the
front of the TX3 Entry Control Panel.
Talk Timer
[ 060 ]
Language
[ x ] English
[ ] French
[ ] Spanish
/