Page is loading ...

SAVE FOR FUTURE USE
7302395-100
Product names listed herein are trademarks of AS America, Inc.
© AS America, Inc. 2018
2882 SERIES
GLENWALL
®
VORMAX
®
WALL-MOUNTED TOILET
INSTALLATION INSTRUCTIONS
CAUTION: PRODUCT IS FRAGILE. TWO PEOPLE ARE RECOMMENDED FOR HANDLING TO AVOID
BREAKAGE AND POSSIBLE INJURY!
NOTE: For proper operation product requires a minimum of 30 psi working line pressure
Thank you for selecting American Standard – the benchmark of fine quality for over 100 years. To ensure this product is installed
properly, please read these instructions carefully before you begin. (Certain installations may require professional help.) Also be
sure your installation conforms to local codes.
!
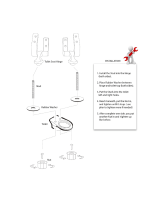
RECOMMENDED TOOLS AND MATERIALS
1
Pictures may not exactly define contour of china
EZ-INSTALL KIT INCLUDED WITH TANK
Attachment Handle
Nuts (3)
When installed so top of seat is 17" to 19" (432mm to 483mm) from the nished oor. MEETS THE AMERICANS WITH DISABILITIES ACT
GUIDELINES AND ANSI A117.1 REQUIREMENTS FOR ACCESSIBLE AND USEABLE BUILDING FACILITIES - CHECK LOCAL CODES.
FINISHED WALL
29-1/2"
(750mm)
9-5/8"
(245mm)
18-7/16"
(469mm)
14-5/8"
(372mm)
9"
(229mm)
17-13/16"
(453mm)
7-1/2"
(191mm)
4"
(102mm)
1-3/4"
(45mm)
5-1/8"
(130mm)
17"
(432mm)
C/L OF WASTE OUTLET
3-1/4"
(83mm)
5-1/4"
(133mm)
4-1/8" (105mm)
C/L OF SEAT POST
HOLES 5-1/2"
(140mm CENTERS)
3-7/8"
(98mm)
SUPPLY AS
REQUIRED
32-13/16"
(833mm)
*7-1/2"
(191mm)
*8-1/2"
(216mm)
BACK-TO-BACK INSTALLATION
Recommended fitting type for
back-to-back installations.
Depending upon your plumbing and venting conditions, the
flow from the toilet in a back-to-back installation may create
a vacuum on the system and draw water from the opposing
bowl. The National Standards Plumbing Code prohibits the
use of a cross fitting for drainage as throw over is possible.
The code does approve a directional "Y" style fitting with
proper venting to direct the water downward and away from
the other toilet.
Closet Carrier Support
Putty Knife
Regular Screwdriver
Adjustable Wrench
Sealant
Tape Measure
Carpenters Level
Water Supply Line - Verify length required

2
FIXTURE MOUNTING
Fixture studs should project 58mm (2-1/4") from face of
finished wall.
FRONT VIEW
SIDE VIEW
FINISHED WALL
2-1/4"
(58mm)
(4) CARRIER BOLTS
STANDARD
BOLT CAP
CHINA / TOILET
WALL
RETROFIT
BOLT CAP
WALL
CHINA / TOILET
STANDARD BOLT CAP
RETROFIT BOLT CAP
NOTE: If carrier bolt does not extend or is flush with
china, use retrofit caps 7381285-200.0070A
(sold separately).
7302395-100
3
5
4
- 2 -
LEVEL
FINISHED WALL
1/16" (2mm)
(IRREGULAR
WALL SURFACE)
FINISHED
WALL
CLOSET
CARRIER
SYSTEM
(3) NUTS
WASTE
HORN
5/16" (7mm)
Using a level on face of
back-up nuts, adjust
the top left back-up nut
so that it is in the same
vertical plane as the
lower left back-up nut.
Adjust the two lower back-up nuts
so that front face of nuts and
washers are positioned to allow a
minimum 1/16" (2mm) gap
between fixture and wall surface.
Place back-up nuts on both bottom bolts, and the
top left-hand bolt only.
Adjust waste horn to project
5/16" (7mm) from finished wall.
NOTE: Bearing nuts and washers must be set to take full loading from the fixture allowing 1/16" (2mm) clearance between fixture and wall.
Wall Carrier and Wall Gasket are not included.
Follow support manufacturer's recommended setting of closet outlet connection.
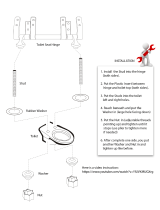
WASTE OUTLET SEAL RING MUST BE NEOPRENE OR GRAPHITE-FELT (WAX RING NOT RECOMMENDED).
When the fixture is installed, closet outlet gasket must be compressed sufficiently to assure a gas and watertight seal.
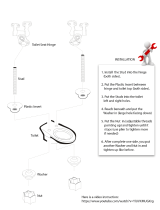
THE FOLLOWING STEPS REQUIRE A HELPER:
Install bowl on support using cap nuts and fiber washers with the back-up nuts and washers.
DO NOT APPLY TOP RIGHT FIBER WASHER AND CAP NUT UNTIL OTHER CAP NUTS HAVE BEEN FIRMLY TIGHTENED USING A WRENCH.
Install top right cap nut with fiber washer and run up hand tight. Wrench tighten approximately 1/4 turn.
Apply sealant to gap between bowl and finished wall. Remove excess sealant.
6 7
8
!
!
WARNING: Overtightening of water supply line nuts could result in breakage and potential flooding. If the connection leaks after hand tightening,
replace the supply line. Do not use any type of sealant on the water supply connection. Use of plumber’s putty, pipe dope, or any other type of
sealant will void the warranty.
WARNING: Do not use plumber’s putty, pipe dope, or any other sealant on the water supply connection to this tank. If the connection leaks after
hand tightening, replace the supply line. If the connection continues to leak with the new supply line, replace the fill valve. Warranty is void if any
type of sealant is used on the water supply connection.
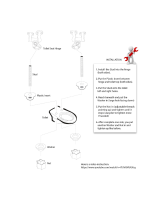
Securely
connect water
supply line to
Shut Off
Valve.
Turn on
water
supply.
Carefully place tank
over bowl while
feeding water supply
line hose through
hole in bowl then
tighten handles
alternately until the
tank contacts the
front and back of
bowl achieving
china-to-china
contact.
Confirm gaskets are fully seated on tank.
Connect water supply line.
(Sold separately)
Hand tighten nut.
GASKETS

7302395-100
- 3 -
Adjust water level to level
indicated on tank by turning
water level adjustment knob
to move float cup up or down.
A
Prime the system by flushing the
product 5 times before use to
achieve optimal performance.
B
C
VERIFY ADJUSTABLE SCREW SETUP
1. Depress trip lever handle all the way (A).
2. Adjust screw on the teeter bar (B) so rear
frame (C) touches the frame stop (D).
3. Return trip lever handle (A) to rest position.
4. Make sure hook (E) is fully engaged under
tab on valve body (F), if not, slightly adjust
screw to make sure hook is engaged.
PROPER FLUSHING METHOD:
Be sure to fully depress the trip lever on each flush. Do not hold the trip lever down for extended periods of time as this could allow air to enter
the system which will slightly degrade performance for a few flushes.
(E)
(F)
(B)
Hook
Approximate
Water Level
Water Level Adjustment Knob
Overflow Tube
Trip Lever Rod
Float Cup
Fill Valve
Or Water
Control
Water Supply Line
Adjustable Screw
(A)
9
10
(C)
(D)

7302395-100
- 4 -
CARE AND CLEANING
When cleaning your toilet, wash it with mild, soapy water, rinse thoroughly with clear water and dry with a soft cloth.
WARNING: Do not use in-tank cleaners. These products can seriously corrode fittings in the tank. This damage can cause leakage
and property damage. American Standard shall not be responsible or liable for any damage caused by the use of in-tank cleaners.
In the United States:
American Standard Brands
1 Centennial Ave.
Piscataway, New Jersey 08854
Attention: Director of Customer Care
For residents of the United States, warranty
information may also be obtained by calling
the following toll free number: (800) 442-1902
www.americanstandard.com
In Canada:
AS Canada, ULC
5900 Avebury Rd.
Mississauga, Ontario
Canada L5R 3M3
Toll Free: (800) 387-0369
www.americanstandard.ca
In Mexico:
American Standard B&K Mexico
S. de R.L. de C.V.
Via Morelos #330
Col. Santa Clara
Ecatepec 55540 Edo. Mexico
Toll Free: 01-800-839-1200
www.americanstandard.com.mx
TROUBLESHOOTING GUIDE - See Step 9-10 For Diagram
IMPORTANT: American Standard does not recommend that the tank components be switched out with anything other
than the furnished specified components as the performance could be affected. Any alterations made using anything
other than the specified components could negatively impact the flush performance and will void the warranty.
Problem Possible Cause Corrective Action
a. Open valve and allow water to fill tank.
b. Shut off water supply, disconnect supply line and inspect all gaskets and washers.
Reassemble.
c. Readjust chain length as required.
d. Shut off water supply. Remove cap and clean as per Fluidmaster maintenance instructions
at: www.americanstandard-us.com/enews/fluidmasterguide.pdf
a. Check that refill tube is connected to water control and inserted into overflow tube without
being kinked or damaged.
b. Open supply valve fully. Be sure that proper supply tube size is used.
c. Remove obstruction. Consult a plumber if necessary.
d. Normal supply pressure must be at least 20 psi.
e. Tighten bolts as shown in Step 7 to make sure the tank is touching the piers of the bowl in
the front and back of the product.
f. Re-prime bowl by ushing 5 times in a row allowing the tank to rell each time to achieve
optimal performance.
g. Check water level in tank to make sure it is at the correct height listed inside the tank.
Re-prime bowl by ushing 5 times in a row allowing the tank to rell each time to achieve
optimal performance.
h. Adjust settings according to adjustable screw setup in Step 10
i. Reseat tank by shutting off water supply, disconnect supply line, remove tank mounting nuts,
inspect all gaskets and reassemble
j. Adjust trip lever nut by loosening the nut a quarter turn at a time clockwise (reverse thread)
k. Do not depress trip lever longer than 2 seconds for optimal performance. Depressing trip
lever longer will negatively affect the toilet performance by causing a loss of prime.
Re-prime bowl by ushing 5 times in a row allowing the tank to rell each time to achieve
optimal performance.
a. Review Step 8 of installation procedure.
b. Review Step 1 through 8 of installation procedure.
c. Send new bowl / return
d. Tighten nuts, reinstall
e. Tighten nuts, reinstall
f. Replace gaskets
g. Clean debris from seal surface. Replace flapper seal as needed and adjust settings
according to adjustable screw setup in Step 10.
h. Clean debris from seal surface. Replace flapper seal as needed and adjust
settings according to adjustable screw setup in Step 10.
a. Clean debris from seal surface. Replace flapper seal as needed. See web for more info.
b. Shut off water supply. Remove cap and clean as per Fluidmaster maintenance instructions
at: www.americanstandard-us.com/enews/fluidmasterguide.pdf
c. Adjust settings according to adjustable screw setup in Step 10.
a. Water supply valve closed.
b. Supply line blocked.
c. Flush valve chain too loose or disconnected.
d. Sand or debris lodged in water control.
a. Bowl water level too low.
b. Supply valve partly closed.
c. Partially clogged trapway and/or drain pipe
and/or vent.
d. Supply pressure too low.
e. Tank not installed tightly on bowl.
f. Product has air stuck in waterways.
g. Incorrect tank water level
h. Trip lever not opening jet flapper to stop
i. Air leak
j. Trip lever not returning to original position
k. Loss of prime due to depressing on the trip
lever too long
a. Poor supply line connection.
b. Poor bowl to tank/wall connection.
c. Cracked Bowl
d. Loose tank nuts
e. Loose flush valve mounting nuts
f. Tank to Bowl gaskets defective
g. Black rim apper leaking. Inlet valve will periodically
run and you will see water coming from port in to
the bowl
h.
Red jet apper leaking. Inlet valve will periodically run
a. Flapper seal leaking or deformed.
b. Sand or debris lodged in water control.
c. Flush valve chain too tight, holding flapper open.
Does not
flush
Poor or
sluggish flush
Toilet leaks
Toilet does
not shut off
/