Page is loading ...
Page is loading ...

3
A
2
1
B
14
ENGLISH
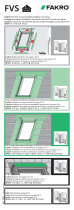
A. Use the handle to open the window. Lay the window down. B.
Remove the gas spring. Lever the locking spring (1) and pull the
head out (2). C. Unscrew and set aside the hinge locking elements
D. Remove the sash according to the direction of the arrows. Set
the sash aside. E. Remove the hinges and frame covering profiles.
Set them aside.
1a. Using the template (included) mark the rough opening and
cut it out according to the traced lines. Cut very close but inside
the traced lines. 1b.Check dimensions of rough opening according
to the table at the beginning of the instruction.
2. Remove existing roofing underlayment around the opening. 3.
Place the window over the rough opening and secure on both
sides with screws provided through the predrilled holes in the
frame. 4. For additional waterproofing, apply self-adhesive window
underlayment. Wrap the bottom frame and corners of the window
with the underlayment. Create water-shedding laps over roofing
underlayment. Keep minimum recommended overlap with existing
roofing underlayment of 4” (100mm) on each side of the window.
5. Wrap the sides and corners of the frame overlapping 4” over
the underlayment. 6. Wrap the top and corners of the frame
overlapping 4” over the underlayment. Make the water shedding
laps. 7a. To ensure proper water drainage, interweave the egress
window's underlayment with the existing roof underlayment
(retrofit). 7b. To ensure proper water drainage, interweave
skylight’s underlayment with the new roof underlayment (new
construction). 8. For further steps refer to installation instruction
of ELW flashing on the next page.
1. Peel off the tape securing the rubber butyl mass on the inside
of the bottom flashing. Place the bottom flashing and nail it to the
sides of the frame. Make sure the top of the middle part of the
flashing goes underneath the rubber gasket of the window. Press
down the bottom part of the flashing where the rubber butyl is.
2a. Place and nail the step flashing to the frame of the window,
interweaving them with the roofing material. 2b. Repeat the above
step all the way up the egress window until you reach Step 3.
3. Place the last part of the step flashing. Adjust the length so it
is flush with the top of the egress window frame and secure it
with the nails. Cut the step flashing if necessary 4. Place the top
part of the flashing and secure it with the screws. Make sure there
is no gap between the top edges of the flashing and the
underlayment on the egress window's frame.
5. Place the sides (first) and the top window frame profiles.
Secure them with the screws. Place the hinges and secure them
with the screws. 6. Finish the roofing material on sides and above
the egress window. 7. Insert the sash according to the direction
of the arrow. Screw the locking hinge elements and snap the air
spring on to the bolt
8. Use a handle to close the sash.
FOR HIGH PROFILED ROOFING MATERIALS, INSTALLATION
INSTRUCTION COMES WITH THE EHW FLASHING
Page is loading ...
Page is loading ...
Page is loading ...
Page is loading ...
Page is loading ...
/