Page is loading ...

Installation Instructions GM-70-CLP
Issue Date May 7, 2019
GM-70-CLP Regulator Conversion Kit
© 2019 BASO Gas Products 1
Part No. BASO-INS-GM-70-CLP, Rev. A www.baso.com
GM-70-CLP Regulator Conversion Kit
Applications
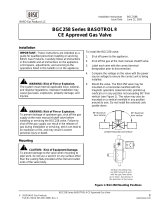
C
LP Regulator
Spring (Blue)
B
Adjustment Screw
Regulator
Stack
A
LP Seal Screw
(Gold)
CAUTION!
Unit was converted to
9 to 12 in. W.C.
(22.5 to 30 mbar)
regulation.
Sample Caution Label
Figure 1: Regulator and Conversion Kit Parts
The GM-70-CLP conversion kit allows the field
conversion of the pressure regulator of a BASO Gas
Products® GM-7000 gas valve with a direct-acting
regulator.
This conversion kit provides a range of regulation of
9 to 12 in. W.C. (22.5 to 30 mbar).
The conversion kit contains the following
(Figure 1):
• regulator spring (blue)
• adjustment screw
• seal screw (gold)
• Caution label
Installation
IMPORTANT: Only qualified personnel should
install or service BASO® Gas Products. These
instructions are a guide for such personnel. Carefully
follow all instructions in this document and all
instructions for the appliance.
!
WARNING: Risk of Explosion or Fire.
Shut off the gas supply at the main manual shutoff
valve before installing or servicing the valve. Failure
to shut off the gas supply can result in the release of
gas during installation or servicing, which can lead to
an explosion or fire, and may result in severe
personal injury or death.
To install the GM-70-CLP conversion kit into the gas
valve:
1. Shut off the gas supply at the main manual shutoff
valve.
2. Change the orifices of the main burner and the
pilot burner to those recommended by the
appliance manufacturer.
3. Remove the outlet pressure tap plug from the
valve or manifold downstream of the valve, and
install a manometer.
4. Remove Seal Screw A, Adjustment Screw B, and
Regulator Spring C from the regulator stack
(Figure 1).
IMPORTANT: Do not reuse the seal screw or
the regulator spring. However, the adjustment screw
may be reused. Note that the new seal screw and
regulator spring must be installed for proper
regulation.
5. Insert the new regulator spring, supplied in the kit,
into the regulator stack. Use care when handling
to avoid deforming the spring.
6. Reinstall the adjustment screw into the regulator
stack. If the original adjustment screw is misplaced
or damaged, use the new adjustment screw
provided.
7. Turn on the gas supply and set the thermostat to
the highest setting.

GM-70-CLP Regulator Conversion Kit
© 2019 BASO Gas Products 2
Part No. BASO-INS-GM-70-CLP, Rev. A www.baso.com
8. Adjust the regulator to the manufacturer’s
specified setting by turning the adjustment screw
in the regulator stack. Turn the screw clockwise to
increase the settings and counterclockwise to
decrease.
9. After the regulator adjustment is completed and
rechecked, install the new seal screw into the
regulator stack. Recheck the settings.
10. Turn off the gas supply and set the thermostat to
Off or to the lowest setting. Disconnect the
manometer and reinstall the pressure tap plug.
IMPORTANT: Place the adhesive backed
Caution label on the visible side of the valve, making
sure the product label on the valve is not covered.
11. Using a felt-tipped pen, change the setting on the
label, located on the valve adjacent to the
regulator stack, to the new regulator setting.
12. Turn on the gas supply and check for leaks using
a rich soap and water solution.
Note: Discard the adjustment screw that was not
used, along with the original spring and seal screw.
Setup and Adjustments
Checkout
Refer to the checkout instructions supplied with the
appliance. Before leaving the installation, observe at
least three complete operating cycles to ensure that all
components are functioning correctly.
Performance specifications are nominal and conform to acceptable industry standards. All agency certification of BASO products is performed
under dry and controlled indoor environmental conditions. Use of BASO products beyond these conditions is not recommended and may void
the warranty. Product must be protected if exposed to water (dripping, spraying, rain, etc.) or other harsh environments. The original
equipment manufacturer or end user is responsible for the correct application of BASO products. Consult BASO Gas Products LLC for
questionable applications. BASO Gas Products LLC shall not be liable for damages or product malfunctions resulting from misapplication or
misuse of its products.
Refer to the Y71/GM-70 Regulator Conversion Kits Product Bulletin (BASO-PB-Y71/GM) for necessary information on operating and
performance specification of this product.
450 East Horseshoe Road
PO Box 170
Watertown, WI 53094 www.baso.com
1-877-227-6427 (1-877-BASOGAS) Published in U.S.A.
/