Page is loading ...


1.0 Introduction 03
2.0 Warnings & Safety Measures 03
3.0 Heating System Design 03
4.0 Unit Selection/Sizing 04
5.0 Location 04
6.0 Preparation 05
7.0 Fixing 06
8.0 Water Connection 07
9.0 Electrical Connection 10
10.0 Commissioning Procedure 14
11.0 Technical Data 15
12.0 Control System Set-up and Operating Instruction 17
12.1 Unit Operation 17
12.2 Operating Modes 19
12.3 Installer’s Set-up Parameters 20
12.4 Building Management System Input Set-up 20
12.5 Program Mode 21
13.0 Troubleshooting 22
14.0 Maintenance 23
15.0 Spare Parts 23
Contents
25278 iVector Installation Guide US 02/01/2013 09:24 Page 3

03
iVECTOR Heater/Cooler
1.0 Introduction
2.0 Warnings & Safety Measures
This heater/cooler fan convector is designed for use on
central heating systems or heating and cooling systems in
homes and commercial environments. Models are available
with 2 and 4-pipe connections.
The control system provides thermostatic room temperature and
fan speed control, and allows operation on a stand alone basis,
or by integration into building management systems.
The unit is fitted with a washable air filter that can be easily
removed for cleaning.
A range of accessories are available for this product including
control valves and condensate pumps for cooling installations.
lPlease carefully follow the instructions and guidelines
contained in this manual during installation. Always perform
each step in sequence.
lInspect this product for concealed shipping damage prior to
installation. If items are damaged or missing please contact
your supplier.
lThis fan convector must be installed by qualified tradespeople.
lDo not install this fan convector in areas where excessive
dust exists.
lThe manufacturer accepts no liability for damage or injury
caused by failure to adhere strictly to the safety precautions
and instructions contained in this manual, or by negligence
during the installation of the product and any accessories
described in this manual.
lFor the correct installation of this unit it is essential that
fixing is carried out in such a way that it is suitable for
intended use and predictable misuse. A number of elements
need to be taken into consideration including the fixing
method used to secure it to the wall, the type and condition
of the wall itself, and any additional potential forces or
weights that may happen to be applied to the unit, prior to
finalising installation.
lPlease leave this manual with the end user.
3.0 Heating System Design
1.0
2.0
3.0
This manual should be read carefully prior to installation and retained for future reference.
This fan convector can be fitted on a series loop with mono-flo or venturi tees, on a two pipe system, or
on a stand alone zone.
This unit MUST NOT be installed in a bathroom or other high humidity area.
This appliance must be grounded.
DO NOT cover or obstruct the air inlet or outlet grille.
Disconnect from the power supply before carrying out any maintenance work.
This heater/cooler fan convector is designed for wall mounted
installation.
For optimum fan convector performance the system must be
capable of providing sufficient flow of water through the heat
exchanger at the correct temperature. This means that:
1. Pipework should be designed and installed to guarantee
sufficient water flow through the unit. Refer to section 3 on
page 4 for recommended pipe sizes.
2. This unit is not suitable for series loop pipe systems.
3. Optimum performance will require effective balancing of the
whole system. Each emitter on the circuit should be checked
and valves adjusted so that the required water flow rate
through each unit is achieved.
4. Where the unit is fitted on to a system with other emitters a
separate circuit for the fan convector should be considered
in order to provide sufficient flow through the unit.
5. The system water must be above 90°F for heating mode and
below 59°F in cooling mode.
6. This unit must not be used to replace a radiator in an existing
heating system unless an adequate flow of water through the
unit can be guaranteed.
25278 iVector Installation Guide US 02/01/2013 09:24 Page 4

04 iVECTOR Heater/Cooler
3.0 Heating System Design (continued...)
1/2"
4"
4"
6"
6"
Note: Pressure independent balancing and control valve kits
are available for this product as an accessory. The valve
kits can simplify system design by eliminating the possible
need for larger balancing valves elsewhere in the system, and
will maintain the flow in the unit to the required levels. See
accessories section for more details.
NB: Pipes should be sized using flow rate and pressure losses.
4.0 Unit Selection/Sizing
Heating output performance data is given in the technical data
section of this manual (see page 15). Outputs are shown for the
three fan speeds, however, it is important to size the unit to
match the calculated heat loss requirements of the room with
the unit operating on the normal fan speed. The higher fan
speeds are used in Comfort mode when the room temperature
is significantly lower than the preset temperature.
Note: It is also possible to electronically remove the highest fan
speed from the functionality of this unit via the control system
(see page 20). This may be advantageous on low temperature
systems to prevent cool air being blown into the room on the
highest setting.
When establishing the temperature difference, i.e. entering
water to room temperature difference, allowance should be
made for the temperature drop in the system. It is the water
temperature at the unit that dictates the output.
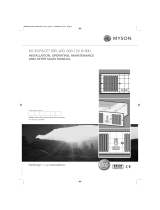
5.0 Location
This unit may be fitted to any convenient wall at a height from
the floor level that suits the application, providing an unimpeded
flow of air into the area to be heated/cooled.
For cooling applications, the need for disposal of condensate
may influence the position of the unit.
Mount on a
flat wall with
sufficient side
clearance
NO mounting
on uneven wall
surfaces
No microbore pipework
25278 iVector Installation Guide US 02/01/2013 09:24 Page 5

05
iVECTOR Heater/Cooler
6.0 Preparation
Before proceeding with the installation, remove the carton lid,
unpack the contents carefully and check against the checklist
below:
1. Heater/Cooler unit (chassis)
2. Outer Casing
3. Warranty Card
4. Instruction Manual
5. Fixing kit
Check contents for concealed shipping damage.
Tools required:
Manual
Warranty
6"
23"
6"
4"4"
1/8"
59/16"
6
15/16"
1
1/2"
3
18"
Exploded view
Grill
Grill hinge
Outer casing
Filter
Side cover
Control panel
Chassis
1
2
3
5
4
3.0
4.0
5.0
6.0
Mounting dimensions
Model Dimensions (inches)
iV60x080 31 1/219 13/16
iV60x100 39 3/827 11/16
iV60x120 47 1/435 9/16
iV60x140 55 1/843 7/16
iV60x160 63 51 5/16
AB
25278 iVector Installation Guide US 02/01/2013 09:24 Page 6


07
iVECTOR Heater/Cooler
8.0 Water Connection
Before making the pipework connections refer to section 3.0 for advice on System Design.
Connect the unit to the supply and return pipes. Pipework can
be routed from the floor or through the wall at the back of the
unit. (See options below). Connections are 3/4"bsp.
Connection directly onto the heat exchanger should be made
using straight connectors so that the pipework can more easily
be routed inside the unit.
For heating only applications the condensate collector mounted
on the chassis below the heat exchanger connections is not
needed and can be removed by unscrewing the two bracket
fixing screws. Removal of this component will aid pipework
fitting when the pipes are routed up from the floor.
For applications involving cooling, the pipework must be routed
to avoid the condensate collector. Connection to the heat
exchanger should be made using straight connectors so that
the pipework can more easily be routed past the condensate
collector.
7.0
8.0
Pipe Routing Options
2-pipe connection
(The same options are possible for 4-pipe connection)
Note 1: The supply pipe should be connected to the bottom
connection of the heat exchanger.
Note 2: Isolating valves are not supplied with this unit, but
should be fitted in case of future service requirements.
The type and size of valves and their location should be suitable
for the application. Valves should be selected in accordance with
system temperature and pressure requirements whilst taking into
account pressure drop characteristics.
Note 3: External pipework carrying chilled water must be
insulated. Use a suitable sealant as necessary to ensure that
condensate does not spill or leak. Once connection to the
system flow and return pipes is made, any exposed internal
pipework and isolating valves must also be insulated.
31/4"- 41/4"* MAX
*Dimension from chassis side to pipe centre.
25278 iVector Installation Guide US 02/01/2013 09:24 Page 8

08 iVECTOR Heater/Cooler
6"
1/32"
6
5/32"
1
7/16"
23
19/32"
20
31/32"
11
2/32"
1
3/4"
33/8"
2
Dimensions 2-pipe
h > 6”
COOL OUT
HOT OUT
HOT IN
COOL IN
"
6
7
/16"
23
19/32"
20
29
/32
"
3
23
/32"
2
1
/8"
1
1
/8"
1
25/32"
18
15"
12"
3
/
4"
3
9
/16"
5
15/
16"
4
Dimensions 4-pipe
8.0 Water Connection (continued...)
25278 iVector Installation Guide US 02/01/2013 09:25 Page 9

09
iVECTOR Heater/Cooler
8.0
8.0 Water Connection (continued...)
Ensure all water fittings are secure before filling the system.
Fill the system, open the valves fully and check pipe connections
for leaks and vent the heat exchanger.
Installations with chilled water will require provision for
condensate disposal in accordance with any local regulations.
A drain tray is fitted for condensate collection within the unit.
This should be connected to a 1/2" drain pipe.
Alternatively a condensate disposal pump is available as an
accessory, e.g. for use on internal walls (see Accessories page).
Spiggot size
19/32" O/D
Connecting tube
>19/32" I/D
How to bleed/vent
Condensate drain connection
25278 iVector Installation Guide US 02/01/2013 09:25 Page 10

10 iVECTOR Heater/Cooler
9.0 Electrical Connection
WARNING: This appliance must be grounded. The electrical installation must comply with state or local codes.
lThe electrical installation of this appliance should be carried
out by a qualified electrician in accordance with current
regulations.
lThis unit is supplied with factory fitted 3 core cord, 6ft in
length with moulded plug.
For Building Management System
lConnect wires from BMS and valves as necessary, using the
same cable routing into the control box, and with the cable
gland supplied.
1. Remove x 2 screws to access control panel 2. Remove control panel cover
25278 iVector Installation Guide US 02/01/2013 09:25 Page 11

11
iVECTOR Heater/Cooler
9.0
Ground
Control Valve
Connection
BMS Connection
Live
Neutral
Cable Entry
Points
9.0 Electrical Connection (continued...)
Refer to wiring diagrams below and on page 12-13.
After making the electrical connections replace the side cover
to the control box.
3. Routing cable
TRANSFORMER
L
N
Supply 120V
60Hz
FAN
POWER
BOARD
CONTROL
BOARD
WATER SENSOR
2-PIPE
AIR
SENSOR
R
G
Y
M+
T+
T-
M-
Lo
Med
Hi
W
Y
G
R
B
2-pipe 0 valve
25278 iVector Installation Guide US 02/01/2013 09:25 Page 12

12 iVECTOR Heater/Cooler
9.0 Electrical Connection (continued...)
TRANSFORMER
L
N
Supply 120V
60Hz
FAN
POWER
BOARD
CONTROL
BOARD
WATER SENSOR
2-PIPE
AIR
SENSOR
Input 120V 60Hz
24V 60Hz
24V DC
+
-
R
G
Y
M+
T+
T-
M-
Lo
Med
Hi
W
Y
G
R
B
2-pipe 1 valve
TRANSFORMER
L
N
Supply 120V
60Hz
FAN
POWER
BOARD
CONTROL
BOARD
WATER
SENSOR
2-PIPE
AIR
SENSOR
Supply 120V 60Hz
24V DC
24V 60 Hz
COM
FAST
SLOW
HEAT
COOL
BUILDING
MANAGEMENT
SYSTEM
Lo
Med
Hi
W
Y
G
R
B
+
-
24V AC
R
G
Y
M+
T+
T-
M-
2-pipe 1 valve + BMS
25278 iVector Installation Guide US 02/01/2013 09:25 Page 13

13
iVECTOR Heater/Cooler
9.0 Electrical Connection (continued...)
TRANSFORMER
L
N
Supply 120V
60Hz
FAN
POWER
BOARD
CONTROL
BOARD
WATER
SENSOR
2-PIPE
AIR
SENSOR
Input 120V 60Hz
24V 60Hz
24V DC
+
-
R
G
Y
M+
T+
T-
M-
Lo
Med
Hi
W
Y
G
R
B
HOT
COLD
WATER SENSOR
4-PIPE
COOLING ONLY
4-pipe 2 valve
TRANSFORMER
L
N
Supply 120V
60Hz
FAN
POWER
BOARD
CONTROL
BOARD
WATER
SENSOR
2-PIPE
AIR
SENSOR
Input 120V 60Hz
24V 60Hz
24V DC
+
-
R
G
Y
M+
T+
T-
M-
Lo
Med
Hi
W
Y
G
R
B
HOT
COLD
WATER SENSOR
4-PIPE
COOLING ONLY
24V AC
BUILDING
MANAGEMENT
SYSTEM
COOL
HEAT
SLOW
FAST
COM
4-pipe 2 valve + BMS
9.0
25278 iVector Installation Guide US 02/01/2013 09:25 Page 14

10.0 Commissioning Procedure
1. lFill and vent the system.
lOpen all valves fully and vent air from the heat exchanger.
lCheck for leaks at pipe connections.
2. lRefit the outer casing and secure with the 2 screws.
lSwitch on the electrical supply.
lCheck the operation of the unit by following the operating
instructions.
3. lSet up the installation parameters on the controls system
as necessary.
lWhen installation and commissioning are complete, hand
over the instruction manual to the end user.
1
2
3
14 iVECTOR Heater/Cooler
25278 iVector Installation Guide US 02/01/2013 09:25 Page 15

11.0 Technical Data
Performance Data 2-Pipe
Relative Humidity: Sensible cooling at 50%.
Model Flow
(gpm)
110 120 130 140 150 160 170 180 190 200
Heat Output (Btu/h)
Entering Water - 65°F Air Temperature
Cooling (Btu/h)
Condition 45-54-81
Fan
Speed
Normal 1.5 3051 3791 4543 5304 6073 6850 7634 8423 9219 10020
Medium 1.5 4023 4998 5988 6990 8003 9026 10058 11098 12146 13200
Boost 1.5 5402 6709 8035 9377 10733 12102 13483 14874 16275 17684
Normal 2 4176 5190 6218 7260 8313 9377 10450 11531 12620 13716
Medium 2 5487 6817 8167 9533 10915 12310 13717 15134 16562 17999
Boost 2 7482 9291 11126 12984 14862 16757 18668 20593 22532 24483
Normal 2.65 5038 6261 7503 8761 10033 11317 12613 13919 15234 16559
Medium 2.65 6708 8334 9984 11655 13345 15051 16771 18505 20251 22009
Boost 2.65 9564 11876 14222 16597 18996 21419 23862 26323 28801 31295
Normal 3.1 5923 7361 8821 10299 11795 13305 14829 16364 17911 19468
Medium 3.1 7933 9856 11807 13783 15781 17798 19832 21882 23947 26025
Boost 3.1 11539 14329 17158 20023 22918 25840 28787 31755 34744 37753
Normal 3.5 6828 8486 10169 11874 13597 15338 17094 18864 20646 22441
Medium 3.5 9157 11377 13630 15911 18217 20546 22895 25262 27646 30046
Boost 3.5 13510 16776 20089 23443 26832 30253 33702 37178 40677 44199
iV60x080
iV60x100
iV60x120
iV60x140
iV60x160
Total Sensible
2412 1798
3842 2829
5623 4187
3450 2569
5459 4019
7861 5855
5186 3177
6688 4920
9956 7414
5084 3787
7916 5824
12055 8977
5899 4395
9141 6728
14150 10536
Performance Data 4-Pipe
Relative Humidity: Sensible cooling at 50%.
Model Flow
(l/h)
110 120 130 140 150 160 170 180 190 200
Heat Output (Btu/h)
Entering Water - 65°F Air Temperature
Cooling (Btu/h)
Condition 45-54-81
Fan
Speed
Normal 300 2157 2681 3213 3752 4296 4846 5401 5961 6524 7091
Medium 300 2854 3546 4249 4961 5681 6408 7141 7880 8625 9374
Boost 300 3849 4782 5728 6686 7655 8633 9619 10613 11614 12621
Normal 350 2938 3652 4376 5109 5850 6599 7355 8116 8883 9655
Medium 350 3867 4804 5756 6720 7694 8678 9670 10671 11678 12692
Boost 350 5285 6564 7862 9175 10503 11843 13195 14557 15929 17309
Normal 400 3519 4373 5240 6118 7006 7903 8807 9719 10638 11562
Medium 400 4681 5816 6967 8133 9311 10501 11702 12911 14129 15355
Boost 400 6666 8277 9911 11565 13237 14925 16626 18340 20066 21803
Normal 450 4129 5131 6148 7179 8221 9273 10334 11404 12482 13567
Medium 450 5523 6861 8218 9593 10983 12386 13801 15227 16664 18109
Boost 450 8014 9949 11913 13901 15909 17937 19980 22040 24113 26200
Normal 500 4753 5907 7077 8263 9462 10673 11894 13125 14365 15613
Medium 500 6532 8118 9729 11360 13009 14674 16355 18048 19754 21471
Boost 500 9726 12082 14473 16895 19343 21815 24308 26820 29350 31897
iV60x080
iV60x100
iV60x120
iV60x140
iV60x160
Total Sensible
350 2292 1708
350 3650 2687
350 5342 3977
450 3277 2441
450 5186 3818
450 7468 5562
600 4927 3018
600 6353 4674
600 9458 7044
700 4830 3598
700 7520 5533
700 11452 8528
800 5604 4175
800 8684 6392
800 13442 10009
15
iVECTOR Heater/Cooler
10.0
11.0
Flow (l/h)
25278 iVector Installation Guide US 02/01/2013 09:25 Page 16

16 iVECTOR Heater/Cooler
The iVECTOR should be sized based on “normal” outputs.
All iVECTOR models require an electrical supply of 120V 60Hz.
Electrical Data
Air Flow Rates
Normal 53 80 106 132 159
Heating Medium 87 130 174 217 261
Boost 145 218 290 363 436
Normal 38 58 77 96 115
Cooling Medium 65 97 129 162 194
Boost 119 178 237 297 356
Air Flow (cfm)
Condition iV60x080 iV60x100 iV60x120 iV60x140 iV60x160
Fan
Speed
11.0 Technical Data (continued...)
Weight, Water Content and Motor Power
Model
Motor
Power
(w)
2 Pipe
Water
Content
(gal)
4 Pipe
Water
Content
(gal)
2 Pipe
Unpacked
Weight
(lbs)
4 Pipe
Unpacked
Weight
(lbs)
Dimensions
Model
Nominal Height
(ins)
Depth
(ins)
Length
(ins)
iV60x080 235
/8631
1/2
iV60x100 235
/8639
3/8
iV60x120 235
/8647
1/4
iV60x140 235
/8655
1/8
iV60x160 235
/8663
iV60x080 32 0.174 0.087 50 115
iV60x100 35 0.243 0.1215 61 140
iV60x120 44 0.314 0.6 72 164
iV60x140 53 0.383 0.73 83 189
iV60x160 65 0.454 0.227 94 215
Note: 2 pipe water content = 2 pipe heating/cooling or 4 pipe cooling and 4 pipe
water content = 4 pipe heating.
Model
iV60x080 24.8 37.7 47.9
iV60x100 27 35.8 47.9
iV60x120 24 40.5 51.7
iV60x140 24.9 35.5 54.8
iV60x160 27 35 56.3
Sound Levels
Sound levels tested in accordance with ISO 3741.
Sound Pressure (dBA) (at 2.5m)
Normal Medium Boost
Pressure Drop
100 12 18 23 26 30
150 26 36 47 52 60
220 44 60 78 85 98
330 66 89 115 124 143
500 92 124 157 170 194
750 123 163 205 221 253
Pressure Drop (ins wg)
2 Pipe Heating/Cooling & 4 Pipe Cooling
100 24 36 46 52 60
150 52 72 94 104 120
220 88 120 156 170 196
330 132 178 230 248 286
500 184 248 314 340 388
4 Pipe Heating
Flow
(l/h) iV60x080 iV60x100 iV60x120 iV60x140 iV60x160
25278 iVector Installation Guide US 02/01/2013 09:25 Page 17

17
iVECTOR Heater/Cooler
12.0
12.0 Control System Set-up and Operating Instruction
11.0
General Description
The electronic control system on this unit provides a wide range
of options that can be selected according to system complexity
and operating requirements.
The unit is factory set to ‘Easy mode’ giving thermostatic
temperature control, fan only option and clock function.
Additional functions are available if necessary from the Full
operating mode menu.
A range of additional parameters and features can be changed
or activated in a further set up menu should these be required.
Easy Mode
Turn on Electrical Supply
Easy Mode
(Factory Default) Full Mode
Use ( ) and ( ) keys to select
operating mode (Refer to
section 12.2 for details)
Setup Parameters
(Refer to section 12.3
for details)
Select Clock
Set Time
Full Mode
Select Comfort Setting
Set room temperature to
desired setting (default 21°C).
Fan runs in heating/cooling
Fixed fan setting
Comfort setting
Clock function
Power on/off
Fixed fan setting
Comfort setting
Auto setting
Setback setting
Frost setting
Power on/off
Clock function
Program setting
Auto
P
Press & hold (+) & (-) for 5 secs
to change between modes
Press & hold (+) & (-)
for 5 secs to change
between modes
Select Auto mode and
press (OK) for 10 secs
12.1 Unit Operation
Use ( ) and ( ) keys to choose from the operating modes
described in section 12.2. A function is selected when the
relevant icon is highlighted by .
25278 iVector Installation Guide US 02/01/2013 09:25 Page 18

18 iVECTOR Heater/Cooler
12.1 Unit Operation (continued...)
Easy Mode Display
1. Heating indicator
2. Cooling indicator
3. Temperature symbol – when this is displayed
the current room temperature is displayed
4. Fan speed symbol (fan blades will rotate when active)
5. Comfort setting
6. Power (on/off)
7. Clock setting
8. Room temperature
9. Time
10. Day of the week
Keys:
OK Validation key (OK)
+ Plus key (up)
- Minus key (down)
Navigation left
Navigation right
Full Mode Display
The full control display can be accessed by pressing the (+)
and (-) buttons for 5 seconds. This action can be repeated to
revert back to ‘Easy mode’.
1. Heating indicator
2. Cooling indicator
3. Temperature symbol – when this is displayed
the current room temperature is displayed
4. Fan speed symbol (fan blades will rotate when active)
5. Comfort setting
6. Power (on/off)
7. Clock setting
8. Room temperature
9. Time
10. Day of the week
11. Auto setting (to follow set programme)
12. Night set-back setting
13. Holiday setting
14. Program menu
15. Program schedule
Keys:
OK Validation key (OK)
+ Plus key (up)
- Minus key (down)
Navigation left
Navigation right
25278 iVector Installation Guide US 02/01/2013 09:25 Page 19

19
iVECTOR Heater/Cooler
12.0
12.2 Operating Modes
Use ( ) and ( ) keys to choose from the following parameters.
A function is selected when the icon is surrounded by .
Function AdjustmentDescription Availability
Easy Full
Control Operation Setup
The unit must be programed for operation
in heating only, cooling only or heating and
cooling.
Control Operation Setup
Scroll to the Fixed Fan mode , and then
press on the ( ) key.
Use (+) or (-) keys to choose from
the following:
Nod (Mode) HOt for heating.
Nod (Mode) COLd for cooling.
Nod (Mode) AUtO for heating and cooling.
Press (OK) to confirm.
Fixed Fan Setting
F1, F2, F3 gives fan speed 1,2 or 3 respectively
with no temperature control. A1, A2, A3 gives
fan speed 1,2 or 3 respectively in heating only
if the water temperature ≥90°F.
Use (+) or (-) to select and press (OK) to confirm.
(Note the fan speed symbol will only appear
when the fan is running).
Comfort Setting
Provides room temperature control with
automatic fan speed adjustment according to
difference between actual and set temperature.
The fan operates when water ≥90°F in heating
or ≤60°F cooling.
Press (OK) to view the set temperature.
Use (+) or (-) to adjust the required room
temperature. Default setting is 21°C in Heating.
Automatic Setting
The unit will run according to one of the 9
pre-set timed programs, or one of the 4 user
defined programs.
See section 12.5 for program options
and setup.
Press (OK) to view the actual set
temperature (Comfort or Set-back).
Night Set-back Setting
Provides room temperature control with
automatic fan speed adjustment according
to difference between actual and night set-back
temperature.
Press (OK) to view the set temperature.
Use (+) or (-) to adjust the required room
temperature. Default setting is 19°C in
Heating.
Holiday Function
Provides frost protection or overheat protection
during periods of absence (holiday). The control
will count down the time to “00” after which
control is resumed in Auto setting. For frost
protection the set temperature is 45°F.
For overheat the set temperature is 86°F.
Select and is displayed.
Use the (+) and (-) to adjust the duration.
(In hours “H” if below 24H and then in
days “d”).
Use the (-) key to interrupt this period
and adjust the duration on “no”.
Power On/Off
Turns unit on/off.
Press (OK) to turn the power on or off.
Set Clock Menu
Displays time in 12h or 24h format.
Press (OK)
Use the (+) and (-) keys to set the minutes.
Press (OK)
Use the (+) and (-) keys to set the hours.
Press (OK)
Use the (+) and (-) to set the days. Press (OK).
Program Menu
Provides choice from 9 pre-programed and
4 user defined timed programs.
See section 12.5 for full details.
No Yes
Yes Yes
Yes Yes
No Yes
No Yes
No Yes
Yes Yes
Yes Yes
No Yes
Auto
P
25278 iVector Installation Guide US 02/01/2013 09:25 Page 20

20 iVECTOR Heater/Cooler
12.3 Installer’s Set-up Parameters
The various parameters that can be defined by the installer are
shown in the table below.
To access the installation parameters menu, scroll to Auto, then
press (OK) for 10 seconds.
Use ( ) and ( ) keys to highlight the parameter to be
adjusted.
Press (OK) to toggle the parameter setting or edit the value.
If the value starts to blink, use (+) and (-) keys to adjust the value.
When the value is adjusted to the desired setting, press (OK)
to confirm.
Once parameters are set, go to <End> parameter and press
(OK) to go back to the main menu.
12.4 Building Management System Input Set-up
If the unit is integrated into a Building Management System,
control of the unit will be by BMS input only. The BMS
alternative setting from the parameters menu must be selected.
On the main screen the AUTO symbol will be turned off.
P1: Low fan speed input: P1 is indicated where the Room
temperature / set temperature is shown normally.
F1 is ON
P2: High fan speed input: P2 is indicated where the Room
temperature / set temperature is shown normally.
F3 is ON
P3: WINT MODE: Winter mode is used for system regulation.
Heating indicator flashes in this mode.
P4: SUMM MODE: Summer mode is used for system regulation.
Heating indicator flashes in this mode.
If the BMS inputs are wrong (e.g. P1 + P2 or P3 + P4), a message
ERR BMS will flash and the system stops BMS control.
Parameter
Name Default SettingDescription Alternative Setting
Select temperature scale.dEG °C °F
Select the hour format.00:00 24H 12H
Fan pulse will switch on the fan for 30 seconds every
5 minutes. This will draw air over the air sensor if unit
is mounted where air circulation is restricted.
AiPu YE5
(Yes)
NO
(No)
Selection of the number of valves to be driven.
This parameter depends on the system design.
Nb vAL
(2 Pipe
models only)
0 valve 1 valve
Allows the maximum fan speed to be switched off -
the unit will only run in Low and Medium speeds.
FAS SPEE FA5
For Fast
NEd
For Medium
Select whether control is from the internal controls
system or from external BMS.
SetU AUt
(Auto)
bN5
(For BMS)
Select option for fan speeds when the unit reverts to
night set back in cooling operation.
NIGt NOr
(For Normal regulation)
AL1
(Fan speed 1 only)
Reverts the control back to factory settings.CLr ALL Press (OK) for 5 seconds
Exit the installation menu.End Press (OK)
Calibration of the internal air sensor against the actual
room temperature.
(The calibration must be done after 12 hours working
at the same set temperature).
AIr
(Air)
To adjust the air sensor temperature, enter the
measured temperature using the (-) or (+) keys.
To confirm the calibration, press (OK)
Press (+) and (-) keys at the same time to reset
the offset value.
25278 iVector Installation Guide US 02/01/2013 09:25 Page 21
/