ELDOM RH-RH01W Electric Wall-Mounted Convector Heater User manual

Category
Thermostats
Type
User manual

ELDOM RH-RH01W Electric Wall-Mounted Convector Heater provides effective heating solutions for various indoor spaces. With power ranging from 500W to 3000W, it offers customized warmth for rooms of different sizes. The heater's sleek design and compact dimensions make it suitable for wall mounting, saving valuable floor space.

ELDOM RH-RH01W Electric Wall-Mounted Convector Heater provides effective heating solutions for various indoor spaces. With power ranging from 500W to 3000W, it offers customized warmth for rooms of different sizes. The heater's sleek design and compact dimensions make it suitable for wall mounting, saving valuable floor space.

v201119
ELECTRIC WALL-MOUNTED CONVECTOR HEATER WITH ELECTRONIC CONTROL
MANUAL FOR INSTALLATION, OPERATION AND MAINTENANCE
EN
ЕЛЕКТРИЧЕСКИ СТЕНЕН КОНВЕКТОР С ЕЛЕКТРОННО УПРАВЛЕНИЕ
ИНСТРУКЦИЯ ЗА МОНТИРАНЕ, ПОЛЗВАНЕ И ПОДДЪРЖАНЕ
BG
ELEKTRISCHE WANDCONVECTOR MET ELEKTRONISCHE BEDIENING
HANDLEIDING VOOR INSTALLATIE, GEBRUIK EN ONDERHOUD
NL
ΗΛΕΚΤΡΙΚΟΣ ΕΠΙΤΟΙΧΟΣ ΘΕΡΜΟΠΟΜΠΟΣ ΜΕ ΗΛΕΚΤΡΟΝΙΚΗ ΔΙΑΧΕΙΡΙΣΗ
ΟΔΗΓΙΕΣ ΕΓΚΑΤΑΣΤΑΣΗΣ, ΧΡΗΣΗΣ ΚΑΙ ΣΥΝΤΗΡΗΣΗΣ
GR
CONVECTOR ELECTRIC DE PERETE CU CONTROL ELECTRONIC
INSTRUCŢIUNI DE MONTAJ, UTILIZARE ŞI ÎNTREŢINERE
RO
3
12
21
30
40
CONVECTEUR MURAL ÉLECTRIQUE À COMMANDE ÉLECTRONIQUE
INSTRUCTIONS D'INSTALLATION, D'UTILISATION ET DE MAINTENANCE
FR
49
ELEKTRISCHER WANDKONVEKTOR MIT ELEKTRONISCHER STEUERUNG
MONTAGE-, BETRIEBS- UND WARTUNGSANLEITUNG
DE
58
ELEKTRONIKUS VEZÉRLÉSŰ, FALRA SZERELHETŐ ELEKTROMOS KONVEKTOR
TELEPÍTÉSI, ÜZEMELTETÉSI ÉS KARBANTARTÁSI ÚTMUTA
HU
67
600 600
Зона
Zone
150
Minimum 60
500
250
3Зона
Zone2
Зона
Zone1
1 2
3 4
5 6
WARNINGS!
Before installation and operation with the appliance, read carefully the present manual!
When using the convector heater, there is a risk of burning in contact with the
appliance front when it is running or has been soon disconnected, so do not touch it in
such cases!
This symbol indicates that it is prohibited to cover to appliance.
It is absolutely prohibited to place any objects on or under the
heater!
In order to avoid overheating do not cover the convector heater!
When the power cord is damaged it must be changed by the producer, his service
representative or a person with similar qualification in order to avoid any danger.
Any activities within the heater internal parts such as maintenance and repair with
change of spare parts must be completed only by qualified specialists!
This appliance may be used by children of age over eight years old and persons with
reduced physical, sensory or mental capabilities, or lack of experience and
knowledge, where they are under supervision or instructed about the safe use of the
appliance and understand the dangers. Children must not be allowed to play with the
unit! User cleaning and maintenance shall not be completed by children except when
under supervision by an adult.
ATTENTION! Children of age under 3 (say: three) years must not approach the
appliance if not under constant supervision!
ATTENTION! Children of age between 3 (say: three) and 8 (say: eight) years must be
allowed only to switch on and off the appliance under condition that it is located or
installed within expected position for normal operation and children are either under
constant supervision or instructed how to use safely the appliance and understand
related dangers. It should not be allowed to children of age between 3 (say: three)
and 8 (say: eight) years to plug-in the appliance, to manipulate its settings an clean it,
or to perform any user related maintenance operations.
ATTENTION! Some parts of this convector heater may heat strongly and cause
burns. It is compulsory to pay special attention if there are children or vulnerable
people around.
ATTENTION! The appliance should NOT be positioned in the immediate vicinity of
mains sockets Fig. 6.
ENVIRONMENTAL PROTECTION
This appliance is marked according the REGULATION concerning waste electric and electronic equipment.
The symbol on the product, or on the accompanying documents indicates that this appliance may not be treated as household
waste. Instead it should be handed over to the applicable collection point for the recycling of electrical and electronic equipment.
Disposal must be carried out in accordance with local environmental regulations for waste disposal. For more detailed information
about treatment, recovery and recycling of this product, please contact your local city office, your household waste disposal service or
the shop where you purchased the product.
EN
12
Regulation (EU) 2015/1188, Annex II, point 3, a).
Model identifier:
Item
Heat output
Value
Nominal heat output
Maximum continuous
heat output
Auxiliary electricity consumption
At nominal heat output
At minimum heat output
In standby mode
Symbol
RH25N RH30NRH15N
Unit
RH10N RH20N RH25NW RH30NWRH15NWRH10NW RH20NW
Type of heat input, for electric storage local space heaters only
manual heat charge control, with
integrated thermostat
Minimum heat output
(indicative)
[yes/no] no no no no no no no no no no
manual heat charge control with
room and/or outdoor temperature
feedback
[yes/no]
electronic heat charge control with
room and/or outdoor temperature
feedback
[yes/no]
fan assisted heat output [yes/no]
Type of heat output/room temperature control
single stage heat output and
no room temperature control [yes/no]
Two or more manual stages,
no room temperature control [yes/no]
with mechanic thermostat
room temperature control [yes/no]
with electronic
room temperature control [yes/no]
electronic
room temperature control
plus day timer
[yes/no]
electronic
room temperature control
plus week timer
[yes/no] yes yes yes yes yes yes yes yes yes yes
Other control options
room temperature control,
with presence detection [yes/no]
room temperature control,
with open window detection [yes/no]
with distance control option [yes/no] no no no no no yes yes yes yes yes
with adaptive start control [yes/no]
with working time limitation [yes/no]
with black bulb sensor
[yes/no]
Contact details ELDOMINVEST Ltd, Varna, Bulgaria www.eldominvest.com
EN
no no no no no no no no no no
yes yes yes yes yes yes yes yes yes yes
13
EN
Pnom
Pmax,c
elmax
elmin
elSB
2,5
2,5
0
0
0,001
3,0
3,0
0
0
0,001
1,5
1,5
0
0
0,001
kW
kW
kW
kW
kW
1,0
1,0
0
0
0,001
2,0
2,0
0
0
0,001
2,5
2,5
0
0
0,001
3,0
3,0
0
0
0,001
1,5
1,5
0
0
0,001
1,0
1,0
0
0
0,001
2,0
2,0
0
0
0,001
Pmin 0 00
kW 0 0 0 000 0
yes yes yes yes yes yes yes yes yes yes
Model identifier:
Value
20W
0
0
0,001
25W
0
0
0,001
10W
0
0
0,001
05W
0
0
0,001
15W
2,5 3,01,51,0 2,0
0
0
0,001
15E
0
0
0,001
20E
0
0
0,001
05E
0
0
0,001
30W
0
0
0,001
10E
0
0
0,001
0 000 0 0 000 0
no no no no no no no no no no
yes yes yes yes yes yes yes yes yes yes
ELDOMINVEST Ltd, Varna, Bulgaria www.eldominvest.com
RH01WxxY-W
xxY
25E
0
0
0,001
0
no
yes
30E
0
0
0,001
0
no
yes
0,5 2,5 3,01,51,0 2,00,5
2,5 3,01,51,0 2,00,5 2,5 3,01,51,0 2,00,5
Item
Heat output
Nominal heat output
Maximum continuous
heat output
Auxiliary electricity consumption
At nominal heat output
At minimum heat output
In standby mode
Symbol Unit
manual heat charge control, with
integrated thermostat
Minimum heat output
(indicative)
[yes/no]
manual heat charge control with
room and/or outdoor temperature
feedback
[yes/no]
electronic heat charge control with
room and/or outdoor temperature
feedback
[yes/no]
fan assisted heat output [yes/no]
single stage heat output and
no room temperature control [yes/no]
Two or more manual stages,
no room temperature control [yes/no]
with mechanic thermostat
room temperature control [yes/no]
with electronic
room temperature control [yes/no]
electronic
room temperature control
plus day timer
[yes/no]
electronic
room temperature control
plus week timer
[yes/no]
room temperature control,
with presence detection [yes/no]
room temperature control,
with open window detection [yes/no]
with distance control option [yes/no]
with adaptive start control [yes/no]
with working time limitation [yes/no]
with black bulb sensor
[yes/no]
Contact details
Pnom
Pmax,c
elmax
elmin
elSB
kW
kW
kW
kW
kW
Pmin kW
no no no no no no no no no no no no
yes yes yes yes yes yes yes yes yes yes yes yes
no no no no no no yes yes yes yes yes yes
yes yes yes yes yes yes yes yes yes yes yes yes
Type of heat input, for electric storage local space heaters only
Type of heat output/room temperature control
Other control options
EN EN
14
TECHNICAL DESCRIPTION
The electric wall-mounted convector heater is a household appliance intended to heat air in living rooms and maintain a specified
temperature.
APPLIANCE INSTALLATION
The heater installation must strictly comply with standards and rules in force in the country.
The convector heater has a degree of protection against Class II electrical current and is splash-proof (IP24). It can be installed
in living rooms, including in Zone 2 of bathing rooms, but so that controls must not be accessible to persons taking a shower or
bath - please refer to Fig. 1.
When installing the appliance it is necessary to comply with the minimum prescribed distances from various obstacles and surrounding
objects as shown in Fig. 2.
Do not install the appliance:
џIn places with compulsory draft, which can disrupt the control settings (under natural or forced ventilation apertures, fans,
etc.).
џUnder, over and in front of sockets (rosettes), please refer to Fig. 6.
When installing the heater on locations of high altitudes take into account that it may impact the temperature of the outlet air (by
о
increasing it with about 10 C when the altitude changes with 1000 m)
Take carefully the heater out of its packaging and keep it at a conventional place for any future needs.
Place the appliance with the front side to the ground without still removing the protective styrofoam side panels (Fig. 3). Please refer to
the figures on the second page of this booklet.
Unfasten the suspension stand according to the diagram shown in Fig. 3.
The installation of the convector heater on a reinforced concrete or solid brick wall can be carried out after the stand is secured to the
wall according to Fig. 4, using the screws and dowels available in the package.
Place the appliance on the stand as shown in Fig. 5.
The convector power cord plug can be connected to a protected single phase power outlet with voltage 230 V~. The socket must be
located so that it is easily accessible after fitting the device into its working position.
It is forbidden to ground the appliance!
It is forbidden to increase the distance from the wall to the convector heater, which is secured by the suspension stand provided by the
manufacturer!
15
EN EN
All data and dimensions provided are approximate.
Model
Power / Voltage
Length W [mm]
L [mm]
1000 W / 230 V~
716 / 592
480 / 200±2
1500 W / 230 V~
916 / 688
480 / 200±2
2000 W / 230 V~
1116 / 880
890 / 480±2
2500 W / 230 V~
1366 / 1072
890 / 480±2
3000 W / 230 V~
1566 / 1216
890 / 480±2
150
59
86
230
150
W
L
Convector heater on / off
switch
Control panel
Suspension
stand
RH10N(W) /
RH01W10X-W
453
106
84
434
RHххN(W)RH01WxxX-W
RH15N(W) /
RH01W15X-W RH20N(W) /
RH01W20X-W RH25N(W) /
RH01W25X-W RH25N(W) /
RH01W25X-W
RH01W05X-W
500 W / 230 V~
400
200±2
ATTENTION!
It is recommended to keep the distance of 150 mm
between the convector and the floor of the room.
The minimum allowable floor distance to the lower end of
the convector is 60 mm. Failure to comply shall reduce the
appliance safety.
242 / 257
HOW TO USE THE APPLIANCE - Convector control board
Switching the convector heater On / Off;
„Settings“ menu - after pressing for 2 sec.
„Exit“ from „Settings“ menu
„-“ or Down;
„Sleep mode“ - after pressing for 2 sec.
„+“ or Up;
Delayed start - after pressing for 2 sec. while in Standby mode о
Extra heating - after pressing for 2 sec. while in Heating mode. The appliance operates at a temperature increased by 2.5 С
above the set temperature for one hour. Then the temperature is restored to the set temperature before the mode is enabled.
This mode is also disabled by pressing button 1.
„Information“
„Clear timers“ after pressing for 2 sec.
„Confirmation“ (ОК) in „Settings“ menu
1 –
2
3
4 –
Symbols:
Clock
Internet
connection
Room
temperature
Date / Error
Messages
Operating
mode
Power
indicator
Set temperature /
Additional timer information /
Time to delay start
overheating protection
child protection
Appliance switching on and off
Switching the convector On is carried out by switching the key located on the right side panel (pressing the end of the key marked "I")
and then pressing the button 1 on the electronic control panel. Switching the appliance Off is carried out in the same way as using button
1 of the electronic control board and then pressing the key marked "0".
ATTENTION! The side panel switch and button 1 of the electronic control board are function keys. Complete turning off of the
appliance is carried out ONLY by taking the power supply cord out of the power supply socket.
Each time the appliance is switched on, on the graphic display for 2 seconds are shown the hardware and software versions. Then is
displayed the main screen with temperature, date, time, and additional information depending on the current operating mode. The
controller stores the last active operating mode for an unlimited period of time before shutting down the device and always starts with the
same when switched on again. The controller also has the ability to save information about system time, date, sleep mode, and delayed
start mode in cases of short-time power failures. Period of such data saving - up to 24 hours. (if the convector heater has been turned on
for at least 4 minutes) or up to 40 seconds (if it was switched on for a shorter time).
The device is preconfigured so that it enters in Heating mode when it is switched on for the first time.
LANGUAGE! The information can be displayed in different languages. Selecting a language is carried out from the sub-menu
Language » 2sec. + ▼+ OK.
ATTENTION! It is imperative to set the time, date and the language initially!
By holding the button 1 for 2 seconds is displayed the main menu which means entering the Settings mode.
Navigate in the menu with the "▲" and "▼" buttons.
To enter the current settings, press the OK button. Once the screen with the relevant settings is displayed, the
individual parameters in it are corrected as follows:
The current parameter is displayed enclosed in a rectangle. With the "▲" and "▼" buttons, the parameters
set are crawled. Pressing the OK key enters the correction mode of the current parameter as its value is
displayed with a negative color in a filled rectangle.
Now with the "▲" and "▼" buttons you can change the value of the parameter. Once the required value is
selected, press the OK button to confirm the change and exit the parameter adjustment mode. An exception to
this rule are parameters as bookmarks (enabled / disabled). Instead, pressing the OK button changes the
status of the bookmark directly. Once all parameters have been set, the changes made are confirmed by
pressing button 1, and the controller returns to the main menu. For additional settings in the main menu, see
the "Controller Features" section.
open window detection
16
EN EN
XXXyy-XXX
SW ver yyy
HW ver yyy
T+ extra heating
1 2 3 4
Controller main operating modes
Heating mode
To start the appliance in this mode, use button 1.
In this mode, the convector heater shall maintain the temperature set. Message in field Operating mode - no
message. The display shows the current measured and set temperatures, the power indicator scale, the time,
and date.
Standby mode
To start the appliance in this mode, use button 1.
In this mode, when the measured temperature falls below the temperature set, the heater shall not switch on.
However, when the temperature drops below C, the mode is activated. Antifrost mode
Message in field Operating mode - Standby
The current measured temperature, time, and date are shown on the display.
Delayed Start mode
Message in field Operating mode - Standby
When the convector heater is in OFF mode, pressing and holding for 2 seconds on the ▲ button allows you to
enter time when the appliance shall switch on automatically. The time is set in 10 minutes steps. The delayed
start can be programmed up to 24 hours. At entry in Delayed Start mode setting, the default time is the current
time, rounded up to 10 minutes, and then pressing the or buttons you may increase or decrease the time by steps of 10 minutes. If
any of the ▲ or ▼ buttons is held for more than 0.7 seconds, the value automatically starts to increase or decrease at 4 units per
second. When the Delayed Start mode is activated, in the middle of the display is shown the turn-on time. If you want to adjust the preset
time, hold down the button again. The Delay Start mode is canceled by pressing the On / Off button. The convector heater shall then
switch to Heat mode. When the power is turned off while the Delay Start mode is on, the controller shall store the delay time. If the set
time shall occur before the power is restored, then the controller shall remain in OFF state when the power is restored.
Antifrost mode
This function shall switch on the convector heater automatically and independently of the selected mode when the room temperature
drops below 7°C. For this purpose, the convector heater must be plugged into the mains and the must convector heater on / off switch
be in the "I" position. When activating this mode, a minimum room temperature of 7°C shall be maintained.
Message in field Operating mode - Antifrost
When the room temperature raises above 7°C, the Anti-freeze safety mode switches off.
Sleep mode
In this mode the convector heater shall, within 2 hours, automatically and gradually decrease with 3 degrees the temperature set. This
mode activates by pressing and holding button 2 for more than 2 seconds when the convector is in Heat mode. When this mode is
activated for five seconds in the display middle field is shown Sleep Mode On, then the display takes the appearance of Heat mode.
Message in field Operating mode - Sleep.
The sleep mode is interrupted by pressing button 1 when the convector heater is switched off. The Sleep mode will turn itself off after 6
hours!
Timers mode / Program mode
The controller has a built-in weekly programmer that allows you to create seven independently set operating time intervals, and each
interval can be repeated over the days of the week. The weekly programmer can operate in two modes - Timer and Program. Switching
from one mode to the other is possible by changing the Timers setting in the sub-menu System When the setting is On/Off, the
controller is in the Timers mode, with only start and end of the time intervals and the days of the week for which it is valid.
Message in field Operating mode - Timers
When the setting of Timers in System is Change t, the controller is in the Program mode, where, in addition to the start and end of the
time intervals and days of the week for which the program applies, a temperature may be entered.
Message in field Operating mode - Program
Each program or timer set can be activated / deactivated. When introducing a start and an end it must be borne in mind that the
controller does not allow the end time to be before the start one.
With a weekly programmer set, hold the OK button for more than 2 seconds and all timers set shall be deactivated by displaying the
Timer Stop message for 5 seconds, then the convector shall switch to Heat mode without a weekly programmer.
17
EN EN
Controllers features and settings
Setting specific temperature
Use buttons 2 and 3 to change the temperature. The maximum temperature that can be set is 28 °C and the
minimum is 7 °C. Pressing any of these two buttons shall display the current temperature set. With the
following keystrokes you may change the assignment in the desired direction. If no new button is pressed
within 5 seconds, the new task shall be memorized and automatically the unit shall switch to the main screen. If
any of the buttons 2 or 3 shall be held for more than 0.7 s, the temperature set point value automatically starts
to increase or decrease with the speed of 4 units per second.
Adjusting the power of the appliance
When the measured temperature is lower than the set one, the convector heater switches on - its power
indicator scale fills in. The more the temperature is approaching the set one, the less is the filling of the scale.
When the set temperature is reached, the indicator goes out. The power control function can be switched off by
the sub-menu Settings by deactivating the check-mark Reg. power. In this case, under all operating modes,
the convector heater shall run at full power during heating or shall be completely switched off when the
temperature set is reached.
Child lock
This feature locks all control panel buttons, limiting the possibility of unauthorized access to the controller
settings. The feature is turned on by the child protection sub-menu, followed by the instruction on the display - Press OK to lock the
buttons. The following message is displayed - Buttons are locked!. It is suitable to press the button 1 to exit the settings menu, displaying
a symbol illustrating child protection . To turn off child protection, you must hold the OK button for a time longer than 7 seconds.
Protection against convector heater falling
If the convector heater is knocked down while switched on, the controller switches off the heater, the unit displays a message Convector
fell, and activates an audible alarm. The alarm will be deactivated automatically after restoring the appliance normal position or by
pressing button 1 to switch off the convector heater. It may be a malfunction if the convector heater was stored in a cold place for a long
time and then placed in a significantly warmer place.
Open window feature
The controller has a built-in feature for recognizing an open window that automatically stops heating. An open window icon appears on
the display. This feature operates in two modes - Smart and On. Switching from one mode to the other is done by changing the setup
Open window in sub-menu System Settings. When the setting is Smart, the convector heater shall continue heating as soon as it
detects that the window is closed or after 15 minutes have elapsed since the protection mode is activated, while the heating mode ON
shall continue for 60 minutes once the mode is activated. The Open window feature is disabled when you press button 1, which switches
the convector heater to Standby mode, or from the sub-menu System set Open Win to Off
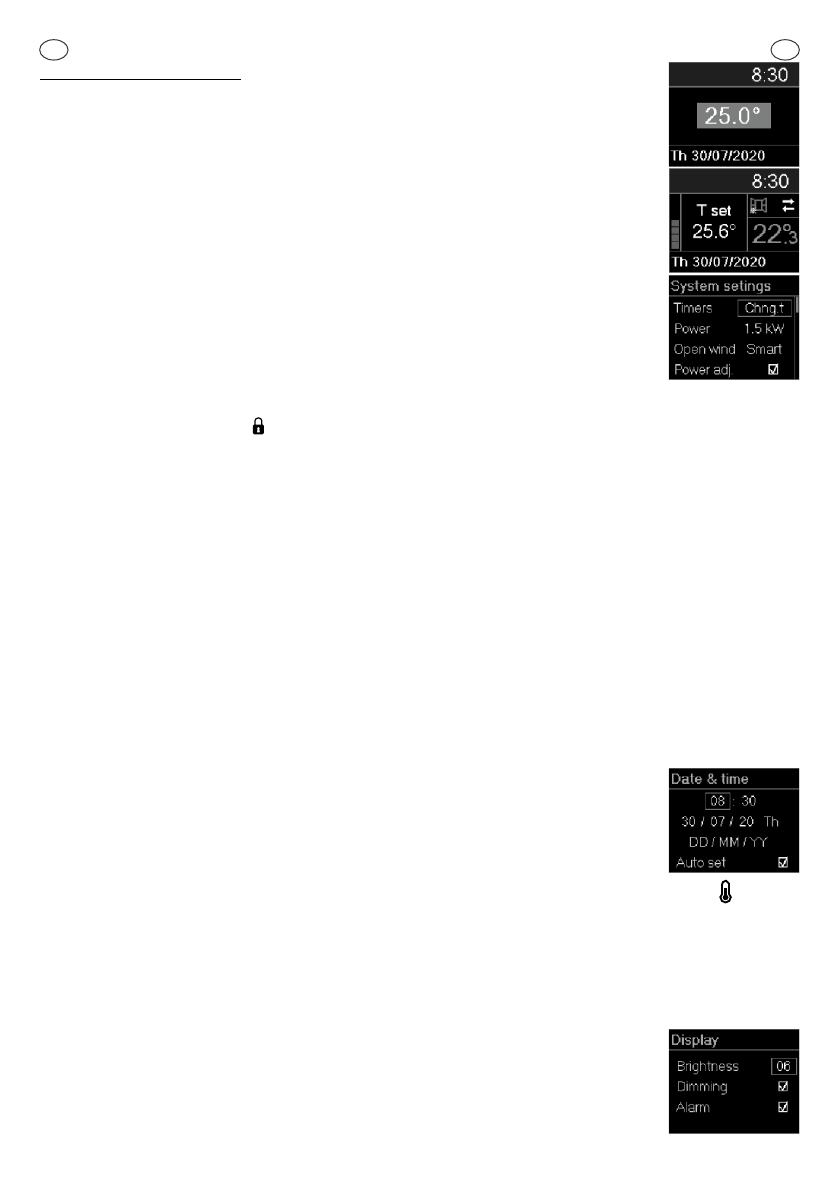
Keeping the system date and time
The controller unit keeps the system date and time
For all Timer / Program, Delayed Start, and Power Meters to work correctly, the date and time must be verified. Verification is set from
the main menu, sub-menu Time and Date. The auto-enable option check box works only on models with WiFi control.
Remote control over the Internet
This feature requires an additional WiFi module installed in the configuration of the following convector heater models: RH10NW,
RH15NW, RH20NW, RH25NW, RH30NW, RH01WxxW-x.
If the appliance you bought has a model number corresponding to one of the listed above - please read the
supplement to this Instruction manual.
Two stage overheat protection
Apart from the electro-mechanical thermal protection, the convector heaters also rely on the electronic
protection built into the controller. This protection prevents accidental overheating of the appliance inside. The
feature temporarily interrupts the heating until the temperature drops below the allowed maximum. A symbol is displayed.
Color graphic display
The electronics have a high-resolution color display. The Display sub-menu sets Brightness settings (from 1 to 10) and Dimming
activation check-box. Dimming automatically reduces the brightness of the display 30 seconds after the last press of a button (the
feature does not work at set brightness -1).
Reporting consumed electricity
The controller supports separate counters for daily and nocturnal electricity consumption. In order to report correctly the concerned
data, it shall be necessary to set the unit power from the sub-menu Settings - Power setting, and the start time of each tariff in the Home
tariffs sub-menu. When the OK button is pressed once, the electricity consumption counters are displayed and
the date and time of their last reset. While this screen is displayed, if the OK button is held for 2 seconds, then
the counters are reset and the resetting date and time are recorded. Next time you press the OK button, it
switches to the screens with a graph of the electricity consumed by hours. The controller shall store such
information for the last 7 days. By pressing the ▲ or ▼ buttons, the charts shall change with the days for
18
EN EN
which information is available. Each graph shows the date to which it refers and the total electricity consumed
for that day. It should be borne in mind that the information on the electricity consumed is calculated on the
basis of the convector heater set power.
Pressing ▲ or ▼ button again moves to the hourly average room temperature graphs. The controller shall
store such information for the last 4 days. By pressing the ▲ or ▼ buttons, the charts shall change with the
days for which information is available. Below each graph is the date to which it refers.
Additional information
The display may show additional information such as:
Information about the condition of the WiFi module It is necessary to press the OK button once, then the ▼
button. If you purchased a device without WiFi control, the message No WiFi module shall be displayed.
Information about the controller hardware and software versions. It is necessary to press the OK button once,
then press twice.
Information about the appliance operation errors. All error messages are displayed in the corresponding field
on the display. Messages can be as follows:
Disconnected TS
TS short-circuit
Open window
Fallen appliance /
Colaps. devoce
Wrong Time !
The room temperature sensor is switched off or interrupted.
The heater shall not work
The room temperature sensor is short-circuited. The heater shall not work.
The Open window mode is enabled.
Enabled protection when the appliance is decommissioned
The watch is not set. The weekly programmer will not work.
SERVICE AND MAINTENANCE
Make sure to turn off the appliance first and remove the plug from the socket.
џIn order to preserve the unit technical characteristics and to prevent overheating is necessary, for example, once a month to
clean the accumulated dust from the heater top with dry cloth and the bottom grid with a vacuum cleaner or a bristle.
џClean the cabinet with a dry cloth, vacuum cleaner or brush, always disconnecting the appliance from the power supply
beforehand.
џIt is prohibited to use liquids when cleaning the unit. It is prohibited to use a steam generator!
џDo not use abrasive materials!
џClean the rear of the convector once you have unlocked the two clamps at the top end of the convector as shown in fig. 5, so you
can release and clean it.
џWarning! After cleaning the heater back side it is compulsory to place the unit back in its normal position (according fig. 5.
ADVICES FOR APPLIANCE PROPER USE
It is not necessary to set the unit in operation at highest temperature, the degrees in the room shall not climb up quicker.
When you ventilate or aerate the room for a long time, turn off the appliance from the button 1 or from the key on the right side panel.
When leaving home for few hours mind decreasing the temperature set.
Should you be absent for:
џless than two hours it is not necessary to change the temperature set.
џfrom 2 (say: two) to 24 (say: twenty four) hours you may decrease temperature set with few degrees.
џMore than 24 hours or in the summer - leave the appliance plugged into the mains and with a mechanical switch turned off by the
electronic control unit (button 1). This will allow the antifreeze function to be switched on as required.
If you have more than one electric convector in the room you may switch them on simultaneously, thus securing constant temperature
without increasing power consumption. It is true also for rooms which are not permanently used – it is better to leave the units switched
on at minimum temperature stings than to switch them off completely.
WARRANTY, WARRANTY PERIOD AND WARRANTY CONDITIONS
The warranty, warranty conditions, warranty period, warranty validity for purchased appliance and service related manufacturer or
vendor liabilities during the appliance warranty period are listed in the appliance warranty form. When buying the appliance the warranty
form must be filled and signed both by seller and buyer. Keep the warranty form in a secure place.
In all instances shall be in force the applicable laws, regulations and other legislation dealing with the rights and obligations of
19
EN EN
consumer, seller and manufacturer, and their relationships related to purchased water heater, its installation, use, servicing and
maintenance.
Warranty term is determined by seller and is in force only for the geographical territory of the country.
Warranty is valid only if the appliance:
џIs installed according to the requirements for installation and operation.
џIs used only as per designed purpose and in accordance with the installation and operation manual.
Warranty consists of free of charge repair of all factory defects, which may arise during the warranty term. Repair is performed by
service specialists, authorized by seller.
Warranty is not valid for damages, caused by:
џImproper transportation
џImproper storage
џImproper usage
џSupply voltage, different than the unit's rated voltage.
џDamages due to freezing
џElemental perils, disasters and other force majeure circumstances.
џNon observance of the installation and operation manual.
џIn cases, when a non authorized person has tried to repair any kind of a defect.
In the above cases the defect will be repaired against relative payment.
Warranty shall not apply to normal wear parts and components of the device, parts that are being removed during normal use, lighting
and signal lamps and the like, changing the color of external surfaces, change of shape, size and location of parts and components that
are exposed to impact and conditions that are not considered normal use.
Lost profits, tangible and intangible damages caused by temporary inability to use the device during its prevention and repair shall not
by covered by the warranty.
COMPLIANCE WITH THE REQUIREMENTS OF THIS INSTRUCTION MANUAL IS A PREREQUISITE FOR SAFE
OPERATION OF YOUR PURCHASED PRODUCT AND IS ONE OF THE WARRANTY TERMS AND CONDITIONS.
IT IS ABSOLUTELY PROHIBITED TO THE USER OR ANY AUTHORIZED BY HIM PERSON TO UNDERTAKE ANY
CHANGES IN THE PRODUCT DESIGN AND STRUCTURE. ANY FINDING OF SUCH ACTIONS OR ATTEMPTS SHALL
AUTOMATICALLY RENDER VOID ALL WARRANTY LIABILITIES OF SELLER OR PRODUCER.
IN CASE OF NECESSITY FOR SERVICE SEEK ONLY MANUFACTURER AUTHORIZED SERVICE COMPANIES LISTED
IN THE ANNEXED FORM.
THE MANUFACTURER PRESERVED HIS RIGHT TO STRUCTURAL CHANGES WITHOUT NOTICE WHERE SUCH
SHALL NOT AFFECT PRODUCT SAFETY.
20
EN EN
  • Page 1 1
  • Page 2 2
  • Page 3 3
  • Page 4 4
  • Page 5 5
  • Page 6 6
  • Page 7 7
  • Page 8 8
  • Page 9 9
  • Page 10 10
  • Page 11 11

ELDOM RH-RH01W Electric Wall-Mounted Convector Heater User manual

Category
Thermostats
Type
User manual

ELDOM RH-RH01W Electric Wall-Mounted Convector Heater provides effective heating solutions for various indoor spaces. With power ranging from 500W to 3000W, it offers customized warmth for rooms of different sizes. The heater's sleek design and compact dimensions make it suitable for wall mounting, saving valuable floor space.

Ask a question and I''ll find the answer in the document

Finding information in a document is now easier with AI