
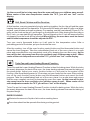
OPERATING AND INSTALLATION
INSTRUCTIONS OF
VISIO TOUCH CONTROL
BUILT-IN OVEN
ROV - 730
ROV - 930

Dear Customer,
We take offering quality products more than your expactation
as goal, offers you the products produced in modern facilities
carefully and particularly tested for quality.
Your manual is prepared in order to help you to use your
appliance that is manufactured by the most recent technology,
with confidence and maximum efficiency.
Before use of your appliance, carefully read this guide that
includes the basic information for right and safe installation,
maintenance and use. Contact to the nearest Authorized
Service for mounting of your product.

1
Contents
1- Presentation and size of product
2- Warnings
3- Preparation for installation and use
4- Using the oven
5- Cleaning and maintenance of your product
6- Service and Transport

2
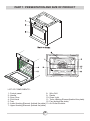
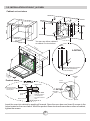
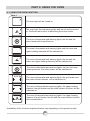
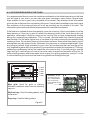
PART 1: PRESENTATION AND SIZE OF PRODUCT
LIST OF COMPONENTS :
1- Control panel
2- Handle
3- Oven Door
4- Child Lock
5- Tray
6- Lower Heating Element (behind the plate)
7- Upper Heating Element (behind the plate)
8- Wire Grill
9- Racks
10- Oven Light
11- Turbo Heating Element(behind the plate)
12- Fan (behind the plate)
13- Air Outlet Shutters

3
PART 2: WARNINGS
READ THESE INSTRUCTIONS CAREFULLY AND COMPLETELY BEFORE USING YOUR
APPLIANCE, AND KEEP IT IN A CONVENIENT PLACE FOR REFERENCE WHEN NECESSARY.
THIS MANUAL IS PREPARED FOR MORE THAN ONE MODEL IN COMMON. YOUR
APPLIANCE MAY NOT HAVE SOME OF THE FEATURES THAT ARE EXPLAINED IN THIS
MANUAL. PAY ATTENTION TO THE EXPRESSIONS THAT HAVE FIGURES, WHILE YOU ARE
READING THE OPERATING MANUAL.
General Safety Warnings
- This appliance can be used by children aged
from 8 years and above and persons with
reduced physical, sensory or mental
capabilities or lack of experience and
knowledge if they have been given
supervision or instruction concerning use of
the appliance in a safe way and understand
the hazards involved. Children shall not play
with the appliance. Cleaning and user
maintenance shall not be made by children
without supervision.
- WARNING: The appliance and its accessible
parts become hot during use. Care should be
taken to avoid touching heating elements.
Children less than 8 years of age shall be kept
away unless continuously supervised.
- WARNING: Danger of fire: do not store items
on the cooking surfaces.
- WARNING: If the surface is cracked, switch
off the appliance to avoid the possibility of
electric shock.

4
- During use, the appliance becomes hot.
Care should be taken to avoid touching
heating elements inside the oven.
- During use, handles held for short periods in
normal use can get hot.
- Do not use harsh abrasive cleaners or sharp
metal scrapers to clean the oven door glass
and other surface since they can scratch the
surface, which may result in shattering of the
glass or damage to the surface.
- Do not use steam cleaners for cleaning the
appliance.
- WARNING: Ensure that the appliance is
switched off before replacing the lamp to
avoid the possibility of electric shock.
- CAUTION: Accessible parts may be hot
when the cooking or grilling is in use. Young
children should be kept away.
- Your appliance is produced in accordance with all applicable local and international
standards and regulations.
- Maintenance and repair work must be made only by authorized service technicians.
Installation and repair work that is carried out by unauthorized technicians may
endanger you. It is dangerous to alter or modify the specifications of the appliance in
any way.
- Prior to installation, ensure that the local distribution conditions (nature of the gas and
gas pressure or electricity voltage and frequency) and the requirements of the
appliance are compatible. The requirements for this appliance are stated on the label.
- CAUTION: This appliance is designed only for cooking food and is intended for indoor
domestic household use only and should not be used for any other purpose or in any
other application, such as for non-domestic use or in a commercial environment or
room heating.
- Do not try to lift or move the appliance by pulling the door handle.

- Ensure that the supply cord is not wedged during the installation. If the supply cord is
damaged, it must be replaced by the manufacturer, its service agent or similarly qualified
persons in order to prevent a hazard.
- While the oven door is open, do not let children climb on the door or sit on it.
Installation Warnings
- Do not operate the appliance before it is fully installed.
- The appliance must be installed by an authorized technician and put into use. The
producer is not responsible for any damage that might be caused by defective placement
and installation by unauthorized people.
- When you unpack the appliance, make sure that it is not damaged during transportation.
In case of any defect; do not use the appliance and contact a qualified service agent
immediately. As the materials used for packaging (nylon, staplers, styrofoam...etc) may
cause harmful effects to children, they should be collected and removed immediately.
- Protect your appliance against atmospheric effects. Do not expose it to effects such as
sun, rain, snow etc.
- The surrounding materials of the appliance (cabinet) must be able to withstand a
temperature of min 100°C.
During usage
- When you first run your oven a certain smell will emanate from the insulation materials
and the heater elements. For this reason, before using your oven, run it empty at maximum
temperature for 45 minutes. At the same time you need to properly ventilate the
environment in which the product is installed.
- During usage, the outer and inner surfaces of the oven get hot. While opening the oven
door, step back to avoid the hot steam coming out of the oven. There may be a risk of
burns.
- Do not put flammable or combustible materials, in or near the appliance when it is
operating.
- Always use oven gloves to remove and replace food in the oven.
- Do not leave the cooker while cooking with solid or liquid oils. They may catch fire on
condition of extreme heating. Never pour water on to flames that are caused by oil. Cover
the saucepan or frypan with its cover in order to choke the flame that has occured in this
case and turn the cooker off.
- If you will not use the appliance for a long time, plug it off. Keep the main control switch
off. Also when you do not use the appliance, keep the gas valve off.
- Make sure the appliance control knobs are always in the "0" (stop) position when it is not
used.
- The trays incline when pulled out. Be careful not to let hot liquid spill over.
- When the door or drawer of the oven is open, do not leave anything on it. You may
unbalance your appliance or break the cover.
- Do not put heavy things or flammable or ignitable goods (nylon, plastic bag, paper,
cloth...etc) into the drawer. This includes cookware with plastic accessories (e.g. handles).
- Do not hang towels, dishcloths or clothes from the appliance or its handles.
During cleaning and maintenance
- Always turn the appliance off before operations such as cleaning or maintenance. You can
do it after plugging the appliance off or turning the main switches off.
- Do not remove the control knobs to clean the control panel.
TO MAINTAIN THE EFFICIENCY AND SAFETY OF YOUR APPLIANCE, WE
RECOMMEND YOU ALWAYS USE ORIGINAL SPARE PARTS AND TO CALL ONLY
OUR AUTHORIZED SERVICE AGENTS IN CASE OF NEED.
5

6
PART 3: PREPARATION FOR INSTALLATION AND USE
When choosing a place for the oven, attention should be paid that there are no flammable
or combustible materials in the close vicinity, such as curtains, oil, cloth etc. which quickly
catch fire.
Furnitures surrounding the oven must be made of materials resistant to temperatures
above 50 C° more than room temperature.
Manufactured with best quality parts and materials, this modern, functional and practical
oven will meet your needs in all respects. Make sure to read the manual to obtain successful
results and not to experience any problems in the future. The information given below contain
rules that are necessary for correct positioning and service operations. They should be read
without fail especially by the technician who will position the appliance.
CONTACT THE AUTHORIZED SERVICE FOR INSTALLATION OF YOUR OVEN!
3.1. CHOOSING A PLACE FOR THE OVEN
There are several points to pay attention to when choosing a place for your oven.
Make sure to take into account our recommendations below in order to prevent any
problems and dangerous situations, which might occur later!

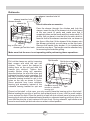
C DETAIL
Insert the oven into cabinet by pushing it forward. Open the oven door and insert 2 screws in the
holes located on the oven frame. While the product frame touches the wooden surface of cabinet,
tighten the screws.
Cabinet cut-out sizes
You can use either cabinet 1
or cabinet 2 cut-out sizes
2
A
B
600mm
Min 25mm
580mm
560mm
600mm
1
555mm
600mm
min 580mm
min 560mm
max 580mm
A DETAIL
20mm
Minimum 40mm(The wooden
part can be extended up
to cut-out depth)
Product sizes
B DETAIL
Countertop
Built-in oven
Min.25mm
Control
panel
Distance between
countertop and
control panel
Min. 50mm
Built-in hob
Distance between
countertop snd
top panel of built-in
oven
3.2. INSTALLATION OF BUILT_IN OVEN
Front
frame
Spacer
Mounting
screw
Wooden
part
C
557mm
595mm
575mm
550mm
Mounting
screws
576mm
595mm
7

8
The dimensions and material of the cabinet in which the oven will be installed must be
correct and resistant to increases in temperature. In a correct installation, contact with
electrical or insulated parts must be prevented. Insulating parts need to be fitted in a way to
ensure that they cannot be removed by using any kind of tool. Installing the appliance in the
close vicinity of a refrigerator or a deep-freezer is not recommended. Otherwise, the
performance of the above-mentioned appliances will be negatively affected due to
emanating heat. After removing your oven from its packaging, be sure that the oven is not
harmed. In case, you suspect of any damage to the appliance, do not use it; immeditely
contact Authorized Service.
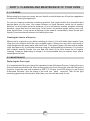
3.3. WIRING AND SAFETY OF BUILT_IN OVEN
The instructions given below must be followed without fail during wiring :
The earthing cable must be connected via the screw with the earthing mark. Supply cable
connection must be as shown in Figure 1. If there is no earthed outlet conforming to
regulations in the installation environment, call the Authorized Service immediately.
The earthed outlet must be in close vicinity of the appliance. Never use an extension cord.
The supply cable should not contact the product’s hot surface.
In case of any damage to the supply cable, make sure to call the Authorized Service. The
cable must be replaced by the Authorized Service.
Wiring of the appliance must be performed by the Authorized Service. H05VV-F type
supply cable must be used.
Faulty wiring may damage the appliance. Such a damage will not be covered under the
warranty.

9
Wiring of the appliance must be performed by the Authorized Service. The appliance is
designed to connect to 220-240V~ electricity. If the mains electricity is different than the value
given, call the Authorized Service immediately. The appliance is designed for using with plug
ofor fixed connection to the mains. It is necessary that you install a double pole switch
between the product and the electricity supply (mains), with a minimum gap of 3 mm between
the switch contacts. (20A rated, delay function type).
The appliance is designed to connect to 220-240V~ electricty is different than the value
given above, call the Authorized Service immediately.
The Manufacturer Firm declares that its bears no responsibility whatsover for any
kind of damage and loss arising from not complying with safety norms!
Figure 1
BLUE
BROWN YELLOW+GREEN
3.4. GENERAL WARNING AND PRECAUTIONS
Your appliance is produced in conformity with the relevant safety instructions relating to
electrical appliances. Maintanance and repair works must be performed only by
Authorized Service technicians trained by the manufacturer firm. Installation and repair
works, performed without observing the rules may be dangerous.
The outer surfaces is heated while your appliance is operating. The elements heating the
inner surface of the oven and the steam out are extremely hot. These sections will continue
to preserve their heat for certain while even if the appliance is switched off. Never touch the
hot surfaces. Keep children away.
In order to cook in your oven, the oven function and temperature setting butttons need to be
adjusted and the oven timer, needs to be programmed. Otherwise, the oven will not
operate.
While the oven door is open, do not place anything on it. You may disturb the balance of the
appliance or break the door.
Unplug your appliance when it is not in use.
Protect your appliance from atmospheric effects. Do not leave it under the effects of the
sun,rain, snow, dust etc.

10
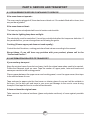
Table 1
The oven light, the red warning light and the fan will be turned
on. Performs the function of defrosting the frozen foods.
The oven’s thermostat and warning lights, the fan and the
turbo heater will be switched on.
The oven’s thermostat and warning lights, the fan and the
lower and upper heating elements will be switched on.
The oven’s thermostat and warning lights, the grill heater and
the roast chicken function will be switched on.
The oven’s thermostat and warning lights, the upper heating
element, the grill heater and the roast chicken function will be
switched on.
The oven’s thermostat and warning lights, the upper heating
element, the grill heater, the fan and the roast chicken function
will be switched on.
The oven’s thermostat and warning lights, the lower
heating element, the turbo heater, will be switched on.
the fan,
The oven’s thermostat and warning lights and the lower and
upper heating elements will be switched on.
The oven light will be turned on.
Availability of the functions explained below vary depending on the product model.
4.1. USING THE OVEN FUNCTION
PART 4: USING THE OVEN

11
Defrost Function :
Figure 2
You can start the defrost operation by putting the frozen
food into oven and bringing the button to the indicated
mark. This function does not cook/bake the food; it only
helps defrost it within a short time. Put the food to be
defrosted on the wire rack that you will place on the third
rack support from the bottom (Figure 2). To collect the
water to accumulate due to the melting ice, insert an oven
tray into the lower rack.
Turbo Fan Function :
The turbo fan function evenly disperses the heat in the oven. All foods on all racks will be
cooked evenly.
Adjust the thermostat button to the desired degree. Turn the function button so it will point to
the Tubo function symbol. After completing the preheating of 10 minutes, place the foods
into the oven, which need to be put into suitable containers. This function is suitable for
cooking multiple dishes.
If you are going to cook using two trays at the same time; while adjusting the cooking
temperature, select the temperature that is the lowest among the levels suitable for your
foods, as shown on the table. Cooking with two trays requires additional cooking time
compared to cooking with one tray. Usually, the foods on both trays do not finish at the same
time. Therefore, take the tray out of the oven, which you observed is finished and continue
the cooking operation for the other tray.
After the cooking/baking, turn off the oven function control button and the thermostat button
and cancel the timer program if available. Take the cooked/baked food out of the oven, place
it on a safe place and ensure that the oven completely cools off by keeping the oven door
open. As the oven will be hot, stay away from the oven and keep your children away as
well. When center of the oven temperature reachs the 70°C, you will see “hot” on the
display.
Lower-Upper Heating Element Function (Static Coking) :
In this type of cooking which is described as the traditional method, the heat emanating
evenly from the lower and upper resistors into the oven ensures even cooking of the lower
and upper side of the food that you are cooking. Adjust the thermostat botton of your oven to
a temperature recommended on the cooking table for the cooking operation you will
perform. A preheating of the oven for about 10 minutes is recommended. Leave a food to
cook, which is placed in a suitable container, for the recommended duration. This position is
a preferred function in making cakes, sponge cakes, pastry, baked pasta, lasagne,
pizza.
After a cooking/baking, turn off the oven function control button and the thermostat button
and cancel the timer program if available. Take the cooked/bake food out of the oven, place
it on a safe place and ensure that the oven copmletely cools off by keepig the oven door
open. As the oven will be hot, stay away from the oven and keep your children away as
well. When center of the oven temperature reachs the 70°C, you will see “hot” on the
display.

12
Figure 3
Fan and the Lower - Upper Heating Element Function:
This is the position where the air is coming from the lower and upper heating elements is
circulated into the oven by the fan motor and blade.
Adjust the thermostat button of your oven to temperature recommended on the cooking
table for the cooking operation yo will perform. Turn the oven button so it will point to the
symbol of this funtion, adjust the oven timer to the recommended time for cooking and
preheat the oven for about 10 minutes. The food placed in a suitable container is put into
the oven and the operation is started. This position is position where usually very good
results are obtained in baking pastry. All parts of the foods will be cooked evenly in this
position . Suitable for cooking with one tray.
After the cooking/baking, turn off the oven function control button and the temperature
setting button and cancel the timer program if available. Take the cooked/baked food
out of the oven, place it on a safe place and ensure that the oven completely cools off
by keeping the oven door open. As the oven will be hot, stay away from the oven and
keep your children away as well. When center of the oven temperature reachs the
70°C, you will see “hot” on the display.
Grill and Roast Chicken Function :
Turn your oven’s thermostat button so it will point to this temperature value. After a
preheating period of 5 minutes, put your food into the oven.
After the cooking, turn off the oven function control button and the thermostat button and
cancel the timer program. Take the cooked/baked food out of the oven, place it on a safe
place and ensure that the oven completely cools off by keeping the oven door open. As the
oven will be hot, stay away from the oven and keep your children away as well. When
center of the oven temperature reachs the 70°C, you will see “hot” on the display.
Upper Heating Element, Grill and Roast Chicken Function :
This function is used for faster grills and for grills on a larger surface, roast chicken and roast
on skewer. For roasting, use the roast skewer ( Figure 3). For grills; put the foods on the grill,
and the grill on the highest rack. After placing the oven tray on the 3. Rack, you
can start teh grill operation. 3, the tray placed on the 3. Rack will ensure that the oil dropping
from the foods will be collected. When grilling, the oven door must be closed and the
oven temperatureshould be adjusted to 200°C.
Turn your oven’s thermostat button so it will point to this temperature value. After a
preheating period of 5 minutes, put your foods into the oven.
After the cooking, turn off the oven function control button and the thermostat button and
cancel the timer program if available. Take the cooked/baked food out of the oven, place it on
a safe place and ensure that the oven completely cools off by keeping the oven door open.
This function is used for grills, roast chicken and roast
on skewer. For roasting, use the roast skewer
(Figure 3). For grills; put the foods on the grill,
and the grill on the highest rack. After placing the oven
tray on the 3. Rack, You can start the grill operation. The
tray placed on the 3. Rack will ensure that the oil
dropping from he foods will be collected. When grilling,
the oven door must be closed and the oven
temperature should be adjusted to 200°C.

13
As the oven will be hot, stay away from the oven and keep your children away as well.
When center of the oven temperature reachs the 70°C, you will see “hot” on the
display.
Grill, Roast Chicken and Fan Function :
At this function; ensuring complete frying by working together, the fan, the grill and the upper
heating element perform the operation. It is also used for faster grills and for grills on a larger
surface, roast chicken and roast on skewer. For roasting, use the roast skewer (Figure 3). For
grills; put the foods on the grill, and the grill on the highest rack. After placing the oven tray on
the 3. rack, you can start the grill operation. The tray placed on the 3. rack will ensure that the
oil dropping from the foods will be collected.When grilling, the oven door must be closed
and the oven temperaure should be adjusted to 200°.
Turn your oven’s thermostat button so it will point to this temperature value. After a
preheating period of 5 minutes, put your foods into the oven.
After the cooking, turn off the oven function control button and the thermostat button and
cancel the timer program. Take the cooked/baked food out of the oven, place it on a safe
place and ensurethat the oven completely cools off by keeping the oven door open. As the
oven will be hot, stay away from the oven and keep your children away as well. When
center of the oven temperature reachs the 70°C, you will see “hot” on the display.
Turbo Fan and Lower Heating Element Function :
Turbo Fan and the Lower Heating Element Function is ideal for baking pizza. While the turbo
fan evenly disperses the heat of the oven, the lower heating element ensures the baking of
the pizza dough. Adjust your oven’s function button so it will point to the symbol of this
function. After a preheating period of 10 minutes, put your foods into the oven. After cooking,
turn off the oven function control button and the thermostat button and cancel the timer
program. Take the cooked/baked food out of the oven, place it on a safe place and ensure
that the oven compltely cools off by keeping the oven door open. As the oven will be hot,
stay away from the oven and keep your children away as well. When center of the
oven temperature reachs the 70°C, you will see “hot” on the display.
Turbo Fan an the Lower Heating Element Function is ideal for baking pizza. While the turbo
fan evenly disperses the heat of the oven, the lower heating element ensures the baking of
the pizza dough.
ENERGY SAVING
Minimize the amount of liquid or fat to reduce cooking times.
Oven door should not be opened often during cooking period.

14
Figure 4
4.2. HOW TO USE THE VISIO TOUCH CONTROL UNIT
Adjusting the Day Time:
When the built in oven installed firstly the time of day must be adjusted according to below
instructions.
When oven installed firstly,“0.00” will start to flash on the display. Touch “M“ sensor or “ - “
and “ + “ sensors to adjust the day time mode. “ : ” symbol will start to flash on the display. You
can adjust it with “ - “ and “ + “ sensor.
If Auto cooking mode is off, touch “ - “ and “ + “ sensors at the same time to the day time mode.
You can adjust it with “ - “ and “ + “ sensor.
You have to adjust the day time to use oven function.
ADJUSTING THE COOKER TIME:
Adjusting the Minute Minder:
Touch alarm sensor which shows “ ” symbol. “ ” will be flashing on the display. “0.00” will
appear on the clock digits. Adjust the desired time period for the warning by using Timer Plus
and Minus sensor while the symbol is flashing. Some time after the completion of the
adjustment, symbol will begin to light continuously. When the symbol begins to light
continuously, the audible warning time adjustment is done. When the set time is up, the timer
gives an audible warning and symbol begins to flash on the screen. Pressing “ - “or “+“ will
stop the audible warning and the symbol disappears on the screen.
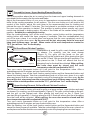
M
Mode Key
Oven function
display
Timer display
Temperature display
Alarm Key
Time setting/Temperature
settings for meat probe/
Key lock Key
Time setting Key

15
Adjusting the Cooking Duration Time:
This function is used to cook in the desired time range. The foods to be cooked are put into
the oven. The oven is adjusted to the desired cooking function. The oven temperature is
adjusted to the desired degree depending on the dish to be cooked. Touch on the “M” sensor
until you see Duration time symbol “ |>| ” on the timer display screen. “AUTO” appear on the
display. Adjusted the cooking period for the food you wish to cook, by using the Timer Plus
and minus sensor while the timer is in this position. Some time after the adjustment operation
is completed, the day's time will appear on the screen and the Duration time symbol will
begin to continuously light on the screen.
At the completion of the set duration, the timer will stop the oven and give an audible
warning. Also, “AUTO” will begin to flash on the screen. Touching any sensor of the control
unit will end the audible warning. “AUTO” will go on to flash. Touch “ - “ and “ + “ symbols at
the same time to finish “AUTO” mode.
Adjusting the Cooking End Time:
This function is used to cook after a certain period of time, within certain duration. The food to
be cooked is put into the oven. The oven is adjusted to the desired cooking function. The
oven temperature is adjusted to the desired degree depending on the dish to be cooked.
Touch on the “M” sensor until you see Duration time symbol “ |>| ” on the timer display
screen. “AUTO” appear on the display. Adjusted the cooking period for the food you wish to
cook, by using the Timer Plus and minus sensor while the timer is in this position.Then touch
the “M” sensor until you see “ >| ” symbol. the day time will begin to flash, with the addition of
the cooking period. Adjust the finishing time for the food by using the Timer Plus and minus
sensor while the timer is in this position. Some time after the adjustment operation is
completed, the day time will appear on the screen and the “ >| ” symbol will begin to
continuously light on the screen. The oven will start operating at the time calculated by
deducting the cooking period from the set finishing time, and will stop at the set finishing
time. The timer will give an audible warning and “AUTO” will begin to flash on the screen will
begin to flash. Touching any button of the timer will end the audible warning. “AUTO” will go
on to flash. Touch “ - “ and “ + “ symbols at the same time to finish “AUTO” mode.
Digital Timer Sound Adjustment:
Touch “-“ sensor until you hear sound. timer will give an audible signal beep. After that each
time “-“ sensor is touched, timer will give three different types of signal beep. Do not touch
any further sensor and timer will save the last selected signal type.
Key Lock Function
The key lock function is used to prevent operating any functions of the control unit by
mistake. Touch “+” sensor until you see key lock symbol on the display to activate key lock.
Touch the “+” sensor to deactivate key lock.
While oven is operating, if control switches and touch buttons are not pushed or
touched for 3 hours, oven turns off.

16
DISHES
FUNCTIONS
TURBO LOWER-UPPER LOWER-UPPER-FAN GRILL
Layered pastry 170-190 170-190 170-190
170-190
170-190
1-2-3 1-2 1-2
1-2
1-2
35-45 35-45 25-35
30-40
30-40
30-40
40-50
30-40
35-45
40-50
45-60 45-60
10-15
15-25
15-25
50-60
25-35
1-2-3
1-2-3
2
1-4
1-4
2
1-2 1-2
4
3-4
4
*
150-170
150-170
25-35
1-2-3
150-170
25-35
1-2-3
150-170
175-200
160-180
170-190
175-200
200 200
200
200
200
200
40-50
2
175-200
Thermostat
0
position( C)
Rack
position
Cooking
period(min.)
Thermostat
0
position( C)
Rack
position
Cooking
period(min.)
Thermostat
0
position( C)
Rack
position
Cooking
period(min.)
Thermostat
0
position( C)
Rack
position
Cooking
period(min.)
Grilled meatballs
Watery food
Chicken
Chop
Beefsteak
Two-tray cake
Two-tray pastry
* Cook with roast chicken skewer
Cake
Cookie

17
5. rack
4. rack
3. rack
2. rack
1. rack
4.3. ACCESSORIES USED IN THE OVEN
It is recommended that you use the containers indicated on the table depending on the food
you will cook in your oven, you can also use glass containers, cake cutters, special oven
trays suiatble for use in your oven, available in the market. Pay attention to the information
given by the mufacturer firm concerning this issue. If small sized containers are used, place
this container on the inner grill wire so it will be precisely on the middle of the wire. The
information given below should be implemented for enamelled containers.
If the food to be cooked does not completely cover the oven tray, if the food is taken out of the
deep-freezer or if the tray is used to collect the dripping juices of the foods during the grill
operation; deformation might be observed on the tray due to high temperatures forming
during the cooking/frying operation. This is normal, physical state thay results during the
heat transfer. Do not leave a glass tray or container in a cold environment immediately after
cooking in them. Do not place them on cold and wet surfaces. Ensure that they slowly cool off
placing them on a dry piece of cloth. Otherwise, the glass tray or container might break. If you
are going to perform a grill operation in your oven, we recommend that use use the grill on
tray, supplied together with your product (if your product includes this equipment). This way,
splattering and dripping oils will not make the oven interior dirty. If you are going to use the
large wire grill, insert a tray into one of the lower racks to avoid accumulation of the oils. To
make cleaning easier, add some water into it as well. In a grilling operation, use the 3. or the
4.rack and ail the grill to prevent the food to be grilled from sticking to the grill.
Wire grid: Used for grills or placing
different containers other than the cooking
tray on it.
Shallow tray: Used for baking pastry such
as flans etc.
Deep tray: Used for baking stews.
Figure 5
WARNING- Fit the
grid correctly into
any correspondent
rack in the oven
cavity and push it to
the end.

Rotisserie
skewer insertion hole lid
skewer grid on third rack
skewer insertion hole
skewer tip
skewer
skewer handle
tray on first rack
Use of rotisserie accessories
Pass the skewer through the chicken and lock the
clamps, insert the tip of the skewer into the hole found
at the rear panel of cavity and make sure that it
completely leans on the frame and fits in motor shaft. To
do this, first you have to turn the lid to the side, which is
found in front of the skewer insertion hole, as shown in
the figure. After that, fit the skewer fit the skewer onto
the skewer grid which you will place on the third rack.
Remove the handle from skewer, if it is installed and
close the oven door. The handle must be atteched only
for removing the food after grilling.
Make sure that the oven is not operating while performing these operations.
Spit
Rotisserie bearing
bracket or rotisserie
bearing grid
Tray
Spit handle Spit hole on back
panel of oven
Small metalic
cover
Pull out the clamps on spit by loosening
their screws and stick the spit into
chicken. Then, mount the clamps by
sliding them on the spit and stick the
clamps into chicken. Tighten their
screws. Before doing any operation
described below, be sure that oven and
rotisserie function is not in operation. Put
the tray on second shelf and locate the
rotisserie bearing bracket for spit in the
holes on the tray as shown in figure.
Some products may have rotisserie
bearing grid accessory instead of the
rotisserie bearing bracket for spit and
Placed on first shelf. ýn this case, you only need to place the bearing grid on third shelf.
Before locating the point tip of spit into hole at back panel of oven, turn the small metalic
cover and see the hole. Place the point tip of spit into hole at back panel of oven and the
bearing tip of spit on the rotisserie bearing bracket or rotisserie bearing grid firmly. Also, be
sure that the point tip of spit is placed into hole firmly. During rotisserie, spit handle must
never be mounted to spit and oven door must be in closed position.
18
Page is loading ...
Page is loading ...
Page is loading ...
-
 1
1
-
 2
2
-
 3
3
-
 4
4
-
 5
5
-
 6
6
-
 7
7
-
 8
8
-
 9
9
-
 10
10
-
 11
11
-
 12
12
-
 13
13
-
 14
14
-
 15
15
-
 16
16
-
 17
17
-
 18
18
-
 19
19
-
 20
20
-
 21
21
-
 22
22
-
 23
23


Ask a question and I''ll find the answer in the document
Finding information in a document is now easier with AI
Related papers
Other documents
-
Malloca Lò nướng âm tủ MOV-659 MCB User manual
-
Sharp K-50M22BL2-FR User manual
-
 De Dietrich DOE7900XE-01 Owner's manual
-
Sharp K-90D10BM2-EN User manual
-
Omega OBO699W User manual
-
Candy FCO 104 N User manual
-
Everdure OBES601 User manual
-
Omega OO640X User manual
-
Omega OO6Ax User manual
-
