Page is loading ...

19001 Kermier Rd, Waller, TX 77484
© 2005-2006, 2012-2013, 2015-2021 Goodman Manufacturing Company, L.P.
www.goodmanmfg.com
1. ImportantSafetyInstrucons
The following symbols and labels are used throughout this manual
to indicate immediate or potenal safety hazards. It is the owner’s
and installer’s responsibility to read and comply with all safety in-
formaon and instrucons accompanying these symbols. Failure
to heed safety informaon increases the risk of personal injury,
property damage, and/or product damage.
HIGH VOLTAGE!
DISCONNECT ALL POWER BEFORE SERVICING OR
INSTALLING THIS UNIT. MULTIPLE POWER SOURCES
MAY BE PRESENT. FAILURE TO DO SO MAY CAUSE PROPERTY
DAMAGE, PERSONAL INJURY OR DEATH.
ONLY PERSONNEL THAT HAVE BEEN TRAINED TO INSTALL, ADJUST, SERVICE OR
REPAIR (HEREINAFTER, “SERVICE”) THE EQUIPMENT SPECIFIED IN THIS MANUAL
SHOULD SERVICE THE EQUIPMENT. THE MANUFACTURER WILL NOT BE RESPONSIBLE
FOR ANY INJURY OR PROPERTY DAMAGE ARISING FROM IMPROPER SERVICE OR
SERVICE PROCEDURES. IF YOU SERVICE THIS UNIT, YOU ASSUME RESPONSIBILITY
FOR ANY INJURY OR PROPERTY DAMAGE WHICH MAY RESULT. IN ADDITION, IN
JURISDICTIONS THAT REQUIRE ONE OR MORE LICENSES TO SERVICE THE EQUIPMENT
SPECIFIED IN THIS MANUAL, ONLY LICENSED PERSONNEL SHOULD SERVICE THE
EQUIPMENT. IMPROPER INSTALLATION, ADJUSTMENT, SERVICING OR REPAIR OF
THE EQUIPMENT SPECIFIED IN THIS MANUAL, OR ATTEMPTING TO INSTALL, ADJUST,
SERVICE OR REPAIR THE EQUIPMENT SPECIFIED IN THIS MANUAL WITHOUT PROPER
TRAINING MAY RESULT IN PRODUCT DAMAGE, PROPERTY DAMAGE, PERSONAL
INJURY OR DEATH.
2. ShippingInspecon
Upon receiving the product, inspect it for damage from shipment.
Shipping damage, and subsequent invesgaon is the responsibility
of the carrier. Verify the model number, specicaons, and accesso-
ries are correct prior to installaon. The distributor or manufacturer
will not accept claims from dealers for transportaon damage or
installaon of incorrectly shipped units.
2.1 Handling
Use cauon when transporng / carrying unit.. Do not carry unit
with hooks or sharp object. The preferred method of carrying
the unit aer arrival at the job site is to carry by two-wheel
hand truck from the back or sides or by hand by carrying at the
cabinet corners.
UPFLOW/DOWNFLOW COILS
INSTALLATION INSTRUCTIONS
3. Codes&Regulaons
This product is designed and manufactured to comply with naonal
codes. Installaon in accordance with such codes and/or prevailing
local codes/regulaons is the responsibility of the installer. The
manufacturer assumes no responsibility for equipment installed
in violaon of any codes or regulaons.
The United States Environmental Protecon Agency (EPA) has
issuedvariousregulaonsregardingtheintroduconanddisposal
ofrefrigerants.Failuretofollowtheseregulaonsmayharmthe
environmentandcanleadtotheimposionofsubstanalnes.
Should you have any quesons please contact the local oce of
the EPA.
4. Replacement Parts
Inspect the unit to verify all required components are present and
intact. Report any missing components immediately to the manu-
facturer or to the distributor. Make sure to include the full product
model number and serial number when reporng and/or obtaining
service parts. Replacement parts for this product are available
through your contractor or local distributor. For the locaon of your
nearest distributor consult the white business pages, the yellow
page secon of the local telephone book or contact:
HOMEOWNER SUPPORT
GOODMAN MANUFACTURING COMPANY, L.P.
19001 KERMIER ROAD
WALLER, TEXAS 77484
877– 254 – 4729
5. Pre-InstallaonInstrucons
5.1Preparaon
Keep this document with the unit. Carefully read all instrucons
for the installaon prior to installing product. Make sure each
step or procedure is understood and any special consideraons
are taken into account before starng installaon. Assemble all
tools, hardware and supplies needed to complete the installa-
on. Some items may need to be purchased locally. Make sure
everything needed to install the product is on hand before
starng.
5.2 Clearances
Refrigerant lines must be routed depending on conguraon
of unit to maintain the required 24” minimum clearance for
service. Consult all appropriate regulatory codes prior to deter-
mining nal clearances. In installaons that may lead to physical
damage (i.e. a garage) it is advised to install a protecve barrier
to prevent such damage. Always install units such that a posive
slope in condensate line (1/4” per foot) is allowed.
IOG-4010E
06/2021

2
6. ApplicaonInformaon
Coils are designed for indoor installaon only and must be installed
downstream (discharge air) of the furnace. The CAPF/CAPT product
line may be installed in upow or downow orientaons.
7. Condensate Drain Piping
In all cooling applicaons where condensate overow may cause
damage, a secondary drain pan must be provided by the installer
and placed under the enre unit with a separate drain line prop-
erly sloped and terminated in an area visible to the owner. This
secondary drain pan can provide extra protecon to the area under
the unit should the primary drain plug up and overow. For coils
with “A” Cabinets (14” wide), use oat switch if secondary drain
line is not installed. Refer to product nomenclature from product
specicaon literature to idenfy coil models with “A” cabinets.
As expressed in our product warranty, we will not be liable for any
damages, structural or otherwise due to the failure to follow this
installaon requirement.
Condensate drain connecons are located in the drain pan at the
boom of the coil/enclosure assembly. Use the female (3/4” FPT)
threaded ng that protrudes outside of the enclosure for external
connecons. The connectors required are 3/4” NPT male, either
PVC or metal pipe, and must be hand ghtened to a torque of no
more than 37 in-lbs. to prevent damage to the drain pan connecon.
An inseron depth between .36 to .49 inches (3-5 turns) should be
expected at this torque. Insulate PVC drain lines/pipes with high
heat resisve tape within 1” furnace ue/vent pipe. Foil-Masc
Sealant tape is the preferred wrapping material.
1. Ensure drain pan hole is NOT obstructed.
2. To prevent potenal sweang and dripping on nished space,
it may be necessary to insulate the condensate drain line
located inside the building. Use Armaex® or similar material.
A Secondary Condensate Drain Connecon, now called for by many
building codes, has been provided. Pitch the drain line 1/4” per
foot to provide free drainage. Provide required support to drain
line to prevent bowing. Install a condensate trap in the primary
drain line to ensure proper drainage. If the secondary drain line is
required, run the line separately from the primary drain and end
it where condensate discharge can be easily seen.
CAUTION
IF SECONDARY DRAIN IS NOT INSTALLED, THE SECONDARY ACCESS
MUST BE PLUGGED.
8.PlascDrainPanApplicaon
D
O
NOT
USE
THE
COIL
PAN
SHIPPED
WITH
THE
UNIT
ON
OIL
FURNACES
OR
ANY
APPLICATION
WHERE
THE
TEMPERATURE
OF
THE
DRAIN
PAN
MAY
EXCEED
300°F. A
HIGH
TEMPERATURE
DRAIN
PAN
SUCH
AS
KITS
HTP-A,
-B, -C
AND
-D
FOR
NORMAL
CABINET
WIDTHS
OF
14, 17.5, 21
AND
24.5
INCHES
,
RESPECTIVELY
,
SHOULD
BE
USED
FOR
APPLICATIONS
WHERE
THE
TEMPERATURE
EXCEEDS
300°F
AND
BELOW
450°F. A
FIELD
FABRICATED
METAL
DRAIN
PAN
CAN
ALSO
BE
USED
FOR
APPLICATIONS
WHERE
TEMPERATURE
EXCEEDS
300°F.
F
AILURE
TO
FOLLOW
THIS
WARNING
MAY
RESULT
IN
PROPERTY
DAMAGE
AND
/
OR
PERSONAL
INJURY
.
If the uncased coil is to be installed on top of a gas furnace, allow
enough space between the top to the furnace and the boom of
the plasc coil drain pan to have a free ow of air.
A minimum of 2.0” distance from the top of the furnace and the
boom of the coil pan is required.
NOTE: The coil must be installed with the line set and drain openings
to the front of the furnace.
Figure 1
NOTE: Water coming from the secondary line means the coil pri-
mary drain is plugged and needs immediate aenon.
Install a trap in the drain line below the boom of the drain pan
(Figure 1). If using a copper drain line, solder a short piece of pipe,
minimum 6” length, to the connector before installing a drain ng.
DO NOT over torque the 3/4” copper connector to the plasc drain
connecon. Using a wet rag or heatsink material on the short piece
to protect the plasc drain pan, complete the drain line installaon.
Use Figure 2 as a template for typical drain pipe roung. This gure
shows how to avoid interference with vent piping.
2” MIN.
3” MIN.
Figure 2

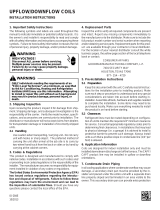
3
A CHASSIS W
ITH 80%
B, C, D CHASSIS WITH 90%
B, C, D CHASSIS WITH 80%
A CHASSIS W
ITH 90%
Figure 3
8.1CondensateDrainPanBreak-awayFeature
The drain pan (0161D00116) possesses a break-away feature on
the lip located on the front-top and rear-top of the drain pan.
This feature is to be used for uncased installaons, as necessary.
The force required to break the lip is 18lbf uniformly distributed
over the feature. A force of 8lbf localized on the corner of the
lip can also be applied. (Applies only for A-size Cabinet)
Figure 3.1
9. Refrigerant Lines
CAUTION
THE COIL IS SHIPPED UNDER PRESSURE WITH AN R-410A GAS
MIXTURE. USE APPROPRIATE SERVICE TOOLS AND FOLLOW THESE
INSTRUCTIONS TO PREVENT INJURY.
A QUENCHING CLOTH IS STRONGLY RECOMMENDED TO PREVENT
SCORCHING OR MARRING OF THE EQUIPMENT FINISH WHEN BRAZING
CLOSE TO THE PAINTED SURFACES. USE BRAZING ALLOY OF 5%
MINIMUM SILVER CONTENT.
NOTE: Refrigerant tubing must be routed to allow adequate access
for servicing and maintenance of the unit.
Do not handle coil assembly with manifold or owrator tubes.
Doing so may result in damage to the tubing joints. Always use
clean gloves for handling coil assemblies.
9.1TubingSize/Length
For the correct tubing size, follow the specicaon for the con-
denser/heat pump. Give special consideraon to minimizing
the length of refrigerant tubing when installing coils. Refer to
Remote Cooling/Heat Pump Technical Publicaon TP-107* Long
Line Set Applicaon R-410A for guidelines for line lengths over
80’. Leave a minimum 3” straight in line set from braze joints
before any bends.
9.2TubingPreparaon
All cut ends are to be round, burr free, and cleaned. Any other
condion increases the chance of a refrigerant leak. Use a pipe
cuer to remove the closed end of the spun closed sucon line.
9.3Brazing
Braze joints should be made only with the connecons provid-
ed external to the cabinet. Do not alter the cabinet nor braze
inside the cabinet. To avoid overheang aer brazing, quench
all brazed joints with water or a wet rag.
A
PPLYING
TOO
MUCH
HEAT
TO
ANY
TUBE
CAN
MELT
THE
TUBE
. T
ORCH
HEAT
REQUIRED
TO
BRAZE
TUBES
OF
VARIOUS
SIZES
MUST
BE
PROPORTIONAL
TO
THE
SIZE
OF
THE
TUBE
.
S
ERVICE
PERSONNEL
MUST
USE
THE
APPROPRIATE
HEAT
LEVEL
FOR
THE
SIZE
OF
THE
TUBE
BEING
BRAZED
.
9.4SpecialInstruconsforFlowrator(Piston)Version
Coils in owrator version are equipped with a check style ow-
rator for refrigerant management. For most installaons with
matching applicaons, no change to the owrator piston is re-
quired. However, in mix-matched applicaons, a piston change
may be required. See the piston kit chart or consult your local
distributor for details regarding mix-matched piston sizing. If
the mix-matched applicaon requires a dierent piston size,
change the piston in the distributor on the indoor coil before
installing the coil and follow the procedure shown below.
9.5TubingConneconsforFlowratorModel
1. Loosen the 13/16 nut 1TURNONLY to allow high pressure
tracer gas to escape. No gas indicates a possible leak.
2. Aer the gas has escaped, remove the nut and discard the
plasc or brass cap.
3. Remove the check piston to verify it is correct and then re-
place the piston. See piston kit chart in instrucons.
4. Use a tube cuer to remove the spin closure on the sucon
line. DO NOT USE A CUTTING METHOD THAT WOULD RESULT
IN THE GENERATION OF COPPER SHAVINGS OR COPPER DUST.
5. Slide the 13/16 nut into place on the tailpiece supplied in the
literature bag or with the unit.
6. Insert liquid line into the supplied tailpiece.

4
Figure 5
7. Insert the sucon line into the connecon, slide the insulaon
and the rubber grommet at least 18” away from the braze
joint. Braze both liquid and sucon line joints.
8. AFTER THE TAILPIECE HAS COOLED, conrm posion of the
white Teon® seal and hand ghten the 13/16 nut.
E
XCESSIVE
TORQUE
CAN
CAUSE
ORIFICES
TO
STICK
. U
SE
THE
PROPER
TORQUE
SETTINGS
WHEN
TIGHTENING
ORIFICES
.
CAUTION
9. Torque the 13/16” nut to 10-20 -lbs. or 1/6 turn past hand
ght.
10. Replace sucon line grommet and insulaon.
9.6TubingConneconsforTXVVersion
TXV models come with factory installed non-adjustable TXV
with the bulb permanently located on the sucon tube.
1. Remove coil access panel.
2. Remove access valve ng cap and depress the valve stem
in access ng to release pressure. No pressure indicates
possible leak.
3. Replace the refrigerant tubing panel.
4. Remove the spin closure on both the liquid and sucon tubes
using a tubing cuer. DO NOT USE A CUTTING METHOD THAT
WOULD RESULT IN THE GENERATION OF COPPER SHAVINGS
OR COPPER DUST.
SUCTION
LINE SET
SUCTION
TUBE
RUBBER
GROMMET
Figure 5.1
LIQUID
LINE SET
LIQUID
LINE
RUBBER
GROMMET
Figure 5.2
5. Insert liquid line set into liquid tube expansion and slide
grommet about 18” away from braze joint.
6. Insert sucon line set into sucon tube expansion and slide
insulaon and grommet about 18” away from braze joint.
7. Braze sucon and liquid line joints.
10. SupplyDuctConnecon
1. Top anges can be bent for ease in installaon to the duct
anges. (See Figure 6)
Unfolded View
Top Flange Detail View
FILLER PLATE
FILLER PLATE
Figure 6
2. A duct ange kit can also be purchased from your distributor.
(See Figure 7)
• 14 inch chassis - CLDUCTFLGA
• 17.5 inch chassis - CLDUCTFLGB
• 21 inch chassis - CLDUCTFLGC
• 24.5 inch chassis - CLDUCTFLGD

5
Figure 7
10. Filler Plates
Filler plates are supplied on all 17.5, 21, & 24.5 inch chassis to be
used for adapng the unit to a furnace one size smaller. If the
plenum and furnace openings are the same size, the ller plates
must be removed. See Figure 6.
11. ReturnDuctwork
DO NOT TERMINATE THE RETURN DUCTWORK IN AN AREA
THAT CAN INTRODUCE TOXIC OR OBJECTIONABLE FUMES/
ODORS INTO THE DUCTWORK.
12. Sealing Along The Panel Gap
IMPORTANT NOTE: To prevent cabinet sweating and
airow leak, apply eld provided insulation tape along
all joining surfaces between the coil, gas furnace, duct
work and panels. See Figure 8.
Apply Insulation Tape
Figure 8
13. AluminumIndoorCoilCleaning
(QualiedServicerOnly)
This unit is equipped with an aluminum tube evaporator coil. The
safest way to clean the evaporator coil is to simply ush the coil
with water. This cleaning pracce remains as the recommended
cleaning method for both copper tube and aluminum tube resi-
denal evaporator coils.
It has been determined that many coil cleaners and drain pan tab-
lets contain corrosive chemicals that can be harmful to aluminum
tube and n evaporator coils. Even a one-me applicaon of these
corrosive chemicals can cause premature aluminum evaporator coil
failure. Any cleaners that contain corrosive chemicals including,
but not limited to, chlorine and hydroxides, should not be used.
An alternate cleaning method is to use one of the products listed in
TP-109* to clean the coils. The cleaners listed are the only agents
deemed safe and approved for use to clean round tube aluminum
coils. TP-109 is also available on the web site in Partner Link >
Service Toolkit.
NOTE: Ensure coils are rinsed well aer use of any chemical cleaners.

6
Air Handler / Coil
ELECTRICAL
Line Voltage (Measure L1 and L2 Voltage) L1 - L2
Secondary Voltage (Measure Transformer Output Voltage) R - C
Blower Amps
Heat Strip 1 - Amps
Heat Strip 2 - Amps
BLOWER EXTERNAL STATIC PRESSURE
Return Air Static Pressure IN. W.C.
Supply Air Static Pressure IN. W.C.
Total External Static Pressure (Ignoring +/- from the reading above, add total here) IN. W.C.
TEMPERATURES
Return Air Temperature (Dry bulb / Wet bulb) DB °F WB °F
DB °F WB °F
Heating Supply Air Temperature DB °F
Temperature Rise DB °F
Delta T (Difference between Supply and Return Temperatures) DB °F
Air Handler / Coil - (Inverter Matched)
INVERTER AH / COIL ONLY
Check EEV and EEV wiring is secure (no adjustment required)
Additional Checks
Check wire routings for any rubbing
Check product for proper draining
Check screw tightness on blower wheel
Check factory wiring and wire connections
Check product for proper clearances as noted by installtion instructions
°F to °C formula: (°F - 32) divided by 1.8 = °C °C to °F formula: (°C multiplied by 1.8) + 32 = °F
Model Number
Serial Number
Cooling Supply Air Temperature (Dry bulb / Wet bulb)

7
THIS PAGE WAS LEFT BLANK INTENTIONALLY

8
NOTE: SPECIFICATIONS AND PERFORMANCE DATA LISTED HEREIN ARE SUBJECT TO CHANGE WITHOUT NOTICE
Visit our websites at www.goodmanmfg.com or amana-hac.com for informaon on:
• Products
• Warranes
• Customer Services
• Parts
• Contractor Programs and Training
• Financing Opons
19001 Kermier Rd, Waller, TX 77484
© 2005-2006, 2012-2013, 2015-2021 Goodman Manufacturing Company, L.P.
www.goodmanmfg.com
CUSTOMER FEEDBACK
We are very interested in all product comments.
Please ll out the feedback form on one of the following links:
Goodman® Brand Products: (hp://www.goodmanmfg.com/about/contact-us).
Amana® Brand Products: (hp://www.amana-hac.com/about-us/contact-us).
You can also scan the QR code on the right for the product brand
you purchased to be directed to the feedback page.
PRODUCT REGISTRATION
Thank you for your recent purchase. Though not required to get the protecon of
the standard warranty, registering your product is a relavely short process, and
entles you to addional warranty protecon, except that failure by California and
Quebec residents to register their product does not diminish their warranty rights.
For Product Registraon, please register as follows:
Goodman® Brand products: (hps://www.goodmanmfg.com/product-registraon).
Amana® Brand products: (hp://www.amana-hac.com/product-registraon)
You can also scan the QR code on the right for the product brand
you purchased to be directed to the Product Registraon page.
GOODMAN® BRAND AMANA® BRAND
AMANA® BRAND
GOODMAN® BRAND
/