INSTALLATION INITIAL START UP
CLEANING
Clean the refrigerator thoroughly according to instructions
and wipe away any dust that has accumulated during
shipping.
Check that the floor is level. If it is not, adjust the stabilising
foot so that the refrigerator is level and stable.
We recommend that the refrigerator be turned on and
left to run for two to three hours before placing any food
inside it. This will allow you to check that it is operating
properly and there is adequate cool air in the freezer.
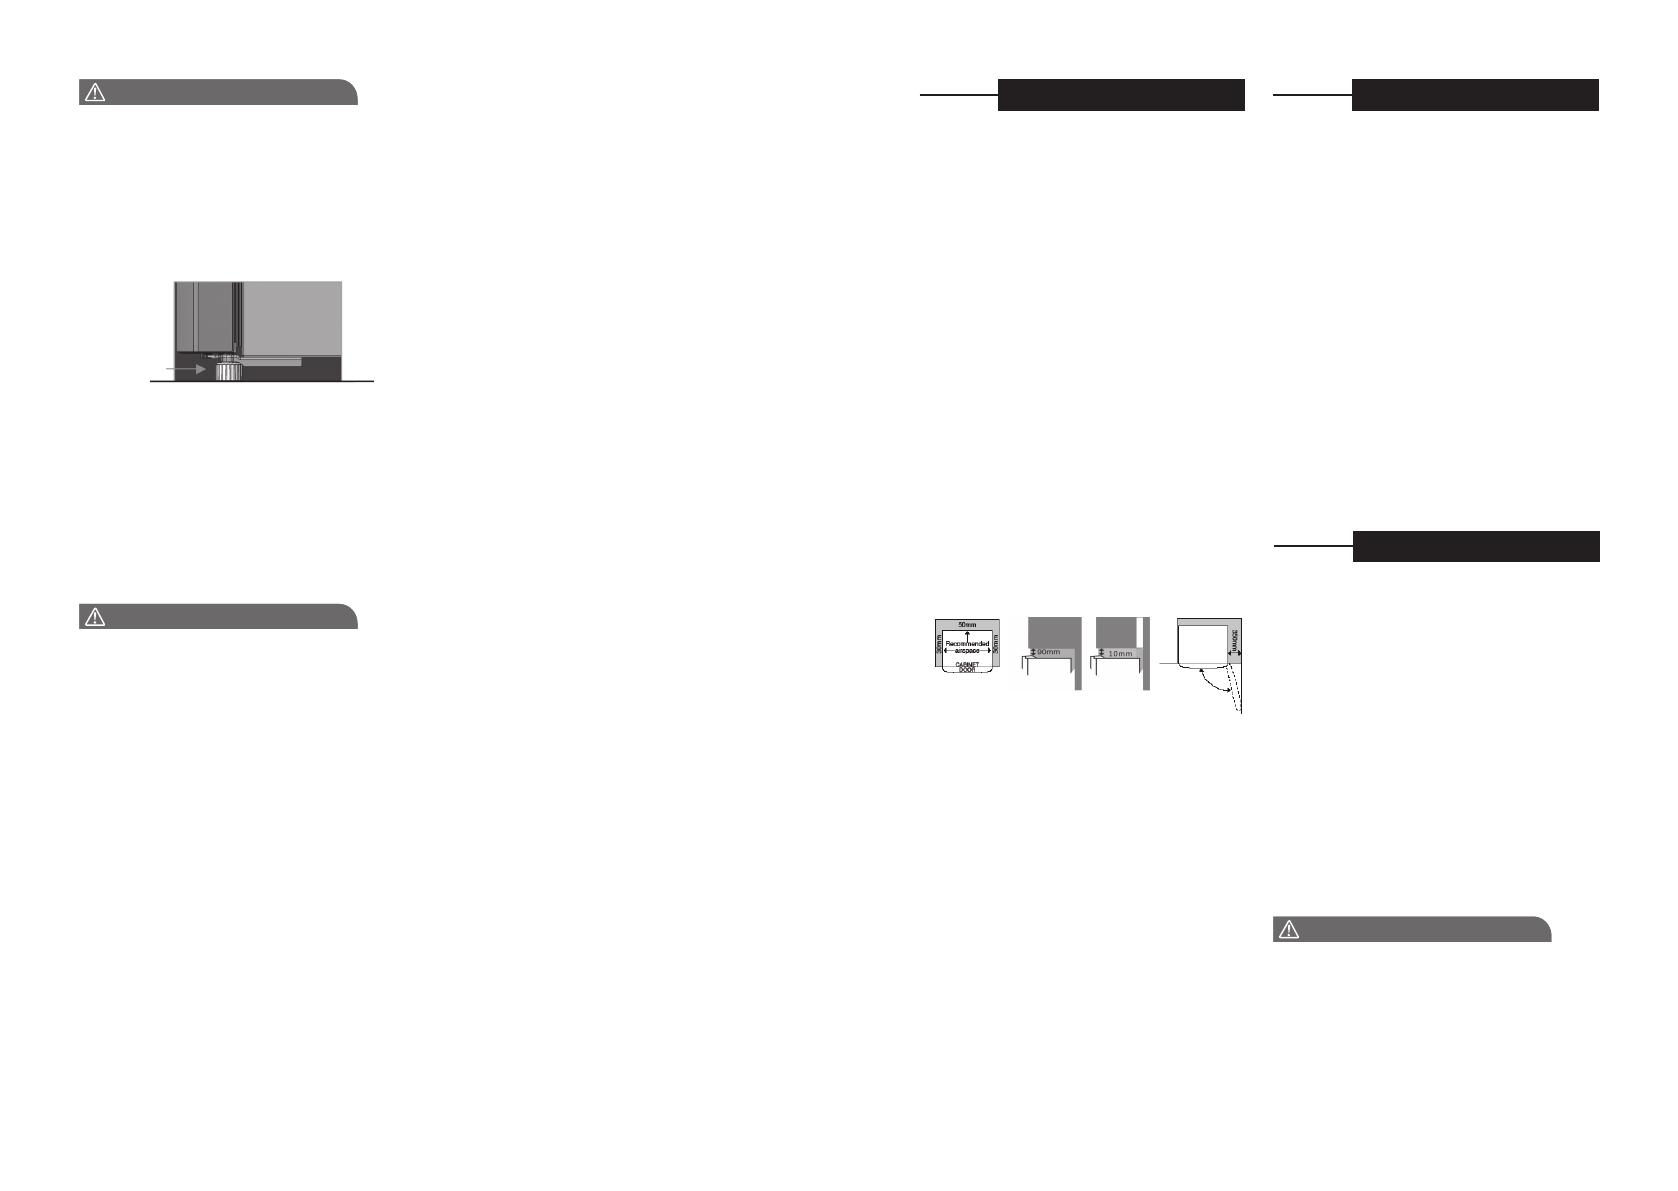
Installation clearances
• Allow a minimum of 30mm clearance on both sides of
the refrigerator.
• Allow a 50mm clearance at the back of the
refrigerator.
• Allow a minimum of 10mm clearance above the hinge
cover.
• If you do not have a cupboard with allowance for
air flow above the refrigerator, the recommended
clearance at the top of the refrigerator is 90mm.
• When positioned in a corner, the clearance must be
at least 350mm on the hinge side to allow the door to
open smoothly so that bins and shelves can be
removed easily.
Note: Refrigerator doors on all models are designed to sit
proud of cabinetry (not flush). The refrigerator should be
placed against a wall and the clearance between the rear of
the refrigerator and the wall should be greater than 75mm.
When in operation, the outside of the refrigerator will feel
warm, particularly at start up. This is normal.
Avoid placing food against air outlets as this will impede
air circulation.
A light frosting will occasionally occur on the cold interior
of the freezer if the door is opened frequently. This is
normal and the frost will disappear after a few days in
most climates.
Make sure that the freezer and fresh foods doors are
fully closed after you have loaded or removed food from
these compartments. If the doors are left partly opened, a
heavy frost will coat the inside of the freezer. If this occurs,
remove the frost. Ensure that all doors are properly closed
to prevent frost from reappearing.
Your refrigerator uses energy efficient components that
may produce different noises (Refer “Noises” page for
examples) from your old refrigerator. Occasionally, a
gurgling sound of refrigerant flowing or sound of parts
expanding or contracting can be heard. These noises are
quite normal.
Exterior
Clean the refrigerator with only lukewarm soapy water
and a soft cloth. Rinse the clean water and then wipe
the surface with a soft clean cloth to remove any soap
residue.
Interior
Clean the refrigerator interior regularly. Turn power off.
Wipe the interior with a soft cloth and lukewarm soapy
water. Thoroughly dry all surfaces and removable parts.
Avoid getting water on the refrigerator controls. If you
have taken out any removable parts, replace them and
switch on the power before re-stocking the refrigerator.
Wipe away thoroughly any food spills.
Keep door seals clean
Ensure that the door seals are always clean. Sticky food
and drinks can cause seals to adhere to the cabinet and
may cause tear when opening the door. Wash seals with
lukewarm soapy water. Rinse thoroughly and dry.
Never use hot water, solvents, commercial kitchen
cleaners, aerosol cleaners, metal polishers, caustic or
abrasive cleaners or scourers to clean the appliance
as they will damage it. Many commercially available
cleaning products and detergents contain solvents that
will damage your refrigerator. When cleaning, use only a
soft cloth and lukewarm soapy water.
WARNING
04
Installing and Cleaning the Refrigerator
• Do not use a steam cleaner to clean the appliance. If
live components come in contact with the condensing
steam, they may short circuit or cause an electric
shock.
• Keep ventilation openings, either in the appliance
enclosure or in the built-in structure, clear of
obstruction.
• Do not plug the appliance into a timer fitted to the
power point.
• Do not place your appliance on an uneven surface.
• Do not store explosive substances such as aerosol
cans with flammable propellant in the appliance.
• Do not store fizzy drinks in the freezer compartment.
• Never try to repair the refrigerator on your own. Use
only a qualified or authorised service person for repairs.
• Never use electric heaters or dryers to defrost the
freezer because you can receive an electric shock.
• Do not use mechanical devices or other means to
accelerate the defrosting process, other than those
recommended by the manufacturer.
• Do not damage the refrigerant circuit.
• Do not use electrical appliances inside the food storage
compartments of the appliance, unless they are of the
type recommended by the manufacturer.
WARNING
Stable Footing
When your refrigerator is in place, you need to stabilize
it. Lift the front of the refrigerator to take the weight off
each stability foot and make small quarter turns to each
foot until it is in firm contact with the floor. If you intend to
move the refrigerator, remember to wind up each foot so
that you can move it freely. Repeat the process of the foot
adjustment once you have settled on the new location of
the refrigerator.
Conditions of use
This appliance is intended to be used in household and
similar applications such as,
• Staff kitchen areas in shops, offices and other working
enviroments;
• Farm house and by clients in hotels, motels and other
residential type enviroments;
• Bed and breakfast type environments;
• Catering and similar non-retail applications
WARNING
Stabilising
foot wound
down
Side View
03
INSTALLATION INITIAL START UP
CLEANING
Clean the refrigerator thoroughly according to instructions
and wipe away any dust that has accumulated during
shipping.
Check that the floor is level. If it is not, adjust the stabilising
foot so that the refrigerator is level and stable.
We recommend that the refrigerator be turned on and
left to run for two to three hours before placing any food
inside it. This will allow you to check that it is operating
properly and there is adequate cool air in the freezer.
Installation clearances
• Allow a minimum of 30mm clearance on both sides of
the refrigerator.
• Allow a 50mm clearance at the back of the
refrigerator.
• Allow a minimum of 10mm clearance above the hinge
cover.
• If you do not have a cupboard with allowance for
air flow above the refrigerator, the recommended
clearance at the top of the refrigerator is 90mm.
• When positioned in a corner, the clearance must be
at least 350mm on the hinge side to allow the door to
open smoothly so that bins and shelves can be
removed easily.
Note: Refrigerator doors on all models are designed to sit
proud of cabinetry (not flush). The refrigerator should be
placed against a wall and the clearance between the rear of
the refrigerator and the wall should be greater than 75mm.
When in operation, the outside of the refrigerator will feel
warm, particularly at start up. This is normal.
Avoid placing food against air outlets as this will impede
air circulation.
A light frosting will occasionally occur on the cold interior
of the freezer if the door is opened frequently. This is
normal and the frost will disappear after a few days in
most climates.
Make sure that the freezer and fresh foods doors are
fully closed after you have loaded or removed food from
these compartments. If the doors are left partly opened, a
heavy frost will coat the inside of the freezer. If this occurs,
remove the frost. Ensure that all doors are properly closed
to prevent frost from reappearing.
Your refrigerator uses energy efficient components that
may produce different noises (Refer “Noises” page for
examples) from your old refrigerator. Occasionally, a
gurgling sound of refrigerant flowing or sound of parts
expanding or contracting can be heard. These noises are
quite normal.
Exterior
Clean the refrigerator with only lukewarm soapy water
and a soft cloth. Rinse the clean water and then wipe
the surface with a soft clean cloth to remove any soap
residue.
Interior
Clean the refrigerator interior regularly. Turn power off.
Wipe the interior with a soft cloth and lukewarm soapy
water. Thoroughly dry all surfaces and removable parts.
Avoid getting water on the refrigerator controls. If you
have taken out any removable parts, replace them and
switch on the power before re-stocking the refrigerator.
Wipe away thoroughly any food spills.
Keep door seals clean
Ensure that the door seals are always clean. Sticky food
and drinks can cause seals to adhere to the cabinet and
may cause tear when opening the door. Wash seals with
lukewarm soapy water. Rinse thoroughly and dry.
Never use hot water, solvents, commercial kitchen
cleaners, aerosol cleaners, metal polishers, caustic or
abrasive cleaners or scourers to clean the appliance
as they will damage it. Many commercially available
cleaning products and detergents contain solvents that
will damage your refrigerator. When cleaning, use only a
soft cloth and lukewarm soapy water.
WARNING
04
Installing and Cleaning the Refrigerator
• Do not use a steam cleaner to clean the appliance. If
live components come in contact with the condensing
steam, they may short circuit or cause an electric
shock.
• Keep ventilation openings, either in the appliance
enclosure or in the built-in structure, clear of
obstruction.
• Do not plug the appliance into a timer fitted to the
power point.
• Do not place your appliance on an uneven surface.
• Do not store explosive substances such as aerosol
cans with flammable propellant in the appliance.
• Do not store fizzy drinks in the freezer compartment.
• Never try to repair the refrigerator on your own. Use
only a qualified or authorised service person for repairs.
• Never use electric heaters or dryers to defrost the
freezer because you can receive an electric shock.
• Do not use mechanical devices or other means to
accelerate the defrosting process, other than those
recommended by the manufacturer.
• Do not damage the refrigerant circuit.
• Do not use electrical appliances inside the food storage
compartments of the appliance, unless they are of the
type recommended by the manufacturer.
WARNING
Stable Footing
When your refrigerator is in place, you need to stabilize
it. Lift the front of the refrigerator to take the weight off
each stability foot and make small quarter turns to each
foot until it is in firm contact with the floor. If you intend to
move the refrigerator, remember to wind up each foot so
that you can move it freely. Repeat the process of the foot
adjustment once you have settled on the new location of
the refrigerator.
Conditions of use
This appliance is intended to be used in household and
similar applications such as,
• Staff kitchen areas in shops, offices and other working
enviroments;
• Farm house and by clients in hotels, motels and other
residential type enviroments;
• Bed and breakfast type environments;
• Catering and similar non-retail applications
WARNING
Stabilising
foot wound
down
Side View
03
R600A REFRIGERANT WARNING
• This appliance contains flammable R600a refrigerant.
Avoid safety hazards by carefully installing, handling,
servicing and disposing of this appliance. If your
appliance contains R600a it will be indicated on the
rating plate inside the appliance.
• Ensure that the tubing of the refrigerant circuit is not
damaged during transportation and installation.
• In the event any damage accidentally occurs, keep
the appliance away from open fires and any devices
that produce sparks or arcs and luminaries
during normal or abnormal operation, and unplug the
appliance at the power point. Call authorized service
for necessary action and advice.
• Leaking refrigerant may ignite vent area if leak occurs.
• The room for installing appliance must be at least
1m
3
per 8g of refrigerant. The amount and type of
refrigerant in the appliance can be found on the rating
plate inside the appliance.
• Do not damage the refrigerant circuit.
• Do not use electrical appliances inside the food
storage compartments of the appliance, unless they
are of the type recommended by the manufacturer.
• Keep ventilation openings, in the appliance enclosure
or in the built-in structure, clear of obstruction.
• Do not use mechanical devices or other means to
accelerate the defrosting process, other than those
recommended by the manufacturer.


