Page is loading ...

Internal Middleweight
Pre-Finished Door Kits
*
Installation, Finishing & Care Instructions
It is important you read this leaflet before installing the door.
The guidelines below will help ensure the door is fitted correctly and in a
suitable environment.
Failure to adhere to the instructions could invalidate any guarantee claims.
• Doors & linings must be stored on
3 level bearers
• Doors & linings must be kept dry at
all times
• Do not install or store the doors &
linings in newly plastered rooms
• Polythene wrapping should remain
on the doors until immediately
before installation
• Check the door & lining for defects
and damage before installation, do
not install if any defects or damage
are found
• Any door or lining which has been
worked on cannot be exchanged,
with the exception of a door with a
proven manufacturing defect
• Doors should be handled carefully
with clean gloves and not dragged
across each other or other surfaces
• 1 x door with female chrome hinge
fitted
• 1 x Door lining kit:
- 1 x Pre-machined primed
lining with door stops
- 3 x male chrome hinge
- 1 x latch
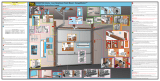
Doors should be
hung at the final
fix stage, limiting
the opportunity for
damage or distortion
(swelling) during the
building process.
Carefully remove
packaging. Doors can
be hung left or right
hand. To reverse the
handing, remove the
female hinges and
latches, and route
through 180 degrees
before re-fitting on the
doors.
Offer the assembled frame up to the opening.
Fit hinges to
pre-machined
recesses in
hinge side of
the jamb.
NOTE: DO NOT
OVER TIGHTEN
SCREWS
Use a spirit level to check that the Jambs are
square and plumb, if necessary use packers to
adjust.
Use pre-drilled head as a template to pilot jambs
Jamb length is 2011mm to allow 15mm gap
at bottom of door for floor covering. If floor
covering already in place, cut down jamb to leave
appropriate gap at bottom of door.
Fix Jambs in place ensuring square, true and
plumb
H
O
W
D
E
N
S
P
R
E
-
F
I
N
I
S
H
E
D
D
O
O
R
G
U
A
R
A
N
T
E
E
YEARS
5
1
4
5
3
6
Check List
Components List
*Door lining is supplied primed
Fit the dust
cap and latch,
keep to the
latch side MDF
jamb liner.
2a
2b
2965-Door Kits Instruction 2pp Leaflet A4 V3 PROOF.indd 12965-Door Kits Instruction 2pp Leaflet A4 V3 PROOF.indd 1 20/03/2020 09:2320/03/2020 09:23

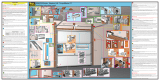
Test the door closes in the frame correctly,
ensuring that the door does not bind or catch
Fix the MDF stops in position using appropriate
grab adhesive and pins. Stops are reversible, and
care should be taken to position these according
to the thickness of the door (ie 35 or 40mm).
Door stops may require cutting down to length
of jambs.
Hang the door by sliding it onto the male hinges
that are pre-fitted on the frame.
Gap between the door edge and the frame
should be between 2-4mm. Adjustments can be
made using a cranking tool. To ease the door
leaf towards or away from the jamb, apply slight
pressure to the tops and bottoms of each hinge
knuckle. Ensure that a consistent gap is achieved
all around the door. Ensure all packers are
pushed up into the gaps.
Hinge cam can be rotated so the pin points to one
of the 4 numbers engraved on the hinge – this
moves the door leaf towards or away from the
door stop. The tongue in the latch keep rebate
can also be adjusted to eradicate any rattle of
the door in the frame.
Neutral
Push door
towards
stop
Pull door
away from
stop
Re-secure the cams back onto the hinges. set
cam pin to '0'
The timber components used on the
door are dried to specific moisture
content during manufacture. Exposure
to damp or moist conditions will
cause swelling of the components,
discolouration and consequent
distortion of the door.
• These doors are supplied fully
finished.
• The linings are supplied primed
and require finishing with a
water or solvent based satin
paint, ensuring all cut outs for
ironmonger are also finished.
Howdens GAR0541 Moulded Door
repair kit can be used to finish the
door lining
The surface finish will be highly
resistant to the rigours of normal use
and should usually only need regular
light dusting with a soft cloth.
If sticky marks occur on the surface
they can be removed with a dilute
solution of warm soapy water. The
offending area should be rubbed lightly
and then completely dried immediately
afterwards.
The use of cleaning materials
containing abrasive compounds,
solvents, acidic or caustic substances
and any bleaches containing oxidising
substances should be avoided as
prolonged use may damage the
painted surface.
As a general recommendation furniture
polishes containing silicones should
be avoided as they can contaminate
the finish surface and cause problems
if the finish ever needs repairing. If
scratches or blemishes in the paint
surface require repairing use Howdens
repair kit.
Howdens Joinery will not be held
Responsible for any incidental work or
problems as a result of bad storage,
handling or incorrect fitting and
finishing of our doors. The foregoing
does not affect your statutory rights.
Finishing
Maintenance & Repairs
Conditions of Sale
Howdens.com
10
8
11
9
12 13
1 -1
2 0
Take the door provided and remove the screws and cams from each of the pre-fitted female hinges.
Hinges are Pre-fitted for RH applications. Remove hinge and turn round.
7
2965-Door Kits Instruction 2pp Leaflet A4 V3 PROOF.indd 22965-Door Kits Instruction 2pp Leaflet A4 V3 PROOF.indd 2 20/03/2020 09:2420/03/2020 09:24
/