Page is loading ...

Manitowoc Beverage Equipment
2100 Future Drive Sellersburg, IN 47172-1868
Tel: 812.246.7000, 800.367.4233 Fax: 812.246.9922
www.manitowocbeverage.com
In accordance with our policy of continuous product development and improvement,
this information is subject to change at any time without notice.
EI219491 Revision 2 08 August, 2007
Multiplex Beverage Equipment Installation Instructions for
Electronic Ice Bank Control Retro-fit Kit
P.N. 00217273 (120 VAC) and P.N. 00219504 (220 VAC)
Manitowoc Beverage Equipment is making a change to the ice bank
controls used in Multiplex Soda Factory and Super Chill units.
The previous control board for
these units was part number:
00219264 CTRL ELECT ICE BANK 120V
00219265 CTRL ELECT ICE BANK 230V
The new control board for these
units will be part number:
020001413 CRTL ELEC ICE BANK 120V (077F1409)
020001414 CTRL ELEC ICE BANK 230V (077F1410)
The temperature probe (part number 00219266) for the boards will remain the same. This probe is not voltage
specific (as the boards are) and will work with the old or new board.
Power wire positions change in addition to the change in part numbers. The previous version had (reading left to
right) Line (1) – Compressor (3) – Neutral (5). The new version board has (reading left to right) Compressor (3) –
Line (1) – Neutral (5). The left and middle terminals have reversed.
DO NOT CONNECT A NEW BOARD WITHOUT FIRST VERIFYING WIRING AND VOLTAGE. YOU MAY
DESTROY THE NEW BOARD IF CONNECTED INCORRECTLY.

2
EI219491 Revision 2 08 August, 2007
Equipment Installation Instructions
Figure 1
Before installing
Make sure the Electronic Ice Bank Control (EIBC) is the
proper voltage for the equipment; either 120 VAC
(P.N. 020001413) Control Circuit or 220 VAC (P.N. 020001414)
Control Circuit.
Removing the old ice bank control(s)
1. Turn “off” all power to the unit being serviced.
2. Remove the existing Ice Bank Control(s) (some models
have two controls. Save two (2) of the screws used for
attachment. You will have to remove the sensor bulb(s)
along with the control.
3. Cut tie wraps and save the plastic bracket from evapo-
rator that the sensor bulb(s) attached to.
4. Record the hole positions where bulb was attached,
new probe should be attached to same hole positions.
The new electronic control is more reliable than two
mechanical controls. Only one Ice Bank Control is
needed.
5. Remove the wires from the existing control(s) termi-
nals, only two (2) existing wires will be needed. Discard
the rest.
6. The two (2) wires needed are one from the compressor
high pressure switch (typically BRN-X), and one (1) from
the Contactor Coil or Compressor (typically 6-5, 2-5) (re-
fer to Schematic Diagram of old Ice Bank Control).
Note: The Electronic Ice Bank Control (EIBC) must match the
contactor coil voltage (either 120 VAC or 230 VAC) on the equip-
ment retro-fit. If no contactor/relay7, new Electronic Ice Bank
Control (EIBC) MUST be same voltage as Compressor. Also note
one (1) Electronic Ice Bank Control (EIBC) replaces two (2)
mechanical controls, if exists.
7. One (1) new wire (Blue) supplied (3-9) will be used to
complete power to new Electronic Ice Bank Control (to
Neutral or Phase B). It will go to a terminal buss with the
blue phase or white (N) wires. Refer to Schematic Dia-
gram included in these instructions.
How to install the new ice bank control
1. If exists, remove Secondary Ice Bank Warning Light. Plug
the hole with supplied part.
2. Install new Electronic Ice Bank Control in place of the
existing mechanical control(s). Pick two (2) holes that
existed for the old mechanical control(s) that line up with
new holes on bracket of electronic control. Attach with
two (2) existing screws.
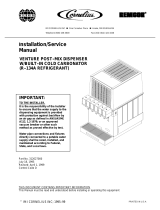
3. Install the new Electronic Ice Bank Control Sensor Probe
onto the existing plastic bracket for evaporator in same
holes as marked above (refer to figure 1).
4. Secure Ice Bank Control Sensor Probe with three (3) new
tie wraps (or maximum allowable by the plastic bracket).
Use at least two (2) new tie wraps.
Note: Make sure probe top extends above water line when
installed.
5. Install plastic bracket and sensor probe onto evaporator
in front right
1
/3 of evaporator, between the 1st and 2nd
coils from top (refer to figure 1).
Note: Do not install the new Electronic Ice Bank Control and
Bracket lower than between 1st and 2nd coil. The old me-
chanical bulb and bracket were installed lower on evaporator
coil.
Probe Top
Keep above water
level.
Existing
Probe
Bracket
Bracket
Mount between
1st and 2nd coil
from top and at
front right
1
/3
corner.
Probe
Attach with three (3) tie wraps
at same position as old bulb.
Tie Wrap
Evaporator
Coils
Re-locate existing
Bracket between 1st
and 2nd coil from top
and at front right
1
/3
corner.

3
EI219491 Revision 2 08 August, 2007
Equipment Installation Instructions
Caution: To Avoid Serious Injury
Important: Read the following warnings before beginning an installation. Failure to do so
may result in possible death or serious injury.
DO Adhere to all National and Local Plumbing and Electrical Safety Codes.
DO Turn “off” incoming electrical service switches when servicing, installing, or
repairing equipment.
DO Check that all flare fittings on the carbonation tank(s) are tight. This check
should be performed with a wrench to ensure a quality seal.
DO Inspect pressure on Regulators before starting up equipment.
DO Protect eyes when working around refrigerants.
DO Use caution when handling metal surface edges of all equipment.
DO Handle CO
2 cylinders and gauges with care. Secure cylinders properly against
abrasion.
DO Store CO2 cylinder(s) in well ventilated areas.
DO NOT Throw or drop a CO2 cylinder. Secure the cylinder(s) in an upright position
with a chain.
DO NOT Connect the CO2 cylinder(s) directly to the product container. Doing so will
result in an explosion causing possible death or injury. Best to connect the
CO2 cylinder(s) to a regulator(s).
DO NOT Store CO2 cylinders in temperature above 125°F (51.7°C) near furnaces,
radiator or sources of heat.
DO NOT Release CO2 gas from old cylinder.
DO NOT Touch Refrigeration lines inside units, some may exceed temperatures of
200°F (93.3°C).
Notice: Water pipe connections and fixtures directly connected to a potable water supply
shall be sized, installed and maintained in accordance with Federal, State, and Local codes.

4
EI219491 Revision 2 08 August, 2007
Equipment Installation Instructions
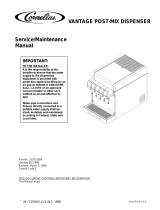
New Electronic Ice Bank Control (EIBC)
Figure 2
6. Route the new sensor probe wire harness to the new con-
trol. Attach as shown in figure 2.
7. Attach existing wire from refrigeration High Pressure
Switch (typically BRN-X) to Terminal 1 (L) of new Elec-
tronic Ice Bank Control (as shown in figure 2).
8. Attach existing wire (typically 6-5, 2-5) from contactor
coil or compressor directly to Terminal 3 (C).
9. Attach new wire 3-9 to Terminal 5 (N) and Common (or
Phase B) power terminal (as shown in Schematic Diagram).
Completing the installation
1. Verify again the wiring for new Electronic Ice Bank Con-
trol matches Schematic Diagram.
2. Turn “on” all power to the unit, and test that compressor
comes on. New control has these built-in delays:
Power On-Delay ................. 25-35 seconds
Compressor Delay ............... 299 seconds (5 minimum)
Short Cycle Delay ............... 120 seconds (2 minimum)
Schematic Diagram
Note: 120 VAC Control (P.N. 020001413)
Terminal 1 – 120 VAC, 60 Hz
Terminal 5 – Neutral
220 VAC Control (P.N. 020001414)
Terminal 1 – 208-240 VAC, 50/60 Hz
Terminal 5 – Neutral or Phase B
Note: Verify voltage label on contactor is same volatage as
label on new Electronic Ice Bank Control (EIBC); ei: 120 VAC
contactor = 120 VAC Control and 230 VAC Contactor = 230 VAC
Control.
Note: If no contactor/relay, new Electronic Ice Bank Control
(EIBC) MUST be same voltage as Compressor.
CLN
315
Terminal 1 (L)
(Power)
(existing wire from
old control)
from High Pressure
Switch or
“On/Off” Switch
Terminal 3 (C) (Load)
(existing wire from
old control)
To Contactor Coil or
Compressor directly
Terminal 5 (N)
(Power)
(new wire)
To Neutral or
Phase B
Probe
Connection
Mounting Holes
(both ends)
/