Page is loading ...

Pinnacle Studio
USER'S GUIDE

Pinnacle Studio
User’s Guide
GB July 2001
41001030
© Pinnacle Systems Inc. 2001
All rights reserved.
No part of this manual may be reproduced or transferred to other media without explicit written
permission from Pinnacle Systems Inc., Braunschweig, Germany.
All brand or product names are trademarks or registered trademarks of their respective holders.
This manual is printed on chlorine-free paper using environmentally safe ink.
Pinnacle Systems Inc. has written this manual to the best of its knowledge, but does not guarantee that the
programs/systems will fulfill the desires of the user.
No warranty is made as to the specifications of features.
Pinnacle Systems Inc. retains the right to make alterations to the content of the manual without the
obligation to inform third parties.
All tenders, sales, supply and manufacturing contracts from Pinnacle Systems Inc., including consultancy,
installation and other contractual performance are subject exclusively to the General Sales and Delivery
Terms of Pinnacle Systems Inc.

User's Guide i
Contents
CHAPTER 1: OVERVIEW 1
EQUIPMENT REQUIREMENTS 2
ABBREVIATIONS AND CONVENTIONS 4
CHAPTER 2: THE STUDIO INTERFACE 5
CAPTURE 5
EDIT 8
USING THE PLAYER 9
THE MOVIE WINDOW 11
THE TOOLBOXES 15
MAKE MOVIE 20
CHAPTER 3: A TOUR THROUGH STUDIO 21
ADDING VIDEO SCENES, TRANSITIONS AND A TITLE 21
ADDING SOUND 30
MAKING A MOVIE 32
CHAPTER 4: CAPTURING VIDEO 34
CAPTURE HARDWARE 34
DV CAPTURE OPTIONS 35
THE CAPTURE WINDOW 38
CAPTURING DV VIDEOTAPES 39
NON DV-CAPTURE 40
CHAPTER 5: USING THE VIDEO ALBUM 43
SELECTING AND OPENING A CAPTURED VIDEO FILE 43
WORKING WITH THE VIDEO ALBUM 43
REVIEWING VIDEO SCENES IN THE ALBUM 44
CHAPTER 6: USING AND ADJUSTING SCENES IN
YOUR MOVIE 49
WORKING WITH SCENES 49
TRIMMING SCENES 50
SPLITTING AND COMBINING CLIPS 54
TRIMMING VIDEO SCENES WITH THE CHANGE CLIP PROPERTIES TOOL 55
EDITING AUDIO AND VIDEO SEPARATELY 59
SPLIT EDITS 61
ADJUSTING VIDEO PROPERTIES OF SCENES 63
ADJUSTING PLAYBACK SPEED OF SCENES 64

ii Studio
CHAPTER 7: CREATING AND USING STILL IMAGES 65
THE FRAME GRABBER 68
TRIMMING STILL IMAGES 70
CHAPTER 8: ADDING AND USING TRANSITIONS 72
THE TRANSITIONS ALBUM 74
ADDING TRANSITIONS TO YOUR MOVIE 75
TRIMMING TRANSITIONS 76
AUDIO TRANSITIONS 78
CHAPTER 9: CREATING TITLES AND GRAPHICS 79
THE TITLEDEKO USER INTERFACE 80
LET’S MAKE A TITLE 83
SELECTING TEXT AND OBJECTS 91
FORMATTING TEXT AND OBJECTS 92
LAYERS 95
TRANSFORMING TEXT AND OBJECTS 95
USING AND MODIFYING STYLES AND LOOKS 96
THE BACKGROUND 98
TRIMMING TITLES AND GRAPHICS 100
CHAPTER 10: ADDING SOUND EFFECTS AND MUSIC 102
SELECTING AND PREVIEWING AUDIO CLIPS IN THE ALBUM 103
PLACING AUDIO CLIPS ON THE TIMELINE 103
CREATING BACKGROUND MUSIC 105
CREATING A VOICE-OVER 107
ADJUSTING AUDIO VOLUME 109
ADJUSTING AUDIO LEVELS 110
TRIMMING AUDIO CLIPS 113
CHAPTER 11: MAKING YOUR MOVIE 115
CONNECTING THE CAMERA… 115
OUTPUTTING TO A CAMERA/VIDEO RECORDER... 117
CONNECTING THE TV SET/VIDEO MONITOR 117
OUTPUT YOUR MOVIE TO VIDEOTAPE 118
SAVE YOUR MOVIE AS AN AVI FILE 119
SAVE YOUR MOVIE AS AN MPEG FILE 121
SAVE YOUR MOVIE AS A REALVIDEO FILE 123
SAVE YOUR MOVIE AS A WINDOWS MEDIA FILE 124
SHARE YOUR MOVIE VIA THE INTERNET 126

User's Guide iii
APPENDIX A: SETUP OPTIONS I
CAPTURE SOURCE/CAPTURE FORMAT TAB SETTINGS I
EDIT TAB SETTINGS V
CD/VOICE-OVER TAB SETTINGS VI
MAKE TAPE SETTINGS VII
MAKE AVI FILE TAB SETTINGS VIII
MAKE MPEG FILE TAB SETTINGS X
MAKE REALVIDEO TAB SETTINGS XI
MAKE WINDOWS MEDIA TAB SETTINGS XIV
APPENDIX B: TIPS AND TRICKS XVI
GENERAL INFORMATION XVI
HARDWARE XVI
SOFTWARE XVIII
INCREASING THE FRAME RATE XIX
STUDIO AND COMPUTER ANIMATION XX
SMART CAPTURE TIPS (DV ONLY) XX
CLIP NAMING CONVENTIONS XXI
APPENDIX C: TROUBLESHOOTING XXII
INSTALLATION XXII
OPERATION XXIV
APPENDIX D: USEFUL HINTS XXVII
VIDEO EDITING AND CAPTURING XXVII
APPENDIX E: GLOSSARY XXXIII
APPENDIX F: LICENSE AGREEMENT XLII
INDEX 1

iv Studio
About the User’s Guide
This manual explains how to use the Pinnacle Studio Software.
In the margins are subheadings to help you quickly find your way through
this manual.
Important text passages are marked with the “notepad” and this format.
Numbers mark step by step instructions:
1. Start Windows.
Bullets mark instructions for optional steps the order of which is not
important.
• Connect the board to the camcorder.
All keyboard commands appear in this font:
Setup
Menus, commands, options, or buttons which the user can select are written
in italics.
Subheadings

Chapter 1: Overview 1
Chapter 1:
Overview
Pinnacle Studio lets you use your personal computer as a complete video
capture and editing system. Studio gives excellent results without
expensive dedicated video editing equipment. Creating videos with Studio is
an easy three-step process.
First, record your video to your PC hard drive.
Next, arrange the video scenes in order. Drag and drop transitions,
titles and still images. Complete your movie with sound effects, background
music and voice-overs.
Create your final videotape or digital movie.
Interactive Editing with Instant Preview
With Studio, you can quickly assemble movies on the fly using an intuitive,
interactive interface. Using the Instant Preview window, you can also play
your movie in preview quality any time during editing. Just drag and drop
video scenes, transitions, titles and audio (effects, background music and
voice-overs). Then click the Play button to play the movie.
Studio creates professional-quality scene transitions such as fades, dissolves
and wipes. Studio uses some of the same Emmy award-winning technology
found in Pinnacle Systems’ professional editing equipment.
Use TitleDeko to make simple or elaborate titles, or mix still images with
your video. Adding voice-overs is a breeze—just pick up the microphone,
click a button and start speaking. Audio effects, such as applause or sound
tracks from an audio CD can be added easily using the Studio point-and-
click interface. The SmartSound feature creates custom background music
quickly and easily—choose the type of music and its length, and it appears
on the sound track.

2 Studio
On-Line Help
On-line help is right where you need it, when you need it, while you’re
working in Studio.
• Standard On-Line Help. Click the Help button in the Studio main menu
bar, or press F1 to display the table of contents page of the standard
help topics. Click Help > Help Topic > Index if you want to search for
a specific topic, or command.
• Tool Tips. To find out what a button or other Studio control does,
pause your mouse pointer over it and a Tool Tip appears explaining its
function.
EQUIPMENT REQUIREMENTS
In addition to your Studio software, here is what you need to make a
Studio editing system.
Computer
• Pentium II 300 or higher or equivalent
• Microsoft Windows 98 Second Edition, Windows Millennium,
Windows 2000 or Windows XP
• DirectX compatible graphics card
• DirectX compatible sound card
• 64 MB of RAM (128 MB recommended)
• CD-ROM drive
• Speakers
• Mouse
• A microphone, if you want to record voice-overs
• 200 MB of free hard disk space to install software. Your hard drive
must be capable of a sustained reading and writing at 4 MB/sec. All
SCSI and most UDMA drives are capable of this. The first time you
capture at full quality, Studio will test your drive to make sure it is fast
enough. DV-format video occupies 3.6 MB of hard disk space for
every second of video, so four minutes of DV video will require almost
900 MB of hard disk space. If disk space is a concern, use
SmartCapture to capture your video at Preview-quality. This feature
uses much less disk space. An entire tape can fit in as little as 360
megabytes (See Chapter 4 Capturing Video for more information).

Chapter 1: Overview 3
Video Capture Hardware
Studio can capture video using a variety of devices, including
• Pinnacle Studio DV or other OHCI-Compliant IEEE1394 (also known
as FireWire, DV or iLink) port connected to a DV or Digital8
camcorder or VCR
• Pinnacle Studio PCTV or other Connexant 848/878-based PCI TV
Tuner/board
• Pinnacle Studio DC10plus or Studio AV analog MJPEG capture board
• Pinnacle USB Video Capture cable (included in Studio Online and
Studio Action) or other DirectShow compatible USB capture device
• USB Video Cameras/WebCams
Video Equipment
Studio can capture video from:
• Any DV or Digital8 Camcorder or VCR.
Requires Pinnacle StudioDV or other OHCI-compliant 1394
(FireWire) port.
• Any analog (8mm, Hi8, VHS, SVHS, VHS-C or SVHS-C) camcorder
or VCR.
Requires Pinnacle Studio DC10plus, or Pinnacle Studio PCTV or other
PCI TV Tuner card or Pinnacle USB Video Capture cable or other
DirectShow compatible USB capture device
Studio can output video to:
• Any DV or Digital8 Camocorder or VCR
Requires Pinnacle Studio DV or other OHCI-compliant 1394 port.
Camcorder must be enabled to record from DV Input.
• Any analog (8mm, Hi8, VHS, SVHS, VHS-C or SVHS-C) camcorder
or VCR.
Requires Pinnacle Studio DC10plus or Studio AV.
Output to analog camcorders or VCRs is possible using a Pinnacle
Studio DV or other OHCI-compliant 1394 (FireWire) port if your
DV or Digital8 camcorder or VCR can pass a DV signal through to its
analog outputs (see your camcorder manual, or Chapter 11 Making
Your Movie, for more information).

4 Studio
ABBREVIATIONS AND CONVENTIONS
This guide uses the following conventions to help organize the material.
Terminology
Studio: Studio refers to the editing software.
DV: The term DV refers to DV and Digital8 camcorders, VCRs, and tapes.
1394: The term 1394 refers to OHCI compliant IEE1394, FireWire, DV or
iLink interfaces, ports and cables.
Analog: The term analog refers to 8mm, Hi8, VHS, SVHS, VHS-C or
SVHS-C camcorders VCRs and tapes, and to Composite/RCA and S-Video
cables and connectors.
Dialog Box and Window Names
Names of buttons, dialog boxes, windows and related items are written in
italics so you can find them in the text faster.
Example: Click the Accept button in the TitleDeko window.
Choosing Menu Commands
The right angle bracket symbol (>) denotes the path for hierarchical menu
items. For example, to create Background Music, the instruction would be
Example: Select Toolbox > Generate Background Music
Keyboard Conventions
Key names are spelled with initial caps. A plus sign denotes a key
combination.
Example: Press Ctrl + A to select all the video scenes in the Album
window.
Brackets denote keys that do not have names printed on them.
Example: Press the [Spacebar] to display the tool.
Mouse Clicking
When a mouse click is required, the default is always a left-click unless
specified.
For example: Right-click and select TitleDeko.

Chapter 2: The Studio Interface 5
Chapter 2:
The Studio Interface
This chapter is an orientation to the Studio user interface, and describes the
main areas of the screen and the controls you’ll be using most often.
Detailed descriptions are found in later chapters.
As described earlier, you make a movie in three steps: Capture, Edit and
Make Movie. These modes are represented by three buttons under the main
menu bar, and are ordered in the sequence used to make a movie: Capture
the video, edit the video, and then make the movie by recording a videotape
or saving as a digital video file.
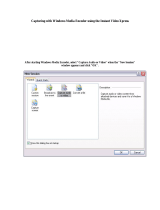
CAPTURE
With Studio, Capture is the process of recording video from your video
source to your PC’s hard drive. The tools and controls you see in Capture
mode are different depending on whether you are capturing from a DV
source or an analog source.
If your video source is analog, you will connect to your computer hardware
with a composite or S-Video cable. Your Capture screen will look like this:
If you are capturing from a DV camcorder or VCR connect to a 1394 port,
the capture screen looks like this:

6 Studio
There are two major differences between the two Capture modes:
1. You have can control the tape transport of a DV camcorder or VCR.
2. You can modify audio and video levels as you make an analog capture.
In both cases as the Capture process proceeds, the Album is populated with
video scenes and the Player shows the incoming video. Concurrently, the
Diskometer monitors the free space on your hard drive. See Chapter 4 for
detailed information on capturing video.
The Player during Capture Mode
During capture the Player shows you the incoming video, and the Counter
displays an accurate running length of the video being captured.
Diskometer
The Diskometer tells you how much hard drive space is available in both
graphical and numerical form. The Diskometer also indicates the duration of
video that can be captured in the available disk space. The duration of video
that will fit in the available disk space is dependant on the Capture quality.
Capture quality settings are selected using the Quality preset buttons in the
Diskometer, or by choosing Custom Settings. See Chapter 4 for more
information.

Chapter 2: The Studio Interface 7
Camcorder Controller
Note: Camcorder control is only available with a DV camcorder connected
to a 1394 port.
Use the Transport controls to view your tape, or seek to the location on the
camcorder tape at which capture is to begin. You can capture the entire tape,
or start capture at any point. The Start/Stop Capture button in the
Diskometer begins and ends the capture process. The Counter window
displays the current position of the camcorder tape, along with the current
transport mode of the camcorder.

8 Studio
EDIT
When you first launch Studio, it opens in the Edit mode, because you use
Edit most often. To return to the Edit mode from Capture mode or Make
Movie mode, click the Edit button on the Movie window menu bar.
The Edit mode display includes three main areas: the Album, the Player, and
the Movie window.
In addition, multilevel Undo and Redo buttons are located in the upper right
corner along with the Help button. Clicking Undo repeatedly steps you back
through the previous changes you made. It is essentially unlimited. You can
feel free to experiment with editing because you can always Undo your way
back to where you started.
The Album
The Album contains five tabs that access sections for Video Scenes
,
Graphics , Transitions , Frame Grabs , and Sound Effects .
Click on the tabs to see their contents.

Chapter 2: The Studio Interface 9
The Player
The Player displays a preview of the movie, or shows what is selected in the
Album. During Edit, the Player displays a preview of the movie at your
current position. The Player also offers controls to navigate the movie you
are editing.
USING THE PLAYER
The Player consists of two main areas, the Preview window and the
Playback controls. The Preview window displays the video at the current
position. The Playback controls allow you to play the video, or go to an
exact position within it.
Playback
controls
Jog
buttons
Preview
window
Player scrubber
Current position counter
The Preview Window
The Preview window is a central point of focus in Studio because you use it
so often. It displays moving video during play. It also displays still images
and titles at your current position, or when you select a scene in the Album
or clip in the Movie window, or if you advance via single frames. The
Preview window is also used in functions such as capture and trimming.

10 Studio
The Playback Controls
➨
The buttons and controls in the Preview window let you navigate.
Play/ Pause. The Play button previews the movie from the
current position. Once preview begins, Play becomes a Pause button. When
paused, the scene or clip on which Preview stopped becomes the selected
scene.
Fast Reverse. Plays the movie in fast-reverse mode at 10x the normal
speed.
Fast Forward. Plays the movie in fast-forward mode at 10x the
normal speed.
Go To Beginning. Moves scrubber to the first frame of your movie.
Jog Buttons
Click the Jog buttons to step the movie forward and backward by
frames.
Player Scrubber
Use the Player scrubber to quickly traverse forward and backward through
the movie. The Player scrubber shows at a glance your relative position
within a movie. Regardless of actual movie length, the scrubber bar
represents the entire length of the movie. The left edge is the beginning.
As you move the scrubber, the Preview window shows the current position
of the movie.
The ability of the Preview to display continuous video depends on the speed
of your computer. If you move the Player scrubber slowly, the Preview
window display plays smoothly. As you increase the rate at which you move
the scrubber, the Preview window will jump frames. The point at which it
does so is dependent on your specific hardware.

Chapter 2: The Studio Interface 11
The Counter
The Counter seeks to and displays the current position within the movie,
and also lets you select the exact point at which to start play. To seek to or
play from an exact point, click on the number you wish to change and type a
new value.
Frames
Seconds
Minutes
Hours
• Step through the field: Tab or Left/Right cursor keys
• Increment or decrement field values: Up/Down cursor keys. Hold the
Up/Down key to continuously increment/decrement
THE MOVIE WINDOW
The Movie window menu bar contains several important controls and
displays. The Toolbox buttons in the upper-left open the Video Toolbox and
the Audio Toolbox , which are discussed in greater detail in the next section.
Video Toolbox Audio Toolbox
To the right of the Toolbox buttons is the project file name, along with an
area that displays messages about the action you are performing. To the
right of the Message Display area are the Clip Split and Clip Delete buttons.
To the far right are three view selection buttons.
The Clip Split and Clip Delete buttons allow you to select a clip in any of
the Movie Window views, and Split or Delete the clip as a whole, or a
selected portion of audio only or video-only.
Clip Split/Delete

12 Studio
The Movie window has three views: Timeline, Storyboard and Text. You
switch between them by clicking the View Selection buttons in the upper
right corner of the Movie window menu bar.
Storyboard View Timeline View Text View
The Storyboard view shows the order of video scenes and transitions. It uses
thumbnail icons for quickly structuring a movie. You can choose Large or
Small thumbnails in the Setup > Edit option tab.
The Timeline view shows the position and duration of clips relative to the
Timescale. This view also displays the five tracks on which you can place
various types of clips: video scenes, original (or synchronous) audio,
transitions, title overlays/graphics, sound effects/voice-overs and
background music.
In the Timeline view, the Video track takes precedence over all other tracks
when trimming or deleting.
The Timeline view also offers the ability to „lock“ any of the four tracks
(Video, Sync Audio, Title Overlays/Graphics, Sound Effects/Voice-overs,
or Background Music) independently of each other. This gives Studio
insert-edit and split-edit capability (see Chapter 6 for more information on
Split Edits). As your cursor rolls over the icons on the left edge of the
Movie Window, each displays as a button which can be clicked to lock that
particular track.
Storyboard
View
Timeline View

Chapter 2: The Studio Interface 13
The list in the Text view shows the start and end times of clips, as well as
their duration. In addition, custom names for clips are visible in this view.
Current Position, Edit Line and Scrubbers
The current position is the frame shown in the Player Preview window. It is
also indicated by the Edit line in the Movie window. The current position
can be changed by moving Timeline scrubber.
When the Change Clip Properties tool is selected, a third Scrub button, the
Trim scrubber, is available for adjusting current position within the clip
during trimming.
Text View

14 Studio
Clip Placement Feedback
Studio gives you feedback about your actions as you place clips in the
Movie window when it is in Timeline view.
The Status line is an area on the left of the Movie window menu bar that
displays messages as you place clips and perform other actions in the Movie
window.
Studio does not allow you to create combinations that cause problems. The
mouse pointer symbols and the colors of the vertical Placement lines
indicate what you can and cannot do. For example, if you attempt to drag a
sound onto the Video track, the Placement lines turn red, the plus sign
becomes an unavailable symbol, and the Status line tells you, ”Only scenes,
graphics and transitions on the video track.”
Green Placement lines with a copy sign mean OK; red Placement lines
with the unavailable sign
mean you cannot perform the action.
The Status Line
Placement
Symbols
/