Page is loading ...

Windows® Phone 8X by HTC
User guide

Contents
Unboxing
Your phone 8
SIM card 9
Battery 11
Switching the power on or off 12
Setting up your phone
Entering your PIN 13
Setting up your phone for the first time 13
Account setup 13
Getting contacts into your phone 14
Your first week with your new phone
Features you'll enjoy 15
Start screen 16
Touch gestures 17
Motion gestures 19
Adjusting the volume 20
Sleep mode 21
Lock screen 21
Changing the ringtone 22
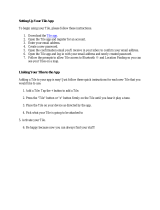
Changing the theme 23
Taking a screenshot 23
Switching between apps 23
Windows Store 24
Using speech on your phone 24
Camera
Camera basics 26
Taking a photo 27
Recording video 28
After capturing 28
Phone calls
Making a call 29
Receiving calls 30
What can I do during a call? 30
Starting a conference call 31
Call history 32
2 Contents

Turning airplane mode on or off 33
People
Keeping in touch 34
Importing contacts from your SIM card 34
Adding a new contact 34
Jumping to a section in the contacts list 35
Filtering your contacts list 35
Merging contact profiles 35
Searching, editing or deleting 36
Sharing with a group of contacts in real-time 37
Organizing your contacts into groups 38
What is the Me tile? 40
Posting to social networks 40
Filtering social updates 41
Keyboard
Using the onscreen keyboard 42
Entering words with predictive text 43
Changing the keyboard language 43
Messaging
Texting and chatting in one place 44
Sharing pictures, videos, and more in a message 45
Viewing and replying to a message 46
Managing conversations 47
Email
Adding your Microsoft account 48
Adding a POP3/IMAP email account 48
Adding a Microsoft Exchange ActiveSync account 49
Checking email 49
Sending email 50
Managing email messages 51
Changing email account settings 52
Photos, videos, and music
Photos 53
Music + Videos 55
Sync and Backup
Keeping things in sync 56
Backing up your files 56
Internet connections
Data connection 57
Wi-Fi 58
Using your phone as a mobile hotspot 60
3 Contents

Search and Web browser
Ways you can search the Web 61
Searching for information 61
Scanning codes, tags, and text 62
Opening and navigating web pages 64
Music search 65
Maps and location
Location services 66
Maps 66
Local Scout 69
Calendar
What you can do in Calendar 71
Creating a calendar appointment 71
Creating a new to-do task 72
Displaying and syncing calendars 73
More apps
What can I do in the HTC hub? 74
What's in the Office hub? 79
Xbox LIVE in the Games hub 80
Bluetooth and NFC
Connecting a Bluetooth accessory 81
Disconnecting a Bluetooth accessory 81
Unpairing 82
Sharing content with NFC 82
Turning NFC on and off 82
Using NFC 83
Settings
Attentive phone features 84
Turning Battery Saver on 84
Changing display settings 85
Changing sound settings 85
Managing apps and storage 86
Security
Protecting your SIM card with a PIN 87
Protecting your phone with a password 87
Making your phone safe for kids 88
Setting up Kid's Corner 88
Launching Kid's Corner 88
Closing and disabling Kid's Corner 89
4 Contents


Conventions used in this guide
In this user guide, we use the following symbols to indicate useful and important
information:
This is a note. A note often gives additional information, such as what happens
when you choose to do or not to do a certain action. A note also provides
information that may only be applicable to some situations.
This is a tip. A tip gives you an alternative way to do a particular step or procedure,
or lets you know of an option that you may find helpful.
This indicates important information that you need in order to accomplish a certain
task or to get a feature to work properly.
This provides safety precaution information, that is, information that you need to be
careful about to prevent potential problems.
6 Conventions used in this guide

Other helpful resources
For health, safety, and regulatory information, please read the Safety and regulatory
guide that’s included in the box.
In addition to this user guide, you can find help information, FAQs, and more in
www.htc.com/support.
To learn a lot more about using Windows
®
Phone, open Help+Tips on your phone. Or
use your web browser and go to windowsphone.com.
Certain Windows Phone features or Microsoft
®
services may not be available in
some countries or regions.
7 Other helpful resources

Unboxing
Your phone
1. BACK
2. USB connector
3. START
4. SEARCH
5. Camera button
6. VOLUME
7. Notification LED
8. Proximity sensor
9. POWER
10. 3.5mm headset jack
11. Front camera
If you want to use a screen protector, please don’t cover and block the proximity
sensor. You can purchase the dedicated screen protector for your phone that
already has a small opening for the sensor.
8 Unboxing

SIM card
The SIM card contains your phone number, service details, and memory for storing
phonebook contacts and/or text messages.
Inserting the SIM card
1. Insert the SIM eject tool (or a small bent paperclip) into the small hole next to
the SIM card tray.
2. Pull the SIM card tray out, and place the SIM card (contacts facing down) into
the tray.
3. Insert the SIM card tray into its slot.
9 Unboxing

Removing the SIM card
Make sure to switch off your phone before removing your SIM card.
1. Insert the SIM eject tool (or a small bent paperclip) into the small hole next to
the SIM card tray.
2. Pull the SIM card tray out and remove the SIM card.
10 Unboxing

Battery
Your phone uses a rechargeable, non-removable battery. How long the battery can
last before it needs recharging depends on how you use your phone. The features and
accessories you use can affect battery life. For example, leaving your Bluetooth
®
connection always on uses more power. Long phone calls and frequent web browsing
use up a lot of battery power. Also, consider your location: poor signal strength from
your mobile network and extreme temperature make the battery work harder.
Charging the battery
Before you turn on and start using your phone, it is recommended that you charge
the battery.
Only the power adapter and USB cable provided in the box must be used to charge
the battery.
1. Insert the small end of the USB cable into the USB connector.
2. Insert the other end of the USB cable into the power adapter.
3. Plug in the power adapter to an electrical outlet to start charging the battery.
As the battery is being charged, the notification LED shows a solid red light. The light
turns to solid green when the battery is fully charged.
When you charge the battery and the phone is on, the charging battery icon is
displayed in the status bar. After the battery has been fully charged, the charging
battery icon turns to a full battery icon .
As a safety precaution, the battery stops charging when it overheats.
11 Unboxing

Switching the power on or off
Switching the power on
Press the POWER button. Easy.
When you turn on your phone for the first time, you’ll need to set it up.
Switching the power off
1. If the display is off, press the POWER button to turn it back on, then unlock the
screen.
2. Press and hold the POWER button until you see the message, slide down to
power off.
3. Swipe your finger down the screen.
Phone not responding?
Restart your phone if it doesn't respond when you touch the screen or press
the buttons.
Press and hold the POWER button for at least 12 seconds. Your phone turns
off and then turns back on.
12 Unboxing

Setting up your phone
Entering your PIN
Some SIM cards come with a PIN (personal identification number) set by your mobile
operator.
If you’re asked for a PIN, enter it and then tap enter.
If you enter the wrong PIN three times, the SIM card is blocked. If this happens, you
can unblock it with the PUK (PIN Unlocking Key) obtained from your mobile
operator.
Setting up your phone for the first time
When you switch on your phone for the first time, you’ll be asked to set it up. Just
follow the onscreen instructions and you’ll be up and running in no time.
Be sure to sign in with your Microsoft account so you can use services such as
Windows Store, Xbox LIVE
®
, and more.
Account setup
Set up your online accounts so you can send and receive email, and more.
Depending on the type of email account that you set up, other items such as contacts,
calendar, or other information can appear on your phone as well. And when you sign
in to your social networking accounts, you'll also get your friends' status updates and
see the pictures they've posted.
Setting up an account
1. On the Start screen, slide to the left.
2. Tap Settings > email+accounts.
3. Tap add an account, and then tap the type of account you want to set up.
13 Setting up your phone

Syncing an account
If you're not seeing your most recent email messages or status updates in an account,
you can manually sync the account to download them.
1. On the Start screen, slide to the left.
2. Tap Settings > email+accounts.
3. Press and hold the account whose information you want to download, and then
tap sync.
Deleting an account
1. On the Start screen, slide to the left.
2. Tap Settings > email+accounts.
3. Press and hold the account you want to delete, and then tap delete.
Your primary Microsoft account cannot be deleted. You'll need to do a factory reset
to remove it.
Getting contacts into your phone
There are several ways you can add contacts to your phone.
Online accounts Log in to your online accounts to import contact
information.
Phone contacts Create and store contacts directly in your phone.
SIM card Copy your SIM contacts to your phone.
Outlook
®
(Exchange
ActiveSync
®
)
Sync your work contacts with Outlook (Exchange
ActiveSync).
Bluetooth Receive contacts via Bluetooth from another phone.
14 Setting up your phone

Your first week with your
new phone
Features you'll enjoy
Keep up to date with your family and friends, and share what's going on in your life.
Hear what you've been missing in your music. And more.
Make your phone as unique as you are
Personalize your Start screen with what's important and unique to you. Create live
tiles for your favorite people, music albums, apps, and more, and pin them all to your
Start screen. To find out more, see Start screen on page 16.
Capture every moment
Here are some of the great camera features you can use:
§ With the ultra-wide angle front camera, you can take a picture of yourself and
more of the beautiful landscape behind you. Or take a close up shot with family
or friends.
§ Quickly launch your camera with the dedicated CAMERA button, even when
your phone is in sleep mode.
§ Use your camera in a wide variety of environments, even in low light conditions.
To find out how to do these and more, see Camera on page 26.
Beats By Dr. Dre Audio™
Beats Audio
™
integration gives you a rich, authentic sound experience, whether you’re
listening to music, watching a video, or playing a game. To find out more, see Making
your music sound better on page 55.
SkyDrive integration
Always have access to your photos, videos, and documents anywhere by storing them
in SkyDrive
®
. See Sharing on page 54.
15 Your first week with your new phone

Start screen
Up front on the Start screen, you'll see live tiles that continuously update and show
what’s most personal to you. You’ll see your photo album, how many new text and
email messages you have, and more.
§ Simply swipe your finger up or down to scroll through the tiles.
§ Swipe your finger left to access apps and settings. Tap a letter tile to see all of
the alphabet tiles.
§ To return to the Start screen from any screen, press .
Rearranging and resizing tiles
1. Press and hold the tile you want to move until it floats.
2. Tap the arrow in the lower right corner to resize the tile.
3. Drag the tile where you want it to go.
4. When you're done moving tiles, press or .
Pinning items to the Start screen
You can pin just about anything you want to the Start screen: apps, pictures, songs,
favorite websites, documents, and even contacts.
For example, when you pin a contact to the Start screen, you’ll get all of that person’s
updates — feeds, email, text messages, and call notifications — right from that tile.
1. To pin something, press and hold it until a menu appears.
2. Tap pin to start.
Unpinning a tile
1. Press and hold the tile you want to remove.
2. Tap .
16 Your first week with your new phone

Touch gestures
Use touch gestures to get around your phone.
Tap
When you want to type on the keyboard, select onscreen items
such as application and settings icons, or press onscreen
buttons, just tap them with your finger.
Press and hold
Press and hold an item to view available options (for
example, additional keys on the keyboard).
Swipe or slide
Swipe your finger vertically or horizontally across the screen
when you need to scroll through a long list or see other screens
in a hub.
17 Your first week with your new phone

Drag
Press and hold your finger with some pressure before you start
to drag. While dragging, don't release your finger until you
have reached the target position.
Flick
Flicking the screen is similar to swiping, except that
you need to swipe your finger in light, quicker
strokes, such as when moving from the Start screen
to the apps list.
Pinch and spread
In some apps, such as Photos or Internet
Explorer, spread your fingers on the
screen to zoom in when viewing a picture
or text.
18 Your first week with your new phone

Pinch the screen to zoom out of the picture or text.
Motion gestures
Use motion gestures to mute the ringer and more.
Flip to silence
When a call comes in you can turn your
phone over to mute it.
Pick up to lower volume
In a business meeting or restaurant, pick
your phone up when a call comes in to
lower the ringtone volume.
19 Your first week with your new phone

Set volume to automatically rise while in your pocket or bag
On a noisy street and can't hear your phone ringing in
your bag?
You can set your phone to automatically detect when it's
in your bag or pocket and raise the ringtone volume so
that you can hear it in noisy environments.
Rotate your phone for a better view
For many screens, you can
automatically change the screen
orientation from portrait to
landscape by turning your phone
sideways.
When entering text, you can turn
your phone sideways to bring up a
bigger keyboard.
Adjusting the volume
1. Press the VOLUME UP or VOLUME DOWN button to make the volume bar
appear.
2. Keep pressing until you get the volume level that you want.
Silencing your ringer
1. Press the VOLUME UP or VOLUME DOWN button to make the volume bar
appear.
2. Tap .
If the Vibrate option is on in the settings, your phone will change to vibrate mode. If
it's not, your phone will change to silent mode.
20 Your first week with your new phone
/