Philips VRB664AT User guide
- Category
- Coaxial cables
- Type
- User guide
This manual is also suitable for
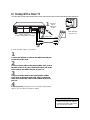
Philips VRB664AT VCR lets you watch one channel while recording another and vice versa, thanks to its two-tuner design. It features stereo audio output for immersive sound and a front panel AV input for easy connection of camcorders and other devices. You can program timer recordings for up to eight events, and the VCR Plus+ system makes it easy to record your favorite shows with just a few button presses. With its simple hookup and user-friendly design, the Philips VRB664AT is the perfect VCR for anyone looking for a reliable and feature-rich recording solution.
Philips VRB664AT VCR lets you watch one channel while recording another and vice versa, thanks to its two-tuner design. It features stereo audio output for immersive sound and a front panel AV input for easy connection of camcorders and other devices. You can program timer recordings for up to eight events, and the VCR Plus+ system makes it easy to record your favorite shows with just a few button presses. With its simple hookup and user-friendly design, the Philips VRB664AT is the perfect VCR for anyone looking for a reliable and feature-rich recording solution.


-
 1
1
-
 2
2
-
 3
3
-
 4
4
-
 5
5
-
 6
6
-
 7
7
-
 8
8
-
 9
9


Philips VRB664AT User guide
- Category
- Coaxial cables
- Type
- User guide
- This manual is also suitable for
Philips VRB664AT VCR lets you watch one channel while recording another and vice versa, thanks to its two-tuner design. It features stereo audio output for immersive sound and a front panel AV input for easy connection of camcorders and other devices. You can program timer recordings for up to eight events, and the VCR Plus+ system makes it easy to record your favorite shows with just a few button presses. With its simple hookup and user-friendly design, the Philips VRB664AT is the perfect VCR for anyone looking for a reliable and feature-rich recording solution.
Ask a question and I''ll find the answer in the document
Finding information in a document is now easier with AI
Related papers
Other documents
-
Magnavox VCR VR602BMG User manual
-
-
-
-
-
-
-
-
-