Optimus WM-D5200-C7D00 User manual
- Category
- Microphone accessories
- Type
- User manual
This manual is also suitable for

WM-D5200DIGITAL WIRELESS MICROPHONE
INSTRUCTION MANUAL
Thank you for purchasing TOA’s Digital Wireless Microphone.
Please carefully follow the instructions in this manual to ensure long, trouble-free use of your equipment.

2
TABLE OF CONTENTS
1. SAFETY PRECAUTIONS
......................................................................................................... 3
2. GENERAL DESCRIPTION ....................................................................................................... 4
3. FEATURES ................................................................................................................................. 4
4. HANDLING PRECAUTIONS .................................................................................................... 4
5. NOMENCLATURE AND FUNCTIONS ................................................................................... 5
6. PREPARING BATTERIES ........................................................................................................ 7
6.1. Battery Insertion .................................................................................................................... 7
6.2. Guide to Battery Operating Times ........................................................................................ 7
6.3. When Operating on Rechargeable Battery .......................................................................... 8
7. OPERATION ............................................................................................................................... 9
8. FUNCTION SETTINGS ............................................................................................................ 9
8.1. Setting the Bank and Channel Numbers .............................................................................. 9
8.2. Performing Encryption Settings ......................................................................................... 10
8.3. Performing Code Settings (When Encryption Function Is OFF) ........................................ 13
8.4. Performing Transmission Output Changeover Switch Settings ......................................... 14
9. CONVENIENT FUNCTIONS
(MICROPHONE SENSITIVITY SELECTOR SWITCH SETTINGS)
.................................. 15
10. SPECIFICATIONS ................................................................................................................. 16
Accessories ............................................................................................................................... 16

3
1. SAFETY PRECAUTIONS
•Beforeuse,besuretocarefullyreadalltheinstructionsinthissectionforcorrectandsafe
operation.
•Besuretofollowalltheprecautionaryinstructionsinthissection,whichcontainimportant
warnings and/or cautions regarding safety.
•Afterreading,keepthismanualhandyforfuturereference.
When the Unit is in Use
•Besuretouseadedicatedbatterycharger
when recharging a battery. Using other
battery charger may cause the battery to
leakorexplode,resultinginare,personal
injury, property damage, and/or pollution.
•Topreventtheelectromagneticwavefrom
badlyinuencingmedicalequipment,make
sure to switch off the unit's power when
placing it in close proximity to the medical
equipment.
When the Unit is in Use
•Whentheunitisnotinusefor2weeksor
more, be sure to take the batteries out of the
unit because battery leakage may cause a
re, personal injury, or contamination of
environment.
•Makesuretoobservethefollowinghandling
precautionssothatareorpersonalinjury
does not result from leakage or explosion of
the battery.
· Do not short, disassemble, heat nor put
thebatteryintoare.
· Avoid using both new and old batteries
together.
· Never charge batteries of the type which
are not rechargeable.
· Do not solder a battery directly.
·Be sure to use the specied type of
batteries.
· Note correct polarity (positive and
negative orientation) when inserting a
battery in the unit.
· Avoid locations exposed to the direct
sunlight, high temperature and high
humidity when storing batteries.
Do not place the dry cell battery into charger.
Placing non-rechargeable batteries in the
charger may cause the battery to crack
resultinginareand/orharmtothebody.
When recharging, please only use the BC-
2000 Battery charger and WB-2000 Battery.
Do not use other battery types.
Whenthebatterybecomesinatedorleaks,
discontinue use and replace with new one
immediately.
If there’s any burning and/or peculiar smell
while charging the battery, please switch off
the power immediately.
CAUTION TO USER:
Changes or modications not expressly
approved by the party responsible for
compliance could void the user's authority to
operate the equipment.
Indicates a potentially hazardous situation
which, if mishandled, could result in death
or serious personal injury.
WARNING
Indicates a potentially hazardous situation
which, if mishandled, could result in
moderate or minor personal injury, and/or
property damage.
CAUTION

4
2. GENERAL DESCRIPTION
The WM-D5200 is a digital wireless microphone employing a condenser microphone element that
features high sensitivity and clear sound quality. The microphone is specially designed to be used
in conjunction with TOA's WT-D5800 digital wireless receiver.
3. FEATURES
•EmploysthePLL-synthesizersystem.
•TOA'suniquedigitalaudioprocessingtechnologyensureshighqualitysound.
•Digital transmission is highly resistant to radio interference and noise, enabling clearer, more
stable communication.
•Whenusedforimportantconferencesorinotherhigh-securityvenues,TOA'suniqueencryption
software combines with digital transmission technology to prevent leakage of or eavesdropping
on sensitive information.
•Switchablemicrophonesensitivityallowstheunittobeusedinawiderangeofapplications.
•Powercanbesuppliedbyeitherthededicatedrechargeable(NiH2=nickel-hydrogen)batteryor
an AA alkaline battery. When replacing the rechargeable battery, use the optional TOA WB-2000-
2 (package of 2).
•Employsaninternalantenna.
4. HANDLING PRECAUTIONS
•Donotexpose theunitto rainoran environmentwhereit may be splashed by wateror other
liquids, as doing so may result in unit failure.
•Neveropennorremovetheunitcasetomodifytheunit.ReferallservicingtoyournearestTOA
dealer.
•Takecarenottodroptheunitontotheoornorbumpitagainstahardobjectastheunitcouldfail.
•Donotplacetheunitinlocationsofhightemperature(ex.inanill-ventilatedcarinsummer)orhigh
humidity as the unit could fail.
•Donotusetheunitinlocationswhereitisexposedtoseawater.
•Toclean,useadrycloth.Whentheunitgetsverydirty,wipelightlywithaclothdampedinadilute
neutral cleanser, then wipe with a dry cloth. Never use benzine, thinner, or chemically-treated
cleaning towel.
•Avoidusingamobiletelephoneneartheunitinuse.Noisecouldbepickedup.
•Whenusingtwoormoreunits,keepthematleast50cmawayfromeachothertoavoidmalfunctions
or noise.
•Keeptheunitatleast3mawayfromthereceivingantenna.Usingtheunitincloseproximitytothe
antenna could result in malfunctions or noise.

5
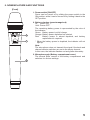
5. NOMENCLATURE AND FUNCTIONS
1. Power switch [ON/OFF]
Power can be turned on by sliding the power switch to the
ON position, while it can be turned off by sliding it back to the
OFF position.
2. Battery checker (green/orange/red)
Lit: PowerON
Unlit:PowerOFF*
The remaining battery power is represented by the color of
the indicator.
Green: Batterypowerisatfullcharge.
Orange:Batterypowerdepletionhasstarted.
Red: Battery power is almost depleted, and battery
replacement is required.
* Whenthebatterypowerisdepleted,theindicatorwill not
light up.
Note
The microphone does not transmit the signal if the bank and
channel selector switches are set to the empty channel.
Inthiscase,theindicatorashesredandgreenalternately.
3. Microphone grip (Battery compartment cover)
The internal parts consist of the battery compartment and
switches for various settings.
ON
OFF
1
2
3
[Front]

6
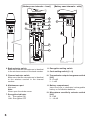
4. Bank selector switch
Make sure that the microphone is identical
to the wireless receiver in the bank number.
5. Channel selector switch
Make sure that the microphone is identical
to the wireless receiver in the channel
number.
6. Maintenance port
Not used.
Note
Never open the rubber cover.
7. Encryption indicator
Lit: EncryptionON
Unlit: EncryptionOFF
8. Encryption setting switch
9. Code setting switch [0 – 9]
10. Transmission output changeover switch
[H/L]
H:10mW
L:1mW
11. Battery compartment
Insert and use a dedicated rechargeable
battery or AA alkaline batteries.
12. Microphone sensitivity selector switch
[H/L]
H:0dB
L: –10dB
ON
OFF
H L
6
7
8
9
10
11
4
5
[Battery case internals – front] [Battery case internals – side]
12

7
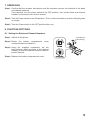
6. PREPARING BATTERIES
The WM-D5200 can operate on both the optional rechargeable battery or replaceable dry batteries.
Please carefully read the corresponding sections for correct use.
6.1. Battery Insertion
Step 1. Turn off the power switch.
Step 2. Holdthemicrophonebodyandrotatethebattery
compartment cover counterclockwise to remove
it.
Step 3. Insert an AA battery according to (+) and (–)
indications on the battery compartment.
For the rechargeable battery, use the optional
TOA WB-2000-2 (package of 2).
For dry batteries, use either the supplied battery
orcommercialAAalkalinebatteries(LR6).
Step 4. Replace the battery compartment cover by
sliding and rotating it clockwise.
6.2. Guide to Battery Operating Times
6.2.1. Remaining operating time
The color of the battery checker changes from green to orange as
battery consumption progresses, and to red if the battery is further
continuously used. When the battery checker turns red, charge the
battery if the dedicated rechargeable battery is used. In the case of dry
batteries, replace it with a new one.
[Guide to the remaining operating time based on the battery
charge indicator status]
Battery checker status Remaining operating time
Lightsgreen 2–8hours
Lightsorange Lessthan2hours
Lightsred Battery requires charge or replacement.
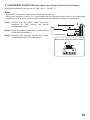
6.2.2. Continuous operating time
Guidetocontinuousoperatingtimes: Approx. 8 hours (for fully-charged dedicated rechargeable
battery or alkaline battery)
Note
Operating times may vary depending on usage conditions, such as ambient temperature.
2
3
ON
OFF
Green Orange Red

8
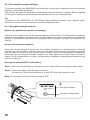
6.3. When Operating on Rechargeable Battery
Notes
•Whenoperatingonrechargeablebatteries,theoptionalBC-2000Batterychargerisrequired.
•For rechargeable batteries, be sure to use the optional BC-2000 or the optional WB-2000-2
(package of 2).
•Avoidusingothermakesofrechargeablebatteries.
•WhenusingtheWB-2000rechargeablebatteryforthersttimeorwhenusingitafterithasbeen
stored for a long period of time, be sure to charge it before use.
•TheWB-2000batteryisdesignedtocyclethroughabout500chargesanddischarges.Whenthe
microphone operation interval becomes extremely short after prolonged repeated use, change
the battery with a new one.
•Charge the rechargeable battery after it has been fully used. (The wireless microphone will
continue to operate for approx. 8 hours per charge.) Frequent charging at short intervals may
shorten the operating life of the rechargeable battery.
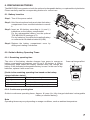
[How to charge]
Step 1. Place the WB-2000 rechargeable battery in the wireless microphone.
(See p. 7, "Battery Insertion.")
Step 2. Set the wireless microphone's power switch to the OFF
position.
Step 3. Fully insert the wireless microphone into the microphone
receptacle of the BC-2000 Battery charger.
The BC-2000's charging indicator lights red and charging
begins.
Charging is completed in approximately 3 hours and the
BC-2000's full-charge indicator lights green.
•If the red charging indicator does not light even if
the wireless microphone has been inserted into the
charger, check to see if the microphone has been
correctly inserted.
•Thewirelessmicrophonebecomeswarmaftercharging
completion, however this is not a failure.
•When disconnecting the wireless microphone from
thecharger,rmlyholdthechargersothatitdoesnot
move.
For more information, see the instruction manual
enclosed with the BC-2000 Battery charger.
WM-D5200
Digital wireless microphone
BC-2000
Battery charger
Do not charge the unit with an alkaline dry battery installed.
Chargethededicatedrechargeablebattery*.
Failure toobservetheseinstructionscouldcausereorpersonal
injury due to a bursting battery.
* TheoptionalTOAWB-2000-2(packageof2).
CAUTION

9
7. OPERATION
Step 1. Conrmthatthewirelessmicrophoneandthewirelessreceiverareidenticalinthebank
and channel numbers
If not identical, turn the power switch to the OFF position, then set the bank and channel
numbers to the same ones as the receiver.
Step 2. TurnthePowerswitchtotheONposition.Then,conrmthebatterycheckerwilllightgreen
or orange.
Step 3. Turn the Power switch to the OFF position after use.
8. FUNCTION SETTINGS
8.1. Setting the Bank and Channel Numbers
Step 1. Switch off the power.
Step 2. Rotate the battery compartment cover
counterclockwise to detach it.
Step 3. Using the supplied screwdriver, set the
bank selector switch’s pointer to the desired
number, and set the channel selector switch’s
pointer likewise.
Step 4. Replace the battery compartment cover.
2
3
Screwdriver
(accessory)

10
8.2. Performing Encryption Settings
To enhance security, the WM-D5200 is provided with an encryption setting function that prevents
leakage of transmitted information.
This function also has the advantage of eliminating radio interference if enabled. Before enabling
theencryptionsetting,besurethatbankandchannelsettingsarecompletedrst.
Tip
In addition to the WM-D5200, the WT-D5800 Digital Wireless Receiver also requires setup.
Therefore, be sure to see the receiver's instruction manual as well.
8.2.1. Encryption settings summary
[Before use (preparatory operation for setting)]
Transmit an ID number from the wireless microphone to the receiver. The ID number is randomly
selected on the wireless microphone side. The ID number to be used is selected from an extensive
numberofcombinationsandcannotbedesignatedbytheoperator,norcanitbeidentiedfrom
outside.
[In use] (No operations required.)
When the receiver detects a signal from the wireless microphone, it simultaneously reads the
microphone's ID information, ensuring that only the audio of the wireless microphone assigned
with the same ID number as the receiver can be output. Even if the bank/channel numbers are
identically set in an attempt to enable reception of a radio signal from outside, since no audio is
output if the ID number does not match, the possibility of leakage of transmitted information to the
outside is quite low.
[Encryption setting ON/OFF confirmation]
Step 1. After removing the battery compartment cover, switch ON the microphone power switch.
Step 2. ConrmthestatusoftheEncryptionindicator.
The setting is ON when the indicator is lit, and OFF when the indicator is unlit.
Note: The encryption setting is factory-preset to OFF
1
2
Encryption setting switch
Encryption indicator

11
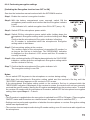
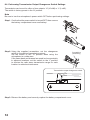
8.2.2. Performing encryption settings
[Switching the Encryption function from OFF to ON]
See also the instruction manual enclosed with the WT-D5800 receiver.
Step 1. Enable the receiver's encryption function.
Step 2. With the battery compartment cover removed, switch ON the
microphonepowerswitchandconrmthattheEncryptionindicator
is unlit.
If the indicator is lit, switch encryption from ON to OFF (see p. 12).
Step 3. Switch OFF the microphone power switch.
Step 4. Switch ON the microphone power switch while holding down the
microphone's Encryption setting switch (continue holding until Step
6).
Conrmthatthemicrophone'sEncryptionindicatorisashing.
An ID number is transmitted while the microphone's Encryption
setting switch is held down.
Step 5. Perform pairing setting at the receiver.
The receiver waits for the microphone’s transmitted ID number for
as long as the Set key is held down. The "RECEIVING" indication
is displayed on the receiver's LCD screen until the ID number is
correctly received.
Step 6. AfterconrmingthattheLCDdisplayhasswitchedtothe"SUCCESS"
indication, release both the microphone's Encryption setting switch
and the receiver's Set key.
Step 7. Conrmthatthemicrophone'sEncryptionindicatorislit.
The encryption setting is now ON.
Notes
•DonotswitchOFFthepowertothemicrophoneorreceiverduringsetting.
•Hold down the microphone's Encryption setting switch and the receiver's Set key until the
"SUCCESS"indicationappearsonthereceiver'sLCDscreen.
If the microphone's Encryption setting switch or the receiver's Set key is released while the
"RECEIVING" indication is displayed on the receiver's screen, the receiver will not have correctly
received the new ID number, leaving the ID number unchanged from the previous value. To match
the receiver ID number with the microphone ID number, switch OFF the microphone's encryption
setting, then repeat Steps 1 – 7 above.
Tips
•TheIDnumberisupdatedwhentheencryptionisswitchedfromOFFtoONagain.(Theencryption
ON/OFF status and ID number are retained even if the power switch is switched OFF.)
•SettingscanbeperformedregardlessofwhetherthemicrophoneorreceiverEncryptionsetting
switchwasdepressedrst.
•ThereceiverdoesnotoutputaudioduringIDnumbersetting,evenifitreceivesaradiosignalfrom
the microphone.
Unlit
Flashing
Lit

12
Unlit
[Switching the Encryption function from ON to OFF]
Step 1. With the battery compartment cover removed, switch ON the
microphonepowerswitchandconrmthattheEncryptionindicator
is lit.
Step 2. Switch OFF the power switch.
Step 3. Switch ON the microphone power switch while holding down the
Encryption setting switch.
Note
Do not switch OFF the microphone power switch during setting.
Step 4. ConrmthattheEncryptionindicatorhasextinguished,thenrelease
the Encryption setting switch.
The encryption setting switches to OFF.
Lit

13
8.3. Performing Code Settings (When Encryption Function Is OFF)
8.3.1. Code Setting Summary
By presetting the specied code between the wireless microphone and receiver, audio is only
output when a digital signal received from the wireless microphone has the same ID code as the
receiver. Even if another signal is received from an adjacent area, if the code does not match, audio
is not output.
Tenvarietiesofcodecanbeselected([0]–[9])forappropriateuse,dependingoncircumstances.
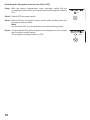
8.3.2. Code settings
Code is factory-preset to "0."
Note
Switch OFF the microphone power switch when performing settings. If the power switch is left ON,
the codes will remain unaffected even if the settings are manually changed.
Step 1. After removing the battery compartment cover, switch ON
the microphone power switch.
Step 2. ConrmthattheEncryptionindicatorisunlit.
If it is lit, switch encryption from ON to OFF, referring to p.
11, "Switching the Encryption function from OFF to ON."
Step 3. Switch OFF the power.
Step 4. Using the supplied screwdriver, set the code setting switch to
the desired code number.
Step 5. Reinstall and securely tighten the battery compartment
cover, as it was before.
This puts the code into the set state.
Step 6. Set the same code number for the receiver, as well.
For the setting method, see the instruction manual enclosed
with the receiver.
1
2
4
Encryption indicator
Unlit
Code setting switch

14
8.4. Performing Transmission Output Changeover Switch Settings
Transmissioncanbesetforeitheroftwooutputs:‘H’(10mW)or‘L’(1mW).
Theswitchisfactory-presettothe‘H’position.
Note
Be sure to turn the microphone’s power switch OFF before performing settings.
Step 1. ConrmthatthepowerswitchisturnedOFF,thenremove
the battery compartment cover and battery.
Step 2. Using the supplied screwdriver, set the changeover
switch to the desired transmission output.
Set the switch to the ‘H’ position when using the
microphone in a wide area.
If the same bank and channel are used in close proximity
in adjacent locations, set the switch to the ‘L’ position
to shorten the radio wave transmission range for each
location to minimize interference.
Step 3. Reinsert the battery and securely replace the battery compartment cover.
1
2
1
Screwdriver
(accessory)
Transmission output changeover switch

15
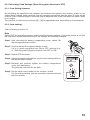
9. CONVENIENT FUNCTIONS (Microphone Sensitivity Selector Switch Settings)
Microphonesensitivitycanbesetto"0dB"(H)or"–10dB"(L).
Notes
•SwitchOFFthepowerswitchwhenselectingthesensitivity.
•Whenthesensitivityissetto"H,"avoidpositioningthemicrophonetooclosetothemouthand
speakinginaloudvoice,asthesoundcouldbecomemuddledanddifculttounderstand.
Step 1. Conrm that the power switch has been
switched off, then remove the battery
compartment cover.
Step 2. Using the supplied screwdriver, set the switch
to the desired sensitivity.
Step 3. Reinstall and securely tighten the battery
compartment cover, as it was before.
1
Microphone sensitivity selector switch
2

16
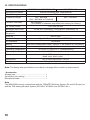
10. SPECIFICATIONS
Version WM-D5200 -C4, WM-D5200 -C7 WM-D5200 -G1
Microphone Element Electretcondenserunit:Unidirectional
Modulation type FSK
Frequency Range 794–832MHz
(794–806MHzforThailand)
606–636MHz
Channel Selectable 160 channels
(The number of channels may differ from country to country.)
RF Carrier Power Lessthan50mW
MaximumInputLevel 132dBSPL(Sensitivity:L)/122dBSPL(Sensitivity:H)
Audio Frequency
Response
100Hz–12kHz
Antenna Built-in type
Dynamic Range Typ. 90 dB (when used with WT-D5800)
ID Selectable 10 patterns
Battery WB-2000 rechargeable battery (option) or AA Alkaline dry cell battery
BatteryLife Approx. 8 hours
Operating Temperature –10to+50°C(14to122°F)(exceptbattery)
OperatingHumidity 30to85%RH(nocondensation)
Finish Body:ABSresin,black,coating
Head:steel,black,paint
Dimensions ø47 × 239.5 mm (ø1.85" × 9.43")
Weight 220 g (0.49 lb) (with battery)
Note: Thedesignandspecicationsaresubjecttochangewithoutnoticeforimprovement.
• Accessories
Storage case ........................................................... 1
Screw driver (for setting) ......................................... 1
Microphone holder .................................................. 1
Note
The WM-D5200 cannot communicate with the TRANTEC Wireless System (S4 and S5 Series) nor
with the TOA Analog Wireless System (WT-5800, WT-5805, and WT-5810 etc.).

17
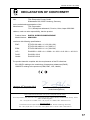
Number of DoC: 16113001
DECLARATION OF CONFORMITY
We: TOA Electronics Europe GmbH
Süderstraße 282, 20537 Hamburg, Germany
as the authorised representative of the
Manufacturer: TOA Corporation
7-2-1, Minatojima-nakamachi, Chuo-ku, Kobe, Japan 650-0046
declare, under our sole responsibility, that the product
Product Name: DIGITAL WIRELESS MICROPHONE
Model Number: WM-D5200
conforms with following specifications:
EMC: ETSI EN 301 489-1: V1.9.2 (2011-09),
ETSI EN 301 489-9: V1.4.1 (2007-11)
ERM: ETSI EN 300 422-2: V1.4.1 (2015-06)
LVD : EN 60950-1: 2006 + A11: 2009 + A1: 2010 + A12: 2011 + A2: 2013
RoHS: EN 50581: 2012
Health: EN 62479: 2010
The product herewith complies with the requirements of the EU directives:
2011/65/EU relating to the restrictions of hazardous substances (RoHS),
1999/5/EC relating to the spectrum (ERM, EMC, LVD, Health).
Hamburg, 29
th
November 2016
(place, date)
The Technical Construction File (TCF) is kept at the UK office:
TOA Corporation ( UK) Ltd; Unit 7 & 8, The Axis Centre, Cleeve Road, Leatherhead, Surrey, KT22
7RD, United Kingdom
Tel.: +44 (0) 870 774 0987; Fax: +44 (0) 870 777 0839; URL: www.toa.co.uk
German Office:
TOA Electronics Europe GmbH, Süderstraße 282, 20537 Hamburg, Germany
Tel: +49 / (0)40 / 25 17 19-0, Fax: +49 / (0)40 / 25 17 19-98 URL: www.toa.eu
T. Sakata, Managing Director
(authorised signature)

18
COMPLIANCE STATEMENT TO WM-D5200
AT
DE
Österreich
Deutschland
HiermiterklärtTOAElectronicsEuropeGmbHdie
Übereinstimmung des Funkmikrofon mit den grundlegenden
Anforderungen und den anderen relevanten Festlegungen der
Richtlinie 1999/5/EG.
BE
België
BijdezeverklaartTOAElectronicsEuropeGmbHdatdeze
draadloze microfoon voldoet aan de essentiële eisen en aan de
overige relevante bepalingen van Richtlijn 1999/5/EC.
Belgique
Parlaprésente,TOAElectronicsEuropeGmbHdéclarequece
microphonesanslestconformeauxexigencesessentielles
et aux autres dispositions de la directive 1999/5/CE qui lui sont
applicables.
CH
Schweiz
HiermiterklärtTOAElectronicsEuropeGmbH,dasssichdieses
Funkmikrofon in Übereinstimmung mit den grundlegenden
Anforderungen und den anderen relevanten Vorschriften der
Richtlinie1999/5/EGbendet.
(verantwortlichfürdieSchweiz:TelionAG,URL:www.telion.ch)
DK
Danmark
UndertegnedeTOAElectronicsEuropeGmbHerklærerherved,at
følgendeudstyrTrådløsMikrofonoverholderdevæsentligekrav
og øvrige relevante krav i direktiv 1999/5/EF.
ES
España
TOAElectronicsEuropeGmbHdeclaraqueelmicrófono
inalámbrico cumple con los requisitos esenciales y otras
disposiciones aplicables o exigibles en la Directiva 1999/5/CE.
FI
Suomi /
Finland
TOAElectronicsEuropeGmbHvakuuttaatätentämälangaton
mikrofoniondirektiivin1999/5/EYoleellistenvaatimustenjasitä
koskevien direktiivin muiden ehtojen mukainen.
FR
CH
France
Suisse
ParlaprésenteTOAElectronicsEuropeGmbHdéclareque
l’appareilmicrophonesanslestconformeauxexigences
essentielles et aux autres dispositions pertinentes de la directive
1999/5/CE.(CH:TelionAG,URL:www.telion.ch)
GB
Greate Britain
Hereby,TOAElectronicsEuropeGmbH,declaresthatthiswireless
microphone is in compliance with the essential requirements and
other relevant provisions of Directive 1999/5/EC.
GR
Ελλαδα
ΜετηνπαρούσαηεταιρείαTOAElectronicsEuropeGmbH
δηλώνειότιτοασύρματομικρόφωνοσυμμορφώνεταιμετις
ουσιώδηςαπαιτήσειςκαιτιςλοιπέςσχετικέςδιατάξειςτης
οδηγίας1995/5/ΕΚ.
IT
CH
Italia
Svizzera
ConlapresenteTOAElectronicsEuropeGmbHdichiarache
questo Radiomicrofono è conforme ai requisiti essenziali ed alle
altre disposizioni pertinenti stabilite dalla direttiva 1999/5/CE.
(CH:TelionAG,URL:www.telion.ch)
NL
Nederland
HierbijverklaartTOAElectronicsEuropeGmbHdatdeze
draadloze microfoon in overeenstemming is met de essentiële
eisen en de andre relevante bepalingen van richtlijn 1999/5/EG.
NO
Norway
TOAElectronicsEuropeGmbHerklærerherved,atdennetrådløse
mikrofon er i samsvar med de vesentlige egenskapene og øvrige
relevante krav i direktiv 1999/5/EC.
(N:ScandecSystemerAS,URL:www.scandecsystemer.no)

19
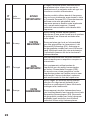
PT
Portugal
TOAElectronicsEuropeGmbHdeclaraqueesteMicrofone
Emissor está conforme com os requisitos essenciais e outras
disposições da Directiva 1999/5/CE.
SE
Sverige
HärmedintygarTOAElectronicsEuropeGmbHattdenna
TrådlösmikrofonstårIöverensstämmelsemeddeväsentliga
egenskapskravochövrigarelevantabestämmelsersomframgår
av direktiv 1999/5/EG.

20
INTENDED USE OF WM-D5200
AT
CH
DE
Österreich
Schweiz
Deutschland
WICHTIGER
HINWEIS !
Der Gebrauch dieses Funkmikrofons
für andere Zwecke als zur Übertragung
eines Tonsignals an einen passenden
Funkempfängeristnichtzulässig.
DiesesGerätarbeitetaufindereuropäischen
Gemeinschaft (EU) nicht harmonisierten
Frequenzen.Abhängigvomgeograschen
Gebiet dürfen nur bestimmte Frequenzen
legal mit oder ohne Autorisierung/individueller
Lizenzentsprechendderbeigefügten
Frequenztabelle genutzt werden.
BE
NL
België
Nederland
BELANGRIJKE
AANWIJZING !
Hetisniettoegestaandezedraadloze
microfoon te gebruiken voor enig ander doel
dan het zenden van een audiosignaal naar de
bijbehorende ontvanger of ontvangstmodule.
Dit apparaat maakt gebruik van
frekwentiebanden welke in de Europesche
Gemeenschap (EG) niet algemeen zijn
toegestaan.Afhankelijkvandegeograsche
ligging kan voor het legaal gebruik van
een bepaalde frekwentie een vergunning
nodig zijn, zoals is aangegeven in de
frekwentietabel.
BE
CH
FR
LU
Belgique
Suisse
France
Luxembourg
AVIS
IMPORTANT !
Nepasutiliserlesmicrophonesanslpour
une transmission du signal audio vers un
autre récepteur ou module tuner prévu à cet
effet.
Cet appareil utilise des fréquences d’émission
qui ne sont pas harmonisées à travers la
Communauté Européenne (EU). En fonction
du lieu géographique certaines fréquences
peuvent être utilisée de façon légale avec ou
sans autorisation / licence individuelle comme
décrit dans le tableau des fréquences.
DK
Danmark
VIGTIGT !
Det er ulovligt at bruge denne trådløse
mikrofon til andre formål end at sende et
lydsignal til en passende modtager eller
modtager modul.
Dette udstyr anvender frekvens bånd, som
ikkeerharmoniseretiEU.Afhængigtafdet
enkelte land/område kan bestemte frekvenser
anvendes lovligt med eller uden individuel
licens som beskrevet i frekvens tabellen.
Page is loading ...
Page is loading ...
Page is loading ...
Page is loading ...
-
 1
1
-
 2
2
-
 3
3
-
 4
4
-
 5
5
-
 6
6
-
 7
7
-
 8
8
-
 9
9
-
 10
10
-
 11
11
-
 12
12
-
 13
13
-
 14
14
-
 15
15
-
 16
16
-
 17
17
-
 18
18
-
 19
19
-
 20
20
-
 21
21
-
 22
22
-
 23
23
-
 24
24


Optimus WM-D5200-C7D00 User manual
- Category
- Microphone accessories
- Type
- User manual
- This manual is also suitable for
Ask a question and I''ll find the answer in the document
Finding information in a document is now easier with AI
in other languages
- italiano: Optimus WM-D5200-C7D00 Manuale utente
- dansk: Optimus WM-D5200-C7D00 Brugermanual
Related papers
-
Optimus WT-D5800EC7D00 User manual
-
-
-
-
Optimus IR-200M Y User manual
-
-
Vizio IR-200BC User manual
-
-
-
Other documents
-
TOA WM-D5200 -C4/-C7/-G1/-H1 User manual
-
TOA WM-D5300 -C4/-C7/-G1/-H1 User manual
-
-
-
-
-
TOA WD-5800 1CE/3CU/4CE/-CE Quick start guide
-
-
-