Kenwood KX-W8010 User manual
- Category
- Cassette players
- Type
- User manual
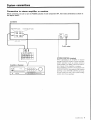
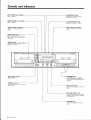
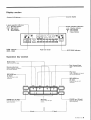
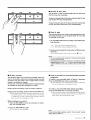
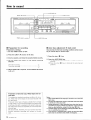
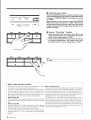
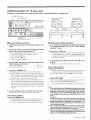
Kenwood KX-W8010 is a stereo cassette tape deck designed to provide high-quality audio playback and recording. It features Dolby noise reduction and HX Pro headroom extension for improved sound quality, as well as a variety of playback and recording functions, including auto-reverse, continuous play, and timer-controlled recording. The deck also has a built-in microphone for direct recording and a headphone jack for private listening. With its combination of features and ease of use, the Kenwood KX-W8010 is a versatile and powerful tool for music lovers and audio enthusiasts.
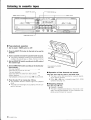
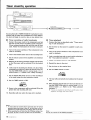
Kenwood KX-W8010 is a stereo cassette tape deck designed to provide high-quality audio playback and recording. It features Dolby noise reduction and HX Pro headroom extension for improved sound quality, as well as a variety of playback and recording functions, including auto-reverse, continuous play, and timer-controlled recording. The deck also has a built-in microphone for direct recording and a headphone jack for private listening. With its combination of features and ease of use, the Kenwood KX-W8010 is a versatile and powerful tool for music lovers and audio enthusiasts.


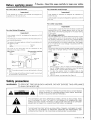
-
 1
1
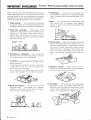
-
 2
2
-
 3
3
-
 4
4
-
 5
5
-
 6
6
-
 7
7
-
 8
8
-
 9
9
-
 10
10
-
 11
11
-
 12
12
-
 13
13
-
 14
14
-
 15
15
-
 16
16
-
 17
17
-
 18
18
-
 19
19
-
 20
20


Kenwood KX-W8010 User manual
- Category
- Cassette players
- Type
- User manual
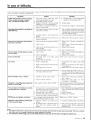
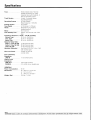
Kenwood KX-W8010 is a stereo cassette tape deck designed to provide high-quality audio playback and recording. It features Dolby noise reduction and HX Pro headroom extension for improved sound quality, as well as a variety of playback and recording functions, including auto-reverse, continuous play, and timer-controlled recording. The deck also has a built-in microphone for direct recording and a headphone jack for private listening. With its combination of features and ease of use, the Kenwood KX-W8010 is a versatile and powerful tool for music lovers and audio enthusiasts.
Ask a question and I''ll find the answer in the document
Finding information in a document is now easier with AI
Related papers
Other documents
-
TP-LINK Tapo L530E Quick Installation Guide
-
Nakamichi BX-1 Owner's manual
-
TP-LINK tp-link Tapo S210 1 Gang 1 Way Smart Light Switch Owner's manual
-
-
 Tapo T315 Smart Temperature and Humidity Monitor User guide
-
 TRIUMPH BOARD Rise User manual
-
-
-
TP-LINK Tapo C320WS User guide
-

