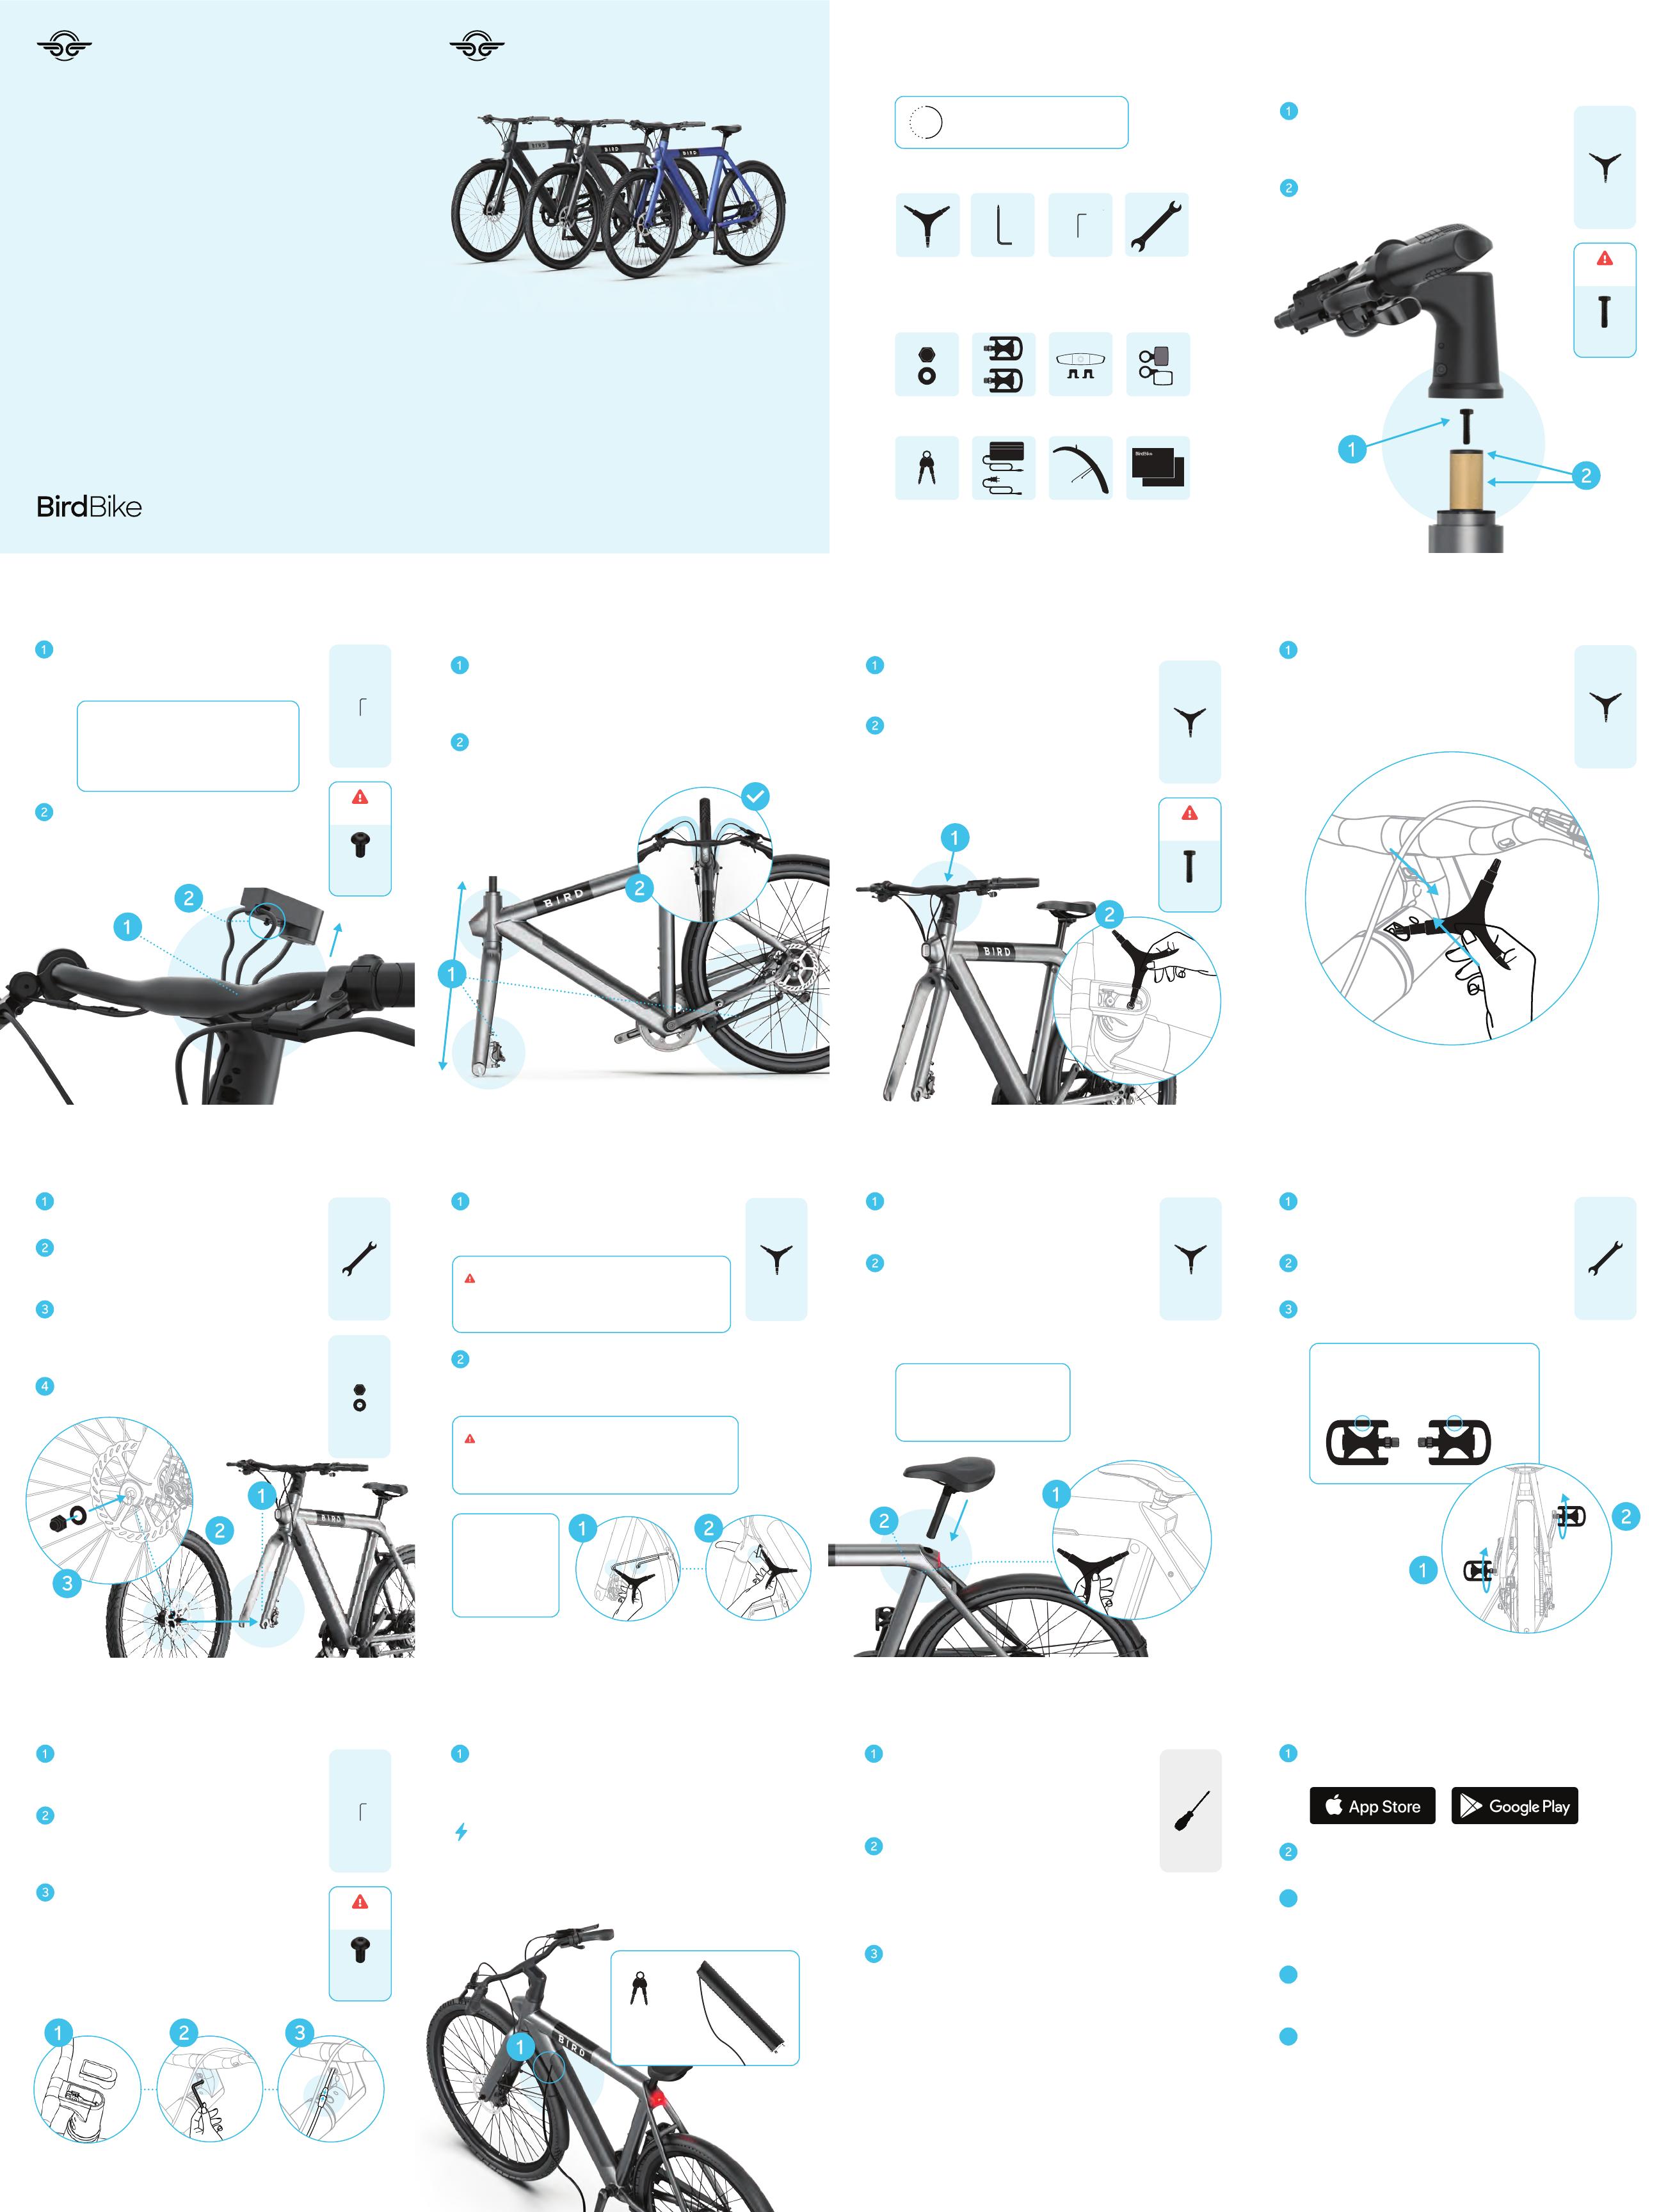
Quick
Start
Guide
A-FRAME
Need help?
We’re here for you.
Please reach out to us directly with any questions,
concerns or if you need help assembling the Bird
Bike. Please do not contact the retailer.
Visit support.bird.co
Tools:
Parts:
Pedals (x2)
Left & Right
2.5mm
Allen key
Y-wrench
(3mm / 4mm /
5mm)
L-key Phillips
Screwdriver
Wrench
(13mm / 15mm)
Wheel Reflectors
and fasteners (x2)
Cap nut and
washer (x2)
Rear and Front
Reflectors
Battery Keys Power Supply
and Cable
Front Fender This QSG &
User Manual
Preparation for assembly1
• Expect 30 minute assembly time
• Clear a work space
• Don’t over tighten screws
Unpack all components from the product
package including the Toolkit
30
min
~Remove the hex bolt screw from the
cardboard tube on the handlebar stem.
Set aside the hex bolt for use during
installation in step 5.
Discard both the cardboard tube and the
black cap held in by the hex bolt.
Prep the handlebar stem2
Remove the hex bolt, cap, and cardboard
tube from handlebar stem
Tool
required
Y-wrench
5mm
Set aside
Hex bolt
Gently pull the LED display out from its
enclosure within the handlebar. Be careful
not to damage any cables.
Remove the screw from under the LED
display using the 2.5mm Allen key. Set
aside the screw for use during installation
in step 11.
Remove the dash display3
Tip: If the LED display doesn’t pull out
easily from the handlebar enclosure, use
the 2.5mm Allen key to gently push it out
through the screw hole from the back of
the handlebar.
Removing the screw from under LED display
Tool
required
2.5mm
Allen key
Retrieve
2.5mm
Allen screw
Align the fork with the frame so that it is
facing forward, the front brake assembly
should be on the same side as the
kickstand. (rider’s left side)
Make sure the cables are clear and do not
restrict the range of motion needed for
steering.
Install the handlebars4
Aligning the front fork (before mounting
the handlebars)
Place the handlebar over the handlebar
stem and insert the hex bolt (from step 2)
through the handlebar.
Using the 5mm end of the Y-wrench,
gently tighten the hex bolt so that there’s
no play between the fork and frame.
Attach the handlebars5
Attaching the handlebar to the handlebar
stem on top of the fork
Tool
required
Y-wrench
5mm
Retrieve
Hex bolt
Tighten the two steering stem screws
under the handlebars using the 5mm end
of the Y-wrench, so they are securely in
place.
Secure the handlebars6
Securing the handlebars
Tool
required
Y-wrench
5mm
Remove the black fork protector from
the bottom of the fork and discard.
Insert the front wheel axle inside of the
fork slots. Ensure the brake rotor is
aligned to fit inside the front disc brake.
Install washers (serrated side in) and cap
nuts onto the outsides of the fork.
Tighten them using the 15mm wrench
until secure.
The correct tire pressure is 3.5-5.6 bar.
Install the front wheel7
Attach the front wheel to the fork
Tool
required
Wrench
15mm
Parts
required
Cap nut and
washer x2
With the 4mm end of the Y-wrench,
remove the two screws attached to the
back of the fork.
Use the 4mm end of the Y-wrench to
remove the screw that’s on
the top of the backside of the fork.
Attach the front fender8
Attach the front fender to the fork
Re-insert the two screws through the
holes at the end of the fender-support
bracket to secure them on to the fork.
Re-insert the screw through the fender
mount bracket on top of the fender and
secure tightly to the back of the fork.
Tool
required
Y-wrench
4mm
Tip: Make sure
fender is parallel
to the wheel so
it doesn’t make
contact as the
wheel rotates.
Remove the soft rubber cap located on
the frame just below the seat column to
reveal the seat clamp screw.
Use the 5mm end of the Y-wrench to
loosen the seat clamp screw. Adjust the
seat post to the preferred height. Once
positioned, tighten the seat clamp screw
until secure and return the rubber cap in
to the frame.
Install the seat9
Do not extend the seat post
farther than the minimum
insertion line indicated on the
seat post.
And adjust the seat height
Tool
required
Y-wrench
5mm
Screw the left pedal marked “L”
counter-clockwise by hand (since it is
reverse threaded).
Screw the right pedal marked “R”
clockwise.
Tighten both pedals with the 15mm
wrench.
Install the pedals10
Attach the pedals
Tool
required
Wrench
15mm
Each pedal is marked with an “L” or “R”
corresponding to appropriate side (left or
right) on the bolt end and on the inside of
the pedal. See below illustration.
L R
Place the display back into the handlebar
enclosure. Be careful not to pinch the
cables.
Use the 2.5mm Allen key, reinstall the
screw previously removed in step 3 from
under the display, so that the display fits
flush inside of the handlebar enclosure.
Connect the end of the power cable
coming from the bottom of the display
to the power cable coming out of the
bottom of the frame. Carefully align the
arrows on the cables.
Reinstall the led display11
Reinstall the display
Tool
required
2.5mm
Allen key
Retrieve
2.5mm
Allen screw
Connect the charger
Use the included power supply and connect
it to the charging port on the battery (below
the +/- rubber flap).
Finish Charging
When fully charged, a green light on the
power supply indicates the charge is
complete. Battery can be charged on the
Bike or removed for charging. Please allow
4-6 hours to fully charge your bike.
Charge battery12
Tip: Use keys
to unlock and
charge battery.
Install reflectors13
Rear reflector - red
Wrap the bracket for the rear reflector
around the seat post. Secure with a
flathead screwdriver. Position the
reflector facing rearward.
Front reflector - white
Wrap the bracket for the front reflector
around the handlebar near the stem.
Secure with a flathead screwdriver.
Position the reflector facing forward.
Wheel reflectors
Wrap the bracket for the wheel reflector
around any wheel spoke. Secure with a
flathead screwdriver.
Tool
required
Flathead
screwdriver
(not provided)
Download the latest version of the Bird app and
sign in or create a new account.
Press the power button on the left handlebar to
turn on your Bird Bike.
Find the QR code for your Bird Bike located
inside the toolkit or on front cover of the
owner’s manual. Can’t find your code? Please
contact your retailer.
After pairing, the My Bird Bike screen will appear.
This is where you can view the details of your
Bird Bike and use the available features.
After closing the Bird app, access the My Bird
Bike Screen through “Private Birds” in the menu.
Bird app14
4
3
5